8. Installing Windows 7 in a VirtualBox virtual machine.
virtual box- a special program for creating virtual computers in PC memory. Each virtual computer can contain an arbitrary set of virtual devices and a separate operating system. The scope of virtual computers is very wide - from performing software testing functions to creating entire networks that are easy to scale, distribute the load and protect. virtual box distributed free of charge, open source.
1) Download the latest version of the program virtual box from the official site: http://www.virtualbox.org/wiki/Downloads
2) Install it on your computer.
2.1) Run the installer; In the first window click Next
2.2) Select item I accept the terms in the License Agreement and press Next.
2.3) Click Next, then again Next
2.4) Click on the button Yes. Attention: At the next step, after clicking the Install button, the connection to the network (both local and Internet) will be disconnected
2.5) Click Install to continue installation
2.6) In popup windows Install software for this device? click on the button Install
2.7) In the last window, leave the checkbox to start creating the virtual machine immediately, or uncheck the box to create the virtual machine later. Click the button Finish. If you unchecked the box, use the desktop icon to launch the program.
3) In the main window of the program, click the button Create. Will open New Virtual Machine Wizard. Click the button Further.
4) Enter the name of the virtual machine, in the OS Type section, set the values:
Operating system: Microsoft Windows
Version: Windows 7.
5) Enter the amount of RAM allocated to the virtual machine.
Attention: The memory will be allocated from the physical memory installed in your computer. Do not install memory below 512 MB or above 50% of the installed physical memory. Click the button Further.
6) Select a bootable virtual hard disk. Set the radio button to: Create a new hard drive. Click the button Further.
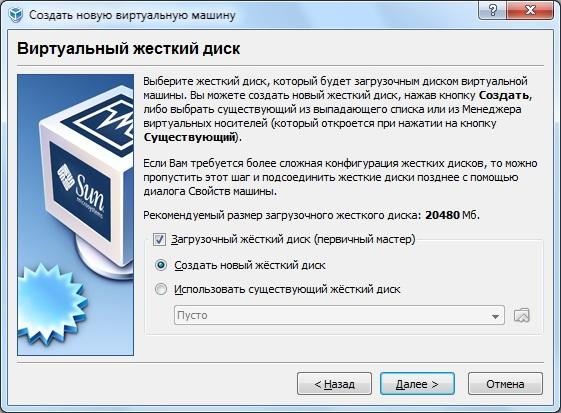
7) Will open New Virtual Disk Wizard. Click the button Further.
8) Select the type of virtual hard disk. A dynamic image will initially take up little space, and will expand gradually. The fixed image will immediately create a disk of the specified size - this may take a long time. Click the button Further.
![]()
9) Choose a name and location for your virtual disk file. By default, the file name corresponds to the name of the virtual machine, and the file itself is located on the same hard drive where the real Windows 7 is installed, in the C:\Users\UserName\.VirtualBox folder.
Select the size of the virtual hard disk. (Default 20 GB). Click the button Further.

10) Click on the button Ready and you will return to the previous window, where the parameters of the virtual machine you are creating will be specified. Click on the button Ready in the window Outcome, and you will create a new virtual machine.
A virtual machine for installing Windows 7 on it has been created.

11) Before you start installing Windows 7 on your virtual machine, you need to configure it. To configure your virtual machine, click the button Properties.
12) In the settings section, from the list on the left, select Display. Set the amount of video memory available for the virtual machine to at least 26 MB. Check the checkboxes for the settings items Enable 3D acceleration and Enable 2D video acceleration.

13) In the settings section, from the list on the left, select carriers.
14) In the settings tree Information carriers select the DVD disc icon.
If you have a Windows 7 installation disk recorded on a DVD, then insert it into the DVD drive and in the column Attributes opposite the element Drive unit select it from the drop down list. Also check the box for Allow direct access.
If you have a Windows 7 installation disk in the form of an ISO image, then in the column Attributes click on the folder icon to open
15) In the window Virtual Media Manager press the button Add. Select an image file and click Open. Click on the button Choose

16) Your image will be added to the settings tree Information carriers, following the virtual hard disk file. Click the button OK.

17) You will find yourself in the main window of the program. Click on the button Start
18) If information windows appear, then click on the button in them OK
19) Click inside the virtual machine screen, and in the information window click on the button Capture
20) Install Windows 7. Installing Windows 7 on a virtual machine is no different from a normal installation on a real machine.
21) After completing the installation of Windows 7 on the virtual machine, virtual box immediately launch Windows 7 inside a virtual machine.
22) Using the mouse and keyboard in a virtual machine blocks them from being used in real (host) Windows. To switch between the virtual machine window and the main Windows window, you have to use the Right Control host key.
So that the virtual machine does not capture the mouse cursor and keyboard, and you can safely move the mouse cursor between the guest (virtual) and host (main) systems, and the clipboard becomes shared, you need to install Guest OS add-ons. To install them, do the following: in the menu of the running virtual machine, select Devices -> Install Guest Additions

23) Popup autostart click VBoxWindowsAdditions.exe and install the program.
24) To turn off the virtual machine, in the menu of the running virtual machine, select Car -> close -> Turn off the car.
25) To start the installed Windows 7 in the main window of the program, click the button Start.