Today we will consider how to partition a disk in Windows 10 without resorting to third-party software, because such a need appears for virtually all users of the new operating system.
Whatever the adherents of specialized programs say, if the operating system has the appropriate functionality, there is no point in using them. Therefore, we will consider in detail how to partition a hard drive using the tool for working with drives integrated into Windows 10.
What is important, we will work from under the operating system itself, without even resorting to using the installation drive with the dozens distribution kit.
First of all, dividing the drive into volumes is necessary if you purchase a new device, it doesn’t matter if it’s a laptop, a computer or an increased hard drive. This is done for several reasons, the main of which are ease of use and safety.
Imagine what will happen to a 500-1000 GB hard drive if you format it during the reinstallation of the operating system in order to get rid of all the files of the old OS. Installing a new system on top of the old one makes little more sense than simply updating it from under Windows itself: all the garbage will remain, which will soon affect the performance of the computer.
And it's more convenient to store different types of data on different volumes (games on one, video collection on another). The operating system with software must be located on the first logical disk due to the nature of the HDD.
Launching the Disk Partitioning Utility
Working with partitions begins with the launch of the Disk Management program, which has hardly changed since its introduction into the Windows 7 operating system. The tool is launched in several ways.
Control Panel
1. Open the Control Panel via Start, Win→X (by holding the appropriate key combination) or a shortcut in a convenient place.
2. Change the visualization style of the window icons to "Small Icons".
3. We call the applet "Administration".

4. Run the last utility in the list "Computer Management".

5. Expand the "Memory Devices" section in the left vertical menu.
6. Click on the "Disk Management" item.

command interpreter
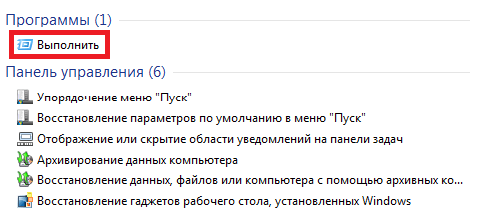
The second, and more effective, method to invoke the hard drive partitioning tool is to use the capabilities of the Run window.
1. We call a dialog for quickly executing system commands and opening resources using the Win + R key combination.
2. Enter the command "diskmgmt.msc".
3. Run it using the "Enter" key.

As a result, the same window will open as in the previous version, but without unnecessary interface elements.
How to use the built-in disk manager
The application window displays a list of all detected digital information storage devices, including those operating using flash-memory technology (solid-state drives and flash drives).
The first in the list are the sections reserved by the operating system, where the files necessary to reset the operating system to its original state, and its bootloader are stored. These volumes of 100-350 (sometimes more) megabytes should not be affected in any way.

1. In the main frame or panel below, select the hard drive or its volume that needs to be divided into the nth number of partitions.
The main thing is that it has a sufficient amount of free space, which at least slightly exceeds the size of the created partition / partitions. And if you split the system volume, you should leave at least 10 GB of free space on it. You will need it to store temporary files and install missing software.
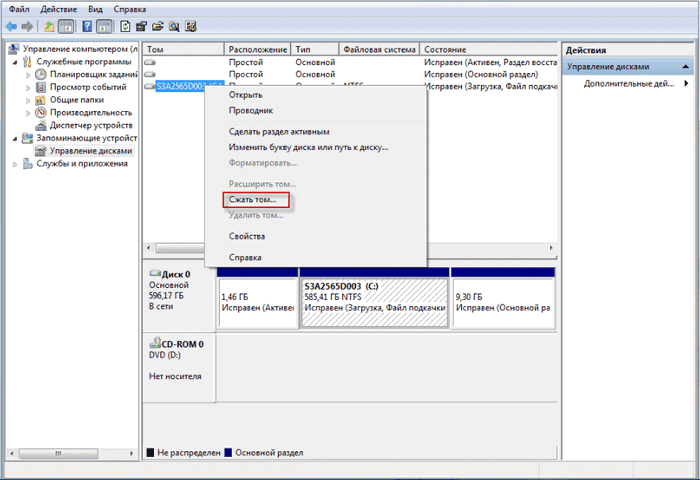
2. We call the context menu of the selected object and select "Compress volume ...".
This operation will allow you to “cut off” the specified number of gigabytes from the partition and form a new partition or several in this place, but their total size will not exceed the amount of data allocated for this.
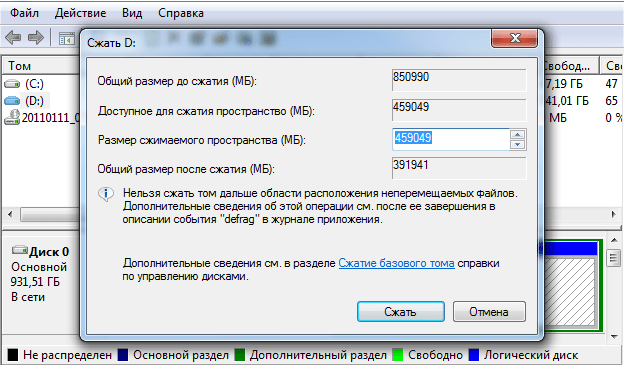
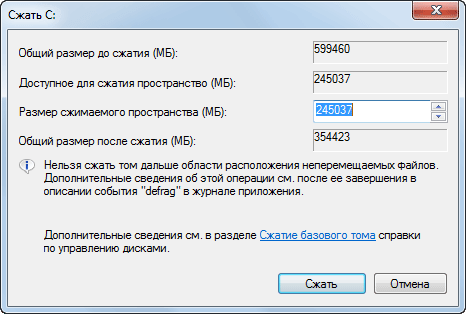
3. In the parametric window that opens, set the volume of the compressible space.
That is how many megabytes will be freed (turned into an unallocated area) in order to subsequently mark it in the desired way.
After specifying all the information, click "Compress" and wait. Depending on the size (and the degree of damage to the hard drive - this factor primarily affects the speed), you will have to wait from ten seconds to a couple of minutes until the application completes the task of reassigning free clusters of the unallocated area.

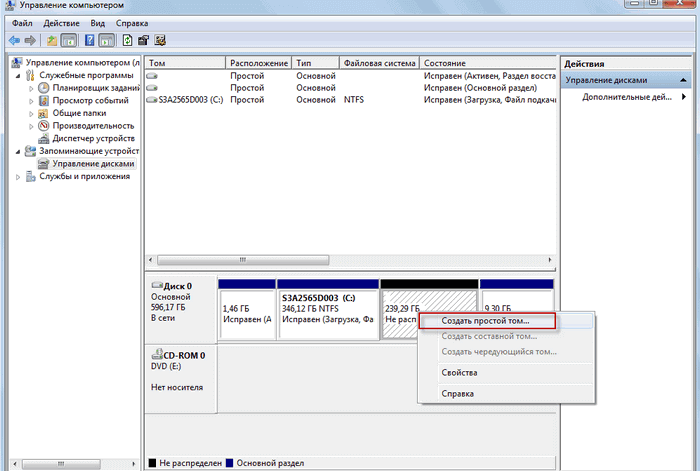
Upon completion of the operations, an unallocated space of the specified volume will appear on the diagram, this area is distinguished by the presence of a black bar at the top.
4. Through the context menu of this space, call the command "Create a simple volume ...".

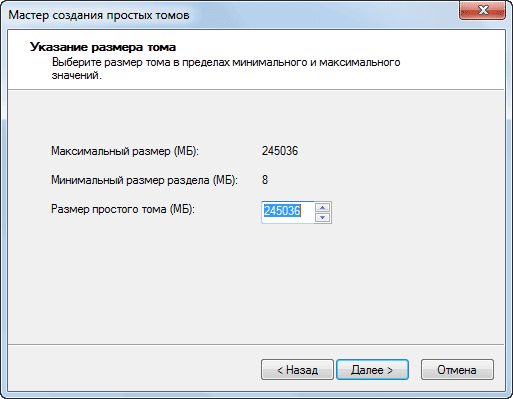
By default, its size will be equal to the unused space, which is relevant for the formation of one volume in this area. If you need to create several partitions, enter the volume of the first one in megabytes (taking into account the fact that 1 gigabyte equals 1024 megabytes, not 1000).
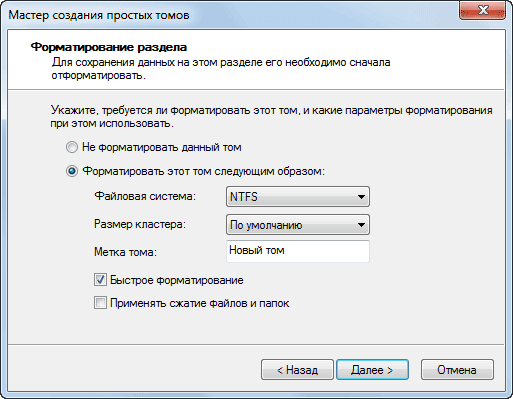
5. In the wizard for creating simple volumes, select the file system. Set the cluster size and label.

It is better to choose NTFS as the file system. Even with many shortcomings, it is the best solution from Microsoft. Cluster size: if the disk will store small files, it makes sense to set it to 2096 kb or less in order to optimize the use of space, and for storing video collections and images, it is better to use a larger cluster size. Nothing depends on the volume label, and it can be easily changed through Explorer at any time.

As a result, the file system of the new partition will be formed and a new volume will appear on the hard disk. When creating several sections with an unallocated area, you will have to do the same as in steps 4-6.
Partitioning a volume during the installation phase of Windows 10
If the computer does not yet have an operating system, you can also partition the hard drive during its installation. The difference between the option is the inability to divide the drive into logical volumes without formatting, and this method will not work for hard drives with important information.
1. We boot from the installation distribution using the Boot Menu.
2. We get to the stage of choosing a disk for installing the “tens”, stopping at the “Custom” option.

3. Remove unnecessary volumes to make them an unallocated area.
4. As before, select this space and create sections of the specified sizes in it.

Hello friends! One month of summer has already passed, and I really didn’t have time to relax, but oh well, there are still two months of rest ahead :). Today I want to give you an example how to partition new hard drive during windows 7 installation.
I already wrote about that, but there, for example, I showed a hard disk already partitioned, and today I want to show how to partition this same hard disk into partitions, and where to install Windows 7.
Let's first say a few words about why partitioning a hard drive and what it will give us. So you bought a computer, for example, with a 750 GB hard drive, since it is new, this will be an unallocated area. You need to create at least one partition to install the operating system. Many people would probably create one partition of 750 GB in size and install the operating system there. But you can’t do this, not that it’s impossible, but I don’t recommend it, as many problems may appear.For example, I always divide the hard disk into three partitions, this turns out to be three local disks C , D and E . But it seems to me that with today's hard drive sizes, more partitions can be made.
Why split a hard drive into multiple partitions?
Well, first of all, for convenience. Imagine if you have an operating system on one 750 GB C drive, and all your photos, movies, games and other files. So it will be very difficult to find something. And when partitioned, drive C goes under the OS, and D and E can already be used to store your files.
The second plus is that if there are problems with the operating system, or rather, if it is reinstalled, the local drive C will most likely have to be formatted, I will destroy all the information on it. Of course it is possible, but it is a very complicated process. Well, if you have only the operating system on drive C, and other files on drives D and E, then they will not be affected.
And it is easier for the operating system to work with a less loaded partition, so the advantages of dividing a hard disk into several partitions are obvious.
The day before yesterday I installed Windows 7 on a new laptop with a 750 GB hard drive, although in fact there was a 689 GB partitioned area. I took a few pictures of the breakdown process and today I will show them to you and write a little.
When the installation process comes to choosing a partition for installing the OS, we see this:

Let's start creating sections. First, let's create a partition for the operating system (drive C). I made 100 GB, click “Create”, enter the size, I entered 100000 MB (but after creation it will be less than 100 GB, so I then wrote 120000 MB, and the partition turned out to be 117 GB). I think that this is quite enough for the OS. It all depends on the size of the hard drive, you can allocate more or less, but do not be stingy. Enter the size and click "Create".

The system will ask you to allocate more space for the reserve area, agree.


This will be the local drive D. For him, I indicated the size of 270 GB. Click "Apply".

The second section is ready. Highlight “Unallocated disk space” and click "Create". Since this was the last partition, I indicated the size of all the remaining unallocated space. And of course, click "Create".
That's all, select the section that we created for the operating system, and click "Next".

More on the site:
Updated: January 14, 2014 by: admin
Hi all! By default, a hard drive is divided into two parts: for the system and for the user. This division seems unfair to me, because a large amount of information has accumulated over time, and it becomes impossible to find the desired file in the labyrinth of folders. Therefore, today we will analyze how to divide disks on Windows 7.
Why do it at all? Here are some reasons:
- Safety. Most often when installing games or entertainment programs. If you allocate a separate place for this category, it will be much easier to localize and fix the problem.
- Convenience and practicality. It's like sorting things out. After all, in life no one keeps working documents, say, in the refrigerator. Therefore, it is better to separate everything on the computer so that it is in its place.
- Functionality. You'll be surprised how many useless files are stored on your computer when you start categorizing them. The first step to cleaning the device from informational garbage is to increase the number of memory departments.
Now let's move on to how to split a hard drive into two. The process can be conditionally divided into two parts: cutting off a piece of free memory from an existing disk and creating a new partition from the resulting material.
How to create a chunk of unallocated memory
Partitioning a hard disk into partitions in Windows 7 begins with the launch. It can be opened in two ways: by simultaneously pressing the Win and R keys, or in the Start menu, find the program "".
The command line is a program that executes queries. To switch to disk management, there is a diskmgmt.msc command.

After the transition, a menu opens with all sections of the hard disk. In my case on Windows 7 it looks like this:

Disk D has 500 gigabytes free. With this space, I will create an F drive, specifically for storing TV shows.
First of all, you need to select the volume from which you plan to allocate space for creating a new storage, and by calling the function menu, select "Compress Volume".

The computer will send a query to the system about the amount of available space. At this time, you should not work with the files that are stored on the checked disk. The process of "thinking" takes from a few seconds to a couple of minutes, depending on the size of the disk and the power of the computer. After collecting the data, you will be able to see a summary of the information.
Everything is written in megabytes, to convert to gigabytes, the number must be divided by 1024. 150 gigabytes of space is enough for me for serials, I multiply 150 by 1024, it comes out 153,600 megabytes. I enter data and start compression.
How to create a new section
The first results can be observed immediately. The system received data about the new memory area and added information about it to the general screen.

Now it's up to the small thing - to make the computer display this section of memory as a separate disk. We call the already familiar management menu and select "Create a simple volume"

The Create Partition Wizard will start. A program that makes working with Windows easier. The default settings there are optimal. You can just click "Next" until the last window opens. In it, the operation is carried out by pressing the button ready.

The new volume will be created quickly. To make sure everything went well, open "My Computer". In my case it looked like this:

Thanks to such simple actions, working with a computer will be simplified due to the ability to rationally distribute files.
If you are still not sure that dividing the hard drive into partitions will work, you can watch the video on the topic of the article:
Partitioning a hard disk into partitions in all Windows systems above Vista occurs according to the same principle. Only the login procedure differs, but we will use the universal method.
Command line for partitioning disks
For our purpose, you can also use the console, for those who are used to working with the command line.

Partitioning a disk during installation
Another convenient way is to create volumes at the time of system installation.

We use third party software
You can also use specialized utilities to create partitions. They differ from standard Windows tools in extended functionality and more stable operation. Also, such software is able to split partitions without deleting data from them.
The first application I would like to mention is mini tool Partition Wizard Free. As the name implies, the application is completely free, while boasting quite powerful functionality.
All actions are intuitive. When the application loads, right-click on the section and select the desired action. For example, to partition a disk, select Split.
Then, moving the slider or entering the values manually, specify the required size and confirm changes. When the process is completed, the disk can be used. 
Another powerful free app is AOEMIPartitionAssistant. The interface and functionality are very similar to the above app.
Run the program and select the desired drive. Click on it with the right mouse button and get the available actions.
How to divide a hard drive into partitions in the Windows operating system - there are two answers to this question. The disk can be divided into several partitions using the operating system tool, or using third-party software.
The process of dividing a hard drive into two or more parts in Windows 7, Windows 8.1 (Windows 8), or Windows 10 operating systems is no different.
Manufacturers of computers, especially laptops, often create only one hard disk partition on which the operating system is installed, and there, in the future, all user files will be placed.
For more convenient use of the computer, you can create another hard disk partition on which the user will store his files - music, videos, documents, and other files. This will make it easier for him to find the files he needs, because if all the files are on the same disk, then it will be quite difficult to find the right folders and files.
In the event of an operating system failure, files located on another drive will not be lost during the reinstallation process or the operating system.
You can divide a hard disk into partitions using the tools of the Windows 7, Windows 8 or Windows 10 operating system. More advanced operations with hard disk partitions can be done using specially designed programs, such as, for example, Acronis Disk Director, EASEUS Partition Manager, MiniTool Partition Wizard.
Keep in mind that when partitioning MBR on a hard disk, you can only divide the disk into 4 main partitions. If you have already created 4 such partitions on your disk, then you will not need to perform this operation, since the new created partition will not be displayed in the operating system. This is a common problem for laptop owners, because manufacturers often create hidden partitions on the disk, for system recovery and for storing individual programs and drivers.
Modern computers use the GPT partition style, which allows you to create as many partitions as you like. There is no such limitation here.
How to Partition a Windows 7 Hard Drive
In order to partition a Windows 7 hard drive, you need to log into disk management with an administrator account. In a similar way, you can split a hard drive in Windows 8.1 or Windows 10, the process of splitting a drive into parts is no different.
After you open Explorer => "Computer", then you will see the partitions of your computer's hard drive.
In this image, you can see that the hard drive has two partitions: "Local Disk (C:)", which will need to be partitioned, and a protected partition - "Microsoft Office 2010 (Q)", which cannot be modified.
Here you can see that the hard disk is already about half full of data. The partition itself, on which the operating system is installed and the files are located, is named after the brand of the hard drive installed on the computer.
A new hard disk partition will be created from the free space of "Local Disk (C:)".
To partition a hard drive, you need to enter Disk Management. First you need to enter the Start menu and then right-click on the Computer button. In the context menu that opens, select the "Manage" item.
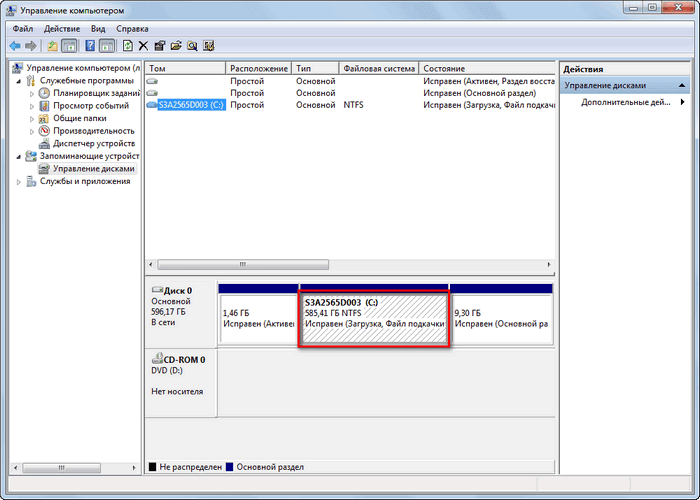
This will open the Computer Management window. Next, select "Disk Management" on the left side of the window.

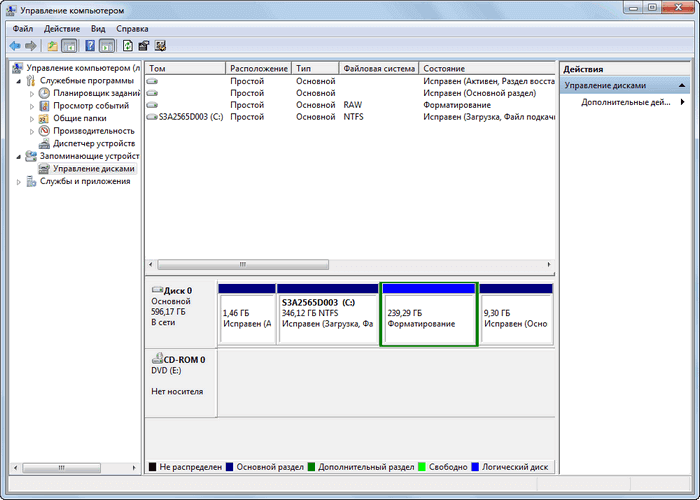
The Disk Management tab will display information about the disks on your computer. This image shows that the computer has one disk - "Logical Disk (C:)", which is named after the brand of the hard drive (hard disk). The disk has the NTFS file system. I will divide this section into two parts.
Also on the hard drive there are also two special protected partitions that were created by the laptop manufacturer - the "Recovery Partition" (it does not appear in Explorer) for system recovery, and the partition with Microsoft Office 2010.
On a desktop computer, there may not be such additional partitions if you did not buy a computer from a well-known manufacturer. These protected partitions will not be needed for our task of dividing a hard disk into two partitions.
You can also enter Disk Management in another way. To do this, enter the "Start" menu, enter the expression "diskmgmt.msc" in the "Search" field, and then press the "Enter" button on the keyboard. This will open the Disk Management window.
The content of this window is identical to the content of the Disk Management tab in the Computer Management window.
In order to split a hard disk into two parts, you must select the disk that will be divided into two parts. To do this, you will need to move the mouse cursor over the disk to be partitioned, in this case it is the “(C:)” drive, and then click on the “Compress volume ...” item in the context menu that opens.
This will open the Request Space for Compression window, informing you that a poll is taking place to determine available space for compression.

In my case, there was already 342 GB of data on the hard drive.
After the polling process is completed, the "Compress From:" window will open, in which the following parameters will be indicated: the total size of the hard disk before compression (599480 MB), the space available for compression (245037 MB), the amount of space to compress (245037 MB), and the total disk size after compression (354423 MB).
You can change the size of the compressed space. The “compressible space size” is the size of the future second disk that will be created after the hard disk is divided into two parts. “Total Size After Shrinking” is the size of the “Logical Disk (C:)” after the partitioning of the hard disk is completed.
When using the Windows operating system tool, it will not be possible to divide the hard disk by more than half. I draw your attention to the fact that the sizes of disks should not be made the same, they should differ in size from each other. Read more about this at the end of this article.
After that, the compression process begins. After it completes, you will see that a new partition with unallocated space has appeared.

After that, the "New Simple Volume Wizard" window opens, in which you will need to click on the "Next" button.

In the next window "Specify volume size" click on the "Next" button.
In the "Assign drive letter or path" window, you need to select a letter for the new disk partition. If the computer already has a drive marked with the letter "C", then it would be better to assign the second drive the following letter of the alphabet: "D". Then you should click on the "Next" button.

In the "Format Partition" window, some settings are already selected by default - the file system, cluster size and volume label, the "Quick Format" item is activated.
By default, the volume label is named New Volume. You can delete this name and do not fill in anything in this field, then the second partition of the disk will have the name - "Logical disk (D:)". In the future, if necessary, the title of the section can be corrected.
Then the formatting of the new hard disk partition begins.
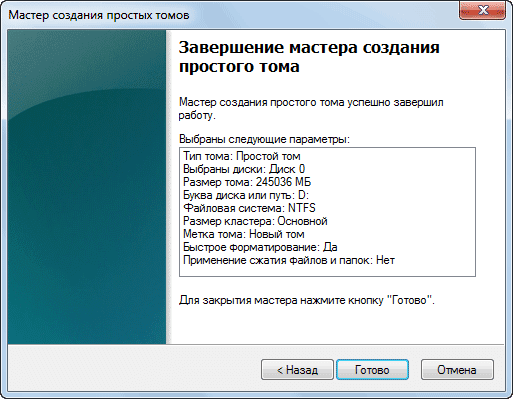
After the formatting process is completed, in the next window "Completing the Create Simple Volume Wizard" you will be informed about the completion of creating a new hard disk partition. You can familiarize yourself with the parameters of the created hard disk partition.
After that, you need to click on the "Finish" button.
In this image, you can see that a new hard disk partition has appeared - "New Volume (D:)" with the NTFS file system.
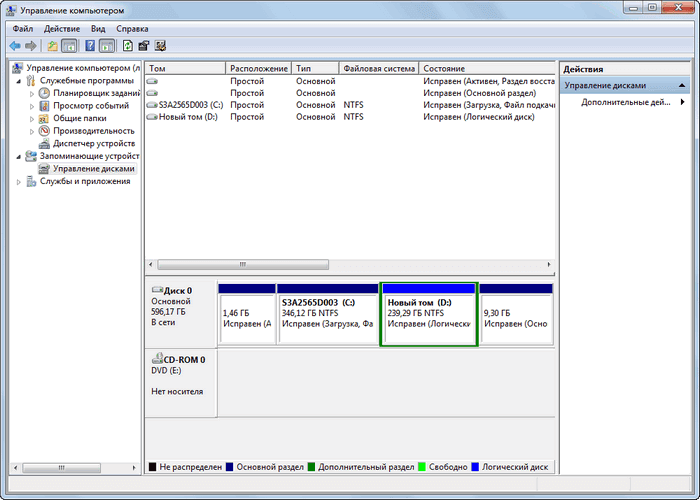
After opening Explorer, you can see the created new hard disk partition, which is still free of files, as well as the "Local Disk (C:)", which is full.

Now it will be possible to change the names of the hard disk partitions, if you have not done this before, to others that are more understandable.
To do this, you need to right-click on the disk that you want to rename, and select "Rename" from the context menu. Then you should enter a new name for the hard disk partition, and then press the "Enter" button on the keyboard. It is not necessary to change the partition names, you can continue to use the partition names already on your computer.
After renaming, hard disk partitions will have more understandable names. In this image, you can see that I have already moved some of the files from "Local Disk (C:)" to another newly created disk - "Local Disk (D:)".

If you have Windows 8 operating system installed on your computer, then you can partition the hard drive in the same way as described in this article.
How to change drive letter
The DVD optical drive on the computer was labeled "D". Since I was going to divide the disk into two parts, I changed the drive letter in advance.
This is done so that the partitions of the hard disk have letter designations in the order of the letters in the alphabet, for more convenient use and perception. For example, Explorer will list hard disk partitions first, then the CD/DVD drive, and then plug-in drives, memory cards, and disks.
To change the drive letter, you need to enter the "Disk Management" and right-click on the CD / DVD drive. In the context menu, you need to click on the item "Change drive letter or path to the drive ...", and in the window that opens "Change drive letter or paths for D:" (your letter name may be different) click on the "Change" button.
In the "Change drive letter or path" window, you must enter a different letter to change, and then click on the "OK" button.
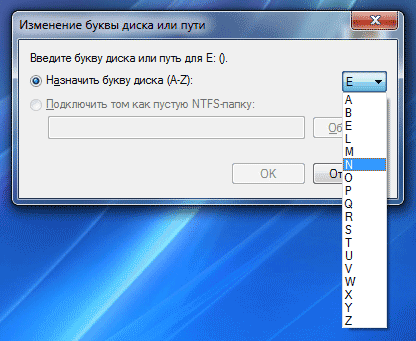
It is not necessary to change the drive letter. A new hard disk partition can be designated by any letter of the alphabet that has not yet been occupied.
Solving the problem with the RAW file system
After partitioning the hard disk using the Windows operating system, if you made the sizes of the hard disk partitions the same, there may be a problem with the file system. After formatting, you may find that the new disk partition is not created in the NTFS file system, but in the RAW file system.
I myself encountered such a problem when I was partitioning a hard drive in Windows 8 on my daughter's laptop. In order to avoid this problem, when creating a new hard disk partition, the created partition must have a different size than "Local Disk (C:)".
To resolve this issue, you must restart the Create Simple Volume Wizard process. In the "Specify volume size" window, in the "Size of a simple volume (MB)" item, you need to slightly reduce the size of the partition, and in the "Format Partition" window, uncheck the box next to the "Quick Format" item.
Formatting will take some time, which will depend on the size of the hard disk partition. After the formatting process is completed, the problem will be solved, the new disk partition will now have the NTFS file system.
Article Conclusions
Using the operating system tool, you can easily split the hard drive into two parts in Windows 7, Windows 8, or Windows 10.