Hello comrades! In this article, we will finish what we started in the previous post, that is, we will make it possible to display materials on the site. Today we will create menu items in Joomla 3.6. It is the menu items that are the most important component of any Internet resource, as they play a significant role in the main navigation of the site.
Beginning inexperienced site builders for a long time cannot grasp the relationship that is seen between the creation of material, the creation of categories and the creation of menus. But over time, you will understand what it is for and how to work with it. As I mentioned earlier on CMS Joomla 3.6, the material you create must be linked to a category. But that's not all, in order for the article to be displayed on the pages of the site, you need to create a menu.
The developers have provided a huge variety of output menu items. Let's add items to the existing Joomla main menu.
Create a basic menu item
1. In the administrative panel of Joomla at the top we find the section - Menu / Main Manu / Create menu item.

2. On the next page, write "Menu Title". Leave the Alias field blank. This is due to the fact that after the menu name is created, the system will automatically write everything you need in it. This also applies to materials and categories for which you write a title.
3. Menu item type- this is an important part responsible for the output of the material. Click to select.

In the window that opens, we find "Materials", where we need to choose one of the options presented. On my site, I use the “List of Category Materials” 99% of the time.

4. Now that you have decided and selected the above type of menu, you should make " Category selection". By default, the system will display Uncategorised. Here you need to select a category that will be linked to the menu. In the future, it is possible to change the binding. So if you mistakenly attached something that you didn’t want, you can always fix it by going to the Joomla menu.

5. In the right area of the window there are settings related to the display. Status - select "Published". The main page - I think everything is clear. If selected, all category content will be displayed on the main page. You can also set the parent element. The default setting is Root Menu Item. This section plays an important role, as it allows you to create a submenu to the main menu selected in the bar. But since we have only one menu item so far, there is nothing special to bind.

6. As a result, the menu item we created must be “Save” by clicking on one of the corresponding buttons in the upper left part of the screen.
Creating a Menu Item with One Displayed Material
If you want the menu to display one article, you must return to Menu Item Type/Materials/Material. And in the column "Choice of material" select the appropriate material. Further, everything is identical to the above method.

Now you can go to the main page of the site and make sure that the fresh Joomla menu item and the content located in it exist and work.
I hope I was able to help you. If you have any questions ask them in the comments.
Thank you for your attention and see you soon on the pages of Stimylrosta.
Found a grammatical error in the text? Please inform the administrator about this: select the text and press the hotkey combination Ctrl+Enter
Menu items in Joomla are extremely important. they form the entire structure of the site. It is the menu items that determine what will be loaded on the page and how. And all this is determined in one of the sections of Joomla - the menu.
There are many varieties of output by menu items, but of course they are all rarely used. The most popular now will be discussed.
We will add menu items to the finished Main menu Joomla, which is presented immediately after installation.
Basic menu item
1. Go to creating a menu item for a single menu (Main Menu).

2. First thing enter the name intended menu item. Next, we move on to menu item type selection, where its destination is selected.

3. Before us is the entire list of appointments. The most common section of the list is "Materials". It outputs one or more materials, i.e. the main content of the site.
Now we are deriving a single material.

4. It remains to choose The most important thing is the material itself. We pass on the new button: "Select".

5. The list will display absolutely all the materials that we have ever created in Joomla. Select the content you want to display.

6. The most important thing is done! Can persist.

7. On the site in the existing "Main Menu", a new item will appear where you can go and make sure it works.

Another menu item option
1. The page we land on, after going through the menu item, it can be completely different, such as category blog.

2. For blog categories a new button appears where you need to select one of the categories. Categories are necessary because it is they who share the whole variety of materials. For example, you can take a standard category, which all materials are divided into by default.

3. On the site, a new menu item is now available, when you click on it, several materials are displayed at once. are actually output all materials the category we have chosen and are even divided into pages.

This is just a small part of Joomla's ability to display site content. You can customize every little thing and debug the pages according to your requirements: display contacts, external link, download link and more.
A menu is a separate block that has menu items. The function of the menu is to create a list of links to various materials or sections of the site. And the formation of output parameters for these materials. Those. where you navigated to and what the article, category, or section will look like.
Category Blog: Articles with an extension are arranged on the page one after the other in a column or multiple columns and links to other articles in this category can be located at the bottom of the page.
After creating the content structure, you need to create a menu for site users.
A menu is a set of buttons that will lead the user to specific objects: articles, a list of categories, etc. You can display information on the site both in the form of a blog and as a static page.
By opening the "Menu Manager" window (using the "Menu" button on the control panel), you can see a page with already created menu types.
To create a new menu, click on the "Create" button.

On the opened page "Menu details" you need to fill in the fields:
System name (in Latin), title - the name of the menu item when displayed on the site, menu description and module title - which will be used when choosing the method for displaying the menu on the site.
To create menu items, in the "Menu Manager" click on the "Menu Items" button in the column of the same name.
On the Menu Items page, click the Create button
and go to the "Menu Item" page.

It contains four types of items:
Section - in the form of a blog or in the form of a table of links (in this case, all articles in the section will be displayed).
Material - in the form of a static page with the material. (Other articles on the page are not displayed.). Or a template for sending material (only to authorized users with rights not lower than the author), in which, using text editor you can write an article on the site.
Blog template on the main page - allows you to display material on the main page only in the form of a blog. (All materials that have the item “display on homepage” checked) are displayed.
From the archive - in the form of a blog with a filter that allows you to set the parameters for selecting material. To create a category blog, click on the "Category Blog" link.

On the page that opens, fill in the fields:
Title - the text that will be displayed in the menu
Alias - text that will become the base url for this item
Show in - bind the item to a specific menu
Parent element - specify parent element item
Access - specify access to the item
Open in - in which window the menu item will open
In the "Settings - General" tab:
Description - hide or show description
Image - descriptions hide or show descriptions image
Full Width - Specify the amount of news to display in the full width of the content area
Intro - specify the number of news items that only show the introductory text
Columns - specify in how many columns the materials will be lined up
Note: The Change Type key allows you to change the type of menu item.
This tutorial will show you how to create User Menu in Templates Joomla 3.x.
Joomla 3.x. How to create a user menuSign in Joomla admin panel, go to the tab Menu(menus) - Menu Manager(menus manager):
Click on the button New(New) to create a new menu item:

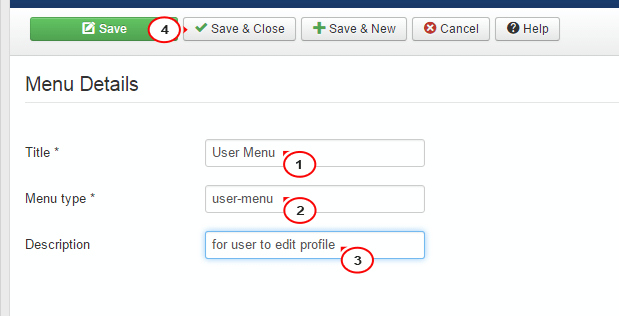
Enter details about the new menu item, such as Name(Title) Menu item type(Menu Type) and Description(Description). Save and close the new menu item(Save&Close):
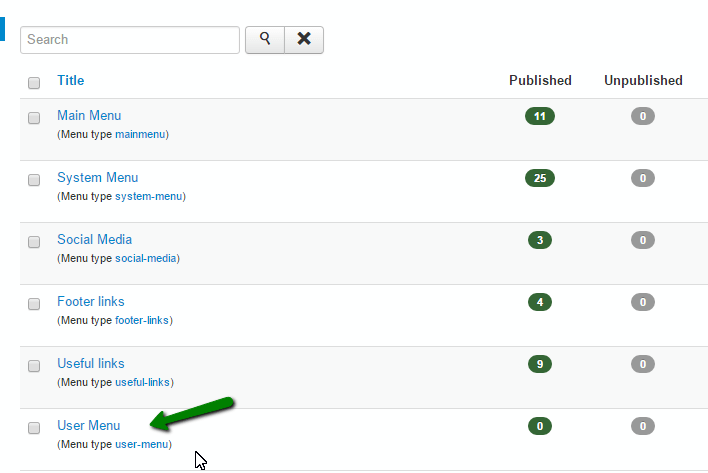
Click on new user's menu(User Menu), in order to add new ones for it Menu items(Menu Items):
Click on the button New(New):

Select Menu item type(Menu Item Type):

For this user's menu, You can use any type of menu from the category User Manager(User Manager). For example, we will choose User Profile(User Profile ) as the first menu item:

Add Menu item name(Menu title). Save and close the menu item(Save&Close):

You can similarly create other menu items:

Create a module for a new one user's menu:
Go to the tab Extensions(Extensions) Module manager(Module Manager):
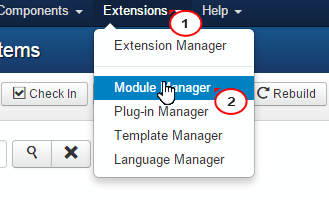
Click on the button New(New):

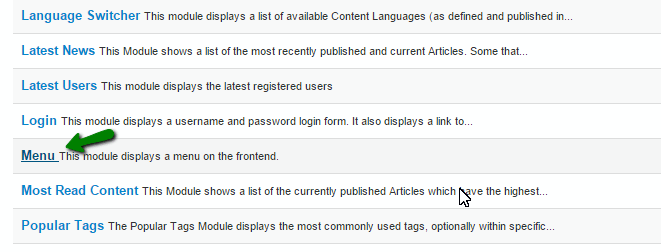
Select module type Menu(Menu):
Enter header(Title):

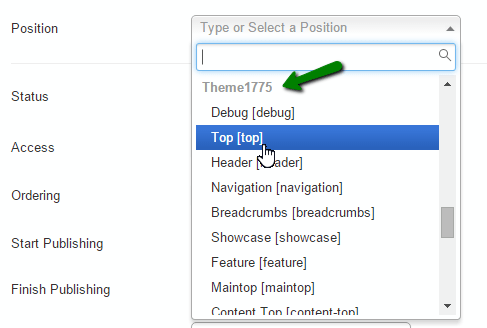
Select a module position. You can find out the appropriate position in the list themeXXXX(where XXXX is the number of the template, or you can follow this tutorial to find out all available positions in a template:
Open a tab Settings(Options) to select a new user's menu(User Menu) for this module:

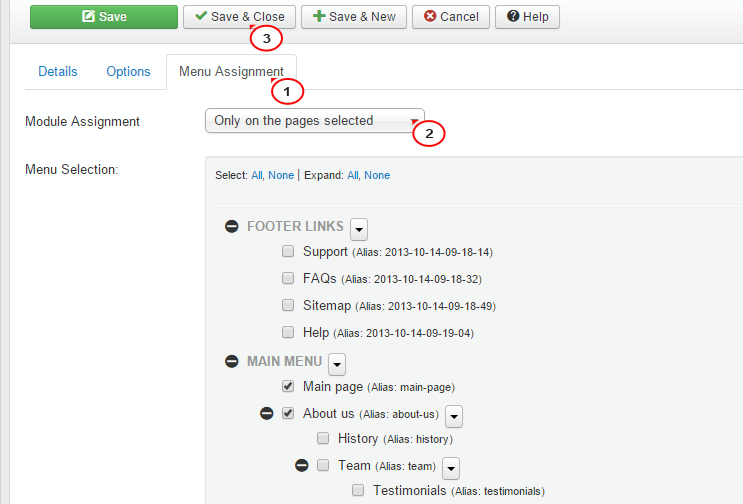
Click on the tab Add to Page(Menu Assignment) to select which page this module should be displayed on. Save and close the module(Save&Close):
In order to create user's menu, follow these instructions:
Open your site, update selected page- for example home page (homepage ), to which we have added user's menu. Review the changes made:

You can also check out the detailed video tutorial below.
The drop-down menu in Joomla 3.x is pre-installed by default, that is, you do not need to look for any additional modules or components that are designed to visually design or customize the drop-down menu in Joomla. In this article, we will show you the whole process of creating a dropdown menu in Joomla.
A dropdown menu in Joomla 3.x is very easy to create and takes a few steps. If you already have at least some experience with this control system, creating a drop-down menu should not be a problem. First, you need to create a menu in Joomla.
Step 1: Creating a Joomla Menu
In the control panel, click on Menu > Menu Manager > Create Menu.
Step 2: Specify Joomla Menu Options
The next stage of creation, where you need to specify the parameters of the new menu in Joomla. These are parameters such as:
- Title (name of the menu, for example, "Main Menu" or "Our Menu") - Type of menu (required, this is a system name, you can write the name in Latin, usually spelled as a transliteration of the title)
- Description (can be left blank, will not be displayed anywhere on the site)

Step 3: add module for new Joomla menu
After we have created the menu and specified its parameters, we need to assign the module and specify the display position in Joomla template. To do this, click on "Add a module for of this type menu".
Then we specify the parameters of the new module, which will be displayed in the position we specified. Read more about how to find out in the article (links will open in a new tab).
In the "Title" field, write a name for the menu module, it can be enabled or disabled in the options on the right "Show / Hide". Then specify the display position, on the right, on the left, in the footer or any place convenient for you on the site. Also, "Show menu sub-items" is highlighted in yellow - this is the drop-down menu function in Joomla, which is enabled by default, you don't need to touch anything here, just save with the changes made and move on.

Step 4: Create Menu Items, Including Dropdowns
Now everything is simple, we create menu items, specify their display format (material, material blog), and as shown in the figure on the right, select the parent element "Item 1" (well, or any created by you, which will be the parent, i.e. main) , and the one that is being created now is a drop-down sub-item, that is, a secondary one.

After completing all the steps, your site will have a full-fledged drop-down menu! We wish you success in your work! If something does not work out, do not be upset, write in the comments, ask and we will help)