The presentation of the processor fan be quiet! Shadow Rock TF 2, which uses TopFlow performance art. Its system includes a copper base, five 6mm copper heatpipes, a 61-fin aluminum heatsink, and a 135mm axial cooler fixed on top of the unit. It distributes airflow through the heatsink fins to the base, guaranteeing additional airflow for both the processor port and the nodes placed around it (memory modules, power subsystem components, ports ...
 Announced back in March of this year, the Colorful iGame Kudan 680 premium graphics adapter still went on sale in China. But the prices for it are not very encouraging, and some buyers may even be scared. The 2GB variant of the graphics card will cost $893 (5,700 yuan), while the iGame Kudan 680 (with double GDDR5 buffer) will set you back as much as $940 (6,000 yuan).
As for the characteristics of these models, they are described briefly. Frequency parameters: the younger video adapter with 2 GB of memory operates at nominal 1100/6400 MHz, and the older one with 4 GB of memory ...
 Thermaright has unveiled a relatively affordable Thermaright True Spirit 120 Direct CPU fan that can be used with 160W platform processors. AMD socket AM4, AM3 (+), FM2 (+), and Intel socket LGA1155, LGA1156, LGA1150, LGA1151, LGA2011(v3), LGA2066.
The new mechanism is made in the usual Tower design. Its design contains four 6 mm nickel-plated heat pipes with direct contact to the heat distributing cover of the processor, aluminum radiator and one 120mm cooler. The cooler speed is in the range from 600 to 1300 rpm, ...
Android Debug Bridge (ADB) is a console application that allows you to manage a wide range of features on Android mobile devices. The main purpose of ADB is to perform debugging operations on Android devices.
Android Debug Bridge is a client-server program. The first launch of ADB with any commands is necessarily accompanied by the creation of a server in the form of a system service called a "daemon". This service will continuously "listen" on port 5037 waiting for a command.
Since the application is a console application, all functions are carried out by entering commands with a certain syntax into the command line. Windows line(cmd).

The functionality of the tool in question is available on most Android devices. An exception can only be a device with the possibility of such manipulations blocked by the manufacturer, but these are special cases.
For an ordinary user, the use of Android Debug Bridge commands, in most cases, becomes a necessity when restoring and / or flashing an Android device.
All the functionality of the program is revealed after entering a specific command. As an example, consider a command that allows you to view connected devices and check the readiness factor of the device to receive commands / files. The following command is used for this:
The response of the system to the input of this command is two-way. If the device is not connected or not recognized (no drivers are installed, the device is in a mode that does not support working via ADB, and other reasons), the user receives the response “device attached” (1). In the second option, - the presence of a device connected and ready for further work, it is displayed in the console serial number (2).

Variety of possibilities
The list of features provided to the user by the Android Debug Bridge tool is quite wide. To access the use of the full list of commands on the device, you will need superuser rights (root rights), and only after receiving them can we talk about unlocking the potential of ADB as a tool for debugging Android devices.
Separately, it is worth noting the presence in the Android Debug Bridge of a kind of help system. More precisely, it is a list of commands with a description of the syntax, displayed as a response to the adb help command.

Such a solution very often helps many users to remember a forgotten command to call a particular function or its correct spelling
Advantages
- A free tool that allows you to manipulate the Android software, available to users of most devices.
Flaws
- Lack of a Russian-language version;
- Console application requiring knowledge of command syntax.
Download adb for free
The Android Debug Bridge is an integral part of the Android developer toolkit (Android SDK). The Android SDK tools are in turn included in the . Downloading the Android SDK for your own purposes is available to all users absolutely free of charge. To do this, you just need to visit the download page on the official website of Google.
If you don't need to download the full Android SDK containing the Android Debug Bridge, you can use the link below. It allows you to download a small archive containing only ADB and Fastboot.
Finding USB driver for your Android is almost a difficult task, if your smartphone or tablet manufacturer doesn't provide a PC suite or if you don't own a famous brand smartphone or tablet. To resolve this issue, today we are going to introduce an Universal ADB driver and installing it will let you connect any of your Android device with computer successfully.
The Universal ADB driver given here is a windows based driver and it is compatible with almost all the Windows versions: Windows Vista, Windows XP, Windows 8, Windows 7, Windows 10 and Windows 8.1. Also, it supports almost all the Android smartphone and manufacturers in the world(Example: Samsung, Xiaomi, HTC, Panasonic, LG, Micromax, Intex, Lava, Gionee, InFocus, etc.)
Universal ADB Driver Features:
1) Supports All Android Devices: The Universal ADB driver supports almost all android device s (including major brands like Samsung, Lenovo, HTC, Sony, etc.). Just download the driver, connect your Android smartphone and install the USB driver.
2) Automatic Brand Detection: This software detects the brand and chipset of your smartphone automatically and install the USB driver accordingly. Also, the Universal ADB driver comes in a quick installer format i.e., just by clicking the “.exe” file, you will be able to install the driver of your device.
3) Supports 32bit and 64 bit Windows Versions: This software supports both 32 bit (x86) and 64 bit (x64) Windows OS versions. also, you can use this software on all Windows versions including Windows 10, Windows 8.1, Windows 8, Windows 7, Windows Vista and Windows XP.
4) New Refresh Button: The new version of this software (Version 2 and Version 3) comes with a refresh button, which you can use to refresh the device list. This feature was not available in the initial version of this software.
– Latest version
How To Install Universal ADB Driver:
1) Before beginning the installation of Universal ADB driver, make sure that you have connected your smartphone to the computer using the original USB data cable as the ADB driver installer won't detect your device, if you connect it after you begin the installation process .
2) To get started, download Universal ADB driver and extract its zip package to a folder in your computer. Now, you will find the universaladbdriver_v3.0.exe” file.
3) Now, click on it to launch the Universal ADB driver installer.
4) Once the installer is launched, it will automatically detect your smartphone or tablet since you have already connected your smartphone with the computer.

5) Now, you will be able to see your smartphone or tablet model number in the Installer's device list. Also, you will see the message Driver incorrectly"Under" device status“, which indicates that you haven't installed the ADB driver in your computer.
6) Next, click on “ Install” in the Universal ADB Driver installer to begin the installation process. Once you do that, you will get a Windows Security Prompt stating that they can't verify the publisher of the driver. Just ignore it and click on" Install this driver software anyway” to install ADB driver in your computer.

7) After the installation is successfully finished, you will be able to see a green progress bar in the Installer along with the message “ Installation Success“.
That's it. Now you have successfully installed ADB driver for your android device in your computer.
Points To Remember:
1) The Universal ADB driver supports almost all Android devices. So, if your smartphone manufacturer doesn't offer PC suite, then downloading and installing this will let you connect your smartphone with the computer.
The ADB and Fastboot utilities are part of the Android SDK (not to be confused with android studio and even more so download its cumbersome installation file, unless, of course, you are going to develop for Android). ADB is a debugging tool that allows you to access the Android console from a computer () by connecting the gadget to a PC via USB. At the same time, it should be. Fastboot is designed to work with the device when it is loaded in the mode of the same name (if there is one on your device).
At ADB help you can control your smartphone/tablet from your computer: make a backup of applications, record a screencast, transfer your smartphone to recovery mode and much more. In addition, you can work with ADB over Wi-Fi. To do this, your device must be root-rights, and you will also need special application that connects to a computer over a network. For example, ADB Wireless or WiFi ADB. But this is material for a separate article.
Using Fastboot, you can, custom Recovery ( or ), unlock Bootloader (on HTC, Motorola, Sony, Nexus, Huawei, latest LG devices it is blocked), clear system partitions.
How to install ADB and Fastboot: instructions
1. Go to the official website where you can download the Android SDK: https://developer.android.com/studio/index.html . Scroll down the page to the "Command line tools only" section and select the archive for Windows.

2. Check the box "I have read and agree with the above terms and conditions" and click the button "Download Android Command Line Tools for Windows". The archive will start downloading.

3. Download it and unzip it to the root of Drive "C:".
4. You also need to download the Java Development Kit from the official page. Go to the site, agree to the terms license agreement, checking the box "Accept License Agreement", and download the JDK version corresponding to the bitness of your system.

First way
Go back to the Android SDK folder, open "tools" and run "android".

Check "Android SDK Platform-tools" (and also "Google USB driver" if you have a Nexus device) and click "Install Packages".

Read about installing drivers for other devices below.
Select "Accept License" and click "Install".

My log showed that an error occurred. But in the end, everything ended successfully.
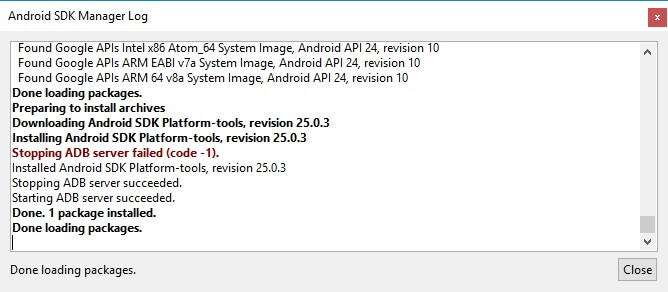
After completing the above steps in the folder "sdk-tools-windows- version" "platform-tools" will appear, and it will contain the "ADB" and "Fastboot" we are interested in.


Second way
Go to the folder "sdk-tools-windows- version» → «tools» → «bin» and, holding down the «Shift» key, click right click mouse over an empty area. Select "Open Command Window" or "Open PowerShell Window Here" if your PC or laptop is running one of the latest builds of Windows 10.

Paste the command into PowerShell or the command line (in PowerShell add ./ at the beginning):

Click "Enter" to execute the command. The files will download and you will be prompted to install:

To enable, type y for "yes" and press "Enter", which will begin the installation of "platform-tools".

At the end, the command line will display a message that the procedure completed successfully. And the "platform-tools" folder with ADB and Fastboot inside will appear in "sdk-tools-windows- version».
(!) If for some reason you cannot install ADB and Fastboot using the previous methods, use the third option - just download the "platform-tools" archive and unzip it to the "C:" drive.
Installing ADB and Fastboot Drivers for Windows
To make a computer a smartphone or tablet, you need to download the USB driver:
- Samsung - the driver is included in the Kies utility: http://www.samsung.com/en/support/usefulsoftware/KIES/ or you can download it separately by selecting the desired model: http://www.samsung.com/us/ support/downloads
- HTC - part of HTC Sync Manager: http://www.htc.com/en/software/htc-sync-manager/
- Nexus - The Android driver is installed with the Android SDK, as described above.
- Huawei - together with HiSuite utility: http://consumer.huawei.com/minisite/HiSuite_en/index.html
- LG - install LG PC Suite: http://www.lg.com/en/support/software-firmware
- Motorola - see this page: https://motorola-global-portal.custhelp.com/app/answers/detail/a_id/88481
- Sony Xperia - FastBoot drivers for all models can be found here: http://developer.sonymobile.com/downloads/drivers/
- Xiaomi - Mi PC Suite: http://pcsuite.mi.com
- MTK - for Chinese devices based on MediaTek chips: http://online.mediatek.com/Public%20Documents/MTK_Android_USB_Driver.zip
- Lenovo - select your smartphone, tablet model and download the ADB driver: http://support.lenovo.com/us/en/GlobalProductSelector
- Look for solutions for devices from other manufacturers on their official websites.
There are various universal ADB driver installers (for example, this one: http://adbdriver.com/downloads/) - you can also use them, for example, when for some reason it was not possible to install the official solution.
If your model comes with a driver without an installer, you will have to follow these steps:
1. Go to "Control Panel" → "Device Manager". In Windows 10, just right-click on the Start menu and select Device Manager.

2. Find the device for which you need to install drivers in the list. Right-click and click Update Drivers.

As you can see, the computer correctly recognizes my Nexus 7 tablet. If your PC detects the smartphone incorrectly or there is a yellow triangle with an exclamation mark inside it, the “manual” installation of Android drivers is mandatory for you.
3. Select "Search this computer for driver software".

4. Specify the path to the folder with the drivers on the PC.

Wait for the installation to complete and then reconnect the gadget to the computer via USB.
How to get started with Fastboot and ADB
Working with ADB or Fastboot is carried out from the command line, the utilities are launched in two ways:
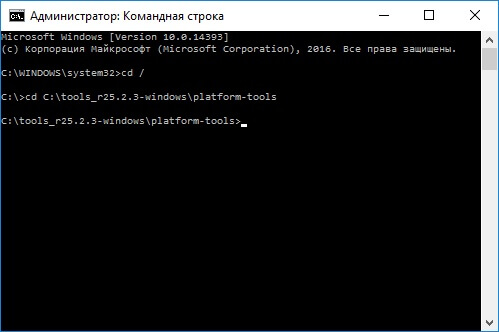
1: Right-click on "Start" and select "Command Prompt (Admin)" or "Windows PowerShell (Admin)". Next, use the commands to specify the path to the folder with ADB and Fastboot (after entering each, press "Enter").
To return to the root of the "C:\" drive, use:
Thanks to this command, open the desired folder:
In my case it turned out like this:
cd\tools_ version-windows\platform-tools
You will get (Google developers changed the name of the archive after writing the initial version of this instruction):
cd \sdk-tools-windows- version\platform-tools
The path to Fastboot and ADB is indicated, now we are working with them from the console.
To avoid doing this every time, add the path to "platform-tools" to the "Path" variable. First, go to the folder, in the navigation bar, right-click on "platform-tools" and select "Copy Address".

Go to "Control Panel". To do this, press "Win" + "R" and in the "Open:" field, paste control . Click OK.

Select "System" → "Advanced system settings" → "Environment variables…".


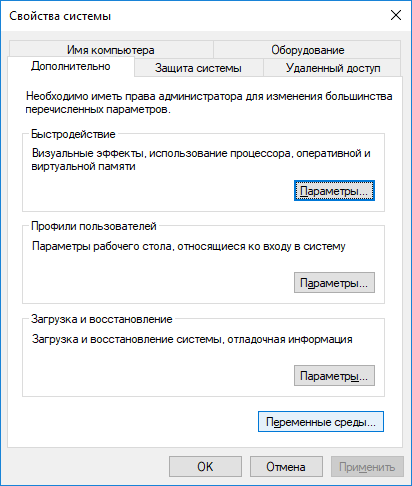
Find the "Path" variable, select it and select "Edit...".

Click New, paste the path to the "platform-tools" folder and click OK.

ADB (Android Debug Bridge) is a driver for smartphones and tablets that connects a device to a computer and makes it possible to control its operation via the command line.
How to install ADB driver?
On most devices with MediaTek processor adb drivers installed in automatic mode. For this download archive , unpack it to your computer and run the Install.bat file.
If after installing the drivers and connecting the switched off smartphone to the PC in Device Manager a yellow light is on next to the name, do the following:
- We go to the computer with an account that has administrator rights.
- Press the key combination - Windows+R (windows button be between the left Ctrl and Alt).
- In the window that opens, write mmc devmgmt.msc(or devmgmt.msc) to bring up Device Manager.
- On the smartphone in the menu " Settings/For Developers» enable « USB Debugging«.
- We take out the battery from the smartphone, and then return it back (not including the device). If the battery is not removed, just turn off the smartphone.
- We connect the smartphone to the computer using a USB cable.
- Device Manager. If a device with a yellow triangle appears in the "" section, then without turning off the smartphone, install it on the computer.
If the device appears in the section com ports or in unknown devices titled " MT65xx Preloader" or " MTK usb port" or " DA USB VCOM“You need to do a manual installation.
Manual installation of ADB drivers
To install adb drivers for a smartphone in manual mode, you will need a computer, a USB cable and a few minutes of time.
- Download and unpack the folder with adb drivers .
- We carry out points 1-5, which are described above.
- Right-click on the new device that appears in Device Manager. In the menu that appears, select Update drivers.
- We go into the previously unpacked folder. In it, go to the subdirectory Win7 and proceed with the installation. For 32 -bit operating systems select file usb2ser_Win7.inf, for 64 -bit usb2ser_Win764.inf.
- We follow the instructions.
- Drivers installed!
On Windows8, 8.1 and 10, drivers are installed with signature verification disabled.
Disable driver signature verification in Windows
Disabling Signature Verification on Windows 8:
- Win + I -> Change computer settings -> General -> Special boot options -> Restart now.
- When shutting down, click Diagnostics -> Advanced Options -> Boot Options -> Restart.
- After the menu appears, in it select "Disable mandatory driver signature verification.
Disabling signature verification on Windows 8.1:
- Win + I -> Settings -> Change PC settings -> Update and recovery -> Recovery -> Restart now.
- When shutting down, click Diagnostics -> Advanced Options -> Boot Options -> Restart.
- After the menu appears, press F7 and wait for the computer to restart.
- Next, install the drivers according to the instructions.
Disabling Signature Verification on Windows 10:
- Press and hold the Windows and shift keys.
- Next Start -> Shutdown -> Restart
- Release the Windows and shift keys, and select "Diagnostics"
- On the next page, select "Advanced Options"
- Next, go to "Download Options"
- Just click "Restart" and wait for the system to boot before the next step.
- After restarting, we will find ourselves on the page for selecting the system boot option. Press the F7 key.
- The computer will restart and disable driver signature verification.
- Next, install the drivers according to the instructions.
If you specify the path to the driver file for the device, but the device manager says that everything is fine with the drivers and does not want to update them, and the device appears in the " Android Composite ABD Interface» with a yellow triangle icon, then you need to edit the file android_winusb.inf, which is in the folder MTK_Android_USB_Driver from downloaded in " paragraph 1» archive. In it we need to write PID\VID, which we previously learn from our computer. Right-click on the device with the yellow triangle/ Properties/Device ID. There will be 2 lines. These lines we need to copy to a file with drivers. Then re-specify the path to this driver.
android_winusb.inf- make changes to this file.
%CompositeAdbInterface% = USB_Install, USB\VID_0BB4&PID_0C01&REV_0255
%SingleAdbInterface% = USB_Install, USB\VID_0BB4&PID_0C01
%CompositeAdbInterface% = USB_Install, USB\VID_0BB4&PID_0C01&REV_0255
VID \ PID can change, set your own values.