On a personal computer/laptop with an operating Windows system You can run the Android OS for mobile devices in a variety of ways. At the same time, some of them require complex initial settings, others differ in functionality, and still others in performance. The Android emulator can run on the Windows operating system for various reasons. But usually ordinary users want to see how it works software for mobile devices, and developers, running emulators on personal computers are testing their applications. There is a third category of users - avid gamers. These run emulators on computers to play Interesting games designed for smartphones and tablets.
If you are a curious user or an experienced player, download the Android emulator for OS Windows. And how to launch mobile applications in several ways, we will tell and demonstrate in this article. Products for mobile devices run on computers not only with the help of Android OS emulation programs. For example, you can install the Android operating system on a PC, run it in the Chrome browser from Google or from a flash card.
Nox App Player
Our users left positive reviews about Nox App Player by calling it herself the best program to emulate Android on Windows. After a long testing, we came to the same conclusions and recommend everyone to use this particular emulator. We are even sure that you will stop there and will not want to install and check other emulation programs, well, except for inquisitive users who always want to form their own opinion. The Nox App Player emulation program is compatible with all new versions of Windows, and we tested it on the "top ten" by installing it on a regular, not the most powerful portable computer.
The emulator is easy to install and runs in about two minutes. After launch, you will see the boot screen of the Android operating system, which will have a pre-installed mobile browser and file manager. The emulation program itself does not support the Russian language, but you can enable it in the OS itself. This happens the same way as it does on your mobile device.

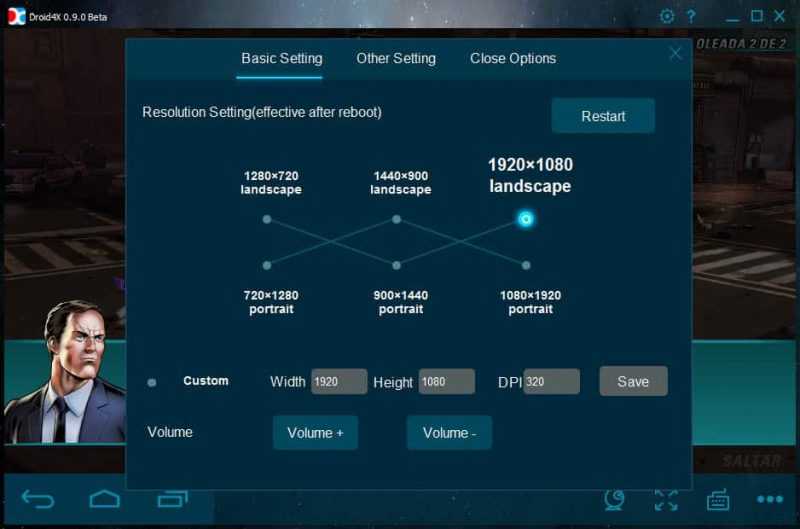
When you first start, you may see an unusual screen resolution. But this initial settings, designed for tablets, and you can change them to be more convenient and familiar. In order to do this, click the gear, calling up the settings, and set your screen parameters. On the same tab, you can also change the performance settings (they are set to low by default). Looking ahead: these settings do not need to be changed, because even with such low performance, the emulation program works fine.

The Nox App Player emulator is controlled in the same way as on any mobile device with Android OS. Are you printing with on-screen keyboard, sound and camera, if present, works like on a smartphone, there is also an application store where you can find and install a variety of applications and toys.
The right part of the emulation program window can be opened in full size without quality loss. Here are all the icons with which you can perform actions, for example:
- Install a variety of mobile applications stored in a special folder.
- Change your location manually.
- Upload and export files ( in the usual way or "drag and drop" on the program window).
- Take a variety of screenshots (screenshots).
- Run several windows of the emulation program at once.
- And we have listed only the main actions.
If the Nox App Player emulation program does not start, firstly, check that the processor supports hardware virtualization technology, and secondly, set the BIOS to correct settings. And if this does not help to start the emulator, rename your name and directory by entering the letters of the English alphabet.
Hello, dear readers of the blog site. If earlier emulators were a tool designed primarily for developers, now it is a mass product used by ordinary users.
There are quite a few application scenarios: someone plays mobile games using the keyboard and mouse, webmasters, for example, can see how their site looks on various devices ah, and many people just get to know Android in this way.
Yes, and over the past couple of years, several popular services have appeared that do not have clients for a PC, but thanks to Android emulators, it is possible to use them on a computer (for example,). Natural questions arise: which of the emulators to choose, which is the most functional, and which one is better suited for certain purposes? In general, let's understand.
BlueStacks 2
When you first launch BlueStacks, you can't help but notice that it's quite different from its competitors. The developers have installed their own special Gamepop launcher on top of Android, which displays only games and applications. That is, you will not find the usual desktops and menus here - the main focus is on testing software for mobile devices on a computer.

For the convenience of users, the developers have added a sidebar that simulates various actions with the device: you can take a screenshot, change the screen orientation from horizontal to vertical, move files from your computer to the emulator, and much more.
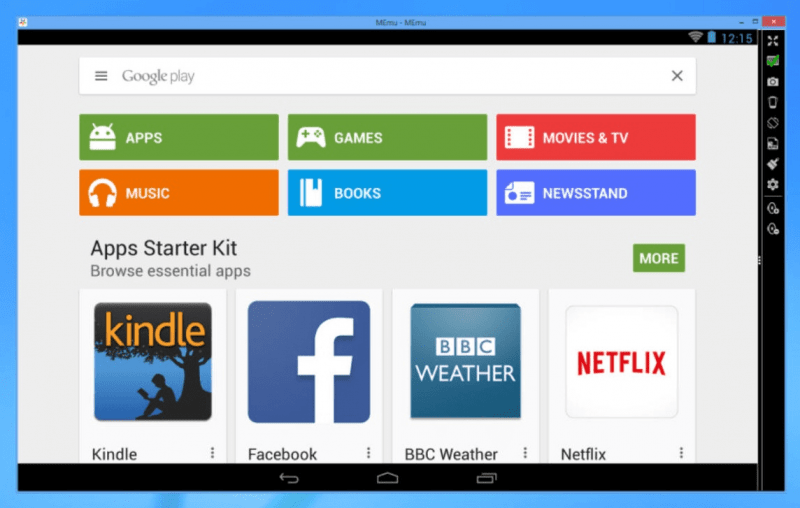
The program has Google Play, so it will be enough to log into your account to then install applications. In addition, this can be done using APK files.
BlueStacks has implemented the transfer of files from a computer to an Android emulator and vice versa, but for this you first have to download a file manager and do some manipulations. In this article you will find detailed instructions on the use of BlueStacks, in particular, on sending files.

In conclusion, I would like to note that BlueStacks is the most popular Android emulator on PC. Whether it was influenced by the fact that it is also one of the first emulators, I can’t say, but I know for sure that most users download it exclusively for gaming, and such a program interface is great for this purpose.
Droid4X
Droid4X is downloaded from the official website droid4x.com or it is possible to download full version on specialized resources. The installation process itself takes 5-10 minutes. After the program is installed, a notification will appear on the screen. On a 2-core Intel processor, the emulator takes a long time to open, about 2 minutes.

Droid4X runs on a slightly revised version of Android 4.2.2, appearance desktop is not much different from what we can see on smartphones with the same OS.
In particular, the changes affected the menus and desktops, while the “OS” settings item is generally embedded in the interface. The main screens are divided into 3 types: "Device", "Recommended" and " App Store". The last screen is a classic Google market.

The controls themselves are located at the bottom of the screen and are almost similar to how the Android 4.2.2 operating system looks in the tablet version. At the same time, the keys standard for the mobile OS were replenished with buttons for controlling the camera, zoom, keyboard, and others.
A useful feature of this Andoid emulator for Windows is that it has a pre-installed SuperSU application, or in other words, ROOT access. Also very useful feature- Droid4X Multi Manager, which allows you to create multiple copies of the system at once. To control actions in the program, it is possible to use an Android smartphone, on which a special controller application is installed.

It is possible to install the Droid4X emulator on the Windows XP or higher operating system. For full operation, you need 1 GB of RAM in your PC. During operation, the amount of RAM used by the program is 400 MB and will increase as applications are launched. Well, one of the main advantages is free and complete absence advertising.
Andy OS
Working with Andy OS starts by running the setup file, which can be downloaded from andyroid.net. There are two versions - offline and online. So if you have problems with the connection, it is better to immediately download the offline version, which weighs about 450 MB. In the case of online installation, the volume of the distribution kit will be 10 MB, and the rest of the necessary files will be uploaded as you work.
By the way, the installation is slow, although the manufacturer indicates that the process takes about 10 minutes, in fact, everything takes longer.

After downloading, we get to the standard desktop of Android 4.2.2. The developer did not "reinvent the wheel" and left the operating system unchanged, and even the graphical shell is the same. True, the appearance of the interface can then be customized independently.
In the application menu, you can find all the programs you need to work, including Google Apps. However, the emulator also has an unpleasant property - to independently load applications that the user does not need without his consent.

In the lower menu, as expected, all the controls are located. In addition to the standard home button for this version of Android, the "Back" and " Running applications"There are new keys, such as controlling the camera, resolution, orientation and other elements.
You can interact with the emulator using peripheral controls, as well as with touch screen connected devices. The easiest way to do this is to use Andy Remote Control.
In terms of performance, Andy OS shows good performance. You can install it on Windows 7 SP1 or higher. For normal operation, you need 3 GB of RAM in your PC, since on average the program uses about 500 MB of RAM during operation. Despite the fact that Andy OS is a free Android emulator, it constantly downloads various adware applications, which gradually “clutter up” memory and lead to uncontrolled traffic consumption.
Genymotion
This emulator is based on VirtualBox. That is, a virtual machine is created, due to which maximum performance is achieved. The main thing is to check if the hardware virtualization extension is enabled in the BIOS (if it is supported by your processor) so that Genymotion works with the most power.
First you need to register on the official website, after which you can download the installation file of the program with or without VirtualBox. If VirtualBox was downloaded and installed by you earlier, you can download regular version Genymotion.

On the first run, you will need to create virtual device: You can choose from a variety of smartphones and tablets running Android OS versions available for these models. So, for example, Nexus 9 can run on Android 5.0 and higher.
The emulator interface is a bare Android with three familiar control buttons, a menu, a “curtain”, etc. In addition, there is a special side panel, from where you can enable / disable the Internet, GPS or webcam, adjust the sound or change the screen orientation.
If you want to learn more about this Android emulator on PC, check out the topic resource. Genymotion is a solution for geeks that is still actively developed and updated with new virtual devices.
Download given emulator you can from the developer's site bignox.com, and it can be both online and offline distribution, the user's choice. The installation itself is simple and relatively fast, and takes no more than 5 minutes. The introduction begins with a redesigned Android home screen with a tablet-like interface. Labels are arranged in the form of a square grid, there is a docking panel, a status bar and other necessary elements.
There is no menu with applications in Nox App Player, thus resembling the interfaces of Chinese developers, where the application shortcut immediately gets to the desktop. But widgets in the emulator cannot be placed on the desktop. Initially in installed program there are several built-in applications, including Google Play.
The controls are located on the right side of the screen, where you can add the desired icon yourself. The advantage of the program can be called a full-fledged full-screen mode, which is not always found in Android emulators for Windows.

You can interact with Nox APP Player using the mouse or touch screen. In addition, it is possible to assign and add additional control keys in the future, which is easy to do in the control settings.
The functionality here is quite decent. It implements the ability to record video from the screen, save multiple system images and switch between them, and support for gaming peripherals with already built-in profiles. Curiously, the settings allow you to independently limit the amount of RAM consumed by the software, while the minimum required amount for operation is 400 MB during startup.
You can install Nox App Player on Windows XP SP2 or higher operating system. To work, you need at least 512 MB of RAM on your computer. The program is free and intrusive advertising this emulator Android user not annoying.
Which Android emulator for PC is best
The review presents 5 utilities, all of them do an excellent job with their tasks, but I would especially like to highlight Nox App Player and Genymotion. These emulators have maximum functionality, they are suitable for both developers and ordinary users and there are no ads in them.
If you are a fan of games, then the best option, in my opinion, is BlueStacks.
Good luck to you! See you soon on the blog pages site
You can watch more videos by going to");">

You may be interested
 Clip2net - how to take screenshots and post them online for free
  Viber and WhatsApp - what is it, comparing Viber with WhatsApp and choosing the best one
  Free minimalistic Screenshot with the ability to instantly share links to screenshots (unlimited)
  How to take a screenshot with using Print Screen and in the Snagit screening program, its settings and features
  How to convert word document(doc) to PDF file, as well as convert it to FB2
  FastStone Image Viewer is a photo viewer that helps reduce (compress) the size and weight of photos
Android emulators on PC are needed for a variety of tasks. So, Android emulators can be used to develop applications, to test new applications, just to get familiar with the operating system, or to run games and applications on a PC. In this article, we will look at the most popular emulators of the Android operating system on a PC.
Download Android Emulators on PC
Genymotion
Genymotion- An Android emulator on a PC that has gained immense popularity lately. The Genymotion emulator is a continuation of the AndroidVM project and on this moment is one of the best (if not the best) Android emulator.
There are currently versions of Genymotion for operating systems Windows and Mac. As for the price, this program is distributed both free of charge and paid.

The free version has a minimum of features. Getting a free version is quite simple, for this you need to register on the official website and download the installation file. There are two paid versions: for 99 euros per year and for 299 euros per year. All features are available in both paid versions of this Android emulator. The differences are only in the support from the developers. Buyers of a more expensive version of the program will receive premium support.
As for the features, this Android emulator on a PC can do a lot. The Android operating system image is built into the program right away (for x86 processors with OpenGL support). The emulator can work with the Internet (by emulating a WiFi connection), supports GPS (the user can set desired coordinates), manage battery life, emulate front and rear cameras, and more.
BlueStacks
BlueStacks- is not a full-fledged Android emulator on a PC. BlueStacks is designed to simply run Android games and apps on Windows (and Mac) operating systems. Therefore, if you are not going to be involved in testing or developing programs and you just need to play Android games, then BlueStacks is perfect for you.
Once installed, BlueStacks will run in full screen mode. If necessary, you can switch to windowed mode. In the main window of the program, you will see a list of all games available for download and launch.

If you already have an Android smartphone or tablet, you can sync game data between your smartphone and BlueStacks. To do this, you need to install the BlueStacksBlueStacks Cloud Connect app on your Android device.
YouWave for Android
YouWave for Android- a small paid program for downloading and running Android applications and games. Against the background of other described applications, YouWave for Android looks outdated, but it still needs to be mentioned.

If you have tried all the previous Android emulators and nothing worked for you, then you can try YouWave for Android. This program It has trial period for 10 days, so you can check it out for free.
Leapdroid
Leapdroid- a relatively recent emulator for android launcher games on a PC (but it is quite suitable for other applications) in Windows 10 - Windows 7, collecting positive feedback from users who note the relatively high FPS in games and just stable work emulator with a variety of games.
The developers themselves position Leapdroid as the fastest and most compatible emulator with available applications. I don’t know how true this is, but I suggest taking a look.
Features and benefits of the emulator
First - briefly about what Leapdroid can please a user who is looking for a good Android emulator to run applications on Windows.
- Can work without hardware virtualization
- Preinstalled Google Play ( Play Store)
- The presence of the Russian language in the emulator (turns on and works without problems in android settings, including Russian keyboard)
- Convenient control settings for games, there are automatic settings for popular applications
- Full screen mode, possibility manual setting permissions
- There is a way to change the amount of RAM (will be described later)
- Declared support for almost all Android applications
- High performance
- Support for adb commands, GPS emulation, easy installation apk, shared folder with computer for quick file sharing
- Ability to run two windows of the same game.
In my opinion, not bad. Although, of course, this is not the only software of its kind with this list of features.
Using Leapdroid
After installing Leapdroid on a desktop Windows desktop There will be two shortcuts to launch the emulator:
- Leapdroid VM1 - runs with or without VT-x or AMD-V virtualization support, uses one virtual processor.
- Leapdroid VM2 - Uses VT-x or AMD-V acceleration as well as two virtual processors.
Each of the shortcuts launches its own virtual machine with Android, i.e. if you installed the application in VM1, then it will not be installed in VM2.
When you run the emulator, you will see the standard android screen-tablet in 1280×800 resolution (Android 4.4.4 is used at the time of writing) with shortcuts to Play Store, Browser, file manager and several shortcuts for downloading games.

The default interface is in English. To enable the Russian language in the emulator, go to the application window in the emulator itself (button at the bottom center) - Settings - Language & input and in the field language select Russian.
To the right of the emulator window is a set of buttons for accessing useful actions in use:
- Turn off the emulator
- Volume up and down
- Take a screenshot
- Back
- Home
- View running applications
- Setting up keyboard and mouse control in Android games
- Installing an application from an APK file from a computer
- Location indication (GPS emulation)
- Emulator Settings
During testing, the games worked properly (config: old laptop Core i3-2350m, 4GB RAM, GeForce 410m), Asphalt showed playable FPS, and there were no problems launching any applications (the developer claims that 98% of games from Google Play are supported).
Testing in AnTuTu gave 66000 - 68000 points, and, in a strange way, the number was lower with virtualization enabled. The result is good - for example, it is one and a half times more than the Meizu M3 Note and about the same as the LG V10.

Leapdroid android emulator settings
Leapdroid's settings aren't teeming with features: here you can set the screen resolution and orientation, select graphics options - DirectX (if you want higher FPS) or OpenGL (if compatibility is a priority), enable camera support, and also set up a location for a shared folder with your computer. .

By default, the emulator has 1 GB of RAM and you cannot configure this using the parameters of the program itself. However, if you go to the Leapdroid folder ( C:\Program Files\Leapdroid\VM) and run VirtualBox.exe, then in the system parameters of the virtual machines used by the emulator, you can set the desired RAM size.

The last thing you should pay attention to is setting the keys and mouse buttons for use in games (key mapping). For some games, these settings are loaded automatically. For others, you can manually set the desired areas of the screen, assign individual keys to click on them, and also use the "aim" with the mouse in shooters.

Bottom line: if you have not decided which android emulator to Windows is better, Leapdroid is worth a try, it is quite possible that this option will suit you.
Update: The developers have removed Lepadroid from the official site and said that they will no longer support it. It can be found on third-party sites, but be careful and check the download for viruses.
When they wrote in the comments to the original version of this review that it was the best Android emulator for Windows, I promised to get acquainted with the program. After doing this, I decided to take this product to the first place in the review, because it is really good and, most likely, the rest android emulators not suitable for a computer. The developers promise compatibility with Windows 10, Windows 8.1 and 7. I tested it on 10 installed on a far from new laptop.

After installing the program and launching it, after a minute or two of initial loading, you will see the familiar Android screen (version 4.4.2, Cyanogen Mod, 30 GB of internal memory) with the Nova Launcher shell preinstalled file manager and browser. Despite the fact that the emulator itself does not have a Russian interface, "inside" Android, you can enable the Russian language in the settings, just as you do on your phone or tablet.

By default, the emulator opens in a tablet resolution of 1280 × 720, if this is too much for your screen, then you can change these parameters on the settings tab (called by the gear icon in the upper right) Advanced. Also, by default, low performance is set (Performance Setting), however, even in this option, running on a weak PC, Nox App Player performs exceptionally well and is fast.

Management inside the emulator is similar to that on any Android device. There is also the Play Market, from where you can download applications and games and run them on Windows. The sound, as well as the camera (if there is one on your PC or laptop) work in the emulator out of the box, the computer keyboard also works inside the emulator, as well as its on-screen version.
Additionally, in the right part of the emulator window (which, by the way, can be opened in full screen without a noticeable loss in performance), action icons are provided, among which are:
- Installing apps from APK files from a computer.
- Location substitution (you can manually set the location, which will be perceived by the emulator as received from the GPS receiver).
- Loading and exporting files (you can also simply drag and drop files onto the emulator window). This function did not work properly in my testing (files seem to be imported, but to find them in the file Android system failed after that).
- Creation of screenshots.
- For some purposes, Nox App Player also creates a Multi-Drive icon to launch multiple emulator windows at once. However, I have not figured out how it can be used and what it can be used for.
Summarizing this short description, if you need to run Android games and applications on Windows, use Instagram from a computer and do things like that, while you want the emulator to work without brakes - Nox App Player will be ideal for these purposes, I have not seen better optimization yet ( but can't promise heavy 3D games will work, not personally tested).
Note: some readers noted that Nox App Player won't install or start. Among the solutions so far found the following: change the username and user folder from Russian to English.
You can download the Android Nox App Player emulator for free from the official website http://ru.bignox.com
Koplayer is another free emulator that allows you to run games and android apps on a computer with Windows 10, 8 or Windows 7.
In general, Koplayer is similar to other related utilities, among which I would include Nox App Player and Droid4x - they are all from Chinese developers, they are productive even on quite weak computers or laptops and have some pretty cool features that vary from emulator to emulator. What I liked about Koplayer is the ability to configure control in the emulator from the keyboard or with the mouse.
Installing and using Koplayer to run Android apps and games on your computer

First of all, when downloading Koplayer on Windows 10 or Windows 8, smartscreen filter blocks the launch of the program, but in my check, nothing suspicious (or unwanted software) was found in the installer and in the already installed program (but still be vigilant).

After launching and loading the emulator for a couple of minutes, you will see the emulator window, inside which the Android OS interface will be located (in which you can set the Russian language in the settings, as on a regular smartphone or tablet), and on the left - the controls of the emulator itself.
Key steps you may need:
- Keyboard settings - it's worth launching in the game itself (I'll show you later) in order to customize the controls in a convenient way. In this case, individual settings are saved for each game.
- Purpose shared folder- for installation apps apk from a computer (simple drag and drop from Windows, unlike many other emulators, does not work).
- Screen resolution and RAM settings.

- Full screen button.
To install games and applications, you can use the Play Market, which is in the emulator, a browser inside the emulated Android to download apk, or, using a shared folder with a computer, install apk from it. Also on the official website of Koplayer there is a separate section for free download of APK -
I did not find anything particularly outstanding (as well as significant shortcomings) in the emulator: everything seems to work without problems, on a relatively weak laptop, no brakes were noticed in games of average requirements.
The only detail that caught my eye was the control settings from the computer keyboard, which is performed separately for each game and is very convenient.

In order to set up control in the emulator from the keyboard (and also from the gamepad or mouse, but I will show it in the context of the keyboard), when running game click on the item with its image in the upper left.
After that you can:
- Just click anywhere on the emulator screen to create a virtual button. After that, press any key on the keyboard so that when it is pressed, a press is generated in this area of the screen.
- Make a gesture with the mouse, for example, in the screenshot, a swipe (drag) up and an up key is assigned to this gesture, and a swipe down with the corresponding given key.
After finishing setting virtual keys and gestures, click Save - the control settings for this game in the emulator will be saved.
In fact, Koplayer provides much more control options for Android in Koplayer (the program contains help on customization options), for example, you can assign keys to simulate the operation of an accelerometer.

I’m not sure if this is a bad Android emulator or a good one (I checked it relatively superficially), but if for some reason other options didn’t suit you (especially because of inconvenient controls), trying Koplayer might be a good idea.
You can download Koplayer for free from the official website.
A really interesting version of the emulator that works fast, allows you to bind the coordinates of points on the screen of the emulated Android to certain keys on the keyboard of a computer or laptop (may be useful for in-game control), equipped with the Play Market, the ability to install APK and connect Windows folders, location spoofing and other features. Of the shortcomings - the program interface on English language(although the OS itself inside the emulator immediately turned on in Russian).

As a test, I tried to run a relatively "heavy" Asphalt game on an old Notebook Core i3 (Ivy Bridge), 4 GB RAM, GeForce 410M. Works decently (not super smooth, but playable).

You can download the Droid4x emulator from the official website (select Droid4X Simulator for download, the other two items are other programs).
In this article, we will talk about ways to emulate Android on a computer. I think everyone knows that Android is a very popular operating system for mobile devices, so let's talk about how you can emulate its environment on a computer, for example, to run Android games.
There are several tools for emulating android on a computer. All of them differ in the way they work and the depth of emulation. But let's not be idle and let's take a closer look at them.
ATTENTION!!! In order for the emulators to work as smoothly and efficiently as possible, we strongly recommend that you enable hardware virtualization in the BIOS. Not everyone will have a similar option, and if it is, it is called " Intel Virtualization Technology" or " Intel Virtualization Technology". With this option enabled, Android emulators will work much better.
1.Andy
A very good Android emulator for PC is the Andy emulator. With its help, you will discover a rather impressive functionality of the emulator that few people can resist. Firstly, you can play Android games on your computer without any problems and practically significant brakes. Andy is perfect for this. You can also use the emulator mobile device as a controller, i.e. will display the game on the computer monitor, and the game can be played from a tablet or phone. You can launch games from the desktop, as well as receive notifications.
2. Bluestacks
One of the most convenient options for running Android games on a computer. If you want Android just to play games on its platform, then this is your choice. Very convenient emulation, which is just aimed only at running Android games and applications on a PC. But there is no Android OS environment itself, there is only its own GUI with shortcuts to the games that you have installed and from Android there is only the ability to play its games.
The Bluestacks emulator is easy to install and configure, so we won't explain anything further. If you run into any questions regarding the emulator, please visit its official website.
3.Android SDK
The Android SDK software is a game developer tool, which, of course, provides the ability to run any application for Android on Android. But there is one big BUT in the operation of this system. The Android SDK is an extremely slow system, which takes from 5 to 30 minutes to load, and the performance of the Android OS itself leaves much to be desired. It is for this reason that it is highly discouraged to use the system, but we have presented it here as a possible option.
If you still decide to use the Android SDK, then download it from the official page and start using it.
4.WindowsAndroid (Windroy)
The Android emulation environment WindowsAndroid is a pretty good job, combining the complete "inner world" of the Android OS, with all its settings and default programs. The emulator may work a little more unstable than BlueStacks, but it is a full-fledged emulation of the operating system. You can download the latest version of the emulator from the official website of the developer.
5. Android for PC + VirtualBox
And finally, the turn has come to the last popular way to run Android in your Windows OS. The whole point is to use a special Android for PC, which was discussed in the adjacent material and VirtualBox, which will allow any operating system to be seamlessly installed inside a running OS, in this case Android will need to be installed.
However, if you liked the use of Android for PC more than its emulation, then just do everything as described in
There are many reasons why you might need Android emulators for PC. App developers test their products on emulators before putting them on Google Play. Gamers use emulators to play Android games using a mouse and keyboard. In addition, in emulators, you can select a simulated device and specify settings such as Android version, number of CPU cores, RAM, the presence of an SD card, etc.
In any case, it’s not so important why you need an Android emulator, you need to know that, firstly, such programs exist and there are many of them, secondly, emulators are very similar in their filling to each other and, thirdly , the installation and configuration process is not so simple and requires minimal technical literacy, so please be patient. Below are the top 15 Android emulators for PC with comments. Choose the one that suits you.
Comparison table of the main Android emulators for PC
| Bluestacks 3 | Andy | NoxPlayer | Genymotion | AMIDuOS | memu | Droid4X | |
| Price | Free / $2 per month | Free | Free | Free / $132-412 per year | 15$ / 10$ (one time) | Free | Free |
| Windows | Yes | Yes | Yes | Yes | Yes | Yes | Yes |
| Mac | Yes | Yes | Yes | Yes | Not | Not | Yes |
| linux | Not | Yes | Not | Yes | Not | Not | Not |
| Applications and games | Yes | Yes | Yes | Yes | Yes | Yes | Yes |
| Streaming | Yes | Yes | Not | Yes | Not | Not | Not |
| Changing screen sizes | Yes | Yes | Yes | Yes | Not | Yes | Yes |
| Customization and setup | Yes | Yes | Yes | Yes | Yes | Yes | Yes |
| File sharing | Yes | Yes | Yes | Yes | Yes | Yes | Yes |
| Synchronization | Yes | Yes | Not | Yes | Yes | Yes | Not |
| Connection external devices | Yes | Yes | Yes | Yes | Yes | Yes | Yes |
| Virtual sensors | Yes | Yes | Yes | Yes | Yes | Yes | Yes |
| multitasking | Yes | Not | Yes | Yes | Not | Yes | Yes |
| Running applications as root | Yes | Yes | Yes | Yes | Yes | Yes | Yes |
![]()
Android Studio Emulator is an emulator for developers.
Free
Android Studio is an IDE (Integrated Development Environment) for Android recommended by Google. In this environment, there is a large set of development tools specifically for Android. And, of course, the program has a built-in emulator so that you can test the developed application or game.
We can say for sure that this program is unlikely to suit those who want to play games or who need an ordinary “consumer” emulator. However, for developers, this is a real find, a powerful and at the same time free environment with the ability to test on the fly.
Installing this emulator is still a headache, but when you install and configure it, and then figure out all the features, you most likely won’t need anything else.
![]()
Bluestacks 3 is the most popular emulator.
There are free and paid ($2/month) versions
Bluestacks is the most popular program to emulate Android on a computer. According to the developer, Android apps are launched on Bluestacks more than a billion times a month! And there are several reasons for this. For starters, we can mention that there are versions for Windows and for Mac. They were the first to make a well-functioning multi-platform emulator. Mostly BlueStacks focused on gamers. Early versions were slightly bloated and complex. latest version(#3) was released in 2017 and differs from the previous ones in that it is noticeably simpler and faster. At the same time, it allows, for example, to work in multitasking mode and run several applications. You can even run multiple versions of the same game at the same time. In addition, the application supports the assignment of hot keys in games. Agree, for many games this can be a very good bonus. Although Bluestacks 3 is noticeably faster previous versions, he still remained too bloated and overloaded when compared with the same Andy or Remix.
And yet, those who choose an emulator for games should take a closer look at Bluestacks 3.
If you need something simpler and faster, choose something else. Even though Bluestacks is number 1, there is a choice.

AMIDuOS is a relatively new emulator.
There is a free trial version and two paid versions (10$ and 15$)
AMIDuOS is a relatively recent emulator for Windows (Win 7, 8 and 10 are supported). Android version can be: Lollipop and Jelly Bean. Just the version of the program with Jelly Bean costs $10, and the version with Lollipop costs $15. And that seems to be the only difference. The good news is that these are one-time, not monthly payments.
AMIDuOS is tailored to fulfill a variety of needs (not just games). His main feature- high performance. Therefore, this emulator will good choice for office or home use. For example, for Instagram, Telegram ... The emulator does not have any special features for games, but games run relatively briskly on it. Developers can use AMIDuOS for some simple tests, but it is unlikely to be suitable for more complex exploitation. In general, in general, AMIDuOS is a good program and deserves attention.
Put a trial to see if it suits you or not.
![]()
Andy is one of the best emulators for gaming.
Free
The next one on our list is a completely free emulator called Andy. It appeared a long time ago and at the time of its appearance it was full of bugs and various surprises. However, a lot of time has passed since then, and the developers did not waste it: at the moment there are practically no bugs, and the program itself is an excellent lightweight alternative to such monstrous emulators as Bluestacks. On Andy you can run the whole gamut of Android apps. And while Andy is more focused on non-gaming use, it can be played just fine. Anyway, the emulator is free and works well.
In addition, Andy has a significant plus: applications can be run as root.
Available for Windows and Mac. Below is a video comparing Bluestacks and Andy (in English).
![]()
Remix OS Player is fresh for gamers.
Free
Remix OS Player (developed by Jide) is one of the newest PC emulators on the list. And it's the only emulator at the moment that runs Android version of Marshmallow instead of Lollipop or Kit Kat. The installation process is very simple. The program is also quite easy to use. Basically Remix focused on gamers. Inside the program there is a convenient sidebar where you can change the emulation settings.
Due to the fact that the program is relatively fresh and at the same time free, developers continue to catch some bugs. That said, the Remix is better than many on our list and performs relatively well. And besides, it's free.
Weak spots A: Remix OS Player only works on Windows 64-bit (7 and above) and does not support AMD processors.
![]()
ARChon is an emulator add-on for Google Chrome.
Free
ARChon is no ordinary emulator. Simply because it is not a program at all. This is an add-on for Google Chrome. You install this extension in Chrome and after that you can run Android applications directly in the browser. Sounds badass, right? In theory, yes, but in practice, installing an extension can turn into a real headache. Here is the installation instruction. Perhaps she will help. If you don't have minimal technical skills, then it might not be worth trying.
You need to install this extension (in developer mode). And then you need to convert the APK of the required application using their utility into a format that will work in chrome with the ARChon extension enabled. Sounds difficult? Then don't try. If you want to dig, then perhaps it will not be so difficult.
The extension works on Windows, Mac and even Linux. This is perhaps the most difficult emulator to install and configure. But also the most unique of its kind.
![]()
Genymotion is a fast emulator for developers.
Free for personal use (with paid options)
This option is more suitable for developers. It allows you to test your application on many different devices without owning them. You can select device in Genymotion options and android version on which you want to run. For example, you can select Nexus One with installed Android 4.2 or Nexus 6 with Android 6.0 installed. And at the same time, you can switch between devices on the fly.
Genymotion is not the most user-friendly program for consumer needs. But it's a bomb emulator for developers. In addition, the program is shareware for personal use. And only for those who really need it, there are paid options.
Droid4X is a simple emulator for games.
Free
Droid4X has its pros and cons. And for many people and their needs, it is not an ideal emulator.
 However, it suits most people due to its ease of installation and simple, concise design. In addition, Droid4X was originally created for gamers. Therefore, the program is focused mainly on emulating simple games in terms of graphics. In principle, you can try to run something more heavy on it.
But remember that the program is a little outdated. So far, the page with the download of the emulator is “alive”, but apparently, the developers have stopped updating the program for a long time.
In general, download at your own risk: the emulator may fail. Yes, it seems like somewhere in nature there is a version for Mac, but it is not possible to find it.
KoPlayer is for gamers.
Free
KoPlayer is one of the new products. Perhaps that is why he has not yet enjoyed well-deserved popularity. This emulator is mainly aimed at gamers. The program supports the assignment of hot keys in games. In addition, KoPlayer supports a feature such as gameplay recording. So, streamers and game bloggers - take advantage. The installation process is quite simple and the emulator itself seems to work without errors. Although there are bug reports on the forums. But this is again a tribute to novelty.
All in all, KoPlayer is a good choice. And not only for games, but also for everyday use (for example, for instagram, whatsapp, telegram, etc.). But so far it has bugs. AT next versions there will probably be fewer of them if the developers do not abandon their offspring.
MEmu - Supports Intel and AMD.
Free
 MEmu is another newcomer to the list of emulators that has just entered the scene. But it has already won the hearts of users. The main feature of MEmu is that it supports not only Intel processors, but also AMD. If you think that this is not so rare, then it is not. So if you have AMD, feel free to download MEmu.
MEmu emulates several versions of Android: Jelly Bean, Kit Kat and Lollipop. In addition, multitasking is supported and you can run several applications at the same time. In fact, there aren't many emulators that offer multitasking on Lollipop.
MEmu supports most games and applications. However, I recommend using it not for games.
![]()
NoxPlayer (bignox) is a bomb emulator for gamers (in Russian).
Free
NoxPlayer is an emulator designed specifically for gamers. It has utilities and settings in order to improve the interaction with the game. For example, in addition to the keyboard, the use of gamepads is supported. And it supports various native gestures (such as “swipe right”) that can be assigned to buttons on the keyboard or joystick. In general, this is cool and, apparently, it works with a bang.
The program is free. There is a version for Windows and for Mac. Supports the game at 60 fps.
If you are looking for a powerful Android emulator for gaming, download Nox, you won't regret it!
![]()
YouWave is a dinosaur.
There are free and paid ($29.99) versions

YouWave is one of the oldest Android emulators for PC. He's been around for years, really. And although Last update It was in 2016, it is still a little morally outdated. The free version of the emulator uses Ice Cream Sandwich. If you shell out $29.99 for the paid version of the program, you will get a Lollipop emulator.
In general, the emulator works well and without failures. It's easy to install too.
And although YouWave does not have any special options for gamers (for example, assigning hotkeys or native gestures), you can still play on it. Perhaps this emulator will appeal to developers, especially beginners.
There is a YouWave version for Mac.
![]()
VirtualBox - do it yourself for developers.
Free

VirtualBox Party
Generally speaking, this is not just an Android emulator, it is an emulator of any operating systems. Like everything DIY on this list, installation and setup requires technical skills. Therefore, if they are not there, then look at the emulators out of the box.
Ok, how does it work. You need to download the VirtualBox file for your OS (Windows, Mac, Linux, Solaris) from the link above. Then you need to download the Android image from the site. And then you need to install the Android OS image in a virtual machine. Get ready for the fact that the likelihood that it will turn out right away is not so great. If it doesn’t work out, then you need to “smoke” specialized forums and search the Internet step by step guides. Write in the comments if you need to make such a guide. We must do it.
To sum up, this emulation option is suitable for geeks and old school programmers.
What are the benefits then, you ask? In fact, there are a lot, and the main one is that you can install absolutely any version of Android and configure absolutely everything. Full customization.
![]()
Xamarin is a Microsoft IDE for developers.
There is a free version and paid options
Xamarin is an IDE (Integrated Development Environment) that is similar to Android Studio in many ways. The difference is that Xamarin can connect to a monstrous development environment like Microsoft Visual Studio.
Just like Android Studio, Xamarin has a built-in emulator for developers.
Xamarin is a tool for developers. Although theoretically it may suit you for personal use if you want to customize the entire Android infrastructure for yourself. Xamarin is not as powerful as Genymotion, but it can handle all applications at once.
Xamarin runs on Windows. It is free for personal use.
Development teams and companies can choose from different pricing plans.
Windroy is dinosaur #2.
Free

Windroy is a classic. This is one of the most ancient emulators in history. As such, it is difficult to recommend it to anyone.
Only use it if you've lost all hope and the newfangled programs can't solve your problems.
There is an opinion that Windroy works better on old Windows versions(for example, on XP).
Windroy is more about non-gaming applications, such as office ones. Games on it can only go as ancient as he himself. And then with a stretch.
On the other hand, the emulator is free. And it's pretty easy to install.
If you (suddenly) have Win XP, install Windroy.
As a conclusion
Above are all the best Android emulators for PC currently available on the web. By and large, they are all good in their own way and it is up to you to decide on the choice. Compare the declared specifications and choose the one that best suits your needs. You need to understand that there is no one ideal program for all. One is good for a developer, another is good for a gamer, and the third is good for a Telegram channel admin. But we can definitely recommend that you do not rush to buy paid versions of programs. Install the trial, play around with the settings, and only then upgrade to the premium version.
More on the site:
15 Best Android Emulators for PC (for Gaming and Development) updated: January 25, 2018 by: admin