With our kit you can connect your own heating elements to build or upgrade your soldering equipment. The set consists of two structurally separate parts:
- Control Panel. Directly from it, the heating elements are controlled, as well as the processing of the received data from temperature sensors.
- Load control unit. This unit controls directly your heating elements. Management occurs through two channels. Both load channels work according to the algorithm set by the control panel. The maximum power should not exceed 2500 watts. When using more power, the triacs of the control unit will require additional cooling. The maximum current for each channel is 16 amperes.
The load control unit and the control panel are connected using a flat cable with connectors at the end.
Power supply of the control unit - 220 volts 50 Hz. For the control box panel, the power supply can vary from 80 to 270 volts (the control box power supply is built into the load control box). Thus, if your power supply is less than 220 volts (eg 120 volts) you can also use this kit. However, it should be noted that your heating elements must be rated for use on a 120 volt network.
There are various options for using this kit. For example, you can upgrade your existing soldering equipment (for example, the Chinese station IR6000, Jovy, Achi Pro and others like them). For such modernization, it is enough to bring out the cable for connecting the lower heater and the cable for connecting the upper heater (use the ones supplied with the Chinese stations solid state relays no need). Usually Chinese manufacturers stations use K-type thermocouples as temperature sensors. You can directly use such thermocouples to connect to the load control unit (for example, a thermocouple for determining the temperature of the lower heaters. Usually it is built-in). You can mount the load control unit on the side or behind your station. Move the control panel to a convenient location. The recommended upper heating element is quartz. - can be installed with minimal difficulty instead of the ceramic heating element that comes with the standard set of Chinese stations (we have already performed a similar operation. It is required to drill two holes with a diameter of 5-6 mm in the fasteners of the Chinese heater (fasteners for the M5 quartz heating element). No more changes for the top heater is not required.We also recommend purchasing.Usually, Chinese stations are not equipped with any fasteners for sensors, they use ordinary metallized adhesive tape, which can fall off at the most inopportune moment and then contact with the place of heating of the temperature sensor will be lost, which will lead to a violation of the soldering profile (usually to overheat).
The load cables are connected via a terminal located inside the load control box.

K-type thermocouples are used as temperature monitoring sensors. Sensors are connected through terminal blocks located on the control board of the load unit. In the standard configuration, it is possible to connect two sensors (option - one sensor for the lower heater and one for the temperature of the soldering point). On the control board itself, there are seats for connecting two more channels for processing sensors. Naturally, it is possible to implement a four-channel sensor connection scheme (you will need an additional 2 microcircuits and 2 capacitors). The current software uses only two channels to process information from sensors. If necessary, you can use all 4 channels. For correction software according to your needs (for example, to use all 4 channels), write to [email protected] website.

The control unit panel contains all the necessary elements for setting up and controlling the heaters in cooperation with temperature sensors. For their heating elements You can adjust the profile coefficient you need.
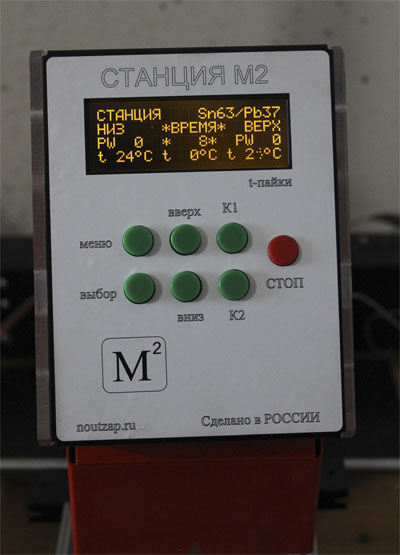
The control panel display shows all the necessary information. The soldering profile, the soldering mode, the power of the upper and lower heaters, the temperature of the lower heater and the soldering point, the required temperature of the soldering point are indicated.
On the control panel there are control buttons for the entire unit. In addition, we have implemented the ability to dynamically (during the current soldering) change the profile (for example, if you do not remove the microcircuit at 230 degrees, you can increase the temperature, for example, to 240 degrees, without changing the profile itself using the "+" and "-" buttons. the profile will rebuild itself.)
Implemented work in four modes:
- Operating mode STATION (8 programmable profiles)
- Operating mode UPPER HEATER (3 programmable profiles)
- HEAT operation mode (3 programmable profiles)
- Operating mode REBALLING (4 programmable profiles) (still experimental)
- Operating mode MANUAL ( manual installation power of upper and lower heaters)
The control unit contains 8 profiles that you can program yourself. Two profiles are already configured for average lead-free soldering and lead-containing soldering. All programming is absolutely clear and transparent. And consists of a choice of 6 menu items for each profile.
- The choice of the expected reflow temperature.
- Choice of soldering profile factor. This coefficient is part of the temperature calculation formula. With an increase in the coefficient, the graph of temperature growth becomes steeper, with a decrease it becomes more gentle. Allowing you to change the time and intensity of heating. At the same time, you do not need to install, for example, profile shelves, as at Chinese stations. In this case, the temperature is calculated by the formula. The graph is a branch of a parabola.
- Selecting the temperature of the lower heater.
- Selection of the bottom heater profile coefficient. Same as point 2.
- Switch-on temperature of the upper heater. Here you can configure to turn on the upper heater when the soldering point reaches the set temperature.
- Enable or disable the lower heater temperature control mode. This option allows you to either keep the set temperature during the pack (specified in paragraph 5), or control the temperature of the board using the temperature of the lower heater directly. For example, when soldering, someone likes to slightly heat the bottom of the soldering place at the same time while heating with the upper heater (in this case, the control must be turned off).
Thus, you can customize any of the 8 profiles.
In the UPPER HEATER mode, only the upper heater works for you. The bottom heater is not activated. This option can be used to remove or install small chips or plastic surface solder connectors. Feature is ostutvie air flow and accuracy of heating.
In the HEATING mode, only the lower heater works for you. In this case, if necessary, you can move the upper heater aside and work directly only with the board and the lower heater. In this mode, you can certainly use the upper temperature sensor. In the preheating function (with the top control option enabled) and directly as informational (to view the current temperature of the soldering point). And for example, use a regular air dryer. At the same time, the soldered buder board is located above the lower heaters, heated to the temperature you need, and you are already doing soldering work with an air dryer.
The REBALLING mode is still going through the experimental stage (the parameters of the heaters are being determined). Of course, the reballing operation itself can now be performed on the two previously described operating modes of the station.
MANUAL MODE - we have not seen this mode in any of the stations (for example, in Chinese clones). Using this mode, we can completely manually control the operation of the heaters. To do this, you use the "+" and "-" buttons for the lower heater, the "K1" and "K2" buttons for the upper heater. Manually setting the power of each heater. Naturally, at zero power, the heater is turned off. Thus in manual mode You can use heaters both separately and together.
REHEAT FUNCTION
In addition, in our station for the first time there was a function of reheating (our name). This function allows you to reheat the lower heaters at the final stage of soldering. For example: You heat the board with the lower element to 90 degrees at the place of soldering, then the upper heater turns on, the lower heater at the same time maintains its own temperature of 90 degrees on the board. With such a gentle mode for the lower part of the soldering, there is a danger when the temperature of the soldering point reaches 180 degrees (for example) and higher, overheating by the upper heater due to underheating of the bottom. You indicate in the profile (when setting) that the afterheating function is enabled, indicate the temperature at which the function is activated (for example, 180 degrees) and indicate how many degrees to increase the temperature of the lower heater (for example, by 40 degrees). Then, when the temperature reaches 180 degrees, additional heating is activated and the lower heater will increase the temperature of the board from below, facilitating the work of the upper heater. In this case, the increased thermal effect on the board from below will be minimal in time and will help to avoid thermal damage to the soldered board. Of course, the settings are saved for any profile. This function is completely absent in soldering stations sold on the market. At the same time, it showed complete convenience and accuracy in soldering. Setting it up is clear and simple. The function was created by us for high-quality soldering on the condition of a heavily soldered board.
Kit contents:
Additionally, the kit may contain:
1 year warranty for the set. Support (software update) without limitation.
Please pay attention to the load connected to the load control unit. As previously written, the maximum current is 16 AMPS. Excess current will cause failure of the control triacs. Be careful.
Product card micro-markup is a very important element of a working store. When marking up a product, we give the search robot a lot of additional information through which in search results a beautiful and expressive snippet is formed. Such a snippet attracts more attention and therefore visitors.
At first glance, this is where the benefits end, but it is not. In addition to the beautiful snippet, search engine a site with micro-markup is understood more clearly and transparently. The robot, scanning the page, clearly understands where the description of the product is, and where its name and model are. All structured information can be processed not only by search engines, but also by various programs and aggregators, which is undoubtedly a big plus for the popularity of an online store.
How to add microdata to a product card?
To add micro-markup in the json-ld format, you need to enter the following code:
The same markup in microdata syntax: