(Denwer) . Today we will continue our lesson from the series " Installing and configuring a local Denver server (Denwer)". After installing Denver, the next step is to set it up. The first step is to set up the Denver database. It uses (Free Database Management System) DBMS MySQL. To set up the database local server used in Denwer phpMyAdmin.
phpMyAdmin is a utility with open source, written in PHP and providing full, including remote, administration of MySQL databases through a browser.
Launch Denver using the desktop shortcut and type http://localhost/tools/ in your browser.
Click on phpMyAdmin and go to home page phpMyAdmin in Denver.

On the left side is a list of available MySQL databases data in Denver. I have as many databases here as there are sites on Denver. Of course, you can use one database for several sites, giving each site its own prefixes. But if the Hosting provider does not limit the number of created databases, of course it is better to create a separate database for each site. BUT phpMyAdmin Denver allows us to create an unlimited number of databases. To create a database in MySQL in Denver, go to the tab (databases) enter the name of the database. It is better to enter a clear name so that it is not difficult to understand from the name which site this or that database belongs to. This is important when a large number of databases accumulate. I recommend creating a database with the name of the site so as not to get confused later. The neighboring drop-down menu can be left by default (comparison), or you can select from the drop-down list " utf8_general_ci". "utf8_general_ci" is the main character set of the "UTF-8" encoding. "UTF-8" is the best encoding to use for building a website. In this case, you will not have problems with the encoding, when the Cyrillic alphabet is displayed with question marks and it is not clear what kind of gibberish. This encoding supports both Cyrillic and even Chinese characters. Click (create).

A database with your name will appear in the left item of the phpMyAdmin panel.

Click on the name of our database and get into the database itself. Now we need to create a new user. To do this, we need a tab (privileges).

By going through this menu, we get to the account page MySQL records in Denver. For the Denver database, one account is enough, since our local server (localhost) is located on our computer. No one will get to it except us. And for real hosting, it is better to create a separate account. After the user table, there is a link "Add user".

By clicking on it, we go to the pop-up window for adding a new MySQL user to Denwer.
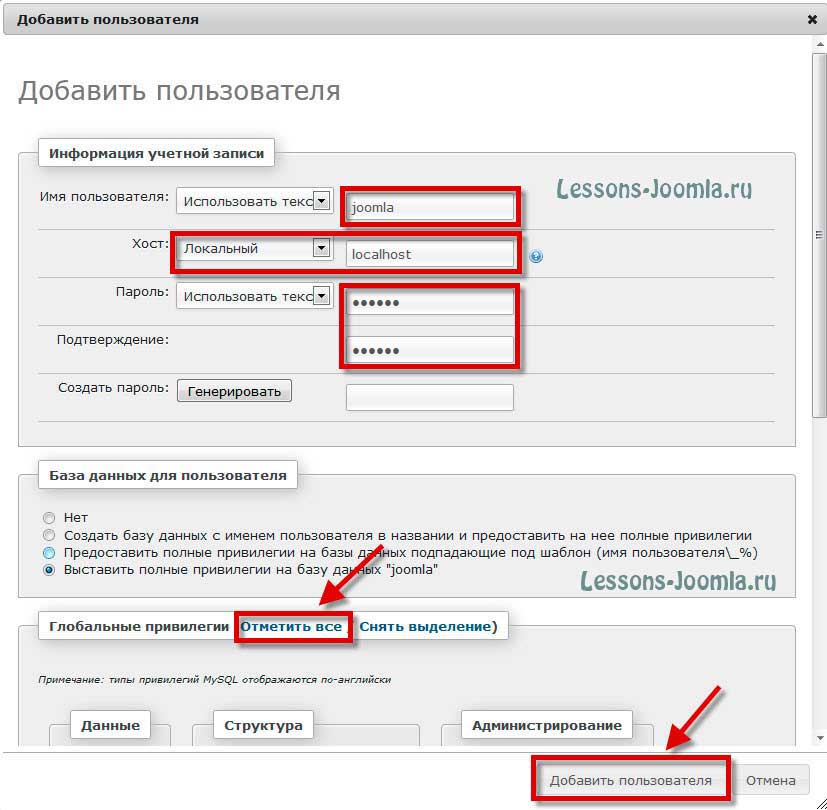
Enter the username in the first field. In the second field "Host" from the drop-down menu, select "local", as a result, "localhost" is automatically entered. In the following fields, enter the password as usual. In the "Database for user" block, leave everything as it is, and go to the "Global privileges" block. Here we choose what privileges we will give to this user. Since we are the owner of this local server, we click on the "Mark All" link and at the bottom click on "Add User". After successfully adding a new user, go to the "Privileges" page again to make sure that a new user has been added to the Denwer database.
Now the database has been created and we can proceed to CMS installation Joomla.
The logic of the search engines is understandable, if there is an article, then it should be explained how his (Denver) and delete.
- How to remove denver?
- How to remove extra denwer drive?
- Denver phpmyadmin folder path?
- Where is the phpmyadmin database in denver?
Questions for which search engines often send people to this site. Well, let's start in order:
How to remove denwer, How to remove denwer disk?
Often, a user who is accustomed to the fact that after installing a program also receives an uninstaller of this program as an output, by clicking on which it can be easily removed.
The Denwer package does not have the usual Uninstall.exe, since Denver is a set of scripts packaged in a self-extracting SFX 7Zip archive.
To remove Denwer, simply delete the folder webservers, which is located on the "C" drive if the installation took place "by default".
C=> WINDOWS=> system32=> drivers=> etc
File host does not have an extension, it can be opened with any editor, even notepad. You will see something like this:

Feel free to delete all entries below the line " 127 0 0 1 localhost".
The next step.
Dmitry Koterov claims that Denver does not make any changes to the registry and system files I think he has no reason to dissemble.
Nevertheless, Windows itself prescribes paths to folders and files in the registry, by running any registry cleaning utility, we clean these entries.
![]()
Everything, Denver is completely removed from our computer.
How to remove denwer disk?
The Denver drive is just an image, a virtual folder created by the system. By deleting Denver, the command to start creating this particular virtual disk is also deleted.
Apparently, the question is different - when installing his first home web server, a person did not quite clearly understand what and why he was written in the installer window.
As a result, having entered at a certain stage the recommended "2" (two), we give the installation on autostart create disk "Z" when starting Windows.
If you don't want the "Z" drive to be created every time you start the system, taking up a chunk random access memory, then you need:
- Go to "Start button => Programs => Startup"
- Delete the shortcut from the Startup folder Create virtual drive for Denwer"
Attention. The Boot.exe utility itself, located in the folder
C => WebServers => denwer => Boot.exe
DO NOT DELETE! By deleting it, you will not be able to start Denver.
Now, when you restart your computer, you will not see the "extra denver disk".
Denver phpmyadmin folder path?
If you did not change the installation path when unpacking Denver, then phpmyadmin folder located at:
C => WebServers => home => localhost => www => Tools
This is another article from the Webmaster Tools section, in which I want to talk called Denwer, which can be freely downloaded from the developer's resource. First, I’ll talk about what a local server is and why we need to work with it. Simply put, you can install and configure it on your computer by getting free analogue hosting (read about what is hosting and domains).
For you, in this case, you do not have to buy hosting and do not even have to have access to the Internet. The capabilities that Denver gives you are practically no different from those of a remote host, and it will consist of the same components and have the same capabilities. It already contains read more about this script), the Apache server (read), has PHP support and much more.
Where to download Denwer, how to install and run it?
You can download separately all the components of the local server described above and, having installed them on your computer, configure them correctly, but not everyone is able to do this. And even those who understand what's what can experience a lot of difficulties during installation and especially when configuring it.
Therefore, in order to simplify life for us, various installation packages (assemblies) were invented and created, allowing you to download a fully working and configured complex with minimal effort.
All you have to do is download the appropriate assembly and install your project engine (Joomla, WordPress, etc.) on it, and then start working on it, just like you would if you found the engine files on a physical host. By the way, as an option and alternative this decision, can be considered , i.e. able to work with Joomla and WordPress. But in this article we will speak specifically for localhost.
So, what do the developers of such free installation packages offer us? Let me list links to resource pages where you can download them, and then I will tell you in detail about installing and configuring one of them, which I chose as a favorite.
This is my personal choice, and you can use the package that suits you best. Fortunately, working with them is quite the same type and, having understood how to work with one assembly (today we will talk exclusively about Denwer), you can easily figure it out with any other.
Where you can download local server builds for free:
- Denver - free download
- VertrigoServ -
By clicking on the link, you will have to register in the proposed form, after which you will receive an email with a link to download the Denwer distribution.
Run the downloaded file with the exe extension, agree to install the package, after which it starts unpacking, and then a browser window will also open with a description of the installation, which you can immediately close, and a black DOS window with the installation wizard will also appear:
Following the instructions of the wizard to continue the installation, press "Enter". In the next window, we need to specify in which folder on our computer we will install the server. You can select, for example, C:\server .

Press "Enter", when asked if you really want to install Denver in this directory, you answer by setting "y" (y) and press "Enter" again. Next, we are informed that a separate virtual disk will now be created, which is necessary for the functioning of all components of the local server.
Just press "Enter", and in the next window select the letter for the virtual drive. This letter, of course, should not this moment be used by your system (i.e., the disk, the Latin letter "c", definitely does not need to be selected).
It is better to choose something from the last letters of the Latin alphabet, for example, Z. If it turns out that this letter is already used to designate a disk in your Windows operating system, then you will see a message that it is impossible to create such a disk.
In this case, you will need to press "Enter" and repeat the step with entering the name of the installation directory, press "Enter" again and enter another letter. You can see which letters to designate drives on your computer are already taken in "My Computer".
If the letter you selected is not occupied, you will see a message about the successful creation of the virtual disk.

Press "Enter", as a result of which the files of this assembly will be copied to the folder you specified earlier on the computer. Next, you will be prompted to select a download option, to which you respond by entering a unit and pressing "Enter". You will also be asked whether to create shortcuts to start, stop or restart on the desktop, to which you will answer "y".
With these shortcuts you will be able to start or stop the server. The installation wizard will then close, and a browser window will open with a page describing the next steps for working with the Denwer assembly.
Checking the health of the local server
Next, you go to the desktop and launch Denver by clicking on the "Start" shortcut. In this case, a DOS window will open for a short time, talking about starting the server, and then in the tray (the area on the right side of the panel Windows tasks, next to the clock), feather and black hat icons will appear to indicate that it is running.
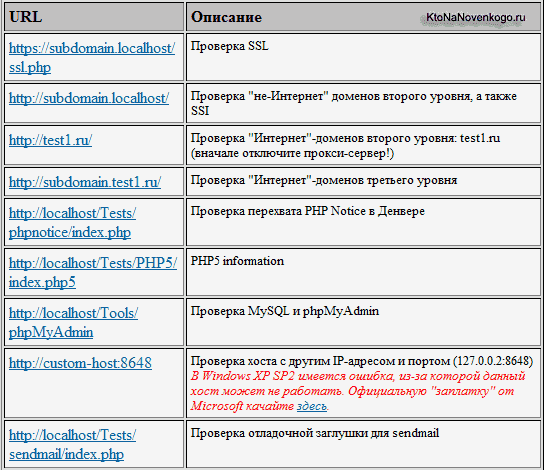
Now dial in address bar your browser's localhost , which will take you to a page that says "Hurrah, it worked". This means that the assembly successfully installed on your Windows computer. Scrolling down this page, you will see links to check its performance:
You follow this link, then in the window that opens, enter some text in the "Text" field (better in Russian - check that everything will be in order with the encoding) and click on the "Send via mail" button. If everything worked correctly, then you will receive a message like: OK, the mail () function worked correctly. But you also need to check that the letter really reached.
To do this, you need to go to our virtual disk (remember the letter that you specified when installing this assembly) and follow the following path:
Z:\tmp\!sendmail\
By the way, you can go not to a virtual disk, but to a real one, where you have a local server installed (in my case, this is drive C) along the same path:
C:\tmp\!sendmail\
If everything is in order with sending mail, then in this folder you will have to find the letter you sent. By opening it, you can check if the Russian language encoding is correct.
Setting up and installing Joomla or WordPress on Denver
First you will need to go to the folder where you installed the assembly (for me it is c:\server\) and go to the following path:
c:\server\home\localhost\www\
In this WWW directory, you must create a directory where you will later need to upload the engine files (Joomla, WordPress, etc.). The name of the folder is up to you, for example:
After creating the folder, restart the localhost using the "Restart Denwer" shortcut on the desktop (if it is not already running, then start it). To check if it works, type in the address bar of your browser:
http://localhost/Proba/
If a page opens with the title "http://localhost/Proba/", then everything is in order. If no window opens, then try restarting Denwer again.
Now you need to install the engine (Joomla, WordPress, etc.) in exactly the same way as you did for real hosting (Joomla installation is described (in details and pictures). How to install SMF forum I wrote, but it is covered in some detail at the link provided.
Those. you need to copy the engine files to the folder created on your computer (it acts as a local host). In my case this is the folder:
C:\server\home\localhost\www\Proba\
This process will differ from installing the engine on a real host () only in that for copying files no need to use FTP manager- an ordinary conductor will also fit perfectly, well, or, like the one described by the link Total Commander.
After you copy the Joomla or WordPress files to the Denver folder, you need to type in the address bar of your browser to install the site or blog:
http://localhost/Proba/
As a result, the window of the installation wizard of one or another engine will open. Then you proceed according to the same scenario as in normal installation to real hosting, with the only exception that you, as described in the article about installing Joomla (see link above), but in the manner described below.
Creating a database and user using Denwer
In order to get to the phpMyAdmin program included in the local server build kit, you need to type the following URL in the address bar of your browser:
http://localhost/tools/
In the window that opens, click on the link called "phpmyadmin", which will open the main page of this program. On it, in the "Create a new database" area, you enter the desired database name (for simplicity, it can be named the same as the directory for the site in the localhost folder, i.e. "Proba", in my case) and click the "Create" button ".
Now we return to the main page of phpMyAdmin by clicking on the house icon in the left column of the program window. Find the "Privileges" link in the "MySQL" area and click on it.

On the phpMyAdmin page that opens, in the center, you should find the item "Add a new user" and click on it.

In the “Username” area, enter the desired name (for simplicity, I use “Proba” again), in the “Host” area, enter localhost, in the “Password” and “Confirmation” areas, enter some very complex password twice.
In the "Global Privileges" area, click on the "Check All" inscription so that the database user being created has maximum rights.

Everything, the database and the user on Denver are created. Now you can use this data when installing Joomla, WordPress, etc., which will follow the same sequence as when installing on a real hosting. Upon completion of this process, your resource will be available at:
http://localhost/Proba/
You can work with Joomla or WordPress in the usual way, but this greatly simplifies and speeds up the work of editing engine files, installing and uninstalling various extensions, and also there is an opportunity to work on your project even there, where there is no internet access.
Website transfer to hosting
After completing the project, you must transfer site from Denwer to hosting in order to make it available to visitors from the Internet. This is done in exactly the same way as if you simply moved from one hosting to another or restored your site from backup(I wrote about creating and restoring from a backup).
To do this, you will need to use the FileZilla program (which I wrote about) to move all the files from the local server folder (in my case, the Proba folder) to the root directory of the remote host (usually either PUBLIC_HTML or HTDOCS).
And then open for editing configuration file your engine and change the parameters of the absolute path to the files and folders of this engine, as well as the database name, user and password, to those that you set when creating a new database on the hosting. All this is described in detail in the article about backup and transfer of the site, the link to which you will find by climbing a couple of paragraphs higher).
How to remove Denver from a computer
Quite often the question arises how to remove this assembly from your computer. The main catch of the removal is to disable the virtual disk created during installation. But first things first. First you will need, of course, to stop the local server using the appropriate shortcut on the desktop.
Then remove virtual disk, which was created during installation. Remember what letter you assigned to this virtual disk and go to Windows along the following path "Start" - "Run" (you can instead press the key combination Win + R), enter the command in the window that opens:
Subst z: /d
Instead of the virtual drive letter Z, you will need to enter your choice (Drive Z suggests cz as the default virtual drive letter). Well, to permanently remove the Denwer assembly from your computer, it will be enough to delete the WebServers directory (by default, this is the C: \ WebServers folder) and remove three shortcuts from the desktop of your operating system Windows systems. Everything, we can assume that we managed to remove it with little bloodshed.
Good luck to you! See you soon on the blog pages site
You may be interested
Hi all! Today I will talk in detail about how to work with denwer- local server. Consider the installation of Denwer, its configuration and removal. Terribly hackneyed theme that is present on every blog dedicated to the creation of sites. My blog is no exception. It's just the basis, the foundation for future victories, without which you can not do. Well, to make it interesting for readers who are already familiar with Denwer local hosting, I will consider a couple of subtleties that are difficult to find on other Internet resources:
- how to create multiple sites in Denver;
- how to russify phpMyAdmin

What is Denver? This is a program for quickly deploying a local server on your computer. There is no need to install separately the Apache server, the MySQL database management system and the phpMyAdmin database admin panel, spending a lot of time, effort and nerve cells on this. Just download it, install it in a few minutes, deal with it in an hour, and then practice working with any . Denver is a sandbox where you can safely test new solutions before implementing them into working projects.
Denver installation
To download Denwer, you need to go to this page and register. Registration is very simple - just enter your First Name, Last Name and email. Be sure to include an existing email, because the download link will be in the email sent to this address.
The Denwer installer consists of just one .exe file with a very long name that starts with Denwer3... . After running this file, a browser window will open (close it so as not to interfere) and a command line in which Denwer will be installed. Command line, of course, black and scary, but you don’t need to be afraid of it - everything is easy there, and now you will see it.
1. Read the welcome message from Denwer, close your browser and press Enter. To see the pictures better, just click on them.

2. Next, you should specify in which folder on your computer the Denver files will be copied. The default directory is C: \ WebServers, you can not be smart and just press "Enter", then confirm your choice by entering the English letter "y" (from the word "yes") and pressing "Enter" again.

3. At the next step, you will be prompted to specify the name of the virtual disk on which the local server will be located. By default, the name Z is given, since it is unlikely that a disk with this name already exists in the operating system. You can specify another letter of the Latin alphabet. To confirm your choice, press "Enter" - the installer will create a virtual disk and test it, all that remains is to re-use the "Enter" button.

4. Now you need to choose one of the two proposed options. In the first option, the local server will start along with the download operating system, in the second - only when you want it, using the Start Denwer shortcut on the desktop. I always choose the second option.

5. The last thing we will be offered is to create shortcuts on the desktop. Agree by typing English letter"y" and pressing "Enter".
That's it, installation is complete! There are now three new shortcuts on the desktop:

- - loading a local server, if you chose the first option in the installation, then this shortcut will have to be used every time to start Denver;
- Stop Denwer - before shutting down Windows is better stop hosting with this shortcut, it will avoid possible errors and outages in Denver.
How to work with Denver
In order for the local server to work, Denver must be started using the Start Denwer shortcut on the desktop. A console window will appear and disappear, and a feather, letter, and black hat icon will appear on the taskbar, in the area next to the clock. Now, when you go to "My Computer", you can see a new local disk with the name you gave it.
To upload files and folders to it, you do not need to use a special one; work with it as with other disks of your operating system. By default, Denver hosts only one test site test.ru. Where are his files? In the \home\test1.ru\www directory. It is in the www folder that you should upload the files of the future site - this is its root directory.
Now let's look at all the utilities that allow you to work with Denwer. We go to its main page by typing http://localhost in the browser. If everything is in order, you will see a page with an optimistic inscription - “Hurrah, it worked!”.
If instead you see a blank white page, turn off the Internet, close your browser, restart Denwer, and visit http://localhost again. As soon as it appears start page Denver, the Internet can be turned back on.
Great, scroll down the page to the heading.

1. DNSearch: search files- the name speaks for itself: search for files on a local server.

I think all the points are clear, so I will not dwell on it.
2. List of registered sites- all sites created on Denwer will be displayed here:

Initially, there is only the test1.ru domain, but you can create as many new sites as you like and give them any names. We will talk about how to create several sites on a local server a little lower.
If you create a site on a local server that has the same name as an Internet resource on the Internet, then when local hosting is running, the site from your computer will be displayed. Don't be afraid of this.
3. Setting up new MySQL databases and users.
All modern CMS work on the basis of the database. Denver supports free open system database management (DBMS) MySQL. This utility is designed to create a new database.

Fill in the fields Database Name, User Login and enter the password twice. Leave the MySQL administrator password blank. Write all this information down somewhere so you don't forget. It is it that must be entered when installing the CMS.
4. phpMyAdmin - Administration DBMS MySQL.
What is a database? A set of values and keys. To work with the database, a special SQL query language is used, which not every user knows and wants to learn. To make it possible to work with databases without knowledge of SQL is used special program, a kind of database administration panel - phpMyAdmin. She has GUI, in which you will work with databases - delete, create, edit tables. All your actions phpMyAdmin itself will convert to SQL queries, which will send to the database for execution. I will tell you more about working with phpMyAdmin a little later, now let's touch on the issue of its Russification.
phpMyAdmin only has English language interface, but this can be fixed. and copy it to a directory on virtual disk Denver: \home\localhost\www\Tools\phpmyadmin\lang. Clear your browser history and restart Denwer if you have it enabled. Login to phpMyAdmin by typing in your browser http://localhost/tools/phpmyadmin/index.php, and change the interface language to Russian:

How to create multiple sites on a local server
Many people think that Denwer is able to support only one standard test1.ru domain, but this is not true. It allows you to create as many sites as you want on local hosting. This is done simply. Go to the home directory on the denwer virtual disk and create a folder in it with the name of the future site (for example, imya_sayta.ru). Go into it and create the www folder, in which all the files of the future site will be located. Now the directory structure resembles test1.ru already discussed above. After restarting denver, the new site will appear in the list of available ones.