The digital signature is an integral part of any operating system. When it comes to Windows, this topic simply cannot be ignored. The system requires a driver in order to understand that it belongs to a specific creator, and is not intended for fraudulent activities.
In this article, we will talk about how to permanently disable a digital signature and what consequences this action can lead to.
Such action involves many risks. The most common shutdown problems are malware infections. Such cases are not frequent, but no one is immune from this. Some users, after installing a specific driver that has absolutely no signature, try to re-enable protection. This can secure the computer, but if there was a virus, then identify malware it will be extremely difficult. Some antiviruses are not able to find virus files, so you should be extremely careful when performing this action.
Windows 7
Method number 1
If you realize the need to turn off digital signature drivers, do the following:
- We launch command line. You can do this by calling the execute command (key combination Win + R), and then typing cmd commands and pressing the Enter key;
- In the window that appears, enter the command:
bcdedit.exe /set nointegritychecks ON
- If you have done everything and it becomes necessary to run the digital signature verification again, then simply put OFF at the end of the command.
- That's it, verification is disabled. Now you can safely install the necessary drivers.
Method number 2
This method differs only in commands.
- After calling the command line, you must enter:
bcdedit.exe -set loadoptions DDISABLE_INTEGRITY_CHECKS 
Then confirm with the Enter key.
- After that, you need to enter the command
bcdedit.exe -set TESTSIGNING ON
and confirm it as well.
Watch carefully to ensure that the commands are executed. If one of the two commands was not executed, the shutdown procedure will fail and you will need to do everything again.
Method number 3
This method does not completely disable the verification of the digital signature of drivers, but only makes it possible to install a temporary one. Such a solution may be useful to those people who regularly test new drivers, but do not want to stay on them.
Actions are:
- You need to restart your PC.
- When you exit the inscription with the BIOS, you must press the F key
- After that, the system will offer a variety of boot options. We select the option where there is no digital signature verification - Disable driver signature enforcement.
- After the whole procedure, the operating system will start and you can install the desired driver. The system will work with it until the reboot. Therefore, if you need a fully disabled signature verification, then this option won't fit.
Windows 8
This version of the operating system has more diverse options for disabling. One of the options helps to disable the signature once, before installing the driver, and the second disables it completely. Let's explore both options.
Momentarily disable driver signing
The first way solves our problem using the Charms bar.

- You need to select "Computer Settings".
- Then "change computer settings".
- Next, select "Update and Recovery".
- In the "Recovery" sub-item, click on the special boot options.
- After that, you need to restart your PC.
- After rebooting the system, select the "Diagnostics" item.
- Disable digital signature verification in boot options.
- When the system boots, the installation of a third-party driver will become available. But, after rebooting the system in normal mode, you will not be able to install third-party drivers.
Using the Local Group Policy Editor
- This method implies complete shutdown verification, so be careful. You should use the Win + R key combination to call the "Run" line, in which you need to enter and execute the gpedit.msc command.
- The local editor will open. group policy. In it, you must select "User Configuration".
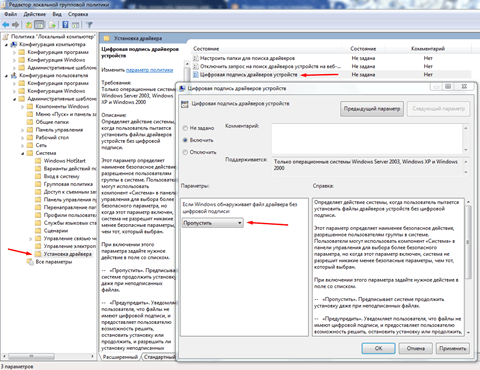
- In the administrative templates, go to the system and select "Install Driver". At this stage, double-click on "Digital Signature of Device Drivers" to go to this sub-item.
- Now click on "Skip" in the "Enabled" item.

The method itself is quite simple, so it should not take much time to implement it. When applying it, you should understand that the check is disabled forever and nothing will change upon reboot.
Windows 10
Win 10 is a more optimized system, so this process here it is implemented in three ways. One of them helps to temporarily solve the problem, and the other two completely disable the check. This procedure is done both on home version 10x64 and on pro.
Via boot options
This method allows you to temporarily solve the problem, so we recommend that you use this method if you need to install third-party drivers.
Procedure:
- Go to settings, select "All options".
- In the "Update and Security" section, select the "Recovery" sub-item. In special boot options, click on the "Restart Now" button.
After the reboot process, follow these steps:
- Select the "Diagnostics" item.
- After him " Extra options».
- Then Download Options.
- We reboot.
After that, an options menu appears, in which you can select what you need to install third-party drivers. After rebooting into normal mode, you will have to repeat all the steps to install the drivers. The method is convenient in that it allows you to install third-party unsigned drivers only once. After the reboot, the system will again start checking the developer for loyalty.
Local Group Policy Editor
The second method is no different from the actions in Windows 8. You can familiarize yourself with this method in this article a little higher.

Command line
This method is similar to the option to disable scanning in Windows 7. It differs only in commands.
You must open a command prompt (required as an administrator, otherwise it will not work). Then enter the following commands one by one:
- exe -set loadoptions DISABLE_INTEGRITY_CHECKS;
- exe -set TESTINING ON.
After performing this procedure, you should pay attention to the operation performed. If everything went well, then you should restart your PC.
minus this method is that in the lower right corner an inscription will appear that the Windows 10 system is running in test mode. To enable the check function, at the end of the second command, replace the value "ON" with "OFF".
Shutdown via safe mode
This process is extremely simple and will take no more than 10 minutes. Must be loaded into safe mode, open a command prompt as an administrator, and then enter the command:
bcedit.exe /set nointegritychecks on
After the operation is successful, you should restart your computer in normal mode. In order to return to checking the digital signature of drivers, you should change the value in the command line to "OFF" and reboot again.
Conclusion
Knowing these methods, the process of disabling digital signature verification will not take much time. Do not forget about the risks when disabling the check. In the event of a computer infection, the consequences can be very sad.
It is worthwhile to clearly understand when a digital signature is needed, and when it is really worth turning it off. Temporary shutdown is the most correct solution, since on a permanent basis the lack of verification can lead to negative results of the PC.
A digital signature is an extremely important element of the system, so you should not neglect it and turn it off forever.
Good luck!
The absence of a signature indicates that the driver package has been changed or is simply not ready for release and has problems if it refers to the official driver. Now we will tell you why you need a driver digital signature in Windows 7 and how to disable it.
What is a driver digital signature
Driver signature - correspondence of the digital signature (signature) with the corresponding driver package. The system verifies the signature to make sure that the data matches the declared signature and does not pose a threat to the computer. But there are often situations when signature verification is a big hindrance. For example, to flash some Android phones installation required software and a special driver that is not digitally signed.
The signature itself is necessary for the protection and security of your computer as well as your information. We remind you that installing unknown drivers without a corresponding digital signature is dangerous!
In Windows 7, there are several ways to disable driver signature verification. Starting from the system boot parameters, ending with special applications. We will discuss each of these options in more detail below. detailed instructions with examples and images.
Disabling Driver Verification via Boot Options
Using this option, you can disable signature verification only until the device is rebooted. After a shutdown and reboot, an unsigned driver will not work. So, in order to disable digital signature verification through additional parameters Windows boot 7 you need to do the following:
- Turn off the PC (or restart it) and when turning it on, press the F8 key at intervals of 1 second;
- The system will boot to the "Advanced Boot Options" page;
- Select download option " Disabling Mandatory Driver Signature Verification » and press Enter;
- The system will boot with the necessary parameters;
This option is quite simple, but as mentioned above, this will only disable the check until the next PC restart. Using the following options, signature verification will be disabled until you enable it yourself.
Disabling Driver Verification via Command Line
The command line opens up a lot of room for change Windows settings 7, the main thing is to know which commands to use. This method is quite simple, but you must follow the following instructions exactly:
- Click on the "Start" button, enter "" or "cmd" in the search and run the application as Administrator;

- Enter the following commands in turn:
- bcdedit.exe -set loadoptions DDISABLE_INTEGRITY_CHECKS
- bcdedit.exe -set TESTSIGNING ON

- Restart your computer;
At some point, you will need to enable driver verification back, for this, run the commands:
- bcdedit.exe -set loadoptions ENABLE_INTEGRITY_CHECKS
- bcdedit.exe -set TESTSIGNING OFF

Alternative way. You can also use Windows registry to set the required parameters, enter the following command at the command prompt as Administrator:
- reg add "HKCU\Software\Policies\Microsoft\Windows NT\Driver Signing" /v BehaviorOnFailedVerify /t reg_dword /d 00000000 /f
Disabling validation through the Group Policy Editor
You can use one more Alternative option, through the Group Policy Editor. It is worth noting that the editor is only available for versions Windows 7 Pro and Ultimate(Maximum). If your version of the system is Home or Starter, the previous options may help you.
In order to disable driver signature verification using this method, you need to do the following:
- Press the combination Win + R and enter gpedit.msc;
- Follow the following path "User Configuration" - "Administrative Templates" - "System" - "";
- Open "Digital Signature of Device Drivers" and set the value to "Enable" and set the value to "Skip";
- Restart your computer;
Bypass Verification with Driver Signature Enforcement Overrider
The Driver Signature Enforcement Overrider (DSEO) application is used to bypass Microsoft's security system that prevents unsigned drivers from being installed. Unfortunately, the application cannot forcibly sign the driver, but it is able to change the signature so that the system can consider it signed and correct. You can download the application on the page -.

Bypass Driver Verification with Driver Signature Enforcement Overrider
For the application to work correctly, UAC must be disabled. To do this, open the Run window (press the key combination Win + R), enter the command "UserAccountControlSettings.exe" and set the slider to the minimum position and click OK.
How to use Driver Signature Enforcement Overrider:
- Once downloaded, run the dse013b.exe application;
- Accept the terms of the license agreement;
- Enable test mode by selecting "Enable Test Mode" and clicking Next;
- Then "sign" the driver by selecting it using the "Sign a system File" option;
- Restart your computer for the changes to take effect;
You can roll back all changes by disabling the test mode with the "Disable Test Mode" function.
All of these methods should help you solve the problem with checking the digital signature of drivers on Windows 7. But we want to reiterate that you should not install drivers if you are not completely sure that it is safe for your device.
A driver digital signature is a special label that is added to system files (most often drivers) to increase the level of computer protection. With its help, the user and Windows itself can identify the software manufacturer (as well as other characteristics). In other words, this is a kind of driver authentication. However, the main thing that the digital signature of drivers allows is to check whether the file has undergone any changes. This is done so that the user cannot accidentally download and install drivers on windows 7 under the guise of a verified file. However, sometimes it becomes necessary to disable this feature.
The digital signature is applied by the manufacturer (or publisher) and ensures that the device is compatible with the operating system. windows system 7.
The absence of a digital signature can mean the following:
- Drivers have not passed security checks.
- The software was published or produced by an unverified company (with a low level of trust).
- Drivers have been modified from outside (for example, infected with malware).
- The manufacturer does not guarantee the correct operation of drivers with different versions of the windows operating system.
Therefore, it is most logical to install only those drivers that have a digital manufacturer's mark. However, this does not always fully guarantee the user's safety. Just as its absence does not always mean a clear threat to the system.
Why disable authentication?
The presence of a digital signature on the driver or any other system file, by default allows the system to perceive such programs as "safe". But, as we have already found out, this is not always the case. If you are going to install a driver from an unverified source, then when Windows installation will give you system notification, which will say: "The driver you are about to install is not signed."
There is no single right and reliable way find out if the drivers have been changed, if the file is infected. Unfortunately, Windows is designed in such a way that even if the user chooses to install it anyway, there is a risk that the system will not allow it. Therefore, the device will not work.
- There is no other source to download drivers.
- You download drivers from the official website of the manufacturer, but for some reason they do not have an electronic mark.
- Install drivers from a licensed disk.
- You are using a rare device whose manufacturers have released drivers without a digital signature.
In any case, installing unauthenticated drivers is recommended only as a last resort, if there is no other alternative.
How is the verification
Before turning off authentication, it is worth understanding how it works. To do this, Windows 7 provides a special system utility sigverif. To run this app, follow these steps:
Issues with Installing Untagged Drivers
If you install files without a digital signature, it will be marked yellow in Device Manager exclamation mark.
However, its presence does not always mean that the problem is precisely in the absence electronic signature. Therefore, in addition to the icon with an exclamation point, the status should contain an additional system notification explaining the reason for this behavior of the device. 
Another system notification may also indicate the problem of the absence of an electronic signature. Therefore, if you are sure that you have downloaded a working distribution of drivers, but they are not installed, the problem may be in the digital mark. Therefore, in order for the device to work, authentication must be disabled.
If you nevertheless strongly decided to disable electronic signature verification, then the first thing you need to do is run the “run” system utility. For this:

Cannot find gpedit.msc
If you see a system notification that the gpedit.msc system utility cannot be found, then as part of your Windows versions she is not included.

The peculiarity of this method is that it allows you to install all programs without an electronic mark once, immediately after turning on the computer. After the next reboot of the device, the settings will return to their original position. However, all files that you install will continue to work. Therefore, if you again need to install any files without a signature, you must again carry out this procedure. This method is suitable for those who need to install multiple drivers without having to change security settings again.
Whether it is necessary to disable the security check of installed programs (with an electronic mark) is up to everyone to decide. Of course, sometimes you can't do without it. We strongly recommend that you turn off the check only in extreme cases and install drivers from official sites and licensed discs.
In contact with
Sometimes, with old drivers, such a problem arises, due to blocking, they cannot be installed in any way. If desired, this protection can be disabled and the installation can be done safely unsigned driver. Now we will look at how to disable driver digital signature verification in Windows 8 and install unsigned drivers.
Disable Driver Signature Verification
Before proceeding with the steps below, you should clearly understand that when installing unknown software, there is a great risk of putting your system (and the integrity of your data) at risk. Therefore, you perform all actions solely at your own peril and risk, subject to clear confidence in the security of this software.
The need for a digital signature dates back to Vista. But in this system, as in Windows 7, the usual warning is displayed, in which there is an opportunity to allow the installation of unknown software. But starting with Windows 8, the warning firmly prohibits the installation and there are no buttons to cancel it. At first glance, it may seem that it is impossible to install such a driver at all. In fact, there are always loopholes.
Disable Signature Verification via Boot Options
Signature verification can be disabled in the boot options menu. To open it, simultaneously press the Win + I keys, and in the menu that opens, click on "Change PC Settings". In the next window, click on the "General" tab and click on the "Restart Now" button (reboot now). After that, the computer will immediately reboot and at the time of system startup, a menu with boot options will appear. By the way, you can also get to this menu by rebooting from the command line as an administrator:
shutdown.exe /r /o /f /t00
In the menu, we must open the "Diagnostics" (Troubleshoot) section. 
And in it, click on “Advanced Startup”.  Then select "Startup Settings".
  Then click on the "Restart" button.
Now there will be another reboot of the computer, after which a new menu with boot options will appear. We need to select the seventh item "Disable driver signature enforcement" (Disable driver signature enforcement). It disables driver authentication. To select it, press F7, or the 7 key, on your keyboard.  After activating this option, Windows 8 will boot in a mode that allows you to install drivers from an unknown publisher. When you start the installation of such a driver, a dialog box will appear on the screen, in which there will be a warning about the impossibility of checking this software.
Select the second item install anyway this driver» (Install this driver software anyway). The installation of the unsigned driver should then begin. After that, we reboot and boot the system in its normal mode. Check how the newly installed driver works
If nothing happened with the previous method, then there is another trick that allows you to install drivers without a signature. On systems such as Windows 8 and Windows Server 2012, a special "test mode" or "Test Mode" is provided. You can install any software in it, even if it is blocked in normal mode. But this mode of operation is associated with increased danger. In debug mode, the risk of disrupting the normal operation of the system or infecting it with malicious software increases significantly.
For a 64-bit operating system, this is done as follows. Launch the command prompt as an administrator and enter the command:
bcdedit.exe /set nointegritychecks ON
bcdedit.exe /set TESTSIGNING ON
After it, immediately enter this:
bcdedit.exe /set loadoptions DDISABLE_INTEGRITY_CHECKS
Watch the messages in the terminal carefully. After completing each step, a confirmation of the successful completion of the command should be displayed.
Now restart your PC and try to install the problematic driver. After the reboot, pay attention to the bottom corner of the screen, near the clock. There should be a message saying Windows 8 in test mode. 
Most of the problems of users who are faced with the fact that Windows cannot detect the device is due to the fact that starting from Windows 7 and up to new version Windows 10 has enabled driver signature verification. How to get around this barrier and install the required driver, read this article!
What is a signed driver?
A signed driver is a digitally signed device driver. A digital signature is an electronic security label that identifies the publisher of the software and changes to the original content. software package drivers. If a driver is signed by a publisher with CA verification of the signature, you can be sure that the driver was released by that publisher and has not been modified.
Windows will issue one of the following warnings: The driver is not signed, The publisher's signature has not been validated by a CA, The driver has changed since release. microsoft
In short, if a driver has not been signed by MicroSoft, that driver will not be digitally signed for Windows drivers. With such a driver, problems arise during installation.
In this article, we will look at how to disable driver digital signature verification in Windows 10, Windows 8 and 8.1, as well as Windows 7.
Before using this method, save all your work data on the computer and close the programs.
1.Go to "START" and select "Settings"
2. Go to "Update and security" -> "Recovery" -> "Special boot options" -> "Restart now" 
3. Next, the computer will reboot into a special Windows recovery mode, you will need to go to "Troubleshooting" -> "Advanced options" -> "Boot options" -> "Restart"  4. Windows will reboot again and you will see a menu with boot options, press the key F7

5. Checking the digital signature of drivers in Windows 10 is disabled for a while (until the next reboot), install the necessary driver.
gpedit.msc
and click Ok 
2. In the window, go to the menu "User Configuration" -> "Administrative Templates" -> "System" -> 
) changes will be available, set the parameter "Skip" 
Method number 3 - command line (test mode)


4. Confirm the changes and restart the computer, digital signature verification of drivers in Windows 10 is disabled.
cmd
3. Enter the command:

6. Verification of the digital signature of drivers in Windows 10 is disabled.
Disabling digital signature verification Windows drivers 8.1 / 8
Method number 1 - reboot menu

Method #2 - Local Group Policy Editor
1. Press at the same time WIN keys+ R and in the Run window that appears, write the command gpedit.msc and click Ok
2. In the window Local Group Policy Editor go to the menu "User Configuration" -\u003e "Administrative Templates" -\u003e "System" -\u003e "Driver Installation" and select the option to change "Digital Signature of Device Drivers"
3. Set the parameter to "Enabled" if at the bottom of the window ( If Windows detects a driver file without a digital signature:) changes will be available, set the parameter "Skip"4. Confirm the changes and restart your computer, driver digital signature verification is disabled in Windows 8.1/8.
1. In the start menu, search - type cmd
2. Run Command Prompt as Administrator
3. Enter the following commands one by one:
bcdedit.exe -set loadoptions DISABLE_INTEGRITY_CHECKS
bcdedit.exe -set TESTSIGNING ON
4. Confirm the changes and restart the computer, digital signature verification of drivers in Windows 10 is disabled.
Method number 4 - command line (Windows 7 boot option)
1. In the start menu, search - type cmd
2. Run Command Prompt as Administrator
3. Enter the command:
bcdedit /set "(current)" bootmenupolicy legacy
4. Restart your computer and press the F8 key while the computer boots
5. In the menu, select "Disable mandatory driver signature verification"

6. Verification of the digital signature of drivers in Windows 8.1/8 is disabled.
Method number 1 - command line (permanent shutdown)
1. In the start menu, search - type cmd
2. Run Command Prompt as Administrator
3. Enter a command