Let's start with the fact that some programs and games do not work correctly or do not work at all under Windows 7, although the software is designed to work specifically on Win 7. The reason for this is insufficient permissions due to incorrect installation or launch. The fact is that in Windows 7 and above, the user does not work as an administrator (compared to Win XP and below), but as ordinary user with limited rights. Accordingly, all the software installed by him, too.
Pay attention to the icon on the application icons in the form of a shield (see enlarged screenshot). Such programs must be installed on behalf of the administrator.
If some application or game does not work correctly, try reinstalling it as well or constantly launching it as an administrator.

Installing games and programs from the admin
Click on the launch icon right click mice and context menu choose run as administrator. When prompted by User Account Control, click OK and then the installation proceeds in the usual way.

Many programs, games and repacks do not have a special designation on the start file. We install them in the usual order, and then we launch them with the right mouse button where we select the item in the context menu Run as administrator.

Launching programs as administrator from the Quick Access Toolbar
Click on the icon desired program right click

In the control menu that opens, we see the shortcut and the name of the program, and now we also right-click on it. Here we select from the menu run as administrator.

Run as command line administrator
We poke on the start button - all programs - standard
Find the command prompt and right-click on the icon. Next, in the context menu (almost at the very top), we see the desired launch line.

Run programs as administrator permanently
If you often have to run some program as an administrator and it annoys you, then let's set permanent additional permissions for this software.
Click on the label with the right mouse button. In the menu choose Compatibility fixes.


At the next stage, the next button cannot be pressed until you make a test run of the program. So we press the button Program launch check if everything is working as it should. If the results suit you, then close the application and at the bottom already press the button next.


That's all, now you won't need to run the program from the shortcut as administrator every time
http://website/wp-content/uploads/administrator_windows_7.pnghttp://website/wp-content/uploads/administrator_windows_7-150x150.png 2019-08-26T22:33:39+04:00 windows windows applications Let's start with the fact that some programs and games do not work correctly or do not work at all under Windows 7, although the software is designed to work specifically on Win 7. The reason for this is insufficient permissions due to incorrect installation or launch. The fact is that in Windows 7 and higher, the user does not work as an administrator ... user site - Computer for dummiesoperating room Windows system can impose various restrictions on applications at its discretion, as well as in accordance with the policy setting of the current account Windows entries. This is especially true for Internet-oriented software, which is software package socialkit. About the protective measures taken operating system does not report, however, while working with the program, this can lead to various errors. As a rule, these errors will be related to the fact that the program does not have access to certain hardware or software resources. For example, a ban on creating and modifying files in folders, up to a ban on accessing the Internet.
SocialKit does not transfer any personal data of users during operation anywhere except directly to the Instagram servers and only when necessary. For example, when authorizing an Instagram account. We guarantee confidentiality when working with SocialKit, the absence of spyware and malicious code in the distribution kit, provided that it is downloaded from our official website socialkit.ru. Therefore, we boldly recommend giving the program more access rights so that it does not interfere with comfortable work.
There is a paragraph in the installation instructions that states that after installing the program, you need to give the program Administrator rights in the properties of the shortcut to launch SocialKit on the Desktop (it is created automatically during installation). Because installing a software package is a fairly simple operation, then most of the clients do not read the instructions and, accordingly, skip the paragraph on Administrator rights.
If you also missed this moment when installing our software, then you can perform all the necessary steps to set up access rights at any convenient time after installation.
There are two simple ways give the program administrator rights:
1. Once at the start of the program. To do this, open the folder where the SocialKit software package is installed (by default, this is the path: " C:\Program Files (x86)\SocialKit Pro"), find the executable " SocialKit.exe", right-click on it and select " Run as Administrator" as shown in the screenshot.
Please note that with this approach, the program will run with Administrator rights once. If you double-click it the next time you start it, the program will start with default permissions.
2. Change default permissions. This approach is recommended during the first installation as allows you to configure the launch rights for the program once and never return to this issue. If you launch the program from a desktop shortcut, you can change the default launch rights in the shortcut's properties. If you run the program from the installation folder by double clicking on the executable file " SocialKit.exe", then you can change the default launch rights in the properties of this file. To do this, go to the shortcut on the Desktop or to the executable file " SocialKit.exe" in the folder where the software package was installed, right-click on it and select " Properties" as shown in the screenshot below.
Opening shortcut properties on the desktop
Opening the properties of a shortcut in the folder where the program is installed
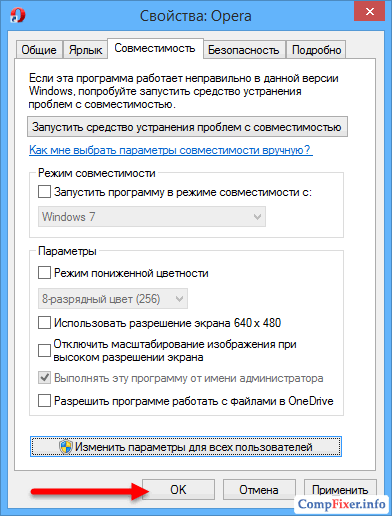
In the dialog box that opens, go to the " Compatibility" and check the box " Run this program as Administrator" as shown in the screenshot below.
After that, the program will always run with Administrator rights.
USER ACCOUNTS CONTROL
If User Account Control (UAC) is also activated on your PC - and each version of Windows older than Windows 7 is configured this way by default, then the launch of the program will be preceded by an additional dialog each time, as shown in the screenshot below.
in different Windows versions, starting with Windows 7, visually this notification may look different, but the essence is the same everywhere. If it doesn't really annoy you, then you can press " Yes", after which the launch of SocialKit will continue.
The display of this dialog can be disabled in the panel Windows controls in the user account settings block or by clicking on the link " Configuring the issuance of such notifications".
In the dialog that opens, you can move the slider down to " Never Notify" and press " OK".
IMPORTANT! The changes made in the settings block for managing user accounts will apply not only to SocialKit, but also to all other programs. If you are not sure about the security of the software you are using, then it is better not to change these settings.
This article answers the questions:
- how to make it so certain program always run with the highest rights;
- how to configure the program to run as administrator for all users.
Setting the program to run as Administrator by default
Method number 1
Properties:
2 Click the tab Compatibility. Here you can:
1) either check the box right there (in this case, the program will be launched on behalf of the Administrator only by the current user);
2) either press the button Change settings for all users(in this case, you can configure program launch options for all computer users at once).
Let's say we want a program to run with the highest privileges when it is run by any user on the computer. Therefore, we press the button Change settings for all users:

3 In the window that opens, check the box Run this program as an administrator and press OK:
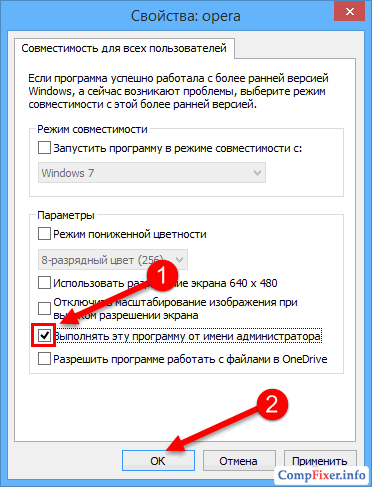
4 Now we're looking at the window again properties programs and see that the checkbox Run this program as an administrator installed and darkened. This means that the setting for all users takes precedence over the settings for the current user.
Click OK to save settings and close the properties window:
Method number 2
1 Right-click the executable file or shortcut and select Properties:
2 Click the tab Label and press the button Additionally:

3 Check the box Run as administrator and press OK to save settings:

In this way, you can configure the program to run with the highest rights only for current user.
Often users are faced with the fact that some utilities need to be run with administrator rights in Windows 7, 8 and 10. This may be required various games, browsers, steam or system utilities. If this is not done, then they may not start at all, or some of the functions may not be available. There is several ways run the required applications with administrator rights, this will be discussed in this article.
How to set admin rights for your account
To perform all these actions, the user must have the appropriate permissions. If this is not the case, then you will need to give them to him. To get started, you can use hidden account administrator, for this it is enough to launch the console and enter operator there net user administrator /active:yes, after which a new account will appear, which you will need to log into.
In it, go to the control panel and go to the section user accounts. Here you should click on the item related to managing another account and click on the one whose type you want to change. 
In the menu that appears, click on type changes account, and in the new menu, click on the administrator. 
It remains only to apply the settings and log into your account.
Using the context menu
The easiest way to open the utility with admin rights is to use the drop-down menu. To call it, you only need to right-click on the executable file or shortcut and click on launch with the required setting. 
It is possible to open programs not only as an administrator, but also on behalf of another user. All it takes is hold buttonshift, then press RMB. The desired item will be added to the context menu, you need to click on it, and then it remains to enter the username and password. 
Label Properties
It is possible to set the necessary permissions through the properties of the shortcut. First, right-click on it and select properties, then go to to the compatibility section. Here you can check the box for the required item. 
At the bottom of the window there is a button Change settings for all users”, you can click on it and put exactly the same checkmark in the pop-up menu. With this approach, the program will run with admin rights for all accounts on the device.
Start Screen in Windows 8
The user has the opportunity to carry out all the necessary manipulations directly from the initial screen, if the application is placed on it. The actions in this case are not very different from the methods described. First you need to right-click on the utility icon, and then go to the section additionally and select the desired item there. 
This method is well suited if you need a one-time launch of the program.
When searching
If the user does not know where the executable file or shortcut is located, he can use the usual search. In this case, running the utility with the required permissions is also not a problem. It is enough just to type the name of the program in the search bar and wait until the system finds it, then it remains to right-click on it and select the desired item menu. 
Using the Task Scheduler
Those users whose accounts are members of the Administrators group can also use task scheduler. To get into it, you need to right-click on the computer, select control, and in the window that appears, click on task Manager, in the utility itself, click on create a task. 
In the window that opens, write the name and set execution with superior rights. 
Next, click on Action, where you will again need to click on create. In the menu that appears, you need to set the launch of the program, click on the browse and specify the path to it. 
It remains to click on ok. 
In the remaining window, everything is also OK. 
Now the scheduler can be closed and exit to the desktop. Here you will need create shortcut.
In the first window, set schtasks /run /tn cmd_admin, however, instead of cmd_admin, you will need to specify your name, if it contains spaces, then all of it should be enclosed in quotes. 
To automate this process, you can use the program Elevated Shortcut which should be downloaded from http://soft.oszone.net/program/9686 . It will need to be downloaded and installed on your computer. All you need to do next is drag and drop the application executable file that you want to give administrator rights to the application shortcut. 
There is a small problem in this method, it consists in the fact that after starting the utility, the focus does not go to it and you have to additionally select it. For the system to do this on its own use command start, in the form /c start /d "path_to_program" file_name.exe, for example, for the command line it will look like this /c start /d "C:\Windows\System32\" cmd.exe.
For this you can also use NirCmd utility. It should write exec show “path_to_program\file_name.exe”, for example, exec show “C:\Windows\System32\cmd.exe”.
Launch via command line
You can also run the necessary utility through the command line. This will only work if command line launched with administrator rights. To do this, in the search bar in the start, we drive in cmd, right-click on the found element and select - Run as Administrator.
It only needs to specify the path to the application. 
For this you can also use third party applications
, such as Elevate by Johannes Passing or PowerToys by Michael Murgolo. In this case, you only need to write the path to the first utility, and then to the one that should be launched. 
In order not to write a lot all the time, you can use the function copy path, which is available when the user right-clicks on the utility while holding down the shift key. 
Run window run with administrator rights
You can also set administrator rights for the Run utility, you will have to do this through the same task scheduler, there you will need to specify in the "Program or script" field: rundll32, and in the "Add arguments" field: shell32.dll, # 61. 
All actions from this application will also be performed with elevated permissions.
runas
You can use a built-in command to give other users the ability to run a specific utility with elevated privileges. To begin with, the user will have to create a shortcut, as a program, specify runas / savecred / user:Andrey "C:\Program Files (x86)\VideoLAN\VLC\vlc.exe".
AT fielduser you need to specify the name of the account, then full path to utility. /savecred is used to enter the password only once. After the first input, the rest will be able to use the shortcut freely and run the specified program with the required rights.
ExecAS
The utility can be downloaded from the link https://pisoft.ru/. You can install the program, when you log in, the user will see such a window. 
At the top, there are options to add, edit, and delete. When adding, you will need to specify the name and password of the account and the program itself. This data is stored encrypted and will not be lost. 
AdmiLink
Usually, when an unprivileged user tries to run a utility with administrator rights, they will be asked for a password, however, giving it all in a row is not a good idea, and some programs must be run with administrator rights. When such a situation arises, this program can help. You can download it from the link http://crw-daq.ru/download/doc/admilink/admilink.htm .
To get started you will need point the way to the program to which permissions will be granted. 
Next is go to account and enter the administrator data there. 

But what does running as Administrator give? More rights. And the whole point is that viruses can make them run on behalf of the System, then you won’t be able to delete them even in the Task Manager, in any way, since you simply won’t have the right to do so. And the programs that you run, they have the same rights as you, so in the Task Manager it says that it is running on your behalf (or rather, the user).
What to do? It's very simple, let's imagine that we want the browser Mozilla Firefox always started with extended rights, what shall we do? Open the shortcut properties:

Now in this window we go to the Compatibility tab, there will be a checkmark at the bottom about running as Administrator, put it accordingly and click OK:

Now, when you start Mozilla Firefox, it will always run as Administrator.
But this is just an example, of course, such a feature is useless for a browser, but for utilities that remove adware viruses, it’s just right. But there is a downside, it’s not always necessary to do this, for example, if you like to play games, then you probably know what trainers are, but in no case should they be run on behalf of the Administrator, and to be honest, these trainers are often in themselves contain viruses (however, like all sorts of keygens). It is not for nothing that many antiviruses swear at them, saying that this is potentially dangerous software.
How to find programs and features in Windows 10?
Well, now I think I need to write more about how to open this window, where all the software is installed. Well, that is the Programs and Features window. Hope this info is useful to someone.
So, look, everything is simple here - you need to right-click on the Start icon, there will be a menu, here at the top select Programs and Features:

By the way, this menu can also be called up with the Win + X buttons! Here you clamp them and the menu appears!
This will open a window with the following list:

You see, all that is here is all your software. It’s just that I don’t advise deleting anything here, because this, well, there may be serious glitches. Also, if you are suddenly a more or less advanced user, then I advise you to use the utility to remove