When working with files and folders in Windows, many people prefer to use the context menu rather than the Explorer ribbon, although the latter contains many more commands. To access the Explorer ribbon commands, you have to switch between tabs and open drop-down menus every now and then, while in the context menu you can select the desired option with a couple of clicks.
However, nothing prevents you from adding the most commonly used ribbon commands to the context menu. This can be done in two ways: manually, using a simple registry tweak, or using free utility Context Menu Tuner. Let's consider both options. The second, of course, is easier, but if you have registry skills, you can use the first.
File Explorer ribbon commands are stored in the registry key HKEY_LOCAL_MACHINE\Software\Microsoft\Windows\CurrentVersion\Explorer\CommandStore\shell, while the context menu commands are located in the key HKEY_CLASSES_ROOT\*\shell. The structure of the entries responsible for displaying the commands is the same, and if you transfer the entry from the HKLM section to HKCR, the corresponding command will appear in the Explorer menu.
So, opening the registry editor and expanding the first branch, in the shell section you will see many nested subsections whose names begin with Windows. These are the commands of the Explorer ribbon. For example, let's transfer the permanent file deletion command, which corresponds to the Windows.PermanentDelete nested subsection. Find it in the list, right-click on it and select "Export".
After that, open the saved REG file with Notepad and replace the entire path up to the penultimate subkey of the HKEY_CLASSES_ROOT\*\shell key. If it is not clear which part of the key needs to be replaced, see the screenshots.


All other elements are left unchanged. Save the edited file in the same format and merge it. The ribbon command will be integrated into the context menu.

In the same way, you can add any other ribbon command to the context menu.


All the same, but much faster can be done using the Context Menu Tuner utility, available for download from the developer's page winaero.com/download.php?view.62 . It is free, does not require installation and supports the Russian language.

Using it is very simple, just select the desired command in the left column, select the element for which it will be added in the right column and click "Add to selected element".
Have a great day!
Add an item to the context menu windows explorer 10 for convenient and quick launch of the programs we use frequently. Quick launch desired applications without labels. Let's look at 2 options: context menu, create cascade popup.
Incorrect operation of the registry will lead to a system crash. All actions are done at your own peril and risk. You can use the video instruction by clicking .

Let's add items to the context menu of Windows 10 Explorer.
Let's start the registry editor. Press "start", the line "search", enter.


We launched the editor, now we follow the path:


Now we create a name to reflect in our menu. In my situation, the Smite toy:
- We press "RMB" - the right mouse button on the line shell.
- Create.
- Chapter.


I made the name of the toy "smite".


We make a command to launch the toy:
- We press RMB on the section made, in the presented case, "wash away".
- Create.
- Chapter.


We set the command to the created key. Create a section, write a name " command".

Now copy the path of the toy. In my case "E:\smite\smite.exe".
- We chose the executable (.exe) file of the game, program.
- Press Shift + Right click on smite.exe, " copy as path". Only when you press a combination of buttons will this line appear.

Set the copied path to the registry. Select our team from the left" command" with a mouse click. From the right in the field, click quickly 2 times to open the window:
- 1. Select a section
- 2. Open the "options" window
- 3. Put the mouse slider in the value line
- 4. Press "RMB" paste


It should turn out something like this. The "value" column should contain the executable path to the program.

- 1. Select the created section from the left in the column.
- 2. Click on the empty field to the right Create.
- 3.String parameter.
- 4. Set a name icon, designate the path to the location of the toy.

It should work. Icon, title.
Creating a cascading menu with items.
I really like this method. You can easily sort everything beneficial for using at the computer. Create sections "game", "programs", "graphics", place 3-9 applications each. Having dealt with simple method, how to add an item to the context menu, It will be easier for you to understand the essence of the pop-up cascade. A complex procedure that requires attention. We will work with two registry keys.
Create a cascading menu. We go into the registry: "start", drive in the word "regedit" in the "search". I'm on my way:
HKEY_CLASSES_ROOT\Directory\Background\shell
- Click "RMB" on the folder shell.
- Create section.
- Come up with a name. I wrote menu 101.


We make in "menu 101" string parameters with the names of the names of the four keys:
- MUIVerb(name to reflect).
- SubCommands(reflection of names).
- icon(reflection of the picture).
- Position(position: above, below).
I want to clarify what is in the key SubCommands you need to separate the toys " ; " (smite; tomb raider).


A visual representation of the set values:
- Asked icon. (assigned the path to one of the games, exe file, will automatically set the icon).
- Position in the contextual scoreboard, did not exhibit, you can write " Top"-above, " bottom"-bottom.
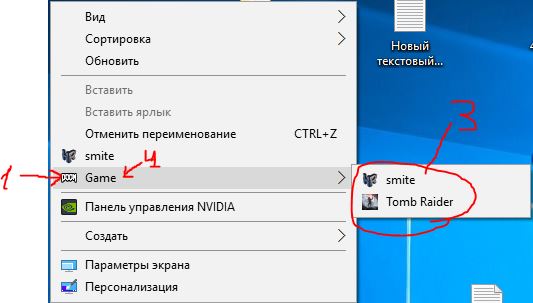
- SubCommands name names that we wrote with ";" (smite;Tomb Raider). The picture shows the icons in front of the name of the toys. We will ask them further. You should get it like here, only without the icons of the games.
- The display name that was written in the value MUIVerb.
In the picture you will not have half. Just an explanatory example of which option will be displayed. There are a few more steps to be taken.

Created four files. Now we register the label functionality. Until then, only Game with picture. For reflection, as shown in point three (picture above). Let's go to the following registry key along the path:
HKEY_LOCAL_MACHINE\SOFTWARE\Microsoft\Windows\CurrentVersion\Explorer\CommandStore\Shell
- Right-click on the shell folder, create the partitions that were set in SubCommands(smite;Tomb Raider). It should turn out from the left in the column there are two folders with names.


Created two of our folders. After these two partitions are created, the windows will cascade, but will not function.

We set the default value with the names of the games to display in the pop-up window:
- 1. Select the section with the toy from the left.
- 2. Click twice on the line.
- 3. In the window that opens, write the name of the game that belongs to the folder on the left. (In the smite folder, the value is smite. Tomb Raider, the value is Tomb Raider).


We create icons opposite the game names. Create in smite, Tomb Raider String parameters With name icon, specified by the path to the exe file. Let me remind you to copy the path. Press Shift + right click on smite.exe, " copy as path". . Create string parameter, specify the path to the game. Don't forget to write the name icon.
![]()
![]()
Now we set the launch of the command so that they function, run. Create a section in each folder (smite, Tomb Raider) named command.

- We allocate command.
- We press 2 times.
- We indicate the path of our toy.


.
Despite the onset of all kinds of finger-oriented interfaces, the good old mouse is not going to give up. And this is not surprising - it is difficult to imagine a simpler and at the same time powerful tool for interacting with a computer. And to further upgrade the capabilities of your rodent, we offer you 44 free programs to increase its capabilities. With these little utilities, you can add a lot of useful features to the right-click context menu that will come in handy when working in Windows.
Deleting some files and folders sometimes turns into a real headache. If the system stubbornly refuses to part with the object, citing the fact that it is currently in use, then use the FileExile utility.

PasteAsFile
If you have copied any text or picture to the clipboard, then to extract it you will need to open the appropriate program, create new file, and then paste the contents of the clipboard there. The PasteAsFile utility reduces this procedure to one click. You just need to right-click on the Desktop and select the appropriate item, and then specify the file name and extension. HTML, CSS, PHP for text and JPG, PCX, PNG, BMP, TGA, GIF, TIF for images are supported.

Find target
This context menu extension makes it much easier to find the file that a shortcut refers to. Now it's enough just to select the Find Target item from the right-click menu and the folder with the desired file will immediately open.

Context Menu Editor for Win 7/Vista

Rightload
it free app allows you to right-click on any file or image and upload it to FTP server. Rightload also allows you to upload to Facebook, Flickr, ImageShack, Imgur or VirusTotal.

append date
Highly useful opportunity to rename files and folders. The utility allows you to select files or folders in batch mode, and right-click to add the current date to their names.

Free Image Resizer
Select an image (or group of images) and then right-click to resize them. You can use predefined profiles or enter permission on the fly.

Ridnacs
This is very useful feature to quickly estimate file sizes in any folder. After selecting the appropriate item in the context menu, you will be shown detailed information about the sizes of all items in this folder.

ChangeExt
A quick way to change the extension of many files at once in one click.

Right Click Explorer Restart
Process windows explorer freezes or slows down a lot? Or perhaps you are a programmer and work with processes or applications that require Windows restart explorer? In any case, this is probably the easiest way to reload File Explorer directly from the context menu.

Explorer's context menu is the menu that appears when you right-click ( Right Button Mouse) on some object (file or folder) or just on an empty space in a folder or desktop. If your system is new, then the context menu will be relatively empty. Is that just added from the drivers for the video card, for example like this:
but if the system has been installed for a long time, then there will be more such points. For example like this:

As you can see, over time, in addition to the standard menu items, more were added from installed programs. On the one hand, it's convenient. After all, you do not need to launch a shortcut or search for a program, but you can directly perform actions immediately from the context menu. But on the other hand, over time, there are a lot of such items, and sometimes the context menu even has to be scrolled up or down in search of the necessary items.
Therefore, sometimes you want to remove these items so as not to interfere. After all, you do not use all the points often.
So how remove item from context menu.
In order to remove a program item from the context menu (KM for short), you can use both the standard methods of the Operating System, and with the help of the programs themselves or specially designed ones.
The easiest thing to remove is to look in the settings of the program (which you want to remove) for the desired item. It is usually located somewhere in Integrations or Upload/Add. For example, in order to remove the item of the famous WinRAR from KM, you need to uncheck Shell integrations:

Other programs may also have similar settings.
Another thing is when you have not found desired settings for deletion or they do not exist at all (sometimes this happens). Then you can use in a standard way the systems itself, namely editing .
I immediately warn you that before starting work it would be better to play it safe and do backup register.
So, we launch the registry and go to the branch
HKEY_CLASSES_ROOT/*/shellexe/ContextMenuHandlers

and see here these same items from the context menu.
Now we right-click on the desired item (the item from the CM that you want to delete) and select Delete:

We agree with the following warning:

reboot and check. The point should be gone.
If not gone, then look at the branch
HKEY_CLASSES_ROOT\AllFileSystemObjects\ShellEx\ContextMenuHandlers
and do the same.
On a note:
If you want to delete an item specifically from CM -> Create

then you need to know the type of file () that is being created. For example for Microsoft office Access extension.accdb file, which means you need to look for it in the HKEY_CLASSES_ROOT registry branch, and delete the ShellNew subsection there

If you want to remove from the KM those items that appear when you RMB on folders, then you need to look at the branches:
HKEY_CLASSES_ROOT\Directory\shell
HKEY_CLASSES_ROOT\Directory\shellex\ContextMenuHandlers
HKEY_CLASSES_ROOT\Folder\shell
HKEY_CLASSES_ROOT\Folder\shellex\ContextMenuHandlers

For the "Open with ..." item, the branch answers
HKEY_CLASSES_ROOT\*\OpenWithList
For KM Logical Disks branches:
HKEY_CLASSES_ROOT\Drive\shell
HKEY_CLASSES_ROOT\Drive\shellex\ContextMenuHandlers

You can also delete items using special programs. For example using ShellExView

Its principle is simple: select the desired item and click on the red circle at the top of the program. The main thing here is to Type of was Context menu

Now a little about how create your own item in the context menu.
The fact is that adding such an item for folders or certain files, as well as on an "empty" place using the registry, will not work. You can only assign it to when it opens with RMB on the Desktop. Therefore, I recommend reading the article and using what is described there.
Well, or use another utility - Ultimate Windows Context Menu Customizer() which has a bunch of features, but in English. And there we only need to select the item and delete it:

If you are interested in more details and do not understand, then write in the comments and I will help. There, in the left column, you need to select the item (computer, folder, files, etc.) where the context menu is called, and to the right, select what to delete and click the Remove Item button at the bottom. If you are friends with English, then you will understand.
You can guess how to add your program to KM -> Create if you carefully read the entire article, namely about deleting one of this item. You just need to create a subsection on the contrary and write for the desired extension.
In general, the article turned out to be a little chaotic and more about removing from the context menu, because. I think that this is more relevant, and there is an article about adding. Therefore, if something is not clear - write in the comments. Let's figure it out.