You can’t forbid living beautifully - especially when fantasy works to its fullest, and the mind prompts in time that old things should not be thrown into a landfill, but should be “repurposed” into something completely new. A broken computer keyboard can also serve as inspiration for creating interesting and useful gizmos: what exactly - we'll find out now!
Eco fashion from keys
One of the areas of "green" fashion is the creation of clothes, shoes and accessories based on outdated things that were in use - that is, what is considered to be garbage. But what about a keyboard button bodice that makes the silhouette more feminine?
Any fashionista can afford such a bright handbag: just stick the keyboard buttons to an old shabby clutch and it will turn its owner into an original business lady with an excellent sense of humor.
It is also easy to make a bracelet from the keyboard: we make two holes on both sides (like in a button), we stretch a thin cord or elastic thread - and here it is, the thing.
Men will not be left out either: designers suggest using keyboard buttons as stylish cufflinks.
Keyboard "utilities"
Why not decorate your desktop at home or in the office with these pen and pencil vases? If you have some incomprehensibly ancient storage media lying around - floppy disks, then you can glue the base out of them, and then decorate with buttons from old keyboard.
In a box of this type, you can store a variety of little things: from paper clips to sandwiches for lunch. The main thing is to choose a suitable basis - gift wrapping, tea packs or even a shoe box.
You can decorate your organizer or notepad with buttons with no less success. Such a thing will also serve as a great gift for friends and colleagues.
And a photo frame will help to complement this composition - its plus is that the keys will give the desired volume even to a home-made base made of thick cardboard, which would not have looked in a different scenario.
Print me... a lawn!
And why not fool around with taste - and plant grass in a keyboard that has not yet been disassembled into keys? To do this, it is enough to place cotton wool under the buttons, sprinkle a handful of seeds and do not forget to water the original flower bed in time.
Mosaics with meaning
Sarah Frost has found a worthy alternative to the expensive disposal of keyboards, which users in Europe and America replace every two to three years. From a thousand buttons, the artist creates paintings that are discreet in color: upon closer inspection, you can read not only letters, but also entire phrases on them. Sarah makes a special emphasis on the fact that each element in these unusual installations served as a tool for work and entertainment for computer users - this means that the mosaics keep the memory of all the hobbies and secrets of hundreds of people. So each button has its own history.
And this is a picture of 5,951 keyboard keys, created by the famous master of unusual mosaics, Doug Powell. However, the artist considered that the mosaic with a starship heading for the moon was not original enough in itself - and he encoded a few words in the image.
Car for true programmers
Not a day without a keyboard? The buttons have become native and seem like an extension of their own fingers? - I have an idea!
Why not glue them to the bumper of your car like those eccentric Simpsons fans did?
Keyboard furniture
Beautiful, unusual and with a massage effect - this is how these designer chairs can be described.
But the work is simple, because you just need to glue the buttons to the finished surface and let your invention dry properly.
Clock from buttons
Turns out, clockwork from an alarm clock battered by many Monday mornings, can be rejuvenated with a CD and 12 F-buttons. You will get an interesting thing, experience the pleasure of the creative process - and nature will also say “thank you” for this.
Has there ever been a time in your life when you wanted something strange for a long time? No matter what - because everyone has different tastes and preferences. My passion sat in me for a long time, but one day it finally broke out. I like doing unusual things and I've always enjoyed modding as a way of expressing myself. A few years ago, I was inspired by modders from different countries and started thinking about some of his projects. In particular, I really wanted to make a nineteenth-century styled keyboard.
After studying the work of such well-known modders as Filimon and Datamancer, I got to work. I want to say right away that although I do not complain about complete absence imagination, but I like to get a predictable result. Therefore, before taking up the tool, I tried to simulate what I want to get in the end. Another feature of this project is that everything software, which I used in my work, is open and free: OS - Debian testing, software - Blender, LibreCAD, Inkscape.
Since my idea was to make a keyboard in a wooden case, first of all I needed to know the sections of the wooden blanks that I would need. Having carefully measured the donor keyboard, I sat down to sketching and modeling.
Having drawn two-dimensional projections, I started modeling in 3D.
So, the appearance of the device has emerged and it's time to embody it in wood and brass. Ash was chosen as the body material and oak veneer for the fingerboards.


The donor keyboard in the final should be between two veneered MDF plates. The key seats were carefully measured and, based on the data obtained, a drawing was made in LibreCAD. According to it, holes will be cut in the MDF plate.


The green LEDs were removed and larger LEDs were soldered in their place, giving a warm, lamp-like glow. In order to make the LEDs look even warmer and more lamp-like, a brass overlay was made for them.


According to the drawings, wooden bars of the required sections were ordered, which were further processed by the hands holding the tool. As per the drawings.


By the way, the device was supposed to have a USB hub, the holes for which were immediately milled. Also, a brass lining was made under it.


The whole structure will be tightened with studs, but I categorically did not want nuts and stud ends to stick out of my work, so I decided to make decorative brass plugs.

As for the keys themselves, I had an option to make them from buttons, but I decided that this was not true. Therefore, the round keys were machined from a brass rod, and the oblong ones were forged from a brass plate.


Separately, the "space" key was made. It consists of three soldered blanks.


The keypads were cut from glossy black plastic. The letters and symbols are laser engraved.

After all the preparatory work, the parts were carefully sanded, sanded, opened with several layers of stain and polished (also in several layers). After assembly, everything began to look something like this.


Additionally, a case was also made.


The dream has become a reality, but now there is an irresistible desire to raise the bar higher. There are many ideas, besides, challenging yourself is very interesting. Wish me success.
CatBoard is a homemade ergonomic compact keyboard with an open source code, has many non-standard solutions, such as: non-standard hardware layout with standard keyboard shortcuts; fast auto-repeat of the pressed key; Fn layer with cursor keys, number pad, function keys; separate keys for switching layouts; more convenient location of Ctrl and Shift; a separate AltTab button; Macintosh compatibility mode, which allows you to work on it in the same way as on a PC; the possibility of firmware without additional equipment; the ability to install over a laptop keyboard. Thanks to open source, you can do anything with the keyboard, new firmware pours in seconds, so you can experiment on the go.
Long historical part
It all started back in 2005, when I wanted to work with a really ergonomic keyboard, but I was not ready to order an expensive keyboard from abroad. I decided to develop a keyboard myself, because what is easier, buy buttons, take a controller from any cheap keyboard, and just connect the buttons exactly the same way as it is done in this keyboard. I really liked the Kinesis Advantage keyboard at the time, it was almost perfect, but I thought it would be worth starting with a flat keyboard, like the Maltron Flat.

Maltron Keyboard
I already knew how to type blindly, I learned thanks to the keyboard simulator Stamina. Before that, I tried to learn in Solo, but it got me so much that I never finished my studies, went through all the exercises, but did not begin to type blindly. But Stamina was easy to learn, and when the typing speed reached the level of 200 characters per minute, I was able to start working without looking at the keyboard. I learned to print both Russian and English text at once, went through the exercises in turn, and thanks to this I was able to immediately start working with the blind method. I rearranged the buttons on my keyboard, thereby troll my colleagues, it was even interesting to come up with different inscriptions on the keyboard, because the caps of the buttons are different on different rows, so I had to rearrange them only on my own row, and it was advisable not to touch fj, which had serifs (and they are important for touch typing, so that you can put your hands in the starting position of printing without looking).

Keyboard Trainer Stamina
Before doing anything, I found a Moscow company where I bought buttons Cherry MX Black with a margin, and a programmable keyboard for trading terminals KBM-105 for experiments (index 105 is the number of buttons, matrix 15x7). Having drawn a diagram of the layout of the buttons, I began to think about how I could make a case at home. I assembled various designs from improvised materials, which are now embarrassing to show, in general, nothing worked, it was both crooked and flimsy. Work on the manufacture of the case stalled, but on the programmable KBM-105 he began to experiment with layouts.

Programmable Keyboard KBM-105
At that time, a very unusual keyboard was being produced. NSK 535, everything in it was revolutionary, and the alphabetical layout, and shifts on the thumbs. Looking at such a miracle, I even decided to try typing with just such shifts, but it seemed very revolutionary, and returned the shifts back to the little fingers, fortunately, flashing the KBM-105 keyboard is very fast, you can change the location of the buttons several times a day.

Keyboard NSK 535 R
I worked on this programmable keyboard at home for several years, while at work I had quite a standard keyboard, no problems with working on two, absolutely different keyboards, was not, only it was much more pleasant to work on mine.
To quickly master new layouts on a programmable keyboard, I even wrote online keyboard trainer Klavarog(http://klava.org/), so that you can work from any computer connected to the Internet without installing any programs, now everyone has begun to do this, and at that time online simulators, if any, were only on Flash, and they did not work in Linux with Russian letters. At first it was a very simple simulator, there was not even a hint about the keys being pressed, only a picture of the keyboard. Although it still remains the simplest simulator, it is very effective, because it was made for itself. Beginners are offered a mode that allows you to literally master the location of all the letters in a day, you do not need to spend a week or two on completing lessons that add one button to study, as is done in almost all simulators.

Keyboard trainer Klavarog
At some point in time, I decided that I would develop a new keyboard, and the project would be open. Created Wiki site http://kbd.klava.org/, where I began to collect information about different keyboards, and began to look for any information on the development of the keyboard, because for my keyboard I already had to make my own controller, the standard one was no longer suitable. It turned out that I knew nothing at all about the manufacture of keyboards.
It also happened that I quit the office and began to work at home, and even on a laptop, the matrix programmable keyboard was used less and less. Over time, the ardor has already disappeared, the usual worries and deeds pushed the development of the keyboard into the background. But the idea was too intrusive, and I began to slowly think about how to remake the keyboard in a laptop, because it was physically impossible to remake it, so we went software. First, I moved the cursor keys to the main alphabet block, if you hold down AltGr (right Alt), then some letters became arrows, at first they were VIM buttons hjkl , then I made a more familiar and convenient ijkl , it turned out that when AltGr was pressed, the arrows as if they were jumping under their fingers. Then posted Ctrl key to the left of the space bar, by moving Alt to the left by one key, this turned out to be a very successful solution. Under this case, I even learned to work in Emacs, it turns out on ancient keyboards ctrl was located on the site of the modern Caps Lock, it is clear why I did not like this editor before, this is due to the inconvenient location of Ctrl. It should be taken into account that this only applies to touch typing, when typing with two fingers, the key arrangement does not have of great importance It's just a matter of habit.

Improved laptop keyboard layout
At one time it turned out that there was no work, and I decided to change the hated QWERTY layout (how my little fingers hurt when I learned touch typing) to a more ergonomic one Dvorak, and with the help of his simulator began to study it. Just at that time, I made a special mode in Klavarog, in which it is proposed to type one short word many times in a row, first slowly, then quickly, driving in new layout into your memory, very effectively. I’ve been studying for about a week, it’s been going hard, the speed has grown very slowly, while for some reason I forgot how to work in QWERTY, others didn’t have such a problem, but I was scared that something urgent would need to be done, and I forgot how to print , but I haven't learned in Dvorak yet. And at this moment of timelessness I catch my eye old computer BK-0010/01, which had a phonetic layout JCUKEN, in it the Latin letters are located in the same place as the similar-sounding Russian ones in the standard YTsUKEN layout. Nostalgia for the times of BK was so overwhelmed that I decided to make myself this layout and try to study it. It did not work out one to one, some frequently encountered letters were not very well located, and in the end I changed it quite a lot, and I have good reasons for rearranging each key. But in general, it still remained phonetic, and for the most part coinciding with the old one. Having made the layout and stitching it into your operating system(I already started working in Ubuntu Linux at that time), I started learning it in the simulator. And then a miracle happened, the process went so fast that I brought the typing speed up to 200 characters per minute (again these 200) in five days, and started working in a new layout.

Soviet computer keyboard BK 0010-01

Improved JCUKEN layout
Now I was satisfied with everything except the location of the keys, and I was not satisfied with the long space, although on a laptop it is shorter than on conventional keyboards, due to additional keys on the bottom row. It's time to make a keyboard, only it should be compact so that it can be placed on top of a laptop keyboard, and as small as possible in height. Since the keyboard should be located on top of the laptop one, and on my Thinkpad there is a touchpoint right in the middle of the keyboard, which is higher than the level of all the buttons, I decided to make a hole on the bottom of the keyboard case, at first it was round, then I just added cat ears. From that moment on, my keyboard began to be called cat board =^.^=
I decided to make the case from aluminum, and began to look for a production facility where I could laser-cut holes for the buttons and the outline of the case. Nobody wants to get involved with small orders, most honestly write about the amount of the minimum order, some only talk about it after the order. To cut aluminum, you need a fairly powerful laser, it’s not easy to find one, so I decided to make a case from sheet plastic or plexiglass. And then, thanks to Habr, I found a mention of the first open in Russia fablabé. I contacted the head of the FabLab77 laboratory, met, I told about my project, and got access to the equipment with which you can do anything, limitless possibilities opened up. It was also lucky that Americans from MIT came at that time and held a week-long seminar at which they taught how to work with all their equipment, only open software was used.

Last day of the MIT workshop at FabLab77
In search of an ergonomic button layout, I made a lot of plywood layouts, on which I found the best location, and it turned out to be almost the same as in the Truly Ergonomic and ErgoDox keyboards (I didn’t know about its existence then). Well, this is not surprising, because people's hands are almost the same.
After the case was ready, and the layout of the buttons completely suited me, I began to study how to make a controller. At the same time, he began to assemble a home mini laboratory for soldering. I bought a soldering iron with power adjustment, assembled a box in which I placed a Dremel 300 with an attachment that turns it into a small drilling machine - Dremel Workstation 220. In this box I made a hinged lid on which you can work. Now the box is always under the table, taking up no space in the apartment, and when I need to do something, I take it out and put it on the table.
At first, I decided to assemble the controller myself, at the same time assembling the programmer, in the fablab on the Modela milling machine I made printed circuit boards, soldered them, but nothing worked, since the working programmer was only in the fab lab, I didn’t want to buy a new one, and I could only mess with the boards at home. I learned that there are microcontrollers with a hardware implementation of the USB protocol, further search led me to ready-made controllers, such as Teensy, and our similar developments from Microsin, from which I purchased AVR-USB162.
I decided to solder the wires not directly to the controller, but through the connector that I installed inside the case. Having gone to the fab lab again, I cut out the case with a laser, which I decided to make not with rounded edges, circling the blocks with buttons with straight lines, I got the current keyboard design. The controller was placed right on top of the case, it is held on a screw with a nut and washers, and the connector does not allow the board to spin. So that the wire does not rest against the laptop screen, I placed the controller closer to the middle of the keyboard. And here's what happens when you don't think about this problem:

Richard Stallman and his OLPC laptop with HHKB keyboard
When developing the circuit, I realized that the buttons need to be connected through diodes so that there is no situation when, when pressing several buttons in different rows and columns, the controller starts to think that a button from intersecting rows is pressed. Everyone knows this, but I didn't know about it at the time. Cherry MX buttons have an empty space where you can install either a diode or an LED. In order not to solder the diodes from the outside, I installed a small KD522B diode in each button, though I messed up the polarity, they have the label location not unified, you need to look in the reference book where the anode is and where the cathode is, so when connecting the buttons to the controller, I took into account my mistake.
When everything was assembled, it only remained to flash the controller, at first I used the LUFA library, but I could not figure it out, because I have never programmed in C, and in fact I do not know this language. In search of another solution, I found a simple keyboard scanning code, where the library from Teensy was applied. The code ended up with a lot of errors, but it was not difficult to fix them, the most important thing worked. I made the firmware in a couple of days, and the keyboard worked, I never thought that I could create it so quickly. Then, of course, there were weeks of fine-tuning it to mind, fixing bugs, adding previously unseen features. And I did it all already on the new keyboard.
Since the keyboard turned out to be divided, the hands are further apart, and the armrest on the laptop is not designed for this, so the hands began to rest against the corners of the laptop. Solved the problem with two mouse pads with gel pads, cut off the excess part of the mouse pad, and got comfortable coasters for hands to the keyboard. Thanks to the straight line of the hull, the pads fit perfectly.

Keyboard CatBoard on top Asus laptop EEE PC 701
What a pleasure it was to finally start working on something that was assembled with my own hands, and did not have those shortcomings that I was just tired of, because I work on the keyboard every day, and every day it oppresses me. Go to any computer store and try to buy a keyboard that doesn't have shifted rows, the heritage of mechanical typewriters, it just doesn't exist. I would understand if standard keyboards were perfectly ergonomic, but no, this standard is based only on the habit of people, and all new users learn again on these antique keyboards (not in appearance, in fact).
At the same time, my main requirement is to use it on top of a laptop keyboard, my new keyboard performed, it will fit even on the smallest netbook - ASUS EEE PC 701, which has a screen with a diagonal of only 7 inches, as can be seen in the photo above. Although I don’t work on this netbook, it’s quite possible that I’ll start using it now, somewhere on the road, because now you don’t need to use its small keyboard when you have to squeeze your fingers together to place them on small keys.
Initially there were flat caps with a transparent cover, bought with a programmable keyboard, later I installed black caps from WASD Keyboards when I ordered new buttons, this time Cherry MX Blue (with a click) and Cherry MX Red (as well as black without click, but softer).
I decided to assemble the second keyboard because of the tight Cherry MX Black, they have a pressing force of more than 60 grams, for blue and red ones from 45 grams. Pressing them was still normal, but keeping it pressed, which is often required due to the presence of the Fn layer, no longer works, the finger gets tired.
A colleague suenot joined the production of CatBoard ][ , whom we met at a meeting of Clavogoners , and one copy was asked to be made for fablab. Therefore, instead of soldering with wires, I decided to make printed circuit boards, two for each keyboard, a connector is installed on the edge of the board into which the controller is inserted, connecting both boards, although due to a lack of ports, I had to connect the boards with five wires.

Eugene collects his white CatBoard ][
Milling such large boards for a very long time, I decided to pickle them. Usually they prepare for etching with a photoresist or LUT, but I decided to do it with a laser, glued a vinyl self-adhesive film to the board foil, cut the film along the track contour with a laser, removed the excess, and etched it in an ammonium persulfate solution. The boards were made of gettinax, and my mistake was to cut them with metal scissors, they are quite fragile, in one place a piece broke off along with the track. I already drilled at home with a dremel, I didn’t want to bother with milling.

Board etching

Drilled board
The use of 1.5 mm plexiglass along with 3 mm colored plastic made the keyboard body a little thinner than the first keyboard made only from 3 mm sheets, which required milling the protrusions for the button latches. The controller took another model, more compact ( AVR-USB162MU). Installed two LEDs, blue and red, which show the current keyboard layout.

Bottom view
The layers of the keyboard are fastened with threaded rivets M3 with a notch and screws with a countersunk head. Instead of threaded rivets, you can take more affordable exhaust rivets, knock out a nail from them, and cut an M3 thread inside.

CatBoard ][
Features of the CatBoard Keyboard
Most importantly, this is the Fn layer, the one that works when you hold down the Fn button under the right thumb. Its presence made it possible to make the keyboard very compact, and at the same time fully functional. I did the same on a regular keyboard, reconfiguring the operating system, although this did not work in all programs, such as Skype and Sublime Text. Now, not only has it become more convenient to work with the Fn layer, due to the correct location of the Fn button, it also works in absolutely all programs, and even in the BIOS, because when Fn is pressed, the keyboard sends completely different key codes, instead of ijkl sent by pressing the arrows, uo is Home and End, p; these are Page Up and Page Down, h - Enter, nm - Backspace and Delete, - Insert. Whole number row becomes functional, i.e. Fn+1 is F1, Fn+0 is F10, and Fn+-= is F11 and F12.

I have been pressing the spacebar for a long time only with my right hand, so it was decided to use the left spacebar as a shift. This turned out to be very convenient, because it can also be held while typing with the same hand, there is no need to alternate the little fingers, the letter on the left is the right little finger, the letter on the right is the left little finger. With this shift, you don't even need Caps Lock, keep it pressed and type as long as you like.
In place of the released shifts, I hung the language switching function, on the left - RUS, on the right - LAT, just like on old Soviet computers. At the same time, I left the function of shifts on these buttons, if you press it once quickly, the desired layout will be turned on, and in other cases these are shifts, and in some specific cases it may even be Ctrl.
To the left of the Tab button, I placed a separate AltTab button, when it is pressed, Alt is pressed, pressing and releasing Tab is sent, and Alt is held. To switch to the next windows, just press the adjacent normal Tab, very convenient. However, if this new button is pressed while Alt or Ctrl is pressed, it will work like a regular Tab.
Ctrl and Alt are now close to the space, with Ctrl closer to it. Thanks to separate buttons for enabling layouts, and a separate AltTab button, I almost stopped using the Alt buttons.

There is a fixed mode, called by Fn + AltGr, in which appears on the right half of the keyboard digital block, and on the left is the same block with arrows.

I have long dreamed of trying a fast auto repeat pressed key, which was written about a long time ago by Jeff Raskin. But I did even better, it requires not a triple keystroke, but a double one, and it works thanks not to a fixed time, but to auto-tuning for the user. The faster the button is double-clicked and then held, the faster the auto-repeat keystroke will begin and occur. At the same time, false positives are very rare, and do not depend on the speed of the user. Tests show that this auto-repeat is twice as fast as usual. At the same time, I got used to it so quickly that I stopped using the usual one, it seems to me too slow, it starts slowly, it works slowly, although of course the second parameter can be easily adjusted, but the first one will not work, otherwise there will be false positives during normal printing. The only negative is that turbo auto-repeat does not work in games where auto-repeat is not needed at all, but just a key pressed, so for such cases I made it disabled by Fn + Esc.
In place of the Russian letter E, I placed the letter Yo, which will be typed while holding Fn. Now I always print Yo, you don’t need to reach for it now. In addition, it turned out to be more convenient to type and ~ in the English layout.
Since I do not print in QWERTY, but in JCUKEN, and there are separate buttons for switching languages, then I made my non-standard hardware layout, and thanks to this, it became possible to do what no one had guessed to do before me, namely, keyboard shortcuts from QWERTY. After all, in order to leave convenient Ctrl + XCV, they made the Colemak layout, and I get not only keyboard shortcuts for working with the clipboard, but also all the rest. After all, I placed V in place of W in my JCUKEN only because Ctrl + W was very inconvenient, and often pressed it accidentally, which led to unpleasant consequences. Now I'm returning back to FYWA, and this became possible just because of the standard keyboard shortcuts.
With the advent of additional LEDs that display the current layout, they are clearly visible with peripheral vision, and at the same time they do not interfere with work, I still made the function to turn them off, press Fn + Y, and the keyboard no longer glows.
Often you need to leave the computer, but since my keyboard does not allow you to close the laptop without removing it, I made the function blocking keyboards. By pressing Fn + RShift, the keyboard turns off the LEDs, stops accepting any presses except the same combination, and sends Win + L to the computer, a combination that locks the operating system with a password so that a stranger cannot use your computer when you are away.
A broken computer keyboard can be an inspiration and the main material for creating decorative and useful things. So what to do with an old keyboard? 7 interesting ideas we'll see now.
1. Ornaments from the keys of an old keyboard
From the keyboard keys you can make a variety of jewelry and accessories. Take the base for earrings, a ring or invisible and glue the key. You can select key combinations with meaning, for example, Cntrl + C, Cntrl + V, and so on.

To make a bracelet from the keyboard, you need to make two holes on both sides of the key, stretch a thread - an elastic band or a thin cord.

And for men, you can make stylish cufflinks from keyboard buttons! 
2. Desktop accessories from an old keyboard
Keys from a broken keyboard can be used as decor for various items. On the desktop in the office, a pen stand, a frame for a family photo and a work diary with a cover made of keyboard buttons will look very harmonious and relevant. The workflow is very simple - you need to glue each key on the selected item.


3. Shelf from an old keyboard
The entire old keyboard, without disassembling, can be turned into a hanging shelf for books. The main task is to securely attach to the wall.

4. Bag from an old keyboard
For a business lady with a great sense of humor, you can make such an original bag or clutch. A great way to update an old bag with cracked leather or frayed fabric.

5. Clock from an old keyboard
Function buttons F1 - F12 use for the clock face. The basis can be made from a CD disc to support the theme of the clock.

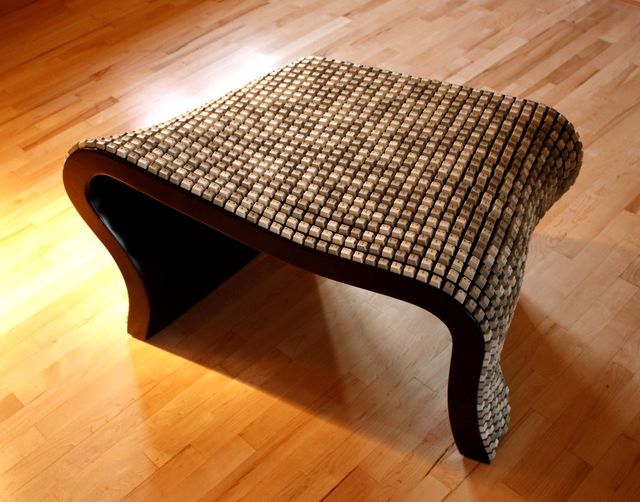
6. Furniture from an old keyboard
Nolan Herbut, an American designer, used about 20 keyboards to create an unusual Wolfgang bench with a massage effect. More than 2,000 keys are built into the wood base and not just glued or screwed on. Each key is pressed in exactly the same way as on a full-fledged computer keyboard, with a distinctive sound and tactile sensations.
7. What else to do with an old keyboard?
In addition to more or less practical things, keyboard keys can serve as material for creating large-scale works of art. For example, huge paintings are mosaics with portraits of famous people.
The main elements of the keyboard that can come in handy after it breaks are the keys. Taking them out is easy enough. To do this, gently pry the “space” button with a knife or screwdriver and pull it out. After that, you can sequentially remove all nearby buttons.
fashion clothes
One of the latest trends in the creation of clothing is eco-fashion. It involves repurposing unnecessary things that a person wants to throw away into clothing items. These items include a broken keyboard. For example, the usual women's bag can be pasted over with buttons, which will turn its owner into a modern lady following the latest fashion trends.
If you drill small holes in the buttons from the keyboard, you can make an original bracelet out of them by threading a thin cord or thread through them.
Men can use the keyboard keys as original cufflinks or style them by sticking them over the buttons.
Decoration of objects in everyday life
Vases on the desktop in the office can be decorated by pasting them with keys. Such, uncomplicated at first glance, decor can make any gloomy office a little more creative.
Using the keyboard keys, an old jewelry box in the bedroom can be turned into a completely mysterious item that will delight its owner every day.
If you do not know what to give your employees or friends for their birthday, you can decorate a regular notebook or organizer with keyboard elements. In this way, you can turn a banal gift into a work of art. In addition, such a souvenir is unlikely to be forgotten by the birthday man.
You can complement such a funny composition with a photo frame, which should be decorated in exactly the same style.
Original window sill decoration
Fans of houseplants can turn the keyboard into a stylish "pot" for grass. To do this, carefully lay cotton wool under the keyboard buttons with a knife and tweezers, then pour the seeds on top. If such a container is watered in a timely and constant manner, grass will begin to sprout between the buttons, turning the keyboard into a nice and unusual lawn.
Keyboard furniture
For those who, even in the kitchen, cannot imagine themselves without a computer keyboard, using it directly on the chair covers can be a good alternative. To do this, you need several old keyboards, from which you should get the buttons and glue the chair cover with them. This design will not only be beautiful, but also have a massage effect.
original declaration of love
Using the letters drawn on the buttons, you can post an original declaration of love for your soulmate. As a basis, you can take, for example, an old photo frame, after taking a photo out of it, or any other flat surface.