When working in a Word text editor, the portrait page orientation is not always suitable. Sometimes it is necessary that the pages are like in an album, i.e. located horizontally. It's not at all difficult to do this. It is much more difficult to make a landscape page in Word in the middle of a document. Here is where you have to work hard.
Default about The page orientation in Word is portrait, but it can be changed to landscape if necessary. How to do it?
This may be necessary when creating reports from or for an album.
- Choose a team – File – Page settings…
2. In the opened window « Page settings » select the tab « fields". In chapter " Orientation» click on « landscape” and save by clicking the button “ OK ».

If you want the document to have only one or more sheets in the middle of the document in landscape orientation,

then place the cursor on the page that should be landscape and select from the menu – File – Page settings . In the opened window " Page settings » tab « fields" In chapter " Orientation» install « landscape". Below in the section " Sample» in the window « Apply» in the drop-down list, select « to the end of the document ” and press the button “ OK ».

Next, place the cursor on the page from which the book format will go again, and do the same. Just select " Orientation » — « Tolower ". And in the section Sample» in the window « Apply» also set to the end of the document.
As you can see, nothing complicated.
The same can be done in a text editor. Word 2007/2010. To do this, open the menu Page layout and to the right of the block name Page settings click on the little black arrow. You will open a window Page settings .

Do the rest in the same way as described above.
This is how you can make a landscape page in Word in the middle of a document .
If you have Word 2007 or 2010 installed, you can watch a video tutorial on changing page orientation:
In a text editor Microsoft office Word, it is possible to reduce the number of printed pages by arranging them on the sheet in book format(when several pages are placed on one sheet). Other editors use roughly the same principle. There are several ways to print two pages on one sheet.
Instruction
Page Layout Mode allows you to see the document as it will be on paper pages printed on the printer. Here, the pages of the document are displayed in the form of white rectangles, on which, along with the text, absolutely all objects are visible, as shown in Fig. 5.14. If the document contains numerous figures or graphics, it is more convenient to work with it in page layout mode.
Rice. 5.14. Page Layout Mode
The markup mode window is almost the same as the normal mode window. But by turning on the display of the ruler, in addition to the horizontal ruler, you will also see a vertical one, which allows you to evaluate the position of objects on the page by the second coordinate. Techniques for moving around the document are also the same in both modes, however, in the drop-down list Scale three additional items appear in the markup mode - Fit to text width, Whole page and Two pages, whose names do not require further explanation.
When working in markup mode, take your time to arrange objects and format text. First you need to adjust the size of the page and its margins.
1. Choose a team File > Page Setup.
2. In the dialog box that opens, click on the tab Paper size, which is shown in Fig. 5.15.
3. Listed Paper size select the paper size on which the document should be printed.
4. To set a custom size, select Another and enter page width and height into counters Width and Height.
Rice. 5.15. Page settings
5. After setting the page sizes, you should specify the size of the indents and select the option for text output to the printer. To do this, expand the tab fields, which is shown in Fig. 5.16.
6. In counters Upper, lower, Left and Right enter the width of the page margins.
7. With switch Orientation in the page setup dialog box, select the portrait or landscape position of the page relative to the text.

Rice. 5.16. Margin customization
8. If you are going to print the document on both sides of the sheets, and the left and right indents are not equal, then in the drop-down list Multiple pages select Mirror fields. This will ensure the correct placement of the fields. When choosing 2 pages per sheet two pages will be placed on one sheet of paper. Field Sample displays the current page layout and allows you to visually check the entered parameters.
Note The top and bottom margins of the page contain headers and footers that contain, for example, page numbers or titles of the current sections of the document. If you use headers and footers, don't make the top and bottom margins too narrow.
9. Expand the tab Paper source. In chapter Distinguish headers and footers use the appropriate counters to adjust the distance from the edge of the page to the header and footer.
10. By clicking on the button OK close the page setup dialog box.
11. Margins can also be adjusted using rulers. To increase the width of the left field, place the mouse pointer on the border of the gray and white areas of the horizontal ruler (see Figure 5.14), click the mouse button and drag the field border. The other three fields of the page are configured similarly.
12. In a multi-page document, as a rule, page numbers are required. There is no point in doing it manually. Word can number pages automatically. Choose a team Insert > Page Numbers. The dialog box shown in Fig. 5.17.

Rice. 5.17. Adding pagination
13. With drop-down list Position Specify whether page numbers should appear at the top or bottom of the page. Listed alignment select the desired number alignment mode in the header.
14. To make the number not appear on the first page of the document, uncheck Number on the first page.
15. If additional number formatting is required, click the Format and adjust the dialog box options Number format.
16. Button clicks OK close all dialog boxes. Word will automatically number the pages of your document. When editing text, you can drop and paste fragments, as well as move entire blocks of pages. Word will automatically correct the numbering and ensure the correct sequence of numbers.
17. To change the font of the page numbers and add other information to the headers and footers, select the command View > Headers and Footers. The text of the document will become faded, and the headers and footers will be highlighted with dotted rectangles, as shown in Fig. 5.18. In addition, a toolbar will appear. Headers and footers.
18. Use the scroll bar to find any rectangle labeled Page header.
And vice versa. But, the button that is responsible for changing the orientation changes the orientation for the entire document at once. Therefore, if it becomes necessary to change the orientation for only one page, then you have to resort to different tricks. In this article, we will look at two ways at once, how to make one page landscape and the other book in Word.
The instruction is written on the example of Word 2010, but it will also be relevant for Word 2007, 2013 and 2016. And with due skill, the information from the article can be applied in Word 2003.
How to make one page landscape with section breaks
Perhaps the easiest way to make one page landscape and the other portrait is to use section breaks. To do this, you need to separate the page you want to make landscape with two section breaks. One section break should be before this page (at the end of the previous one) and one section break after this page (at the end of the page, which should be landscape).
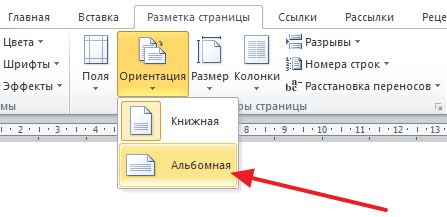
So let's say you have a text document. And you need to make one of its pages landscape, while the rest of the pages of the document should remain portrait. To do this, position the cursor at the end of the previous page, go to the "Page Layout" tab, click on the "Breaks" button and select the "Next Page" option. After that, place the cursor at the end of the page that you want to make landscape and click "Breaks - Next Page" again. If you have Word 2003, then to insert a break, use the "Insert - Break" menu.
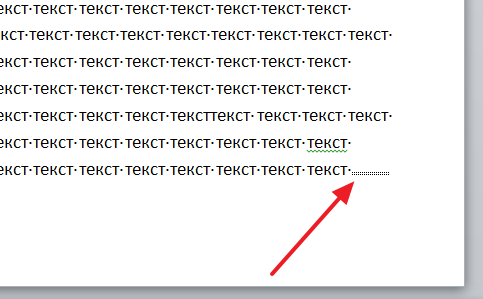
Thus you separate desired page from the rest of the document with two breaks. To make sure the section breaks are in the right places, go to the Home tab and turn on Show All Characters.

You should then be able to see where the section breaks are set. They should be right above landscape page and at its end. If the breaks are placed incorrectly, you can edit the pages so that the breaks fit properly. In the screenshot below, you can see what the break should look like at the end of the page.
After section breaks are set to desired positions, you need to place the cursor on the page that should be landscape, go to the "Page Layout" tab, click on the "Orientation" button and select the "Landscape" option.
If everything was done correctly, then you will get one page landscape, and the rest of the book. If something does not work out, then most likely the problem is in the placement of the gaps.
How to make one page landscape through page options
There is also another way to make one page landscape and the other portrait. It's a little more complicated than the one above, but it can also be used.
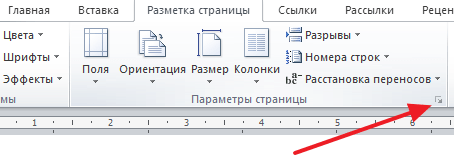
In order to use this method, you need to place the cursor on the page that comes before the one that should be landscape. After that, you need to go to the Page Layout tab and use the small button to open the Page Setup window. If you have Word 2003, then in order to open the Page Setup window, use the menu File - Page Setup.
After that, you need to select the orientation "Landscape" and apply this setting "To the end of the document".

After saving the settings using the "Ok" button, all pages below the selected one will switch to landscape orientation. Now you need to place the cursor on the page you want to make landscape and open the Page Setup window again. This time you need to select portrait orientation and apply it to the end of the document.

After saving the settings with the "Ok" button, you will get one page, and landscape orientation, and the rest in portrait.
Sometimes the page orientation has to be adjusted after typing all the text and placing all other objects, such as tables, pictures. Next, we will look at how to make one page landscape in Word and create a document for this purpose, consisting of two sheets.
Make different page orientation in Word using the menu "Orientation" on in masonry "Page layout" won't work because this setting applied to the entire document. We need to go directly to the settings "Page settings" what can be done on the tab "Page layout".
In Word last page making it landscape is much easier, since it will require fewer steps to do so. For example, let's place the cursor on the first sheet and go to "Page settings". In the settings, select landscape orientation and in the column "Apply:" set "to the end of the document", although in this case it is not important, since we start from the first sheet.

After applying this setting, both of our sheets became landscape orientation. Now let's place the cursor at the beginning of the second page and again go to "Page settings".
Now we select the portrait orientation of the page and in the column "Apply:" install "to the end of the document", which will allow us to make the first page in landscape orientation in Word, and the second in portrait orientation.

