Why does a PC user need to know how to create an image hard drive? Of course, in order to, if necessary, produce a complete including lost data, and not just the operating system. To create a hard disk image, you will need one of the specially designed for this purpose computer programs. For example, this can be done with help from Acronis true image home.
To get started, you will have to download and install the above program, fresh version which is located, for example, at this link http://openprog.ru/acronis-true-image-home and install it on your computer. It's free. Wondering how to take into account and the fact that you will need free place. For example, you can save to one of your drives personal computer. Or create this image on
So, Acronis True Image Home is installed and running, how to create a disk image, what further actions PC user?
Step one: You need to enter the main menu of the installed and running program and select the button in it - " Backup", after which a menu will drop out, including other sub-menus. You should select - "Backing up disks and partitions".
Step two: In the opened window "Archived partitions", you need to select HDD or section. How to create an image of a disk or partition on which the OS is installed? In this case, you are advised to check the option for archiving in sector-by-sector mode, while taking into account that more free space will be needed. You will see the estimated size of the archive below in the same window. Everyone, click next.
Step three: A new window has opened and now you should check "Create a new archive backups", if you need to create a new archive and copy the disk image into it. How to add it to the archive that was created earlier? In this case, check "Add to existing backup archive".
Using the "Browse" button here, you should select the folder in which the archives of disk images created by the program in question will be placed for storage.
Now, using the appropriate button, create a name for the archive, select its format, and in order to save these and other settings offered by the program, press the "OK" button.
Step five: After all the previously done manipulations, you will see a newly opened window - "Summary data". Here you need to check the name of the created disk image archive and its location. If the need arises or your desire, you can use the "Parameters" button to configure Extra options copy or modify previously set. The creation of the archive will begin after the PC user presses the "Proceed" button.
In fact, after reading the above information, any user of a personal computer and even a child who can read, type on the keyboard and "click" the mouse will understand how to create a disk image and will be able to perform all the necessary operations in practice.
After pressing the "Proceed" button, the disk image archive is actually created in automatic mode. At the end of the process, you will see a window indicating that the operation was successful, and in another window, after clicking "OK", you will see the relevant information about the newly created image hard disk or one of its partitions.
Good afternoon.
I must make a reservation right away that this article is in no way aimed at distributing illegal copies of discs.
I think that every experienced user has dozens or even hundreds of CDs and DVDs. Now it’s not so important to store all of them next to a computer or laptop - after all, hundreds of such disks can be placed on one HDD, the size of a small notebook! Therefore, it's not a bad idea to create images from your disk collections and transfer them to a hard drive (for example, to an external HDD).
The topic of creating images is also very relevant. Windows installation(for example, to copy the Windows installation disk to an ISO image, and then create bootable flash drive). Especially if you don't have a disk drive on your laptop or netbook!
Just as often, creating images can be useful for game lovers: discs get scratched over time, they begin to be difficult to read. As a result of intensive use, a disc with your favorite game may simply stop being read, and the disc will need to be bought again. To avoid this, it's easier to read the game into the image once, and then start the game from this image. In addition, the disk in the drive makes a lot of noise during operation, which annoys many users.
So let's get down to the main point...
1) How to create an ISO disk image
The image of such a disk is usually created from discs that are not copy-protected. For example, discs with MP3 files, discs with documents, etc. For this, there is no need to copy the "structure" of the disc tracks and any service information, which means that the image of such a disc will take up less space than the image of a protected disc. Usually, for such purposes, an ISO format image is used ...
CDBurnerXP
Very simple and multifunctional program. Allows you to create data discs (MP3, document discs, audio and video discs), in addition, it can create images and burn ISO images. This is what we will do…
1) First, in the main window of the program, you need to select the option "Copy disk".
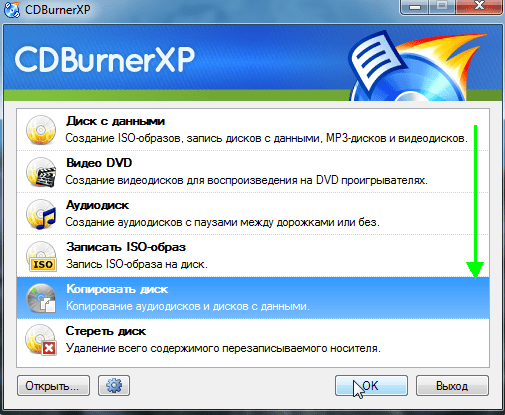
The main window of CDBurnerXP.
Drive: CD-Rom where the CD / DVD disc was inserted;
A place to save the image;
Image type (in our case ISO).

Set copy options.
3) Actually, it remains only to wait until the ISO image is created. Copying time depends on the speed of your drive, the size of the copied disc and its quality (if the disc is scratched, the copy speed will be lower).

Disc copy process...
Alcohol 120%
This is one of the best programs for creating and emulating images. By the way, it supports all the most popular disk images: iso, mds / mdf, ccd, bin, etc. The program supports the Russian language, and its only drawback, perhaps, is that it is not free.
1) To create an ISO image in Alcohol 120%, in the main program window, click on the " Image creation«.

Alcohol 120% - creating an image.
2) Then you need to specify the CD / DVD drive (where the copied disc is inserted) and click the "next" button.

Select drive and copy settings.
3) And the last step... Select the location where the image will be saved, as well as specify the image type itself (in our case, ISO).

Alcohol 120% - a place to save the image.
After pressing the "Start" button, the program will start creating the image. Copy time can vary greatly. For a CD, this time is approximately 5-10 minutes, for a DVD - 10-20 minutes.
UltraISO
I could not help but mention this program, because it is one of the most popular programs for working with ISO images. Without it, as a rule, it can not do with:
Installing Windows and creating bootable flash drives and disks;
When editing ISO images (and she can do it quite easily and quickly).
In addition, UltraISO allows you to make an image of any disk in 2 mouse clicks!
1) After starting the program, you need to go to the "Tools" section and select the option " Create CD image...«.

2) Then it remains only to select the CD / DVD drive, the place where the image will be saved and the type of the image itself. Remarkably, besides ISO creation images, the program can create: bin, nrg, compressed iso, mdf, ccd images.

2) Creating an image from a protected disk
Such images are usually created from game discs. The fact is that many game manufacturers, protecting their products from pirates, do so without original disc you won't play... That is. to start the game - the disc must be inserted into the drive. If you do not have a real disk, then you will not start the game ....
Now let's imagine a situation: several people work at a computer and everyone has their own favorite game. Disks are constantly being repositioned and over time they wear out: they get scratched, read speed deteriorates, and then they can stop being read at all. To do this, you can create an image and use it. Only to create such an image, you need to enable some options (if you create a regular ISO image, then at startup, the game will simply give an error that there is no real disk ...).
Alcohol 120%
1) As in the first part of the article, first of all, launch the option to create a disk image (in the menu on the left, first tab).

2) Then you need to select the disk drive and set the copy settings:
Skip reading errors;
Advanced Sector Scan (A.S.S.) factor 100;
Reading subchannel data from the current disk.

3) In this case, the image format will be MDS - the Alcohol 120% program will read the sub-channel data of the disk into it, which will later help you run a protected game without a real disk.

By the way, the size of the image during such copying will be larger than the actual volume of the disk. For example, based on a 700 MB game CD, an image of ~800 MB will be created.
Nero
Nero is not just one disc burning software, it's a whole suite of disc burning software. At help Nero you can: create any discs (audio and video, with documents, etc.), convert videos, create disc covers, edit audio and video, etc.
Using NERO 2015 as an example, I will show how an image is created in this program. By the way, for images it uses its own format: nrg (it is read by all popular programs for working with images).
1) Run Nero Express and select the section "Image, project ...", then the function "Copy disk".

2) In the settings window, pay attention to the following:
On the left of the window there is an arrow with additional settings- turn on the checkbox Read subchannel data«;
Then select the drive from which the data will be read (in this case, the drive where the actual CD/DVD is inserted);
And the last thing to specify is the source drive. If you are copying a disk to an image, then you need to select Image Recorder.
Setting up protected disc copying in Nero Express.
3) When you start copying, Nero will prompt you to choose a location to save the image, as well as its type: ISO or NRG (for protected discs, choose the NRG format).

Transferring many small files over the Internet is not very convenient. That is why various assemblies operating systems can be downloaded from the Internet as an image saved in ISO format. The downloaded image can be stored on a computer or written to any device, so you can make a bootable Windows flash drive or disk.
If you have a disc, for example, with a game or various programs, you can create an ISO image from the disc, in which the files and its structure are completely preserved. Then using special programs, for example Alcohol 120% or Daemon Tools, You will be able to run the created image via . If over time, you need to burn a disc from the image that you created, read the article on this topic by clicking on the link.
In this article, we will look at how you can make an ISO image from files and folders. In this form, it is more convenient to transfer them over the network, and the image transfer rate will be higher than each file separately.
To begin, consider creating an ISO image using Alcohol 120%. Read the description and you can on our website by clicking on the link.
In the menu on the left, click on the button "Image Mastering".

To create an image from files, click on the button "Add files". If you want to create an ISO image from a folder, click Add folder.

Select required files or folders on your computer and click Open .

You can create folders in the program itself, and then add files to them. To do this, click right click mouse in the program window and select New Folder from the menu. You can also use the corresponding button on the right side.
After adding all the files, click Next.

Next, specify the location on your hard drive where you want to save the created ISO image. In the "Image Format" field, select "ISO image" from the drop-down list. You can change the Image Name. Press "Start". I'll name the image "MyPhoto" and save it to my desktop.

Wait for the process to complete. In the same window, you can see how much space the created ISO image takes up on your computer. Click Done.

Now I have the created ISO image on my desktop.

By double-clicking on it with the mouse, you can mount the image into a virtual drive and view the files stored in it. Please note the amount of memory virtual drive, corresponds to the size of the generated image.

Now let's consider how to make an iso image using UltraISO program . She is the most popular program, which is used to create images, edit them, and burn them to disk.
Launch UltraISO. At the bottom of the program window, find the desired files and folders on your computer, and drag them to the top area. You can also select them and click on the button "Add".
The image will be saved to the specified location. It can also be mounted in a virtual drive.

I think now you understand how, using the described programs, you can create an ISO image from files and folders that are stored on your computer.
Watching video
Transferring many small files over the Internet is not very convenient. That is why various assemblies of operating systems can be downloaded from the Internet as an image saved in ISO format. The downloaded image can be stored on a computer or written to any device, so you can make a bootable Windows flash drive or disk.
If you have a disc, for example, with a game or various programs, you can create an ISO image from the disc, in which the files and its structure are completely preserved. Then, using special programs, such as Alcohol 120% or Daemon Tools, you can run the created image via . If over time, you need to burn a disc from the image that you created, read the article on this topic by clicking on the link.
In this article, we will look at how you can make an ISO image from files and folders. In this form, it is more convenient to transfer them over the network, and the image transfer rate will be higher than each file separately.
To begin, consider creating an ISO image using Alcohol 120%. Read the description and you can on our website by clicking on the link.
In the menu on the left, click on the button "Image Mastering".
To create an image from files, click on the button "Add files". If you want to create an ISO image from a folder, click Add folder.
Select the desired files or folders on your computer and click "Open".
You can create folders in the program itself, and then add files to them. To do this, right-click in the program window and select New Folder from the menu. You can also use the corresponding button on the right side.
After adding all the files, click Next.
Next, specify the location on your hard drive where you want to save the created ISO image. In the "Image Format" field, select "ISO image" from the drop-down list. You can change the Image Name. Press "Start". I'll name the image "MyPhoto" and save it to my desktop.
Wait for the process to complete. In the same window, you can see how much space the created ISO image takes up on your computer. Click Done.
Now I have the created ISO image on my desktop.
By double-clicking on it with the mouse, you can mount the image into a virtual drive and view the files stored in it. Please note that the amount of virtual drive memory corresponds to the size of the created image.
Now let's consider how to make an ISO image using UltraISO. It is the most popular program that is used to create images, edit them and burn them to disk.
Launch UltraISO. At the bottom of the program window, find the desired files and folders on your computer, and drag them to the top area. You can also select them and click on the button "Add".
The image will be saved to the specified location. It can also be mounted in a virtual drive.
I think now you understand how, using the described programs, you can create an ISO image from files and folders that are stored on your computer.
Watching video