The hard drive is an important, but far from perfect, component. personal computer. For some users, it works unreliably, “crumbles”, data from it is lost or is significantly damaged. One of the most common hard drive problems is the appearance of so-called "broken" (bad) sectors on it, which become a "headache" for many users. In this article I will talk about the reasons for the appearance bad sectors on the hard drive, I will list a number of programs that allow you to recognize them, and also explain how the hard drive is checked for bad sectors on your PC.

What are "bad sectors"?
As you know, a traditional hard disk consists of several rotating magnetic disks, over which magnetic heads move, magnetizing any part of the disk and thus writing information to it (in the form of zeros and ones).
The disk itself is divided into tracks, and the latter, in turn, are divided into sectors into which the information necessary for the user is recorded.
Due to certain reasons (I will list them below), information from a number of sectors cannot be read by the hard drive. Such sectors receive the status of "bad sectors" (bad sector), and the system tries to either restore the operability of such a sector (restore), or reassign the address of such a bad sector to the reserve sector (remap), or carry out its total cleaning of the bad sector (erase). In the case of remapping, spare healthy sectors are usually located at the end of the hard disk, and the hard drive spends additional time accessing them, which inevitably affects the speed of the hard disk, loading various applications and programs. Next, I will tell you how to check HDD computer into bad sectors.

Causes of bad sectors
What are the reasons for the appearance of bad sectors on the HDD? Usually they are as follows:
- Gradual “shedding” of the surface of the hard disk due to its wear, due to which there are more and more bad sectors on the disk;
- Physical impact on the hard drive due to various kinds of external shocks;
- Power surges in the network that directly affect the integrity of the data on the hard disk, and leading to the appearance of bad sectors;
- Incorrect shutdown of the computer (improper operation), as a result of which bad sectors appear on the hard drive.
Symptoms of bad sectors
Due to the described reasons, there are more and more bad sectors on the hard disk, which begins to directly affect the work operating system. In particular, you may notice the following:
- The system boots slowly;
- The system slows down (freezes) when reading and writing data from the hard disk;
- The system generally refuses to boot (quite often - in the middle of the process);
- The computer sometimes restarts for no reason;
- During the operation of the OS, various errors regularly occur.
After we have described the symptoms and causes of bad sectors, let's move on to a description of how to check your hard drive for bad sectors.
The best ways to check your hard drive for bad sectors
So how to check bad sectors (and fix them)? Below I will describe a number of methods that have proven their effectiveness in working with various hard drives.
Method 1. Use the CHKDSK system utility
The easiest and most convenient way to find and fix bad sectors on an HHD hard drive is to use the functionality of the CHKDSK system utility.
- To use its capabilities, launch Explorer, right-click on an inactive volume (which does not have an installed operating system), select "Properties" in the menu that appears.
- In the window that opens, go to the "Service" tab, there click on the "Perform verification" button.
- Check the boxes next to the two verification options, click on "Start", and wait for the process to finish.

The same can be done for system volume(on which the OS is installed). The only thing is that this may require a system reboot, but after the system reboots, it will start checking the disk for bad sectors.
You can also run CHKDSK through the console. To do this, run command line on behalf of the administrator, and in it enter:
chkdsk c: /f /r - (instead of with: if necessary, specify a different letter of the problematic drive) press enter and wait for the process to finish.

Method 2. We use the Victoria HDD program to analyze and treat the disk
Victoria HDD is probably the most popular program to check the hard disk for bad sectors (and to restore the latter). It effectively checks and recovers bad sectors, has good feedback from specialists, and can be used both in classic graphics mode and in DOS mode.
One of the Wiki's bonuses is the ability to read the SMART indicator of your hard drive, which allows you to monitor in sufficient detail the degree of its performance (the "SMART" tab of the program). In addition, the Victoria program performs "remapping" (reassignment of damaged sectors), resets bad sectors, conducts a detailed test of the hard drive surface, ranking sectors into different groups depending on the speed of reading information from them.
- To use this program, download and run it.
- Then go to the "Test" tab, select "Ignore" there and check the surface for bad sectors.
- If such are found, it is worth choosing the “Remap” mode in the same tab, this will allow you to reassign addresses from bad sectors to backup ones.
- If bad sectors remain after remapping, you can try to restore them using the “Restore” function, while the “Erase” function completely erases data in bad sectors by writing zeros there.
In general, the functionality of "Victoria" is quite extensive, and in order to familiarize yourself with its full description, you need to go to the material specifically about using the program.
Method 3. We use the HDD Scan program to check the hard drive for bad sectors
Another program that can check the hard disk for bad sectors is HDD Scan. This is a fairly popular utility that offers several different tests (Surface Test, Smart Offline Tests, etc.). Let's select Surface Test, check the box next to "Read" on the right and start checking the surface of the disk.
The program will analyze the response time of the available sectors, and give us the result in graphical mode.

Method 4. Checking your hard drive with HDD Regenerator
Program HDD Regenerator allows you to check and recover data on your hard drive, the same applies to bad sectors. I note that the program is paid, but those who wish can search the net for its free options.
- To take advantage of the program's capabilities, you need to run it, select the disk to work with, decide on the scan mode (I recommend Normal Scan), and then select the "Scan and repair" option (scan and repair).
- Then it will be necessary to specify the boundaries of the scan (starting from sector 0) and monitor the scanning process itself.
- Depending on the response speed, the sectors will be marked with different letters and colors.

Method 5. Scan the disk with the HDD Health program for bad sectors
Another program for checking the disk surface is bad sectors. HDD Health analyzes the general state of the disk, provides detailed statistics on existing partitions (using SMART technologies, which includes the general state of the structure, the disk rotation temperature, the presence of bad sectors, and so on).
Icon running program located in the system tray, the program itself, as necessary, notifies the user of any problems in the hard drive.

Hard disk recovery, removing BAD (bad) sectors [video]
Usually, a hard disk check for bad sectors is carried out using special software tools, the Victoria HDD or HDD Regenerator level. The most effective of all the programs listed in the article - Victoria HDD allows you not only to check the surface of the hard disk for bad sectors, but also to restore them, remap and clean them. If bad sectors began to appear on your hard drive, then I recommend using the functionality of the above programs, they have proven their effectiveness in working with the hard drives of many users.
How to check the hard disk (HDD) for errors?
We need the Victoria program. Download the image of the program to burn it to a disk here or the image for a floppy disk here and burn it to a disk (floppy disk).
Now we need to boot from this disk (floppy), restart the computer. And when you boot your computer or laptop, press F12 or Tab, you need to launch the BOOT MENU. If all else fails, try to look at the name of the keys at the bottom of the screen when loading, look through the instructions for the motherboard. You can also go into the BIOS and specify the first boot device. To enter the BIOS, press Delet when booting the computer, on laptops and old computers F2. In general, on the first page immediately after turning on the computer, this information is written at the bottom of the screen. The BIOS menus are slightly different for various manufacturers. Your task is to change the boot from hard drive(Hard Drive) on CDROM. Look for a tab boot device Priority, "Boot" or "First boot device"
In the BIOS, you need to set the CDROM (or Floppy Drive if you boot from a floppy disk) to the top line (using the + -, or F5 F6 buttons). Save the changes and restart the computer.
If the message Press any key to continue appears, press any key, after which the Victoria program will start.

Press the P key (eng), and select the desired channel, the choice is made with arrows (if you do not know which disk you have, choose in turn).

Press Enter and F2. A list should appear hard drives(if there are several or one if you have only one hard drive). If it does not appear, press P again and select another channel.

And press the number that is written opposite desired disk. And enter. After we have selected the disk we need, we will start checking it for errors. To do this, press F4. Another small window will open, we don’t change anything in it and press Enter (you can read about the functions in this window in the instructions that I will attach below). The hard disk will be checked for errors.

In the right upper corner you see the numbers 5ms, 20ms, 50ms, etc. it shows the access time for each sector on the hard drive. The more sectors with less load, the better. And in the Defects tab, bad sectors will appear (these are sectors where the hard drive is damaged and this place is not written or read). If you find defects, you will have to purchase new hard disk. In principle, defects on a hard disk can be cut off by hard disk (read how to do this in the instructions), but I would not recommend doing this because the hard drive will continue to crumble anyway and in the end you will lose all your data.
You can also run the program under Widows, and it will work, but for this you need to fulfill one of the conditions written below (download, unzip to a folder and run):
- Disable (Control Panel > System > Hardware > Hard Disk Controllers) the IDE controller channel to which the tested hard drive is connected. This is necessary so that the program can access the HDD ports directly.
- You can not turn off the channel in the system, but then when Windows boot nothing should be connected to this channel (otherwise the OS, having found an ATA device, will block the ports). If you chose this option, then you need to connect the hard drive after the system boots. Or, as an option, turn on the power to the tested hard drive only after the OS is fully loaded (not all cheap power supplies "tolerate" this)
- It is absolutely pointless to disable the hard drive in the BIOS, because modern multitasking operating systems do not use the BIOS to check for the presence of an HDD on the channel. The driver does this for it. so that DOS itself does not see this disk (and so that it does not use ports in this way, which theoretically can lead to conflicts between the OS and the program).
You can download the instruction here.
ps-land.ru
How to check hard drive through BIOS?
A hard drive is not the most reliable part of a personal computer and at the most inopportune moment this device can fail. To prevent this, the HDD requires constant analysis of its performance and verification of the data recorded on it for integrity. As a rule, this is done by specialists, which means several things: you will definitely be charged for it and well, the hard ones will have to say goodbye for a while. However, we have a little secret for you, using which you can easily check the status of your hard drive on a PC. This secret lies in the BIOS of the system.
Before we start
Before you start explaining to you how to check a BIOS hard drive for performance, you should understand a few things:
- this method will not work with SSDs;
- Depending on the BIOS version, the names of its menu items and their location may differ significantly (or not significantly).
Actually, that's all. Now let's enter the BIOS and figure out how to use it to diagnose the HDD.
Entering BIOS
We have already talked about the BIOS environment, its varieties and settings, and for this we have dedicated an entire article. In the same place, in one of the paragraphs, we told you how to enter the BIOS. Follow this link and read the Entering the BIOS section so that you and I can continue further.
Enable hard drive check
So you are inside. Next, be extremely careful, since the items that will now be called in this article may look and be placed in a completely different way for you. Using the keyboard arrows to navigate, navigate to the Diagnostics section, then select Primary Hard Disk Self Test. Provided that your computer uses more than one "hard", the system will prompt you to select a disk to check from the available ones.

It will take some time for the system to check the hard drive for bad sectors. However, upon completion of this process, you will easily understand if there is damage on your hard drive:
- if you fail to test, your hard drive is damaged and needs to be repaired or replaced;
- if the test was completed 100% - everything is fine with the HDD, and all minor errors of the hard disk will be corrected by the system.
Outcome
Using BIOS as a tool for checking bad sectors on a hard drive, you can quickly diagnose hard working disk on the computer. Of course, there is a problem here, namely, a visual difference different versions BIOS, as a result of which it is sometimes quite difficult to find one or another item, following some example. Despite this, this method is very good, and everyone should know about it.
chopen.net
Learning to understand the computer
When you install a new hard drive on your computer, the drive is not always detected by the system. You connect it, check it in the list of devices - but the disk is not there. In such a situation, you should think about how to turn on the hard drive in the BIOS.
The fact is that for a new drive in the BIOS, separate adjustments may not be configured. In order for the drive to start showing, you need to set up the correct system configuration. For this:
- Power up your computer;
- Before the OS starts loading, a screen will appear on the monitor where you can start the BIOS. Usually, to perform this operation, you need to press the "DEL", "F2" or "F11" key;
- Entering the BIOS, press the line "MAIN", then the "Enter" button;
- In the menu that opens, you will see all the drives and disks connected to the PC. Select the desired line and click on it;
- If you did not find it, point to the "SATA" number you connected to, and then select "AVTO". The disk search will start;
- When the system detects it, select "save end exit". The computer will restart;
- And now you should be able to find the hard drive by clicking Start, then My Computer.
Checking the SATA connector
However, the disk may not show up. Probable Cause– Disabled SATA interface controller. To fix it:
- Go to BIOS and find the item "SATA configuration";
- On the "controller" tab, click the "enable" item;
- Then use the same algorithm of actions that was described above.
Activating a Disabled Drive
You may have disabled the hard drive in the BIOS. To activate it, you need to perform a factory reset. To do this, go to BIOS and click on the line "Load Default". After that, the PC will reboot and the disk should be determined. Go to "My Computer" and see if it's there.
Update "Device Manager"
When the system "sees" the disk, it will be necessary to update information about the connected devices. For this:
- Turn on the PC;
- Click on the "My Computer" icon with the right mouse button;
- Click on "Properties" and open "Device Manager";
- Right-click on the line with the name of the system (at the top of the window);
- Then click Update Configuration. A scan will be performed, after which the disk should appear in the "Device Manager".
If the disk does not want to be detected in any way, the problem may not be in software components. To find out, do the following:
- Try connecting the drive to a different connector on the "motherboard";
- Replace the interface cable, replacing the power supply cable may also help;
- By the way, perhaps the problem is in the power of the power supply. It is simply not enough to determine the hard drive. In this case, failures may also occur in the operation of the first disk (on which the OS is installed);
- If to connect a disk with motherboard If you are using IDE-SATA splitters, replace them with others. Maybe that's the problem;
- The hard drive may not be detected in the BIOS if there are any failures in the system. Often in such a situation only a specialist can correct the situation;
- If you have an IDE type drive (today SATA is predominantly used), then you might think that the problem is the compatibility of old designs with the new one. motherboard. This is not true. If the "motherboard" has at least one IDE connector, then this type of disk will work in the system. Another thing is that the corresponding function can be disabled in the BIOS. The "Award BIOS" option must be enabled.
Hard disk health check
Other possible reason- the hard drive simply does not rotate. This is due to the fact that the device does not receive enough power or it does not exist at all. To find out for sure, do the following:
- Turn off your PC;
- Open the computer system unit by unscrewing the bolts on the side cover;
- Then, remove the data cable from the drive. After that, the system will no longer receive information about the need to save energy;
- Turn on your computer. Listen to see if the disc starts spinning. To better understand, you can touch the hard drive - a vibration should be felt. If there is no vibration, then the disk is not turned on;
- If you cannot accurately understand whether the hard drive is rotating, do the following:
- Turn on the PC, listen to the disc;
- Turn off your computer;
- Remove the PC power cable;
- Then remove the hard drive power cable;
- Insert the PC power cable;
- Turn on the machine and listen again. Then restore power to the drive and listen again.
- Check the hard drive's power cable by connecting it to another device, such as a floppy drive.
- If all else fails, connect the drive to another PC.
Is the disk still spinning? It's probably broken and just doesn't work. Then it will need to be replaced. Usually hard drives not repairable. Magnetic hard drives (HDD) can fail after one fall, so they must be handled very carefully so as not to damage moving parts. In the case of SDD standard disks, even with a serious impact, the disk will remain in working condition, since there are no magnetic elements in its design.
Enabling a hard drive in BIOS and all related operations can be performed independently. Usually a new hard drive is detected by the computer immediately. Maximum after BIOS setup. If the cables are faulty, it is easy to replace them. If the disk is broken, then you will need to buy a new one.
comp-genius.com
How to quickly check and repair your hard drive | Everything-Nauchim.ru
The computer began to slow down? Are files and programs taking too long to open? Do crashes happen all the time? All this may indicate a hard drive failure. How to check the status of a hard drive? You will find out in this post.
Hello. Today I will tell you how to test and also repair your hard drive.
Indeed, the hard drive can be the cause of braking and crashes in the computer. The fact is that the hard drive is constantly in operation. We constantly write information to it, and then erase it. There is a constant overwriting of data on our hard drive. All this can lead to malfunctions in its operation. But how do we determine the status of a hard drive?
For this, quite a few various programs have been created, we will consider one of them today. This program is called "HDD Regenerator". Why I chose this particular program. Yes, just because this program quite easy to use, for example, if you compare it with the program "Victoria". Although, of course, the Victoria program has more features, it is more difficult to work with it. In general, today we are working with HDD Regenerator.
This program tests the hard drive, and also performs the recovery of bad sectors (bad sectors). These are the main features of this program.
You can use the program both from under Windows, that is, with the operating system turned on, and from under dos, without using the operating system. Program management is the same in both cases. The only difference is how to run the program. Below is a video in which I showed how to use the program with the operating system turned on, therefore, here I will describe the second option, namely how to use the program from under dos. Let's start.
How to use HDD Regenerator
First you need to install this program. The installation process is normal, so I will not describe it. After installation, you launched the program. A program window will open in front of you.

In this window, you need to do the following:
- Select the "Bootable USB Flash" item, click on it.
- Next, you will need to choose your USB device, the flash drive must already be inserted into the computer. Select it and click OK.
- Next, an informational message will appear in which you just need to click "OK". The flash drive will be written very quickly, and you will be prompted to restart the computer (on English language). Click "Yes", the computer will restart.
Now we do the following:
- When turning on the computer, press and hold the "F12" key. This is necessary in order to launch the "BOOT MENU". On some computers it starts differently, if it doesn’t start for you, look on the Internet to see how it starts on your computer.
- In the "BOOT MENU", select boot from "USB-HD" (this item may look different, for example, "USB-HDD").
- After that, the program with which we will work will be loaded.
The program opens and prompts you to select the drive you want to scan. Select the desired one by pressing the corresponding key (number).

- Prescan - this option will show you the bad zones, if any.
- normal scan- this option scan and repair bad sectors.
- Version Info is information about the hard drive.
- Scan and repair is scanning and repair.
- Scan, but do not repair - this is to scan, but not to restore. It will just show the bad sectors.
- Regenerate - this option rewrites the entire disk, even if there are no bad sectors.
I choose the first option, press "Enter".
Now you need to choose which sector to start with. I choose the first option to start scanning from sector zero. I recommend that you do the same. Press one and press "Enter".
So the scanning began, and if the program finds bad sectors, it will restore them.
After verification, a similar window will appear.
To exit the program, press the Esc key. Another, often, after pressing "Esc", a black screen appears with an input line. Just press the reset button on your system unit. After the reboot, do not press anything, Windows will boot automatically.
That's all. You have learned how to test and repair your hard drive. If not everything is clear, watch the video, I showed the process on it scan hard disk. It should be noted that this method it only helps with hard drive failures, it is unlikely to help if, for example, you dropped the hard drive on the floor, that is, with physical damage.
You can download this program on the Internet, and this program is also available on bootable flash drive that we created earlier. Here is a link to a note that talks about this flash drive...
Well, that's where I'll end this post. I hope it was helpful to you. Subscribe to the news of the blog or channel "PC Instructor"
Comments powered by HyperComments
vsemu-nauchim.ru
How to check the status of a hard drive

Hello dear readers of my blog! In this article, I will tell and show you how to check the status of a hard drive; and it doesn’t matter if it’s hdd or ssd, 2.5 ”(on a laptop) or 3.5” (on a PC). Someone checks the status because they notice that the speed of reading or copying is lower than it was before, someone is reinsured for fear of losing important data, and someone is just out of curiosity. It does not matter for what reasons you are faced with this issue, it is important which program is best to use and how.
Why does a hard drive fail?
- Overheat. The operating temperature of the HDD should not exceed 45 degrees.
- Hit. It happens less often on a computer. More often on a laptop with a strong abrupt closure, transportation in working condition or during operation, when windows freezes, many have a habit of hitting the case.
- Forced shutdown, that is, from a button or socket instead of the usual: Start - Shutdown.
- And last but not least, the service life. Sooner or later everything breaks down, even though there was a good care.
Hard Drive Diagnostics
I will not conceal, I will say right away, the best program for checking hard state disk is Victoria. And so, let's get started. First, download the Victoria program, install it on your computer. A shortcut to the installed utility will appear on the desktop. It should be run under administrator rights, for this you should do the following steps: point to the Victoria shortcut, click right click mouse, select "Run as administrator" windows vista, 7 and 8 may ask the question "Do you want to allow the following program from an unknown publisher to make changes to this computer? - press yes.
Despite the fact that recently solid-state drives are increasingly gaining the niche of the main memory module of computers and laptops, their market share is not so great. Good old mechanical hard drives have a much lower cost, so they are still popular. However, they have the ability to fail, like any other technique. This article is devoted to the question of how to check a hard drive for serviceability at home without resorting to service centers. Moreover, options will be given here, thanks to which it will be possible to partially restore working capacity. damaged hard disk.
A little about the hard drive itself
A classic laptop or computer hard drive is a few so-called "pancakes" with a ferromagnetic coating, on which information is written with the help of heads, and with their help it is read. These discs spin at high speeds ranging from 5400 to 10,000 rpm. For comparison, the industrial cutting tool, commonly referred to as a "grinder", has the same rotation speed. Impressive?
It is during rotation that reading or writing occurs. But if the hard drive is hit or pushed at the time of operation, the heads can make an almost imperceptible scratch on the surface. And although it is small, the clusters in this area become unreadable, and the computer tries to access them again and again. As a result, after unsuccessful attempts to read information, it freezes. How to check your disk for such areas?

Victoria testing program
One of the popular utilities for testing hard drives is Victoria. Although it can also be run from under the operating system, today we will learn how to check the hard drive for health through BIOS. The website of the manufacturer of this utility has information on how to boot disk or a flash drive with it. In the BIOS of a laptop or computer, you need to set the boot from removable media, after which, turning on your device with the bootable media connected, you will see the interface of this program. Select your hard drive by pressing the "P" key on your keyboard and start scanning it with the "F5" key.
Now you can go and mind your own business. Depending on the volume of the disk, scanning will take from 1 to 3 hours. As a result, on the right side you will see the legend of the disk map, which will indicate the number of sectors of each type. If there are sectors readable for more than 1.5 s, or bad sectors in the frame below, then the hard drive is faulty, it needs to be restored or replaced. So, in your arsenal there is already one way to check the health of a hard drive on a laptop or computer.

Testing via HDD Regenerator
You have to prepare bootable media in the same way by downloading the utility from the developers' website. This utility is easier to use, but works a little longer. It is believed that this The best way, since it is easier to check the hard drive for health with it, moreover, it gives more information.
To start the scan, select your drive by entering its number from the list. After that, you need a menu item called Normal Scan. In the next submenu, select Scan, but do not repair. Further on everything standard scheme: You can go about your business. After a period of time, get a map of the hard drive, on which you can see exactly which areas are damaged. If the disc is OK, the entire card should be white, with no "D" or "B" letters. What test can still check the hard drive for serviceability?

One of the difficult options is MHDD
Working with this utility is very similar to previous version. As in other cases, you must first prepare bootable media in order to run it without starting the operating system.
After starting, you will have to select the desired hard drive, if you have more than one. The choice is made by entering the desired number from the list. After that, initialize the disk using the "F2" key and enter the SCAN command. It starts scanning the surface of the hard drive. If necessary, you can scan not the entire surface, but specific area clusters.
The interface of the program resembles the already known Victoria. As in the case with it, as a result there should not be sectors that could not be considered a program or are read for too long.
Now you know all the common ways to check the health of a hard drive. It makes no sense to install these programs on a computer, a bootable USB flash drive is enough.

Hard drive recovery through Victoria
Of course, knowing about the malfunction alone is not enough, you need to fix it. But it is physically impossible to cure problem sectors. Programs simply block access to the hard drive to problem areas, due to which they are completely deleted from the map, and it does not access them.
In the case of the Victoria program, before starting the scan, after pressing the "F5" key, you just need to set one of the recovery options in the fourth line of the window. As a result, not only scanning will occur, but also re-partitioning of problem sectors, and you will put your disk in order if it has not completely failed. Now you know not only how to check the hard drive for health, but also how to restore it.

Recovery with HDD Regenerator
The very name of this program says that it is adapted for the treatment of problem disks, and this is actually the case. In order for sectors to be re-partitioned during scanning. When you start in the last menu, instead of Scan, but do not repair, select Scan and repair. This operation will take a little longer, but all problem areas of the surface will be overwritten.
It is worth noting that if the recovery lasts more than 5-6 hours, then, most likely, the disk has completely failed and it will not be possible to restore it. This applies to all recovery programs.

Scanning with BIOS without utilities
Some laptops and computers are able to check the hard drive and random access memory without additional utilities. Therefore, in the question of how to check a hard drive for serviceability through BIOS, you can not complicate your life by preparing bootable media, but use standard tools.
However, they may not always be designed to be recovered. In fairness, it should be noted that all the same, they will allow you to make an initial diagnosis without unnecessary problems, which means that you should definitely not neglect them.
What about removable hard drives?
Such a plan drives are also for the most part mechanical devices packed in a special pocket. So how to check external hard drive for good? All the same methods work for them, except for the Victoria program, since it will not be able to detect it. The main thing is to connect it to the USB connector of a computer or laptop before turning it on, so that it can correctly recognize it. After that, the procedure does not change, you can just check it. Or run the script for restoring damaged clusters.
Now you know all the ways to check the hard drive for health without the help of professionals. This information will help you save a lot of money on trips to service centers, because hard drive failures are one of the most common in computer technology.
Hello.
Forewarned is forearmed! This rule comes in very handy when working with hard drives. If you know in advance that such and such a hard drive is likely to fail, then the risk of data loss will be minimal.
Of course, no one will give a 100% guarantee, but with a high degree of probability, some programs can analyze the readings of S.M.A.R.T. (a set of software and hardware that monitors the condition of the hard drive) and draw conclusions on how long it will last.
In general, there are dozens of programs for performing such a hard disk check, but in this article I wanted to focus on some of the most visual and easy to use. So…
How to check the status of a hard drive
HDD life
(By the way, in addition to HDD, it also supports SSD drives)
One of the best programs to constantly monitor the status of the hard drive. It will help to recognize the threat in time and replace the hard drive. Most of all, it captivates with its clarity: after launch and analysis, HDDlife presents a report in a very convenient form: you are shown a percentage of the "health" of the disk and its performance (the best indicator, of course, is 100%).
If your readings are above 70%, this means that your disks are in good condition. For example, after a couple of years of work (quite active, by the way), the program analyzed and concluded: that this hard drive is about 92% healthy (which means that it should last, if there is no force majeure, at least the same amount) .

After starting, the program minimizes to tray next to the clock and you can always control the status of your hard drive. If a problem is found (for example, heat disk, or there is too little space left on the hard drive), the program will notify you with a pop-up window. An example is below.

HDDLIFE notification that the hard drive is running out of space. Windows 8.1.
If the program analyzes and gives you a window as in the screenshot below, I advise you not to hesitate with the backup (and replacing the HDD).

HDDLIFE - data on the hard drive is in danger, the faster you copy it to other media - the better!
Hard Disk Sentinel
This utility can compete with HDDlife - it monitors the disk status just as well. What is most captivating in this program is its informativeness, at the same time as its simplicity for work. Those. it will be useful for both a novice user and an already experienced enough one.
After starting Hard Disk Sentinel and analyzing the system, you will see the main program window: hard drives will be presented on the left (including external HDD), and their status will be displayed on the right side of the window.
By the way, a rather interesting function is to predict the health of the disk, according to how long it will serve you: for example, in the screenshot below, the forecast is more than 1000 days (that's about 3 years!).
The condition of the hard drive is EXCELLENT. Problematic or weak sectors were not found. No revving or data transfer errors detected.
No action needs to be taken.
By the way, the program implemented enough useful feature: you can set the threshold for the critical temperature of the hard disk, upon reaching which, Hard Disk Sentinel will notify you of the excess!

Hard Disk Sentinel: disk temperature (including the maximum for the entire time the disk was used).
Ashampoo HDD Control

An excellent utility for monitoring the status of hard drives. The monitor built into the program allows you to know in advance about the appearance of the first problems with the disk (by the way, the program can notify you about this even by e-mail).
Also, in addition to the main functions, a number of auxiliary ones are built into the program:
Disk Defragmenter;
Testing;
Cleaning the disk from garbage and temporary files (always up to date);
Deleting the history of visiting sites on the Internet (useful if you are not alone at the computer and do not want anyone to know what you are doing);
There are also built-in utilities for reducing disk noise, power settings, etc.
Screenshot of Ashampoo HDD Control 2 window: c hard drive everything is in order, condition 99%, performance 100%, temperature 41 gr. (it is desirable that the temperature be less than 40 degrees, but the program considers that everything is in order for this disk model).
By the way, the program is completely in Russian, intuitively thought out - even a novice PC user will figure it out. Pay special attention to the temperature and status indicators in the main program window. If the program generates errors or the status is assessed as extremely low (+ besides, there is a rattle or noise from the HDD), I recommend that you first copy all the data to other media, and then start dealing with the disk.
Hard Drive Inspector
The salient features of this program are:
1. Minimalism and simplicity: there is nothing superfluous in the program. It gives three indicators in percentage terms: reliability, performance and absence of errors;
Hard Drive Inspector - monitoring the state of the hard drive.
CrystalDiskInfo
A simple but reliable utility for monitoring the status of hard drives. Moreover, it works even in cases where many other utilities fail, crashing with errors.
The program supports several languages, is not replete with settings, and is made in a minimalist style. At the same time, it has rather rare functions, for example, disk noise reduction, temperature control, etc.
What is also very convenient is the graphical display of the situation:
Blue color (as in the screenshot below): everything is in order;
Yellow color: alarm, action needs to be taken;
Red: urgent action needs to be taken (if you still have time);
Gray: the program was unable to determine the readings.

CrystalDiskInfo 2.7.0 - screenshot of the main program window.
HD Tune
This program will be more useful advanced users: which, in addition to graphical display of the "health" of the disk, also need high-quality tests of the disk, in which you can get acquainted with all the characteristics and parameters in detail. It should also be noted that the program, in addition to HDD, also supports newfangled SSD drives.
HD Tune offers a rather interesting feature to quickly check the disk for errors: a 500 GB disk is checked in about 2-3 minutes!
HD TUNE: quick search for disk errors. Red "squares" are not allowed on the new disk.
Also very necessary information- This is a test of the speed of reading and writing a disk.
HD Tune - check disk speed.
Well, it is impossible not to note the tab with detailed information about the HDD. This is useful when you need to know, for example, supported features, buffer/cluster size or disk rotation speed, etc.
HD Tune - detailed information about the hard drive.
In general, at least the same number of such utilities can be cited. I think that most of these will be more than enough ...
And lastly, don't forget to backups, even if the condition of the disk is rated as excellent at 100% (at least the most important and valuable data)!
Good job…
The hard disk drive (HDD) is the most important element of the computer, which stores all the necessary information, programs and user files. Like any other component, over time, the hard drive wears out, its normal operation is disrupted, and failures begin to occur. Along with physical wear and tear, leading to the appearance of so-called bad sectors (bad blocks), there are often logical errors associated with file system, indexes, and the main file table.
For the time being, you may not observe problems in work hard disk, but this does not guarantee that one day the hard drive will not die. Therefore, it is important to periodically (once or twice a year) check the hard drive for errors and bad sectors that need to be fixed. Regular monitoring will allow you to track the state of the carrier and respond in time to changes in its state. Of course, you should not neglect such a proven method of protecting information as backup. The most valuable data must necessarily be duplicated on a spare custodian.
Symptoms of a failing hard drive
In most cases, HDDs operate smoothly for several years without requiring special attention. However, in case of improper operation (physical impact, lack of proper cooling), the resource of the information carrier is significantly reduced. In rare situations, there is a factory defect or a sudden failure.
The occurrence of hard disk failures may be indicated by too long loading operating system, causeless disappearance of files and folders, slow application launch. Obvious symptoms of a loss of performance by a hard drive are program slowdowns and long file copying. If the computer constantly “hangs”, and nothing but restarting helps, then in the process of identifying the causes, checking the hard drive should be the first item.
Using standard Windows 7/10 tools
You can test the media with standard Windows tools. The easiest way is to select the desired hard drive in Explorer, right-click on it and go to the "Service" tab.
Next, click the "Perform verification" button and set the verification parameters in the window that opens. If both checkboxes are checked, then Windows will automatically fix everything during diagnostics. system errors and repair bad sectors.

The results of the audit can be found in the report.

Command line
You can also audit the hard drive using the utility chkdsk called from the command line. In fact, such a check will not differ much from the above option.
So, we launch the command line by selecting the necessary item on the Start menu. Then in the window enter the command: chkdsk G: /f /r
- G - the name of the tested hard disk (select the disk that you want to check);
- f - checking and correcting errors;
- r - detection and recovery of bad sectors.

All information about found errors and bad sectors will be displayed as diagnostics are carried out.

Third Party Hard Drive Checker
There are many programs and utilities for finding bad sectors and fixing HDD errors. We present only the most famous.
Victoria
Perhaps the most popular tool for checking hard drives. The program can be run as Windows environment, and in DOS mode from a bootable flash drive.
The interface provides five tabs: Standard, SMART, Tests, Advanced, and Setup. First of all, go to the section standard, where in the list of devices we select the hard drive we are interested in. The Drive passport area will display basic information about the HDD.
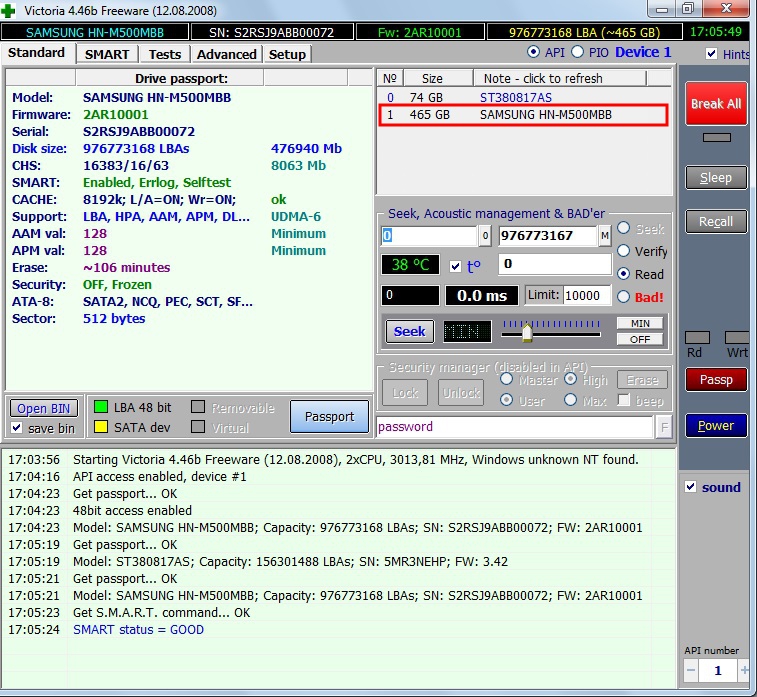
Next, select the tab SMART and press the "Get SMART" button. SMART (Self-Monitoring, Analisys and Reporting Technology) is a hard drive self-monitoring technology. Those. the hard drive monitors its work during operation, recording information on a set of parameters that allow assessing the state of the media. It is this service information that we are trying to obtain.
After pressing “Get SMART”, either the inscription GOOD on a green background or the inscription BAD! will appear to the right of the button. on red. The second option will indicate that the media is in poor condition and will most likely have to be changed. For a more detailed study of SMART statistics, let's pay attention to the list of parameters on the left. Here we are primarily interested in the attribute 5 Reallocated sector count A indicating the number of remapped sectors. If there are too many of them, then the disk began to “crumble”, that is, its surface quickly degrades and it is urgent to make a copy of all data. In this case, there is no point in restoring the hard drive.

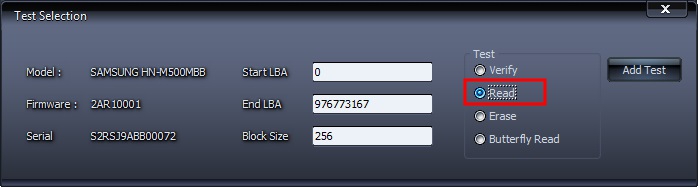
Chapter Tests makes it possible to check the hard drive for bad sectors, as well as try to "cure" or reassign unreadable blocks. For simple testing of the hard drive, set the switch to Ignore and start the test with the Start button. The assessment of the state of the sectors is made by measuring the response time. The smaller it is, the better. Each range of response time values has its own color designation. The "slowest" blocks are marked with green, orange and red colors. Sectors that could not be read at all are marked blue. If there are a large number of "slow" and unreadable blocks, the hard drive should be replaced.

The Victoria program allows you to restore bad sectors, but we will not consider all the nuances of the procedure. Moreover, "treatment" often contributes only to a slight extension of the service life of the information carrier. To reassign bad blocks, check with the mode enabled Remap. If the recovery was successful, do not rush to rejoice. Re-diagnose the disk after a certain period of operation. The appearance of new bad blocks will indicate that the degradation of the hard drive is irreversible, and it is time for him to find a replacement.
HDDScan
This is another handy program for identifying problems with hard drives. After launching the application, select the drive that needs to be checked in the Select Drive list.

At the bottom, click on the button "S.M.A.R.T." and get acquainted with the submitted report.

Now we will diagnose the surface of the disk. Click on the round button to the right of the drop-down list of media and select Surface Tests from the menu that opens.

Click on the Add Test button, thereby adding a test to the list and starting its execution.

You can get information about the progress of testing in the graph (Graph), map (Map) and report (Report) mode. All blocks are also, depending on the access time, divided into groups with the corresponding color marking.


At the end, a final report is generated.

Perhaps this is all that we wanted to talk about methods for checking the hard drive of a computer for operability. We hope that the information provided will be useful to you and help you save important data.