Many people, when buying a computer, when they started using it, or after hearing their friends talk about the extremely harmful effects of viruses, thought about installing an antivirus program.
And you still decided to install an antivirus. This raises a reasonable question: How to install an antivirus?
If you yourself have never done this, then there are three options for the further development of events:
In this article, we will learn how to install Kaspersky Antivirus 2010 (at the time of this writing, the latest version).
First of all, before installation we need an installation package the desired antivirus. It can be asked from friends, bought on disk or downloaded via the Internet. If you are going to install Kaspersky Antivirus 2010, then you can download it for free here:
So, the antivirus is downloaded. Run it (in my case, the file kav9.0.0.736ru.exe) and see the following window:

A license agreement appears, read it and, if you agree with the proposed terms, click "I agree".

Then check the box "I accept the terms of participation in Kaspersky Security Network" and click "Install".

After that, a window appears in which the installation process of the antivirus is displayed.

After the installation is completed, the Program Activation window appears. Select "Activate Trial" and click "Next". The computer must be connected to the Internet at this point.

Activation in progress...


The installation of the antivirus is completed, click "Finish".
![]()
An icon of a running Kaspersky Anti-Virus appears next to the clock ( capital letter"TO"). Let's launch it...
And we see the main window of the program. On the left, click on the "Update" button.

Then the anti-virus databases are updated.

After the update is completed, select "Check" on the left.

And depending on what we want to do, select "Perform a full scan", "Run quick check" or "Perform object check" (in this case, you need to specify below what exactly you want to check). For the first time, I recommend performing a full check.

A full system check has begun. The first time it can take quite a long time.

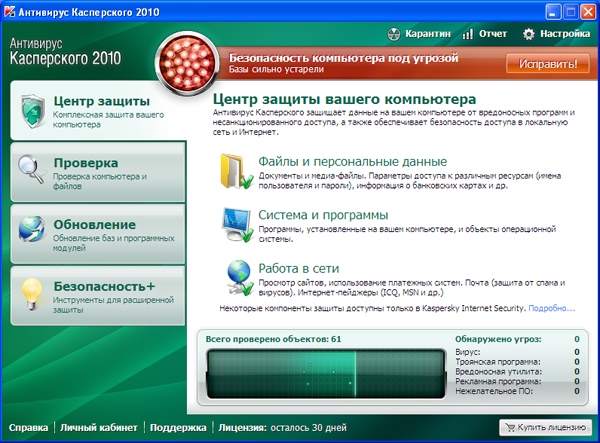
After the verification is completed, we need to view the results of the verification. To do this, click on the inscription that appears at the top: "Computer security is at risk."

The "Status" window shows the results of the scan.

The Threats Detected window displays all the actions taken during a system scan.

The "Report" field graphically presents the results of the anti-virus program.
As a result of our actions, we downloaded and installed the antivirus, updated the antivirus databases and performed a full system scan. In the future, if you do not touch the settings, the antivirus will work completely in automatic mode: run with the system, automatically check all running services and processes, download updates, scan newly connected devices (flash drives, disks, floppy disks, etc.), protect email, control Internet traffic. You can also run a full system scan at any time or set it to run automatically.
It remains to consider one more aspect - this is the registration of the antivirus, because. if you do not register it, then it will work for you only 30 days.
Again, there are two options here:
1. Buy a license online and become the legal owner this antivirus with all the rights and obligations arising from this, which are stipulated in the license agreement accepted by you at the second and third steps of the installation;
In the name of a free antivirus from Kaspersky Lab -Kaspersky Free- lies the main rule of the game: you can always use the generosity of developers. Free activation of the program lasts 365 days, then you can simply reinstall the antivirus and use it for another year and so on ad infinitum. Download free antivirus Kaspersky Free available on the Kaspersky Lab website.
Let's take a look at the work below. Antivirus Kaspersky Free in detail: what functionality is offered for free use for a whole year, how to install the program, what can be configured in it, etc.
Free Antivirus Kaspersky Free: overview
What does Kaspersky offer for free?
Free - in this case does not mean defective. Kaspersky Free is based on the same antivirus engine as the paid products of Kaspersky Lab. The difference between the Kaspersky Free edition is in functionality: this product is designed to provide basic computer protection. However, which is what is needed for most of the users who use the computer for non-commercial purposes and have not once crossed the road to vindictive programmers.
The following are available for free use in Kaspersky Free:
- Full-fledged anti-virus module;
- Real-time computer protection;
- Web protection (checking incoming Internet traffic and blocking malicious scripts);
- Checking software messengers to block malicious and phishing links in incoming messages;
- Checking mail;
- Auto-update of anti-virus databases;
- Cloud protection of Kaspersky Security Network.
As you can see, Kaspersky Free offers more than many other free antivirus products. Rare of them will offer something more than the classics of the genre - an anti-virus module and real-time protection. And certainly rare security software will mess around with spam in ICQ or Skype for free.
Installing Kaspersky Free
The installation process is simple. We start the installation.

We agree with the developer's license.

The next step is to choose whether or not to participate in the cloud protection of Kaspersky Security Network. Working with a product like Kaspersky for free, it would be more honest to take part in cloud-based protection and let the developers of Kaspersky Lab use their experience of dealing with threats. Perhaps this will help someone someday and prevent problems. Helping software developers or not is a personal matter for everyone.

After installing the program, click "To complete" and check the launch box.

First launch of Kaspersky Free
At the first start, the program will prompt you to go through free registration by using Email. For a bun in the form technical support antivirus software, we will from time to time receive email marketing masterpieces from Kaspersky Lab. But for now, let's postpone this matter.
Once in the main window of Kaspersky Free, first of all, pay attention to the countdown of the license term in the lower right corner.

By clicking on this countdown, we will move to the licensing window, which will contain detailed data on activation, as well as the possibility of switching to extended protection in the future - a functional edition Kaspersky internet security .

Updating anti-virus databases
Returning to the main window, the next step is to update the anti-virus databases. Already in the main window of the program we will see the status of the update module - "The database has not been updated for a long time". Let's fix it - click "Update".

And we update the anti-virus databases.

Antivirus check
In addition to the update module, in the main window we will see another one available in the free edition of Kaspersky Free - anti-virus scanning.

In the anti-virus scanning section, we will find traditional scanning modes:
- Full scan, including all areas of the computer;

- Quick scan, which scans startup programs and services, objects in system memory;

- Selective scanning - scanning mode for individual files;

- Examination external devices– mode of anti-virus scanning of information storage devices connected to the computer (flash drives, external hard drives, SD cards).


Real time protection
When threats are detected, Kaspersky Free will notify you in the information window in the lower right corner of the screen and place the files in quarantine.

The red color of the program interface will also indicate a security threat.

The preset settings of Kaspersky Free provide for the launch of a search for rootkits in the system after the detection and neutralization of viruses.

Quarantine and other additional tools
Among the additional tools of free Kaspersky Free

we'll see a little. This is a monthly report on the work of the antivirus, a section on switching to paid versions Kaspersky products, section enabling and disabling cloud Kaspersky protection Security Network, as well as quarantine.

It is in the additional tools that the quarantine is hidden, where you will need to go to restore controlled files that the antivirus may mistakenly regard as dangerous. You can also go to quarantine to remove detected threats if these are unnecessary files.

Kaspersky settings
Access to the settings is implemented by a button in the lower left corner of the main window.

The antivirus is preinstalled already optimally configured. As we see in the first tab "General", Kaspersky Free is configured to start automatically with Windows and provides for quarantine of detected files before deleting them.

In the second tab "Protection" if necessary, we can temporarily opt out of some protective modules of Kaspersky Free.

Next tab "Performance"- a rare occurrence even in antivirus, even in any other program. However, if we are talking about products from Kaspersky Lab, which are famous for the gluttony of computer system resources, such a settings tab is very useful. It comes with predefined options:
- Opting out of scheduled antivirus scans for laptops in power saving mode;
- Performing scheduled checks during computer downtime;
- Low priority use of system resources during Windows boot;
- Automatic launch of a rootkit search after malware is detected.
Not pre-installed, but possible for manual installation the option to give priority to the use of system resources to other programs on the computer when the processor is under high load, or HDD. This option can be enabled on older or low-powered devices.

In the tab "Examination" instead of the pre-installed automatic selection of Kaspersky Free actions when threats are detected, we can set one specific one for all cases in a row - only informing about the threat, only treatment, treatment, and in extreme cases, removal or removal in each case. The preset automatic selection is the best option, and it is hardly worth changing these settings for users with little computer experience. But you can refuse to check external connected devices. If flash drives, SD cards or other storage media are connected only to trusted other devices, why bother every time to refuse to scan. If you intend to work in a dangerous environment - visiting sites with a dubious reputation, installing and testing third-party software, you can move the security level slider from recommended to high.

AT last tab "Additionally" we will find sections with other program settings.

We will consider some of them in a separate order.
Adding files to exclusions in Kaspersky Free
In order for the antivirus to leave alone and not terrorize the controlled file, which is mistakenly considered malicious, this file must be added to the exceptions. In the settings tab "Additionally" choose a section "Threats and Exceptions".

Clicking the option "Set up exclusions", in the exception window that appears at the bottom, click the button "Add".

In the first field, use the browse button to specify the path to the file. This file will not participate in anti-virus scanning in the future, and it will not be pulled by other modules of Kaspersky Free, the checkboxes of which are pre-installed in the column "Protection Components". Click the button "Add" at the bottom of the window.

By the same principle, you can add executable program files to the list of exclusions by clicking in the " Threats and exclusions» option "Specify trusted programs".

Storage of quarantine objects
By default, Kaspersky Free provides a monthly storage period for files in quarantine. You can change this period in the settings tab "Additionally" by selecting a section "Reports and Quarantine".

In addition to choosing a more or less long period for storing objects in quarantine, we can configure its cleaning not by time, but as it is filled with data. To do this, uncheck the option to store objects by time and select the option to limit the size of the quarantine, specifying the allowable amount in MB in the field.

Rejection of interface animation
Where animation of the software interface is definitely useless is in the case of antiviruses, and especially with Kaspersky Lab antiviruses. On weak devices, it is better to abandon the effects for the sake of speed. In the settings tab "Additionally" choose a section "View" and remove the preset animation checkboxes.


Pausing Kaspersky Free protection
In the event that the vigilance of protection modules needs to be temporarily lulled, for example, in order to install dubious software without obstacles, Kaspersky Free provides a convenient tool for pausing protection. AT context menu on the Kaspersky Free icon in the system tray, you need to click the item "Pause Protection" and choose one of the proposed options - suspend for a certain time, for an indefinite time, or until the first reboot.
To find out the answer to the question of how to install Kaspersky Anti-Virus, we have to go through four stages. Each of them should be performed as prescribed in order to avoid confusion.
Downloading the installer
To download the installation package of the application, go to the developer's official website at www.kaspersky.com and select the appropriate version. We advise you to download the file from here so that no one slips a virus into the archive. The file weighs within 120-150 megabytes. The next step is to install the antivirus.
Removing old versions
Now you need to remove all old versions of antiviruses previously installed on your computer. This can be done through the Control Panel, which is located in the Start menu. There you need to select the "Add or Remove Programs" item, where you can remove old programs. Kaspersky does not transfer other antivirus packages and all kinds of security programs, so this item must be completed. You can view the list of programs that are not compatible with Kaspersky Anti-Virus at this link www.support.kaspersky.ru.
Installing an antivirus
We proceed directly to the installation of the antivirus. This stage can be divided into several more steps.
Step 1: When you run the downloaded file, the Kaspersky Anti-Virus Installation Wizard will open. In order to run standard installation, click the "Next" button.
Step 2: Be sure to read the license agreement that will appear in the next window. If everything suits you, click "I agree" and proceed to the next step. If not, the "Cancel" button is at your service, which will immediately complete the installation.
Step 3: The program will now prompt you to participate in Kaspersky Security Network. If you agree to the proposed terms, the antivirus will be able to send data about viruses found on your PC, as well as information about new possible threats, to Kaspersky Lab. In addition, information about the system and a special identifier that the antivirus assigns to your computer are sent. The program does not send any personal data. So if you agree with all the clauses of the agreement, click "I accept the terms of participation", and then click on the "Install" button.
Please note that when installing an antivirus on operating system Windows 7 may receive a message from the UAC service - User Account Control. In this case, you will need to enter the administrator password and click the "Yes" button to continue the installation.
Step 4: Check the box next to "Run Kaspersky Anti-Virus" in the next window and confidently click on "Finish" to complete the installation of the program.
Activate the application
There are three ways to activate the program different ways, and which one - to choose, of course, you.
Option 1: You can activate the trial version of the antivirus for 1 month first. When 30 days have passed, you can download a program on the Internet called "Registry Key", with which the counter in the antivirus is reset. Thus, this operation with the program will have to be performed monthly.
Option 2: You can also use a special key downloaded from the Internet for activation. Often there is a lot of trouble with the keys, as they fly out. However, this is one of the ways how to install Kaspersky Anti-Virus for free.
Option 3: If you don't want to spend time looking for keys and registries, buy a license. It costs about $25 per computer, so it comes out to about $2 per month. Agree, not so much money. The security of your files stored on your computer is more important.
After activating the program, you will see a window in which the antivirus will quickly analyze all installed applications on the computer. After analyzing, you will be prompted to restart the PC, which should be done. After that, be sure to:
- update the anti-virus databases (this can be done through the program itself or download the databases in another place, for example, in local network).
- perform a full scan of the computer (in the main window of the program, find the item responsible for checking all files stored on the PC). This may take a long time, depending on the number of files being checked.
- check the protection status of your computer - this is also done in the main window of the antivirus.
So, let's sum up. Now you know how to install Kaspersky Anti-Virus on your computer. You know there are two ways. One simple one that comes down to payment software package, the other is more complex. Remember that in an effort to find the answer to the question of how to install Kaspersky Anti-Virus for free, you are putting your computer in danger. After all, along with the same keygen, you can catch the virus.
Antivirus products from Kaspersky Lab are among the most popular programs protect your computer from viruses and unauthorized access to personal data. Downloading a package with installation data is available on various websites, for this, just enter the query "Kaspersky" in search engine. But we recommend downloading from the official website of the antivirus program developer. In this step by step instructions with photos you will learn How to download and install an anti-virus program from Kaspersky Lab.
Step 1
How to download an antivirus program from Kaspersky Lab
Let's start by going to the official website of the antivirus program kaspersky.ru. Then go to the "Trial Versions" section and click on the "Home" tab.
Step 2
Next, select an antivirus program from the list and click the "Trial version" button. In this step-by-step instruction, as an example, it will show how to download and install the Kaspersky Anti-Virus anti-virus program.

Step 3
To download a package with installation files, I use Yandex.Browser. At this stage, click on the "Downloads" button and in the window that opens, double-click on the package with the installation files with the left mouse button. In order to go to the folder with downloaded files, click on the line "All downloads".

Step 4
Now click "Open Folder".

Step 5
In a new window, the folder where the package with the installation files of the anti-virus program was downloaded was opened for you.

Step 6
How to install an antivirus program from Kaspersky Lab
To start the installation of the anti-virus program, double-click the icon with the installation files of the program with the left mouse button.

Step 7
At this point, click the "Continue" button.

Step 8
To continue installing the antivirus, you must accept the terms license agreement To do this, click the "Accept" button.

Step 9
The next step is to agree to the terms of the provision by clicking the "Accept" button.

Step 10
Now click the "Install" button.

Step 11
At this stage, you will see the installation process of the anti-virus program from Kaspersky Lab.

Step 12
The program is installed.

Step 13
When you start working with the program, you may encounter problems with the lack of a license. To activate trial version program, click "Enter activation code."
Many people already know that at the end of 2015, Kaspersky Lab introduced its first completely free antivirus. It is a complete antivirus that provides basic protection computer in real time.
I tried to install it at the beginning of this year on a computer with Windows 10. But then he didn’t work normally on the “top ten”. I remember that he constantly demanded to purchase a paid license (despite the fact that Kaspersky Free is a free antivirus 🙂).
And recently I decided to install it again on the same computer. Oddly enough, everything was installed without problems and now it works without failures. Therefore, now I can safely recommend it for installation. Windows users 10 who do not want to spend money and are looking for a good free antivirus.
The license for Kaspersky Free is issued for a period of one year (365 days). Antivirus is available for download and installation for users from Russia and Ukraine.
is a simplified version of the most popular product of Kaspersky Lab - Kaspersky Internet Security. He is simply deprived of various additional features: technical support, protection of Internet payments, parental control:
 But the user has access to:
- real-time file protection;
- full-fledged anti-virus scanner;
- IM antivirus;
- mail antivirus;
- web antivirus;
- cloud technologies provided by Kaspersky Security Network;
- automatic updating and obtaining the latest virus databases

So, how to install free antivirus kaspersky free?
Download the antivirus on the official website by clicking on the button “ Free download”:
Then run the downloaded installation file. In the window that opens, click "Install": 
We accept the license agreement: 
Then click “Accept” again: 
We are waiting for the installation to complete: 
Then click the “Finish” button: 
The program will run for the first time: 
You will immediately be prompted register the program by creating an account: 
You can, of course, close this window. But I still recommend register. Otherwise, you will constantly get an annoying notification that periodically pops up in the right corner of the screen. Here is this: 
Therefore, click in this window on the left side of the button “ Further". Then enter your email address, create a password and click the " Create an account”:
After that, log in to your mailbox, open the letter sent to it from Kaspersky Lab and follow the link to activate account:

On the site that opens, enter the password for the account (the one that was invented above) and click the “Activate and Login” button: 
In the last window, select the country (Russia) and click “Finish”: 
This completes the installation process. By the way, in addition to the antivirus itself, the extension will be automatically added to the browsers installed on the computer: 
If you, like me, after Kaspersky installations Free some sites stopped opening in the browser Check it out for a quick fix.