Timers are used frequently. For example, some exhaust fans contain a timing device. After turning off the blade does not stop, it works for a fixed time. It is assumed for expired the bathroom will be cleaned of steam. Let's see how to connect and set up a lighting control timer.
Varieties of lighting control timers
There are three types of timers according to their design:
- Overhead mounted on the wall. Deprived of features, remember: electrical wiring stretched over a combustible base only in fireproof insulation. Take the trouble to carry out in most cases a protective gasket. Fireproof box, wall plaster. Read more about the recommendations in PUE 6, there is a huge table listing the options. We explain, we started talking about open wiring for a simple reason, it is often combined with overhead switches.
- On sale you will find timers mounted in a typical socket box. Look carefully at the diameter, because the dimensions (fittings) differ. Sometimes it can be difficult to install. Try to choose a timer that is included in the socket in place of the switch.
- Today, a lot of timers are sold, clinging to DIN rails. Special guides for modern switchboards. It is not difficult to carry out installation by snapping the case. You can feed the apartment with a timer, if there is a reasonable explanation for this. Readers are asked to see how it is possible, using a timer, to replace pass-through, other complex types of switches that are used as standard in a complex to control one source (chandelier) from different places!
F&F remote timer

Bell button that becomes a switch
On sale there are AS-222T timers from F&F, remotely controlled by buttons. Where can I get so many buttons? - And to be beautiful. Just a minute! See photo: call button. It differs from a single London switch only in the presence of a return spring inside, a small bell icon. Feeling the need, you can remove the marking by rearranging the button from another product of the company and series (it is carried out without difficulty).

Can we arrange the buttons - got some air? - as much as you like! In the presence of a long corridor, we will put "bells" wherever it pleases. Limited by one condition: the contacts must converge to the location of the timer. It is allowed to use junction boxes, there are ample opportunities for switching. We give the address of the manufacturer's website fif.com.pl, for now let's see the skills of the timer!
We made a screen of the official English manual, provided by the F&F company website. Model for DIN-line TH-35, mentioned above. The characteristics say: the block takes the place of two modules at once. It will allow you to estimate in advance the possibilities of the switchboard. We see that the turn-on delay is less than a second. A lot or a little, you will have to check it yourself, it is allowed to vary the delay from half a minute to 600 seconds.

Characteristics provided by the official website
It is written that half a minute before the extinction, the light intensity drops. Visually reminds the owner that the shutdown is coming soon... Brilliant? Not a bad solution, we'll try to find a better one. When pressed again, the light goes out. It doesn’t matter, it’s better to allow you to realize your plan. Let's say you can't put a "through" switch in the bedroom, waiting for the attenuation is simply unrealistic.
What is the bedroom, you ask? It is not difficult to power the chandelier in parallel. You can put a simple switch at the entrance, opening-closing the circuit. And if the timer, the switch will simultaneously supply a phase? It's not scary if one phase. The potential difference between devices will be equal to zero. Another thing, an exotic option, there seems to be no prohibitions on PUE (check).
Timer with calculation of solar cycles
The Apel company produces timers that, at a given latitude, calculate the moments of sunrise and sunset of a given area. We make adjustments if necessary. Depending on the type of devices, set the settings:
- The need to include the days of the week.
- Calculation adjustments.
- Current time, date.
Adjustments are required due to geographical conditions. Rough terrain, air content of various components. Apel timers provide the ability to make global and quarterly corrections. Enough in most cases. In addition, some Apel timers are equipped with two relays. One works, guided by the principle described above, the second is configured more flexibly. Helps save light. In the early morning hours, on weekends, it is allowed to leave the load idle.
It’s clear that you don’t want to get caught by voltage while replacing light bulbs, Apel timers for a while technical work switched to test mode. The manual writes: both relays are switched on in parallel. They tend to make a typo, or an incredible subtle move that allows you to remove tension from the cartridges. Judging by the timer connection diagram, zero, phase are supplied. After a short circuit, voltage is applied to the load, it is impossible to change the light bulbs due to the danger of the event.
There is a fuse inside the Apel timer, if the system stops working, it is logical to start checking from here. There is one in every performance. For example, timers for a DIN-line will not let the fuse ring. Otherwise, the leads are between terminals 2-3. The diagram provided by the official manual shows: the load is connected in parallel with the timer. It can be considered a simple device.
However, the lighting circuit is interrupted by the timer's internal contactors. The total power consumption does not exceed 1 kW. More required, bottom drawing used, external contactors used. It is necessary to exclude sparking inside the timer, as a result, failure. Clearly, the external contactors must be sized to handle the applied power. Otherwise, they will already fail. Finally, a contactor is a device for safe switching of loads.
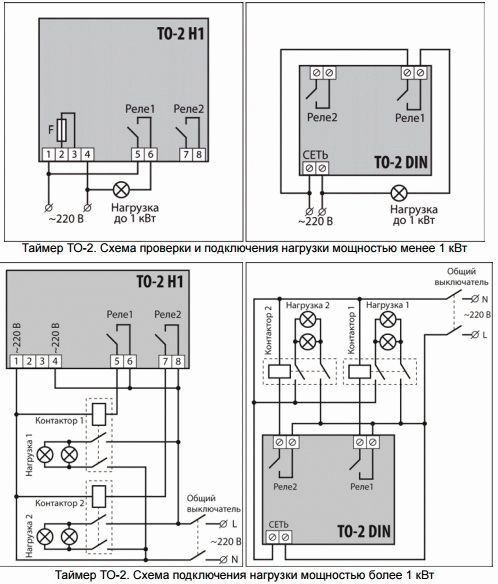
Those interested study GOST R 50030.4.1. The text specifies: a contactor is a device that provides connection of the load not manually, in another way. The closing force is generated by an electromagnet. It is necessary to connect the lighting control timer through external contactors in the presence of a powerful load. The total consumption can be increased up to 5 kW. In addition to electromagnetic, there are many other types of contactors. Obviously, in our case, the device is controlled by electricity.
I would like to point out that the application energy saving lamps can increase returns by 10 times (order of magnitude) luminous flux. Which is the more advantageous mode. To set the timer, follow the information characterizing the IP protection of the case, the standards (bathrooms are described by GOST 505071.11). Please note: DIN version is not protected. The housing of the switchboard must protect the filling from extraneous influences.
To set the Apel TO-2 lighting control timer, three buttons are used: switching functions, arrows for increasing and decreasing the parameter. The LCD display allows you to place information on the screen in a very convenient way.
Timer Specifications
Frame
Readers understood: one of the most important characteristics is the execution of the case. It will determine whether it will be possible to put the timer in the switchboard or not, hang it on the wall, mount it in the socket. In many cases, the installation method will be decisive. For example, for a private apartment, the wall version looks, to put it mildly, ugly. On the other hand, not everyone has a switchboard at home. There remains the option of a socket. The type of housing design determines the degree of protection IP, which is decisive when choosing a mounting location.

Load current
The parameter shows how much the W timer can carry. Ideal for establishments operating according to the schedule. Suppose, at the right time, the main lighting is turned off by the timer, and auxiliary lighting remains, requiring less energy. The mind remembers the barracks, however, if you think about it, any cafe works in sync with the schedule. It is required to serve the company outside the plan - a separate changeover switch can be provided. Automation will play a positive role by measuring a fixed time before the end of working hours, turn off part of the load, signaling the approach of hour X. It is convenient for banks (dimmed light from a distance will make it clear: the office is closed), offices. The load current must not be exceeded without allowing the equipment to fail.
Working method
The designation is not marked separately. We saw that in parallel with automatic timers there are models controlled remotely. In fact, the ability of the manufacturer to anticipate the tastes of consumers will determine the degree of popularity of the product. It is clear, the design factor is unique, maintainability. In the case of Apel's TO2, the entire fee changes. The filling is formed mainly by a microcontroller, it is not possible to reprogram at home.
Operating temperature range
The parameter will instantly allow you to separate the options for the premises from the outdoor version. If the manufacturer's requirements are ignored, the equipment will fail. The temperature spread of outdoor timers is large, the range of indoor devices falls within the range of products.
Delay range
In controlled timers, the concept of a time delay range appears. The interval after which the device will turn off automatically. Similar mechanisms apply exhaust fans bathrooms, as mentioned when starting the review.
Connecting a timer
The connection of the lighting control timer is not always carried out by contactors, as one might think. Torque is closely related to peak load current. Most timers are simply not a match for powerful devices. A high-quality contactor is not included in the composition of the case by default, reducing the cost of the timer: it is clear that not every house of light bulbs will have 5 kW.
Timer setting
The methods for setting the lighting control timer are important. We saw that many algorithms were invented. Ahead are externally programmable timers, where the algorithm is loaded via the I / O port interface (COM, USB). Obviously, the second option is ideal for large companies where there is a need to change the lighting conditions of a large area. It is clear that running and clicking buttons is costly, the main thing is not even that - the possibility of making a mistake increases. And what will be the consequences, determines the specifics of the venue.
Electronic time relay, designed to count time intervals, automatically turn on / off various electrical equipment (lighting, heating, etc.) after a specified period of time during a repeating weekly cycle.
For example:
to turn on and off the lighting of the courtyard, park or street;
to turn on and off the night lighting of staircases in apartment buildings;
to turn on and off at night advertising signs and shop windows;
to control the inclusion of electric heating at home;
for automatic watering of plants;
to create the effect of presence in the house
It is powered by a household power supply with a voltage of 220 Volts (it is possible to order a relay for a voltage of 12, 24, 36, 110 Volts).
You can program, for the whole week or any day of the week, one or more times on and off, during the day.
All data are displayed on the liquid crystal display.
When the power is turned off, it saves the programming mode due to the built-in battery.
Time relay service life from three to five years.
Specifications
| Parameter | Meaning |
| Rated operating voltage | 220V |
| Mains frequency | 50/60Hz |
| Retains performance, with a supply voltage within | 180V-250V |
| Relay power consumption | no more than 2VA |
| Permissible switching contact current, with resistive load | 16A |
| Permissible switching contact current, with reactive load | 8A |
| Minimum programming step | 1 minute |
| Maximum programming step | 168 hours |
| Number of on/off programs | 16 cycles |
| Mechanical durability, on/off cycles | 10⁷ |
| Electrical endurance, on/off cycles | 10⁵ |
| Programming data retention time when power off | up to 150 hours |
| Accuracy of the watch during the day, at a temperature of +25°С | ≤1 second |
| Overall dimensions (HxWxD), mm | 86.5x36x65.5 |
| Operating temperature range, °С | -10°C~+40°C |
| Relative Humidity | 35~85% |
Mounting on a DIN rail (occupies two S-type modules), the size of a two-phase circuit breaker.
Operate indoors with artificial regulation of ventilation and heating.
Timing relay front panel

Assignment of control and indication buttons of the time relay
| Assignment of buttons and indications | Inscription |
| Contact ON indication | ON |
| programming button |  |
| Button for setting the day of the week | D+ |
| Hour setting button | H+ |
| Minute setting button | M+ |
| Setting and current time button |  |
| Reset all button | RESET |
| Mode control button (ON, AUTO, OFF) | MANUAL |
Liquid crystal display

LCD data
At the top of the display:
days of the week
MO- Monday; TU- Tuesday; W.E.- environment; TH- Thursday; FR- Friday; SA- Saturday; SU- Sunday.
The day of the week is set using the button D+
In the middle of the display:
current and programmable time
Time setting is carried out by buttons , H+ and M+
On the lower left side of the display:
numbers of switching on and off cycles
ON- included; OFF- disabled; figures from 1
before 16
- cycle number.
The cycles are set using the button
On the lower right side of the display:
control mode
ON- always on; AUTO- auto mode; OFF- disabled permanently.
The control mode is set using the button MANUAL
Setting the time relay
It is recommended to start with a button RESET (press gently with a thin screwdriver, no effort is required). After pressing, the display is blanked, followed by the display of all elements, all settings are reset and current time.
Devices that turn on or off the light at a pre-set time are called time relays. They are very convenient and allow not only to save electricity, but also to bring comfort to many areas of human life. You can find such an electric or electromechanical timer in many hardware stores and departments. household appliances. Devices come in different types, differing in price and functions.
Main characteristics
Monoblocks, which are time timers, are most often built into a portable outlet, sometimes into an extension cord or adapter. This device controls a relay that connects input and output contacts. It opens and closes them, thus stopping and starting again the supply of electricity to the connected device. The process is controlled and the parameters are set through the control panel installed on the front of the monoblock.
Although different models timers have the same principle of operation, they are quite different from each other. They are as simple mechanical devices, and electrical with complex settings and many additional features. They are designed to be used in various conditions and with different purposes. They differ in the following characteristics:

Almost all devices of this type are equipped with a built-in battery that is charged from the mains, and can work even without power for 100 hours or more. Full charge such a battery takes 12-14 hours. In addition to switching the relay to automatic mode, most models can also be simply turned on or off manually.
Device types
Different types of timers and time relays differ in principle of operation, switching period, installation method and conditions necessary for their operation. normal functioning. All of them have their own advantages, disadvantages and features of operation that make each type of device suitable for its types of tasks.
Mechanical and electrical
 Control over the mechanical timer is exercised through the wheel divided into sections showing intervals of time, and the buttons or levers located on the front panel. Although it has a built-in mechanical clock that determines the time, the device's motor still requires mains power, so it would be more correct to call it electromechanical.
The smallest switching range on the instrument is 15 minutes. Such a timer is most often used to turn the light on and off at intervals of a day or a week, when second-by-second accuracy and the choice of response time are not important. Its advantages include ease of setup and operation, as well as a low price compared to electric models, the disadvantages are the inability to adjust the parameters to specific needs and the lack of a backup power source. This model is well suited for simple tasks.
 Among the most common breakdowns of electromechanical timers, one can distinguish the wear of teeth and gears, due to which the adjusting wheel stops working. In order to cope with this, you will have to call the wizard, but the likelihood of such a problem is much less than a variety of damage to parts and wires in electrical devices.
The control of the electronic timer for turning on and off the light is carried out by a microprocessor. It is configured by a person using a panel located on the front of the device. The parameters are displayed on a small LCD display and are stored in the device's memory when turned off. Such a timer works from a built-in battery or batteries that are charged from the mains through an outlet.
The advantages of an electric timer in comparison with a mechanical one include big choice settings, the ability to set the exact operation parameters and visually see them on the display, minimal errors in the calculation of time and the ability to create small, up to a minute, switching ranges.
Among the minuses, it is worth noting more high price, as well as the fragility of such devices - they sometimes fail the battery, parts and software. In addition, they are more susceptible to negative influences. environment and demand additional protection From him.
On and off time
In addition to the principle of operation, timers differ in operating periods and operating ranges. On this basis, they can be divided into the following groups:

There are also universal multifunction devices with the ability to set them the parameters of any of these modes of operation and combine them. But they are more difficult to operate and configure, so you should not buy them unnecessarily.
Socket and stationary
According to the type of installation, light timers are divided into socket and stationary. The first of them are connected to the electrical network through a socket using a standard plug, the second are placed in a specially installed box or rail of a dividing shield.
The socket relay is convenient when you need to control the operation of a separate electrical appliance or lighting in one room. They are easy to install and use, are small in size, do not require auxiliary wiring for installation in the power grid, and can be moved from place to place as needed. The stationary relay does not share these advantages, but compensates for them by the ability to control the operation of electrical equipment at once in the entire residential building or work building. If this is what you need, then its installation will be much more convenient and profitable than using many mobile devices, even with all the shortcomings of this type of device.
According to working conditions
 When choosing a timer, sometimes the conditions under which they can work normally are important. For example, a device installed to regulate an automatic watering system for plants must continue to function when splashed with moisture, and a timer installed in a work shop will need protection from dust.
The security class of the time relay, like other electrical appliances, is determined by the IP system. In total, there are 7 levels of protection against dust and 10 - against water, as well as additional designations for weather resistance of the device, high voltage and other factors. They are listed in technical specifications device. You need to choose a timer in accordance with the conditions of the room in which it will then be installed.
In addition to protection against harmful influences, it is necessary to take into account the maximum power of devices that can be connected to the timer. In total, it should not exceed this indicator for the device itself. You can find it in the instructions or on the information plate on the time relay housing.
Timer functions
Electrical and electromechanical timers are used to automatically control not only lighting, but also other electrical appliances: heaters (including underfloor heating systems), air conditioners, hoods and others. Compared to the constant manual switching of devices, the use of a time relay has the following advantages:

Thus, time relays are quite common and are found everywhere in a person's daily life. They are inexpensive, but significantly increase comfort and save time and effort, which brought them popularity.
Criterias of choice
There is nothing complicated or unusual in choosing and buying a time relay. First you need to determine why such a device will be needed, what it will be used for and in what conditions it will work. Then you need to look at the following characteristics:
- discreteness of setting the switching time;
- instrument accuracy;
- the number of different programs to be set;
- the degree of protection from the effects of the external environment;
- maximum power of connected devices;
- convenience, clarity and accuracy of settings;
- the ability to connect several plugs to the relay at the same time;
- price availability.
Comparing these characteristics with the purpose for which the time relay is purchased, it will not be difficult to choose the right model. In this process, you should not chase the most expensive and fancy devices - if, for example, you just need to turn the light on and off at the same time all the time, then a simple and cheap electromechanical timer with a clock will be enough. You can buy a timer in any electronics department or a specialized online store.
An economic person will definitely need to automate some processes in time. Turning on the light for poultry, supplementing the greenhouse, feeding pets, turning on and off electrical appliances at a given time. All those processes that do not require direct human intervention and can be successfully automated. Today the article will be about how to set up a mechanical and electronic socket with a timer. We will provide instructions with video examples so that you can clearly see the setup process.
Mechanical
The heart of the timer is the drum, with switch levers installed on it. The drum is driven by a micromotor. The actuating device is a microswitch with one pair of contacts.Sockets with a cycle of 24 hours are very popular, they are also called a daily timer. As a rule, one hour in them is divided into four parts, each fifteen minutes.
As you can see in the photo, the design of the Feron TM50 socket is quite primitive. Setting up such a timer comes down to setting the switches on the drum to right order in a certain time sector and forced manual installation current time, by scrolling the drum clockwise to the arrow of the pointer. A switch is installed on the side of the relay for forced switching on of the load. Let's try to figure out, using a small example, how to set up a mechanical outlet with a timer, model Feron TM50.
In this diagram, the operating time of the filter pump in the pool is distributed over the day:
- No food is served from 1:00 am to 2:00 am.
- After two in the morning, the pump turns on for fifteen minutes.
- It's off from four to five.
- At 6.00 for fifteen minutes the pool filter works.
- After this happens at nine and twelve o'clock, again for fifteen minutes.
- At 15.00 rush of swimmers, we turn on the pump for thirty minutes.
- At six and nine in the evening we make the pump work for thirty minutes.
- And the final cycle at twelve at night for 15 minutes we filter the water.
There is an opportunity to save if you correctly set up the socket with a timer and at the same time use a two-tariff electricity meter.

According to the settings on the diagram, it becomes clear that the consumer is disconnected during peak tariff hours, when the price per kilowatt of energy consumed is one and a half times the usual price. From eight in the morning until eleven, the device is turned off. Also in the evening peak from eight to ten in the evening. The rest of the time, the socket with a timer keeps the consumer on.
You can learn more about how to set up a mechanical outlet with a timer in the video below:
Another popular model from Feron is the TM32. Features of setting up this outlet are also discussed in the video review:
Electronic
Using the TM24 model as an example, let's look at how to set up an electronic outlet with a timer.

When you turn it on for the first time, you must leave the device for 12-14 hours in the socket to charge the built-in battery.
Button functions:

This programmer has the ability to set up twenty programs for switching on and off.

As you can see from the diagram - point 1, it is possible to install the program from Monday to Sunday. That is, it turned on and off at the same time. Setting individual programs for the days of the week from the 2nd to the 8th point. Combination of the program on weekdays from Monday to Friday p. 9 or only on weekends (Saturday and Sunday) p. 10. For six days a week item 11. Every other day Monday, Wednesday, Friday item 12. Tuesday, Thursday, Saturday item 13. Three days in a row item 14 and 15.
To start using the outlet, you must first set the current time. Hold down SET for 5 seconds until the day of the week flashes. Use the RIGHT or LEFT buttons to set the desired day. Pressing and holding SET again takes us to setting the clock. Use RIGHT or LEFT to set the desired time. We repeat the same procedure to set the minutes.
Now you can start setting up the program. You can do this in the following way:
- Press and hold RIGHT until "1_ON" appears, this is the first timer.
- After that, press and hold SET until the days of the week flash, use the RIGHT or LEFT buttons to select the desired day or combination of days.
- Next, using SET, select the hours and RIGHT or LEFT the desired value, and so on with minutes.
- Then repeat the operation while holding RIGHT, until the value "OFF_1" appears.
- We repeat the setting similar to the paragraph above, set the day, hour and minutes.
- To exit the programming mode, press CLK.
Press the MANUAL button to reset the current program settings to set new parameters. To force the timer to turn on or off, there is a MANUAL function, which has three modes: MANUAL-OFF, MANUAL-ON, MANUAL-AUTO. In OFF mode, the timer does not run programs and is in the off state. In ON mode, the device is forced to turn on, and in AUTO mode, programs are executed.
To simulate the presence of a person on the outlet, there is an interesting RND button. This is a function with a floating timer advance, which varies arbitrarily from two minutes to half an hour. The time interval is worked out taking into account the advance.The inclusion of electrical appliances is not strictly tied to a certain minute, which can confuse thieves trying to find out whether people are at home or not.
Instructions for setting the parameters of the electronic outlet are provided in the video below:
Setting up the rest of the sockets with a timer is no different from the installation algorithm described by us in the example, and should not cause difficulties. Do not forget to change the clock to winter and summer time for more correct operation of the device.
We hope our instructions were clear and useful for you. Now you know how to set up an outlet with a mechanical and electronic timer!
Automation every day more and more penetrates into our apartments. Sockets with a timer are a very useful and simple device that will allow you to adjust the operation of most electrical equipment in a variety of ways.
Thanks to them, you can easily turn on or off the heaters or air conditioner at home according to the schedule. Imagine that in early autumn, when the heating season has not yet begun, you come home from work, and your apartment is already warm and comfortable. 
Sockets with a timer are indispensable if you want to create for outsiders the effect that someone is present in your house. Lighting and TV will turn on and off on their own in the evening. And you yourself at this time will be far from home. This sometimes helps from uninvited guests. 
Sockets with a timer are divided into 2 types:
- mechanical
- electronic
Mechanical
The simplest are mechanical. They have plastic sectors around the perimeter of the dial. By clicking on them, you can set the desired operating time of the device. 
Each sector segment is divided into 15 or 30 minutes (depending on the outlet brand). Thanks to this, a maximum of 96 programs can be set per day.

Setting up a mechanical outlet
- check the box for the current time
The timer rotates clockwise, it cannot be rotated in the opposite direction due to a mechanical stop. You can break all the insides.

- press the plastic sectors of the period when the device should turn on and work
- turn on the socket and connect the plug of the configured equipment through it
- the device is ready to work
There are mechanical sockets with a timer and another sample like those that are in washing machines. By turning the lever, you start the timer for a specific off time. 
Mechanical sockets can work continuously without a timer, for this they have a lock button on the side. 
The maximum power that can be connected through such devices reaches 3.5 kW. Some unscrupulous manufacturers overestimate these data. Therefore, I do not recommend immediately connecting the maximum possible load. Especially considering the fact that they will work without your presence and supervision, and the contacts inside are not so thick. 
It should be noted that mechanical sockets are only daily performance. This means that the same program will work the same way throughout the day. The cycle will repeat the next day.
Advantages
Advantages of sockets with a mechanical timer:
- low cost. 2-3 times cheaper than electronic type
- quick and easy mode switching
Everything is very simple. Pressed the button - the mode is on, pressed - off. No need to go to the menu, climb in the settings, etc. 
Flaws
There are also disadvantages:
- no built-in battery
There is no light in the apartment - the device settings go astray. For example, the water in the boiler may not warm up at all by your arrival home, but at a completely unexpected time for you.

The hour dial can run a few minutes forward or backward depending on whether the outlet is overvoltage or undervoltage.

Instructions for setting up a mechanical outlet with a timer -
You can choose a similar outlet for yourself and get acquainted with the current prices for them on Aliexpress.
Electronic
There are two types of electronic sockets with a timer:
- daily allowance
- weekly
 The daily principle is the same as that of mechanical ones. But the weekly one can be customized to your individual mode of operation for all seven days, including weekends. Therefore, such sockets can be advised to owners of suburban dwellings and people who often go on business trips.
Electronic type sockets are programmed for 140 on-off operations. There is a so-called presence function. Through it, the lighting in your apartment will turn on spontaneously during the day. 
Most models have built-in batteries inside. They allow the clock mechanism of the socket to work even without mains voltage. If the voltage suddenly disappeared at your home, the program set earlier is saved and the device works as if nothing had happened. 
After purchasing the timer, immediately plug it into the outlet. Batteries should be charged within 15 hours. Only after that the device is ready for operation.