If for some reason you need to change the User Agent in your browser, then this article is for you.
So, User Agent is such a browser string (application) that serves to identify various parameters - browser name, browser bit depth, browser version, version operating system and other options.
The term is commonly used in networking and Internet technologies for applications that access websites. User Agent is used by browsers, search robots (Yandex, Google and others), as well as various "spiders", Cell phones and other devices.
A typical situation at work - the system administrator has closed access to all browsers except Internet Explorer, but I want to use Chrome or Opera, how to be in this case? Let's deceive system administrator. The secret to bypassing the lock is to change the user agent "a browser.
Method 1.
This method works in most browsers. Let's write the parameter in the browser shortcut:
user-agent
Let's force Opera to impersonate Internet Explorer 9, click right click click on the label - "Property" - "Object" and add the line:
User-agent="Mozilla/5.0 (compatible; MSIE 9.0; Windows NT 6.1; Trident/5.0)"
That is, the full path should be something like this:
"C:Program Files (x86)Operalauncher.exe" --user-agent="Mozilla/5.0 (compatible; MSIE 9.0; Windows NT 6.1; Trident/5.0)"
Now it remains only to click "OK".
Method 2Mozilla Firefox
Open the browser in address bar we type the following:
About:config
Click on the "I promise I'll be careful!" button:

general.useragent.override

And in the value we enter the user agent of any browser, for example ie 9:
Mozilla/5.0 (compatible; MSIE 9.0; Windows NT 6.1; Trident/5.0)

Ready. Now we're masquerading as IE.
Method 3. Extensions
AT modern browsers can be used various extensions. We look in browsers for something like: "Load extensions" and look for extensions such as "User-Agent Switcher", "Custom UserAgent String" and others.
A large number of interesting additions have been implemented that can significantly expand the capabilities of this web browser. So, in this article we will talk about an interesting add-on for hiding information about the browser you use - User Agent Switcher.
Surely you have repeatedly noticed that any site can easily recognize the operating system and browser you are using. Almost any site needs to receive such information in order to ensure the correct display of pages, while other resources, when downloading a file, immediately offer to download the required version of the file.
The need to hide information about the browser used from sites may arise not only to satisfy curiosity, but also for full-fledged web surfing.
For example, some sites still refuse to work properly outside of the Internet Explorer browser. And if for Windows users this, in principle, is not a problem (although I want to use my favorite browser), then Linux users and completely roll around in the span.
You can either immediately go to the installation of User Agent Switcher by clicking on the link at the end of the article, or find the add-on yourself.
To do this, click on the browser menu button and go to the section "Additions" .
In the right upper corner window, write the name of the desired add-on - User Agent Switcher .

The screen will display several search results, but our add-on is listed first on the list. Therefore, to the right of it, immediately click on the button "Install" .

To complete the installation and start using the add-on, the browser will prompt you to restart the browser.

How to use User Agent Switcher?
Using the User Agent Switcher is extremely easy.
By default, the add-on icon does not automatically appear in the upper right corner of the browser, so you will need to add it yourself. To do this, click on the browser menu button and click on the item "Change" .

In the left area of the window, elements hidden from the user's eyes will be displayed. Among them is the User Agent Switcher. Just hold down the icon of the add-on and drag it to the toolbar, where add-on icons are usually located.

To accept the changes, click on the icon with a cross on the current tab.

To change the current browser, click on the add-on icon. The screen will display a list of available browsers and devices. Select the appropriate browser, and then its version, after which the add-on will immediately begin its work.

Let's check the success of our actions by going to the page, where information about the computer, including the browser version, is always located in the left area of the window.

As you can see, even though we are using a browser Mozilla Firefox, the web browser is defined as Internet Explorer, which means that the User Agent Switcher add-on does its job perfectly.
If you need to stop the add-on, i.e. return real information about your browser, click on the add-on icon and from the menu that appears, select "Default User Agent" .

Please note that a special XML file is distributed on the Internet, implemented specifically for the User Agent Switcher add-on, which significantly expands the list of available browsers. We do not link to resources for the reasons that given file is not an official solution from the developer, which means that we cannot guarantee its security.
If you have already acquired a similar file, then click on the add-on icon, and then go to step "User Agent Switcher" - "Options" .

A window with settings will appear on the screen, in which you need to click on the button Import , and then specify the path to the pre-downloaded XML file. After the import procedure, the number of available browsers will expand significantly.

User Agent Switcher is a useful add-on that allows you to hide the real information about the browser you are using.
Probably everyone knows that sites and services collect information about users for their own purposes. User Agent - a string that contains information about the version of the operating system, the browser and its special features, as well as the device from which the user visits the site. Sites collect this information to correctly display the page and its content. In the past, sites were built to suit different browsers, so users changed the User Agent to view the site's pages the way they wanted. Developers often use this tool to check the performance of pages from different devices.
By itself, the information provided by the Browser User Agent is not harmful, however, some sites and services use it to identify users. Therefore, the User Agent interferes with those who work with multi-accounts, social networks and trading services: smm managers, arbitrageurs, arbers, etc. With their help, websites, services and social networks detect the simultaneous operation of several accounts and block the entire network, which leads to loss of money and time. To prevent this from happening, users change the User Agent in browsers and programs that have a built-in browser.
Also, User Agent substitution will help to simply remain anonymous and ensure the security of the computer and the data stored on it, as well as bypass restrictions and visit sites whose content is available only when using a specific platform or device.
However, changing the User Agent has disadvantages: some sites may not display correctly, and services technical support will receive incorrect information about your device and browser, which will make it difficult to resolve the problem. Therefore, do it wisely and do not forget to roll back changes if the situation requires it.
How to disable User Agent in browsers
The methods for changing the User Agent differ depending on the browser. Somewhere it is easier to do it, somewhere it is more difficult, and in individual cases, it will not be possible to change the User Agent without third-party extensions. If you do not know how to change the User Agent, then use the instructions below. They talk about changing the User Agent in popular browsers.
ChangeMozilla Firefox
In new versions of Mozilla Firefox you can change the User Agent through command line browser. For this you will need:
- Open a browser and type in the address bar: about:config.
- Right-click in the settings window and select "new" and then select "string".
- After that, a window will open where it is proposed to name the line. We give it the name general.User Agent.override and click "OK".
- After that, a new window will appear, which will require you to enter a string value. Enter the User Agent you need into it and click "OK".

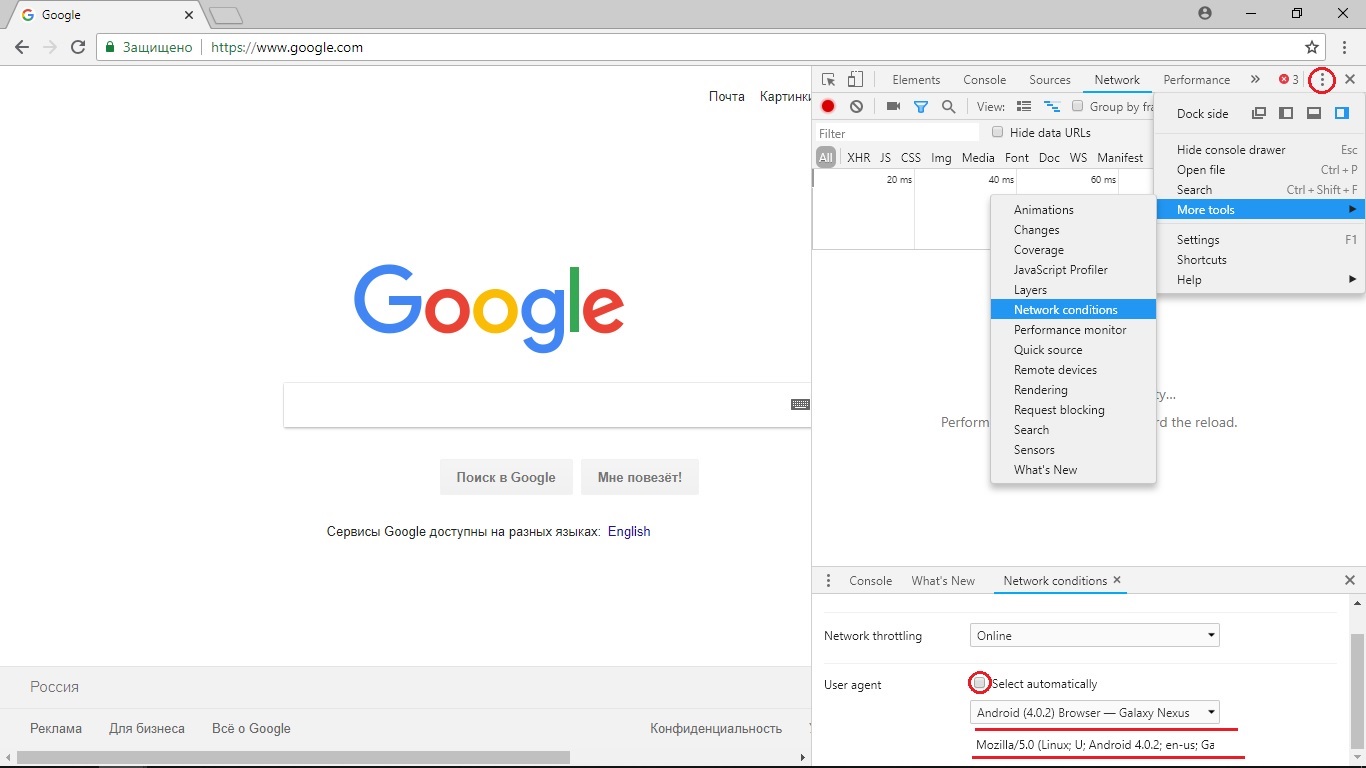
Universal way to change User Agent for Chromium-based browsers
A universal way that is suitable for all browsers based on Chromium. Replacing the user agent is carried out directly through the browser using the built-in developer tools. For this you need:
- Open the browser and go to its menu. Hover over the item "Additional Tools", then click on the item "Developer Tools", or call the menu with the key combination Ctrl + Shift + L or just press F12.
- In the window that appears on the right, click on the three dots, which are located on the tabs at the top
- In the pop-up window, select the "More Tools" section, in it click on the "Network conditions" button.
- An additional tab will open at the bottom right. In the "User Agent" section, uncheck the "Select automatically" box.
- After that, select the required User Agent from the slider, or enter the required one in the special field below.
- This method is suitable for the three browsers mentioned above. If it does not work, then try using the other methods listed below.
Change Google Chrome
Changing the User Agent in Google Chrome is easy. If the universal method did not help you, or turned out to be too complicated, then try this one. It works for versions above 26. You will need:
- Right click on the browser shortcut.
- In the pop-up window, click "Properties."
- In the "Object" field, add the following content: --user-agent="(the User Agent you need)”
- After that, click "OK".
- Press Win+R. In the Run window that opens, type chrome --user-agent="(desired User Agent)"
- Click "OK"
You can also just use an extension that will change the User Agent in a couple of clicks. You can find them in a search engine, or in a store. Chrome extensions. If you do not know which extension to use, then we advise you to pay attention to the User-Agent Switcher for Google Chrome.

Changing the User Agent in Opera
If the universal method above did not help you, try using additional methods for changing the User Agent in Opera, which depend on the version of your browser. To change the User Agent in version 43 of Oprea and below, you need to:
- Open a browser, enter opera:config#UserPrefs|CustomUser-Agent in the address bar.
- In the window that opens, enter the User Agent you need.
In new versions, this method may not work, so you have to use third party extensions, which change the user agent of the browser, or make it random each time the browser is logged in. They are easy to find by the relevant query in the search engine. For example, the User-Agent Switcher extension for Opera.
Change Yandex Browser.
In addition to the universal method described above, you can change the User Agent in Yandex Browser using a special extension that can be found using a search engine. We recommend using the User-Agent Switcher extension for Yandex Browser.
Remember that changing User Agent should be used wisely. Don't forget to revert to the original settings after each change, because an incorrectly set User Agent will display some pages incorrectly, and in the worst case, access to the page you need will be completely blocked.
User agent- This is a set of parameters by which the browser, operating system, their versions, language and plugins are determined. Such data is required for the correct display of web pages on various devices and browsers.
After the standardization of the main browsers, User Agent data is no longer required, and is used mainly for debugging sites, collecting statistics and "black" search engine optimization. Also, User Agent data can serve as an additional source of information for intruders. Therefore, to ensure anonymous browsing on the Internet, users change the User Agent value using various plug-ins and programs.
It is important to remember that not all plugins are able to correctly change the user's User Agent. Some plugins make the User Agent data spoof only in the client browser, leaving similar server data unchanged. Users whose User Agent values do not match may be suspicious of the administrations of various banking sites and payment services.
How to check your User Agent
After installing or removing plug-ins and programs to replace the User Agent, it is recommended to take a test on the site. The test will show if the User Agent values are the same on the client side and on the server side.
How to Change User Agent in Chrome Browser
AT Chrome browser It is more convenient to replace User Agent data using the User-Agent Switcher plugin.
- In the Chrome browser, download and install the "User-Agent Switcher" plugin.
- Click on the plugin icon and select any User Agent value.
- We check the coincidence of User Agent values with a test on the site.
How to change User Agent in Firefox browser
In Firefox, it is possible to change the User Agent through the browser settings.
- AT Firefox browser we call hidden settings, for this we write the command about: config in the address bar and press Enter.
- We create new parameter named general.useragent.override. Next we call context menu, select "Create" and "String".
- Enter the name of the parameter general.useragent.override and confirm.
- In the window that appears, enter the necessary User Agent data.
- We check the result of replacing the User Agent with a test on the site site.
How to change User Agent in Opera browser
In the Opera browser, User Agent substitution is possible using the User-Agent Switcher plugin.
- On the menu Opera browser find "Extensions" and load the "User-Agent Switcher" plugin.
- After installation, click on the “User-Agent Switcher” plugin icon and select any data that will be displayed in the User Agent.
- We check the correctness of replacing the User Agent with a test on the site site.
SQLMap — this utility works on most platforms and is written in Python "e. Its purpose is to conduct sql injection. Some of its features:
* Definition of the "system banner" (server, script interpreter, database) * Display of the username under which the attacked farm works * Display of databases, tables, columns and fields
#Description Everyone has heard of WPS and its famous hole, so I'll start from the middle.
AT WPS protocol There is a pin consisting of 8 digits. Reaver implements a brute force attack on this pin. If the pin is matched successfully, Reaver recovers the WEP/WPA key.
On average, the reaver's work is 10 hours, but in a minority of cases, it is possible to get the key to these Wi-Fis of yours in 3 hours.
#Installation
If you have not decided to download Kali Linux, then most likely it is not on your ubuntu. So for starters, download for free without registration and SMS desired version. After unpacking the archive, we build it: $ ./configure$ make# make install And if you want to delete it, then: #
nmap is a utility for various scanning of IP networks, it has the ability to determine the OS of a remote host, "invisible" scanning, parallel scanning and much more. Now available for any OS. Scans various methods: UDPTCP (connect) TCP SYN (half-open) FTP-proxy (breakthrough ftp) Reverse-ident ICMP (ping) FINACK Xmas tree SYN and NULL scan.
So a note is not an article.
The topic raises many questions. One of the solutions.
The answer to the question in the profile topic on chat.
Decided to post it here and I'm sure someone will be interested.
================================================
Python installed in most cases
Login via SSH to the VPS.
# wget https://thesprawl.org/media/projects/dnschef-0.3.zip
# unzip dnschef-0.3.zip
# chmod 755 *.py
Install modules
# pip install dnslib
# pip install IPy
create hosts.txt file
Huyandex.ru=IP_TYOUR_VPS
We launch. first make sure that port 53 is not busy and Apache is running with a fake
./dnschef.py -i 0.0.0.0 --logfile=log.txt --file=hosts.txt
Your DNS is working. Returns addresses, but only responds to requests from huyandex.ru
IP_TYOUR_VPS
Either like this:
./dnschef.py -i 0.0.0.0 --logfile=log.txt --fakeip=IP_TYOUR_VPS
So your ip is returned in response to ANY request.
If you need to leave the script running and exit vps, then run through screen or nohup.
You can register the DNS address in (! YOUR!) router. Second...