I talked about why I always prefer to order a new computer in the form of separate components. In the comments to this article, I was asked to show for those who have never encountered this before, exactly how the assembly process takes place: how difficult it all is, well, maybe whether not too advanced user to assemble a computer on their own. And then I thought that if I filmed and demonstrated this process, then this could become a useful article for the "Likbez" section. After all, in fact, there is nothing impossible in self-assembly of a computer. Mastering all this is no more difficult than assembling a cabinet from IKEA, and even then - in my opinion, assembling a cabinet from IKEA is noticeably more difficult. And if you more or less understand what components a computer consists of and how these components you need to choose, then you, of course, new computer it is better to assemble it yourself - from those components that you yourself select for your tasks and your financial capabilities. Well, let's see how I assembled my computer: what goes after what, what difficulties and subtleties there may be. Here is a prepared set of components (what are these components and why I chose them in the article). (All photos are clickable so you can see all the details.)
At home, it is better to assemble on the table if it is of sufficient size, but it is even better on the bed - this is the most convenient: you don’t have to bend down much, and there is plenty of space. I take the case out of the box. Handsome, right?  Remove both side covers.

The case has wires with pads for connecting all sorts of ports, coolers and switches. Also there are mandatory bags with all kinds of fasteners and clamps.

The front door opens, under it - four five-inch seats, for example, under the DVD and all sorts of additional panels.

Left on top cover buildings - two USB port 3.0, two USB 2.0 ports, headphone and microphone outputs.

On the right - the power button, the reset button, the on / off button for the backlight of the case, the three-position button for switching airflow modes, the hard drive operation indicator, the airflow mode indicator.

The back of the body.

Install the power supply first. In the article, I wrote that I decided to take the V550 model - 550 watts. However, after thinking, I decided that I would still take a more powerful power supply. And the point is not that I want to have a power reserve: you never know what I would think of putting in a computer. The point is that more powerful block the power supply will turn on the cooler for blowing much less often, and it is extremely important for me that the computer is almost silent.

That's what I call a smartly packaged power supply. Just nice to take in hand.

The power supply itself, complete wires and a set of clamps.

We install the power supply in the PSU compartment of the case. It is installed with the fan down - there is a corresponding ventilation window with a dust filter on the computer case.

We fasten the power supply with bolts.

Now it's the motherboard's turn. By the way, before picking her up, make sure that you do not have static electricity on your hands, otherwise, if you discharge directly into your mother, this may end badly. The same goes for other computer boards.

We take out the motherboard.

It comes with a large set of fasteners, wires, adapters and so on.

Port block.

It must be installed in the corresponding slot of the computer case: carefully bring it to the slot inside the case and insert it evenly until it clicks. Check that the block is properly seated on all sides.

Slot for installing the processor. We release the clamping handle, open the clamping frame, remove the plastic plug.


We take out the processor from the box.

We install it in the landing slot. The triangle in the corner of the processor should face the triangle drawn on the motherboard under the socket. There are also two guides there, so putting the processor in the wrong way simply won’t work.

We cover the processor with a clamping frame, fix the handle under the ledge.

Now we install a cooling system on the motherboard with a processor, in simple terms - a cooler.

We take the cooler out of the box. It consists of a heatsink and a removable fan.

Two types of fasteners - for Intel processors and AMD processors.

Fasteners for Intel processors.

We remove the fan from the radiator so that it does not interfere.

The black frame is set to lower part motherboard under the processor, and its racks pass through special holes.

Holders are installed on these racks from the top. They can be installed the way I have, or you can turn them 90 degrees.

Before installing the heatsink, the top of the processor must be lubricated with a special thermally conductive paste, which will increase the area of contact between the radiator pad and the processor and improve heat dissipation. If the paste is not used or applied incorrectly, then, quite possibly, the processor will overheat, which is fraught with very big problems in the computer's operation. A special syringe with paste is attached to the cooler. There you need to unscrew the cap, squeeze the required amount onto the upper surface of the processor and spread this paste very evenly in a thin layer. Before this, do not touch the processor surfaces and the heatsink seat with your fingers so that grease stains do not appear.

After that, you need to install the heatsink and fix it properly so that it is pressed against the surface of the processor as tightly as possible.

Special double plastic buffers were applied to the fan, with which it had to work even quieter - I installed them.

After that, I installed the fan on the radiator and connected its power to the corresponding connector on motherboard. This connector is located next to the processor, and there, through the BIOS or special programs, you can set the rotation speed of the cooler.

Next, you need to install the motherboard into the case. But first, one remark about installing the cooler. I have it installed opposite the case fan, which supplies air into the case. However, it would be best to rotate the radiator with the fan 90 degrees counterclockwise so that it supplies heated air to the exhaust fan, which is installed on the rear end (both of these fans are clearly visible in the photo). But I was prevented from installing it in this way by the location of the memory card slots on the motherboard - in this case, the fan would rest against the memory cards, which is undesirable. Therefore, I installed it exactly as in the photo - so it does not interfere with anything. And I thought that even with such an arrangement, I would not have any problems with cooling the processor: after all, this is a very efficient cooler. (I must say right away that this is how it turned out - there were no problems.)

The ports and outputs of the motherboard should be in their places in the already installed block. First, we check that everything is in place, after which we attach the motherboard without missing a single place of fasteners.

The motherboard is installed, now we begin to connect the wires.

In modern cases, special holes with rubber nozzles are always made through which cables and wires can be laid not from above motherboard and through the back wall. It's more convenient, and then everything looks much neater.

Connect cables as needed. power supply, we draw them through the back wall and connect them to the pads on the motherboard. The heads of the power supply cables clearly correspond to the pads, so it’s simply impossible to confuse something.

We connect the power to the main block of the motherboard, bringing the cable out of the hole closest to the block.

In the same way, we connect the rest of the cables - audio, USB, cooler power, and so on.

We pass all cables through the back wall, bring them out of the nearest hole and connect them. Later, when we collect everything, we will remove the extra sections of cables under the back wall.

A bundle of wires with heads comes from the case, which are connected to a group of contacts on the motherboard - this is a power button (two contacts simply close there), a power indicator, Reset, an indicator hard drives.Theoretically, the names and polarity of the contacts are written on the board and in the instructions, but in practice, a special block is usually applied to advanced motherboards, to which you can easily and simply connect wires, and the block is then planted on a group of contacts. Here is this block.

We insert the wires (there is written on the head of each wire what it is).

We insert the block on the contacts.


For the convenience of work, I purchased such a universal card reader with additional USB ports. It is installed in a five-inch slot in the case.

The kit comes with two front panels in other colors - white and gray.

I have a white case, so I installed a white socket.

A plug is pulled out of the five-inch landing slot, a card reader is placed there and fixed. Its cables connect to the motherboard's USB pins.


Now install the memory. Before that, just in case, you need to look at the instructions: if only two of the four slots are used (and that's how it is for me), then the memory plates must be installed through the slot - this is the so-called dual-channel memory configuration. The instructions clearly describe how to install this memory: either in the 1st and 3rd slots, or in the 2nd and 4th.

Here are two strips of memory.

Installation: there is a special ledge in the memory slot, which shows exactly how to unfold the memory board so that the recess on it coincides with this ledge and the board is installed in the desired position. The board should be placed in the desired position, and then lightly pressed from the edges so that the board sits in the slot and the plastic levers snap into place along the edges.

Now we install a terabyte M.2 SSD - here it is, handsome.

The motherboard has two M.2 slots. We install in one of them and fix the board with a screw.

Despite the presence of a terabyte SSD, I nevertheless decided to put a quiet three-terabyte HDD in some far corner of the case - for all kinds of data that are not constantly used. holes hard drive, after which the disc is inserted into the selected section of the basket and clicked into place. Its power and interface pads are on the back wall, where they are connected with a power cable and a SATA cable.

Installed disk.  Now it's the turn of the video card.

We take it out, insert it into the motherboard slot until the lever clicks into place. (There is still a small video capture card already inserted in the photo, which I use to take screenshots from media players.)

Advanced video cards require their own power supply - we connect it. (In very cool cards, you need to connect as many as two power heads.)

Well, everything seems to be collected.

Reinstall both covers.

We connect to the power supply, monitor, keyboard and mouse, run it - it all worked.

By the way, the illumination of the rear end is very convenient, especially since it can be turned off when it is not needed.

Well, now some indicators on the assembled machine. SSD speed on M.2.

On an old computer, Samsung 850 PRO has such a speed.

The difference, of course, is very noticeable. There, people at the Samsung SSDs switch the RAPID mode into the Samsung Magician and get such completely unrealistic speeds through caching.

But these are just beautiful numbers that have nothing to do with reality. But on M.2, this is reality! And it's not a PRO version yet (it's quite expensive, I didn't see the point in spending money). How does it look purely practical? The system from the beginning of the boot (after the BIOS) to the login window - 4 seconds. Launch Lightroom - 2 seconds. Starting Photoshop - 1.5 seconds. The overall index of the system by Basemark is like this. My old computer (very powerful) had 314.59.  Well, about the temperature of important components. Temperature at minimum rotation speeds (complete silence) when working with a browser, text editor and so on.

Temperature at minimum rotation speeds (complete silence), when the processor is 100% loaded - DVD is being transcoded to MKV with H.264.

It practically does not go beyond 70 degrees, and this is quite normal. Moreover, one has only to increase the speed of the coolers from the quietest to the slightly noticeable - everything becomes something like this. At one hundred percent, I note, loading.

In the usual loaded mode (Lightroom and other programs), the processor temperature is somewhere around 35 degrees. The video card here is quite powerful - Palit Geforce GTX 1070. It has two coolers, but it turns them on only when it's under heavy load, and you still can't hear the coolers. The temperature is less than 60 degrees and the coolers are spinning at 32% of their maximum speed.  Here are the figures for the assembled machine. No wonder everything was selected separately. Well, as a conclusion about the assembly of the computer. The main thing here is to do everything VERY CAREFULLY, slowly and carefully studying the manuals and pictures in the manual (especially if there is still not enough experience).
Hello friends! Many of us in childhood loved to collect the designer, right? Those who are younger still remember how many wonderful things can be created with even a small Lego set.
The older generation remembers with nostalgia the time when Lego was an overseas curiosity, but in toy stores you could sometimes get the products of their competitors - the PB company from the GDR. These kits were ingenuously dubbed the "German Constructor".
Assembly system block ATX and other form factors differ little from these fun: from interchangeable unified parts according to a similar principle, with right approach you can “blind” a PC with your own hands, which will even work.
This publication about the order of assembly of the computer is an introductory to the next cycle of instructions. In it, I will try to convey the main points as concisely as possible, but these tips will already help you assemble the computer yourself. We will analyze each stage point by point in the following guides.
The main rule when assembling
It is quite simple and in a perverted form says "You can not shove what is not shove." I explain. Details of the same type, but different generations(as in the case of RAM) or different modifications (as in the case of processors) have different slots for installation.
Even if they are similar in appearance, the locks and lockers present will not allow the component to be mounted correctly. If you make an effort, expensive components can simply be broken. 
Therefore, even if you are 95% sure that you ordered the correct parts, double-check before assembly that they really match.
And if it suddenly turns out that you forgot something or bought the wrong thing, you will find everything you need in this popular online store.
Assembly diagram by points
The position of each of the stages is not a dogma at all and they can be interchanged. However, according to the list that I bring to your attention, it is most convenient to assemble a computer. So, in order:

Ready! It remains to install the operating system and all the necessary drivers - and you can hack into Dota 2.
As you can see, everything is very simple, and the assembly will take you no more time than I wrote and checked this publication for errors. Going from top to bottom, according to this algorithm, you can assemble a computer of any configuration.
And in conclusion, I want to add one small clarification. When assembling a computer, it is important to distinguish between similar concepts. To install means to mount a part on its seat. To connect means to connect all the necessary cables to the appropriate slots.
It is worth noting the following point. Budget motherboards are equipped with a 4-pin CPU power connector. So with our hands we divide the existing 8-pin cable into two 4-pin ones and connect to the board. Expensive motherboards, on the contrary, in addition to the 8-pin connector, are equipped with an additional connector. The trick is that in this case everything will work from one 8-pin wire. An additional port is needed if, for example, you will overclock very seriously CPU. But then you will also need an accompanying power supply, or an adapter.
Step #5: Install Drives and Optical Drive
For a desktop PC, there are two most common drive form factors: 2.5-inch and 3.5-inch. Plus, M.2 SSDs are gaining popularity. As for the latter, everything is simple with this form factor: the device is installed directly into the port soldered on the motherboard. But 2.5- and 3.5-inch drives must first be fixed in the case.
In 99% of cases, the case is equipped with a special basket with skids. The manufacturer also indicates in the characteristics the number of slots for 2.5- and 3.5-inch drives, as well as 5.25-inch devices. In the case of the Fractal Design Define R5, two metal baskets are used. The first (top) can accommodate five 3.5-inch or as many 2.5-inch drives. The second (lower) - three. In some cases, these baskets may be removable. Plus, this case specifically has two seats for 2.5-inch drives behind the chassis.
Not all computer cases support the installation of 2.5-inch drives as an option. True, many SSD manufacturers complete their products with special adapters for 3.5-inch sleds. Usually they are packed in cardboard boxes, but not sealed in a blister.
Before we start building the computer ourselves, let's take a look at the figure below. It presents all the main components from which the computer will be assembled with your own hands (our hands) :)
Clicking on an image will open it in modal window in improved quality.
Let's briefly go through the individual components of our "experimental" so that assembling a computer with our own hands seems to us more holistically. From the link below, open a new window with the top image on which the numbers (from 1 to 10) will be put down, and on this page below we will give short description each of the components.
- At number "1" we have -
- number "2" - standard PCI Express
- "3" - cooling system (aluminum radiator and cooler for heat dissipation)
- "4" - itself under the socket (connector) LGA 775
- "5" - two DDR2 modules
- "6" - IDE cable (for connecting or old standard CD-DVD)
- "7" - DVD-ROM
- "8" - computer
- "9" - winchester ( HDD) SATA standard
- "10" - cable (for connecting a hard drive or CD-DVD SATA standard)
- "11" - floppy disk (disk drive) and its data cable
Naturally, all this "economy" must be packed somewhere. For this we need a good one.
Assembling a computer with our own hands takes place in the following sequence: first we install (actually screw) the motherboard into our case, install the processor and its cooling system into it, and then we connect and fix the rest of the necessary elements to this "foundation".
Another link, which in a separate window schematically shows in what sequence the computer should be assembled.
So, at the initial stage of self-assembly of the computer, we need to install the motherboard in the case. With regards to it, there may be such recommendations: the case must be spacious enough so that we can easily install all the components we need into it.
The board is attached to it with screws, which are screwed into special mounting sleeves (metal hexagons). They come with the body.
The bushings are screwed into special holes on the rear wall of the computer (on the inside of its right side wall), the motherboard is placed on top of them and attracted with screws.
Hexagons are needed in order to form a gap between the board itself and the metal surface of the system unit (to eliminate the possibility electrical contact between the soldering of elements from the rear surface of the board and the case). Such a contact may well cause a short circuit () and disable its electronics. The more bushings you manage to use, the more secure the fixation will be (look at the number of mounting holes on the case and the board itself).

Tip 1: remember, mounting sleeves for the motherboard must go complete with computer case . If you buy a case, then only with them. This is important because these fasteners are different in height and differ in the width of the thread at the base. With others, you simply won't be able to set the fee!
Tip 2: If you plan to change the motherboard (buy it from your hands or in a store), then be sure to make sure it comes with a panel with holes for connectors? When assembling a computer with your own hands, the socket will need to be installed on the back wall of the system unit. Pay attention to the photo below:
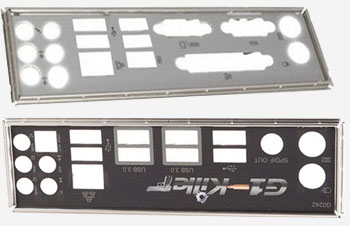
Note that the location of the holes for the connectors for each batch of boards is different, and if you are not sold a panel that matches the motherboard right away, then later it will be very difficult to get it separately.
The panel is installed in a specially designated place for it. It needs to be done before placing the motherboard in the case.

Correctly orient it in relation to the main connectors and install it with a noticeable pressure with your fingers. The plug should "sit down" tightly and lock with a characteristic click.
Below you can watch a video that clearly demonstrates the whole process:
We continue to assemble the computer with our own hands. After we have fixed the motherboard in the case, we need to install the central processor in the slot (socket) of the board. Let's look at the figure below and comment on some points.

The installation procedure in the slot is as follows: press down and bend the clamping latch to the side (indicated in the photo above at number 2). To do this: click it out from under the special hook (number 1 in the photo), raise the metal frame (number 3), which fixes the processor in the socket. After that, we just have to install the CPU itself (indicated by the number 4).
Attention! Take a good look at the processor and determine on which side it has a "key" (a corner specially cut off on one side or two small indentations on the sides). The socket has the same corner or protrusions in the appropriate places. When installing the processor in the socket, they must be combined with each other.
When the installation is completed, we repeat all the steps in reverse order: put the fixing cover (No. 3) on the processor, lower (already with a certain force) the clamping metal rod (No. 2), slightly move it to the side at the bottom point and thread it under a special hook on the side No. 1.
To learn how to install an old PGA processor (believe me, you need to know this), see the video below:
In the process of self-assembling a computer, we need to be able to install a cooling system (radiator with a fan). It should be noted that now we are installing a cooling system for a product from Intel, in the case of AMD it looks a little different.

In theory, it looks like this: at the four corners of the processor slot there are special holes in the motherboard, it is through them that the entire air system cooling.
Accordingly, there are four special plastic clips on the heatsink, which, when pressed, press the heatsink against the processor and, along the way, fix the entire structure on the motherboard.
That's how close-up looks like a cooling system for our processor, which we just installed:

And this is one of his latches on the board close-up and we snap it.

Pay attention to the photo below:

See the slits (grooves) on each of the four plastic tabs? The position when the recesses are perpendicular to the radiator fins correspond to the closed state of the latch-latch (in the photo above, all latches are closed). It is in this position that all of them should be before installation on the board! Remember this!
The arrows indicate the direction in which you need to turn (you can do this with a screwdriver) the latch in order to move it to the open position.
Advice: After placing the radiator clamps strictly above the holes around the mounting slot (you need to make sure that the plastic tips of the fasteners “fall through” a little in them), you need to simultaneously gently but strongly press on two clamps located diagonally from each other (until they click and securely fix them in the board ). Then we carry out the same procedure for the two remaining clamps. All! The cooling system is installed!
It is much easier to show the whole process once in a short video than to describe it in words, so watch the video below:
If it becomes necessary to remove the cooling system, then simply move all four latches to the "open" position and pull the structure towards you (it can be removed quite easily).
Advice: some people find it more convenient to install a computer cooling system before that how the motherboard will be fixed in the case. So it is possible to visually see what and where snaps into place, and to measure the force of the applied force for reliable fixation of the elements.
The design for attaching the cooling system to processors from AMD is somewhat different from what we can observe in products from Intel. It consists of two constituent parts: a plastic base frame, securely fixed around the processor socket, and a heatsink with a fan, which are attached (snapped) to this frame. Here, for example, how it looks for an AM3 processor socket:

As you can see, with this approach, the clamping pressure force from the radiator is first transferred directly to the plastic base (frame) and only then is evenly distributed over the textolite of the motherboard itself.
By the way, when removing cooling systems from motherboards under the control of Intel processors, quite often one has to observe how the base of the motherboard itself (textolite) has a visually noticeable curvature (due to constant pressure on it from the radiator of the cooling system), which is attached directly to the board itself . This is bad and can potentially lead to micro-cracks in the very core of the motherboard.
Do-it-yourself computer assembly, in particular, installing a processor and motherboard is often associated with installing third-party cooling systems on the processor, which can weigh half a kilogram or even more! In this regard, in order to prevent deflection of the motherboard at the attachment point, they come with a special metal cross, which is located on the back side of the board (under the processor).
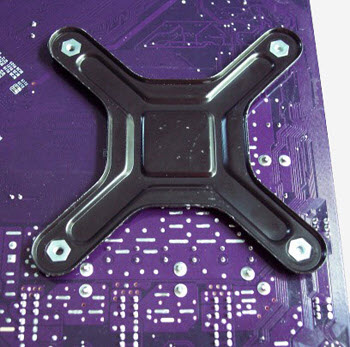
This additional mount is called the word "backplate" (Backplate) and it serves, as we have already said, to remove unnecessary physical stress from the motherboard. The only caveat of this design is that it must be installed before fixing the board in the computer case.
Don't forget it's right installed system cooling avoids in the future!
When assembling a computer on our own, we need to remember to do one more thing: a small (3 or 4-pin) wiring comes from the cooling fan, which supplies power from the motherboard to the fan so that it spins and dissipates heat. We need to find the appropriate connector on the board (usually 3-4 pins next to the processor socket) next to which there is an inscription “CPU_FAN” and connect our power cord to it.
The most important components and the cooling system are installed. Now we need to install all the remaining devices. And since assembling a computer with your own hands is a rather responsible and painstaking task, then, for the general readability of the text, let's continue our description on the next page.
In conclusion (for better consolidation of the material), you can watch a video on how to install a processor and cooling system on products from Intel:
Well, if the components have already been bought, and it only remains to assemble your computer from all this, then let's figure out together what goes where and why
STAGE 1: Preparation for work
Assembling a computer on your own is not so difficult as it seems at first glance - the main thing is to do everything carefully, not to rush anywhere. To build a computer you will need:
- crosshead screwdriver
- pliers
- cable ties
- wire cutters
- iodine or brilliant green with bandages
A Phillips screwdriver is the most basic tool. In principle, often only it is enough to completely assemble a computer.
Pliers may be needed, for example, to screw the racks under the motherboard, bending some elements of the case.
Ties are necessary in order to carefully lay and tighten the wires inside the case after assembly, and wire cutters are used to cut the ties and break out the case plugs.
Iodine, brilliant green, bandages may be needed if your body has sharp edges. You can cut yourself corny, this happens quite often - so it's better to have all this on hand.
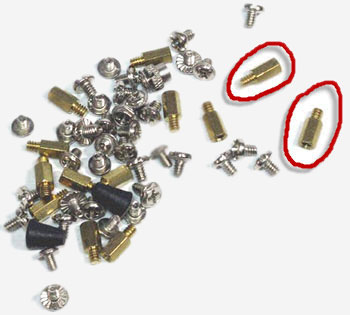
STAGE 2: Dealing with the main types of fasteners
Attachments for accessories must be supplied with the case. Here is the purpose of the main ones:
1. To secure the side covers of the system unit: 
2. For screwing into plastic parts. Used, for example, to fix case fans:

3. Stand-mounts are screwed into the case of the system unit in the places where the motherboard is attached:

4. Used to mount hard drives, disk drives. The same screws, but slightly smaller, are used to secure the motherboard:

5. For fixing all other parts inside the case of the system unit, for example, a video card, sound card, power supply. They can also screw the side covers of the case if there are no fasteners No. 1:

When tightening, excessive force must be avoided; it must be tightened firmly, but in moderation so as not to strip the thread.
STAGE 3: Getting Started with Assembly
Assembly must be done as carefully as possible, without rushing anywhere. Never use excessive force to anything - all parts of the computer connect and fit into each other very easily.
If something is screwed or inserted with difficulty, then you are doing something wrong.
Any computer assembly begins with mounting the motherboard inside the case. Open the case cover, lay it on its side. On the wall you will see the holes for the rack-mounts of the motherboard. Position the motherboard inside the case so that its mounting holes line up with the holes in the side of the case. Now it is necessary to screw racks No. 3 into all the holes in the case that fit the holes of the motherboard. This is where pliers come in handy:

After the mounting posts are screwed, insert into back case, a metal plate-stub that comes with the motherboard:

And only after that you finally insert the motherboard into its rightful place and screw it on.
STEP 4: Installing the Processor
After the motherboard is installed, you can install the processor on it. Remove the plastic cover from the motherboard socket and open it. If you don’t know how it opens, find the instructions for the motherboard and look in it, everything should be shown in pictures there:


When installing the processor, note that there are triangular marks on it and on the socket, and in some cases special grooves. They are needed in order not to confuse exactly how to install the processor. Align the labels and carefully insert the processor into the socket:


And remember - no strength, neither physical nor Jedi!
The processor is extremely easy to insert, and force can permanently damage the socket.
After installing the processor, the socket must be closed. This is done in exactly the same way as the discovery, only in reverse - but I think you yourself have thought of this
STEP 5: Installing RAM
There shouldn't be any problem installing memory. First, push the holders along the edges of the slots, then insert the RAM sticks until they click:

Pay attention to the cut in the middle of the memory contacts and the bulge in the memory slot on the board - they must be combined so that the bar enters as expected:

RAM is one of the few parts that are inserted with some effort. Try not to bend the motherboard too much when applying force. If necessary, hold its right side with your hand.
Pay attention to the colors of the slots under RAM. For example, if you have two memory sticks, then you should insert them into slots with the same colors. Thanks to this, the computer will be able to use dual-channel memory mode, which will allow it to work a little faster.
STEP 6: Installing the CPU Cooler
Before installing the cooling, be sure to remove the protective film, if any:

Apply a very thin layer of thermal paste to the bottom of the heatsink and install it on the processor. You can see the instructions that come with your cooler for installing it.
Make sure that the cooler fits snugly on the surface of the processor, there are no distortions after its installation. Wrong installation cooling is fraught with constant overheating of the processor.
Don't forget to connect the fan power to the motherboard after installation.
On the motherboard, the fan connector is usually labeled "CPU":

The "CHA" connector is needed to connect case fans.
You can connect 3-pin (three-pin) fans to a 4-pin (four-pin) motherboard connector.
STEP 7: Installing the graphics card
If you don't have a graphics card and decide to use the motherboard's integrated graphics, skip this step and move on to the next one.
There is nothing complicated in installing a video card. Break or pull out the cover on the back of the case where the graphics card will be installed:

Please note if there is a latching mechanism on the PCI-Express graphics card slot, if there is, open it before installing the board. After inserting the card into the slot, the mechanism should click into place:

Also, do not forget to fasten the video card with screw number 5 to prevent it from falling out of the slot involuntarily.
STEP 8: Install hard drives and drives
At the front of the case is a hard drive cage. Install the hard drive in it with the cover up, with the contacts facing the motherboard. Hard drives fastened with screws number 4.
On the front panel of the case there are removable dummy elements for installing drives. Remove the front cover from the housing and pull out the plug. Also in the case itself, break out or pull out the iron plug in front of the basket for installing drives.
Replace the front panel of the case, and then install the drive, remembering to fasten it with #4 screws.
STEP 9: Chassis Ventilation System
For normal cooling, constant ventilation of the air inside the case is required. For this, additional case fans are used.
Recommended fans in anterior lower and side parts of the body to put on fence(blowing) air into the body. And the fans rear and top parts of the body to put on blowing air. This ensures optimal ventilation. inner space inside the hull.
Fans are connected to the connectors on the motherboard, marked as "CHA" or "FAN", or directly to the power supply, to the MOLEX connector, depending on what type of connectors are used on the fan:

In general, the design of a cooling system is a topic for a separate article. Novice collectors are advised to adhere to the scheme described above - it is the most optimal and common. Over time, an understanding will come of which parts require more cooling, and which do not require cooling at all, how best to build a cooling system for this particular computer, etc.
STEP 10: Attaching the Chassis Front Panel
Each motherboard has system panel connectors, where almost all the elements of the front panel are connected. Where to connect what, you can see either on the board itself or in the instructions for it:


Often, the same designations are used on all motherboards:
- PWR LED– computer power indicator;
- HDD LED- indicator work hard disk;
- PWR SW– power button;
- RESET- button "reset";
- SPEAKER– to connect a buzzer (which beeps at startup);
Be careful when connecting the PWR LED and HDD LED indicators - the polarity is important for their operation, which is also indicated in the instructions. If connected incorrectly, the indicators simply will not work. To find out what polarity corresponds to the wire of the indicator itself that you connect, look at its color. Black is a minus, and any color is a plus. The system panel connectors are arranged so that the plus is always to the left of the minus, - knowing this rule, you can easily determine the polarity of the wire connection.
STEP 11: Connecting all other cables
Now you need to connect SATA cables, USB connectors, and audio outputs. All SATA ports on the board are numbered in order. It is recommended (but not necessary) to connect the system hard drive to the very first one, then the other drives, and after them the drive. This scheme is not fundamental, but sometimes it can slightly reduce the turn-on time of the computer.


If you have an optional (non-integrated) sound card, then you need to connect the cables to it, and not to the motherboard.
Then connect the USB port cables to the corresponding connectors on the board:

STEP 12: Installing the power supply
Screw the power supply on top or bottom of the case, depending on its design:
 Next, you need to connect power to the motherboard and all components. To insert a cable in the wrong place, you need to have a rare talent and considerable skill. So do not be afraid - if something is not inserted, then you are either inserting it incorrectly or not in the right place.
Power up the motherboard:

Then the processor power:

Food to hard drives and drives:

If the video card has an input for connecting additional power, then we connect the power there as well.
If the fans are powered only by a MOLEX connector (large rectangular, with 4 pins), connect them to the power supply. If possible, connect a fan to the motherboard, use it.
STAGE 13: Completion and start
Once again, carefully inspect the entire assembly of the computer. Is everything firmly seated in its place, is everything fully inserted and connected. Drive the cat away and put on a bulletproof vest.
Connect your monitor, keyboard, mouse, power cable and get ready to start your computer for the first time.
If everything was done correctly, then when you press the power button on the computer case, it should turn on. If it does not turn on, check if the front panel buttons are connected to the motherboard correctly, check again if everything is connected correctly, if the computer is plugged in.
I hope you succeeded the first time, and the computer happily rustled with fans. If you have any questions, ask in the comments.
BIOS setup and installation operating system we will cover in future articles.
P.S. If you have read this huge article to the end and you are still not enough, I suggest watching the video "How not to assemble gaming computers":