Surely, many users, if necessary, transfer various data from Sony smartphone Xperia to a computer using a USB cable for synchronization is an old tried and tested method. However, you may not have known that Sony Xperia has the ability to wirelessly sync a smartphone and PC that are on the same Wi-Fi network. Now you can forget about the cables and the constant opening of the plugs, which, due to constant manipulation, can become loose, which is fraught with waterproof models. And so, below is detailed instructions how to do it!
1. In order for everything to work out, the first thing you need to do is install it on your computer.
2. You may have been prompted to set up wireless media when you first connected your smartphone, but if this did not happen or you did not pay attention to this message, you can do it as follows - go to “Settings - Xperia Connections - USB Connections - Pair with PC ".
After that, a pairing settings window will appear in front of you, in which everything is intuitive and tips are also described. You need to connect your smartphone with via USB to the computer. Make sure that at this moment Sony Xperia and computer are connected to the same wireless WiFi networks(to one router). In the next step, select the type of operating system on the PC.


3. Now you need to launch the PC Companion application and select the “Connection” item. If suddenly synchronization with a smartphone has already taken place and there is no connection point, you can disconnect the USB cable, stop synchronization, select “Connection” and connect the phone again. Further, everything is also intellectually clear: select the item “ WiFi connection”wait until the smartphone is detected, do everything that is written in the tips and always click next to go to the next steps.


4. The penultimate step of the setup is to activate the connection in the smartphone, at this time you will see the following notification on the computer

5. To complete the wireless sync setup, go back to Settings - Xperia Connections - USB Connections” and under “ Wireless transmission multimedia” select your computer with which you synchronized and click “Connect”. After that, your smartphone will be displayed on the laptop: internal and external drive, similarly as it happens about USB synchronization. 


6. This completes the entire setup process and now you can quickly select your laptop in the connection settings and transfer files to it via Wi-Fi without using any cables!
Many users, when trying to connect their phone to a computer using USB cable faced with the fact that the computer does not recognize the connected gadget. The connected device is charging, while there is no access to the smartphone itself and its internal content. I also encountered this synchronization problem, and in this article I will tell you why the computer does not see the phone via USB, and I will also share various methods for solving this issue.
The whole complex of reasons for the problem that the PC does not see the smartphone through the USB cable, I would divide into hardware and software, and below I will list each of them, in parallel providing instructions for fixing it. But before using the methods I have indicated, try restarting your computer and smartphone - this does not help as rarely as it seems. This problem mainly occurs with Samsung, Lenovo, HTC, LG, and Fly devices.

So why does the computer not see the phone via USB, but is charging - hardware reasons
1. Damaged cableUSB. It often happens that the cause of this dysfunction is damage to the USB cable itself. Cables from little-known or "non-name" manufacturers do not have a large margin of safety, and can fail in just a couple of months from the start of operation, and as a result, the computer will not detect the connected phone.

In addition, even the most reliable cables from global brands are prone to stochastic damage - they can be accidentally damaged during use, pets can chew them or spoil them by children. Therefore, first of all, inspect your USB cable for the possibility of mechanical damage, and, if the external safety of the cable, try using it to connect your device to another computer. If the device is not recognized on another PC, try replacing the cord.
2. Damaged portUSBon the computer. The USB ports used in the computer are also subject to various mechanical damage, including damage to the USB controller, as well as damage to the south bridge. motherboard. Try plugging the cable into another USB connector, if this did not help fix the connection of the phone to the PC, follow the further advice.

3. Damaged socket for connecting the cable on the phone. Has the smartphone jack been exposed to water or damaged? If yes, then it needs to be replaced.
4. Try removing the battery. According to some users who also had a problem with the fact that the computer did not see the phone through U-ES-BI, removing the battery from the smartphone helped.
Turn off the battery, remove the battery from it for a few seconds, then put it back, and turn your device back on.
If nothing helps you fix this problem then describe your situation. What have you already done and what is happening to your Android device at USB connection gadget to the PC in the comments, I will try to help not only me, but also everyone who has encountered this problem.
The computer does not see the phone via USB - software reasons
After describing the hardware reasons, we list the main software reasons if your computer still does not recognize cellular telephone connected with a USB cable, follow the further instructions.
1. Working with the settings.We go into the settings of our device, select "Memory" there, click on the three dots at the top (Properties), select "USB connection to a computer" and put a tick in front of "Media device" (" USB stick"). If you have a checkmark next to USB usage as a modem - remove it.

Must be enabled on PC windows service Update (for downloading phone drivers) and a new device discovery service. Don't forget to unlock your phone when connected to your computer, this is important.
If you are a conservative and have Windows XP installed, download the Media Transfer Protocol (MTP) for XP from the Microsoft website and install it on your computer.
2. If your drivers have crashedUSB-ports, the computer may not see the phone.When drivers for USB ports malfunction, the latter simply stop working. To fix this problem, install the USB drivers from the "native" driver disk to your PC motherboard, or download the latest drivers from the motherboard manufacturer's website.
Also, due to any reason, power can be turned off for a number of ports.

3. Device drivers have crashed. Go to the "Device Manager" and see if there is a question or exclamation mark in the "Portable devices" item.
Check if your device is there and make sure it works fine by right-clicking on it and clicking "Properties". If it's not there, or if you're in doubt, uninstall the driver, disconnect your phone from the computer, and then turn it back on, and let the system install the driver again. This can help solve the problem that the smartphone does not connect via USB to the computer.

It will also not be superfluous to enter the website of the manufacturer of your smartphone and download the latest drivers for it on your PC (for example, there is a special Samsung Kies software for Samsung).
4. Install the updateKB3010081 (KB3099229). For owners of Windows 10, you may need to install update KB3010081, which is responsible for working with Windows media player. This player is directly related to the normal operation of the MTP (Media Transfer Protocol) service, so download and install these updates.
Also, a common cause may be an unreliable assembly of the OS itself on the PC. Only rearranging Windows with a more working version will help here.
5. Custom firmware is not working. The desire of many fans to play around with firmware for their Android device can do them a disservice in the form of a device failure to work normally with a computer. Try to restore standard firmware or restore from a backup (if any).
There are no drivers for the phone on the computer
Although, usually, a computer with the latest OS detects and sees a smartphone via USB without problems, reverse cases can also be observed. Try to search for a driver for your smartphone on the net, sometimes a driver for similar models of this brand may come up.
The phone may not be detected by the computer due to viruses
Trite, but all sorts of virus programs can block work with external mobile devices. Try checking your computer with Dr. Web CureIt!, in some cases it can help.
If the problem of detecting a mobile device by a computer is not resolved, reset the settings
If until now, your computer does not see the phone via USB, resetting the smartphone using Hard reset. Go to the settings of your phone, select the "Backup" menu item, and select "Data reset" in it.
But I immediately warn you that you will lose your files and settings located in internal memory phone (the files on the SD card will remain intact), so this item should be used only as a last resort!
Conclusion
As you can see, problems with the lack of visibility of the connected phone on the PC can be both software and hardware in nature, and there are a considerable number of such problematic factors. I would advise you to first pay attention to the probable mechanical damage in the cable and device, and only then switch to software methods.
In many cases, a simple reboot of the smartphone (temporary removal of the battery) can help, as well as working with the phone's USB connection settings. If all of the above does not help and the computer does not see the phone via USB, but is charging, then you may need to contact a qualified service center.
P.S. For lovers of visual demonstrations, I present a video on the subject:
Everyone faces this problem at least once: you connect your smartphone or tablet to your computer via a USB cable, but nothing happens except for charging. The computer does not see the phone or identifies it as unknown device. The situation is common, but ambiguous, and there are quite a few reasons why it occurs. Today we will understand what causes such problems and how to deal with them.
Software and hardware failures lead to a situation where the PC does not recognize the mobile device connected to it:
- The absence of a device driver in the PC operating system.
- Device model driver mismatch.
- The USB driver is missing or malfunctioning in the system.
- Connection with a cable unsuitable for data transmission or damaged.
- There is a problem with the USB socket (both on the computer and on the phone), the socket group, or the USB controller on the PC.
- Malfunction of any of the computer hardware, blocking by static electricity.
- An error in the system settings of the phone.
- Blocking access to the phone by security programs running on a PC (including when viral infection gadget).
- The application that syncs your phone and PC (if using) has crashed.
In case of software problems, the computer, as a rule, does not display the contents of the phone’s memory, but the device charges normally when connected to it. If the problem arose due to a physical malfunction, charging most often does not work either, but there are exceptions when only data lines do not work.
draw a circle possible causes it helps to analyze the previous situation - what happened before the problem arose. For example:
- Have you reinstalled the operating system on your computer or removed some of the drivers (the reason is the lack of the correct driver).
- The phone (tablet) has ceased to be detected after flashing, cleaning from viruses, deleting applications, optimizing and other manipulations with the OS (failure to work operating system mobile device).
- The device has been subjected to mechanical stress (USB socket is damaged) or has been repaired (after replacing parts, a driver of a different version is needed or the malfunction is not completely resolved).
- You are using a USB cable that you have never connected your phone to a computer with before (the cable is only for charging or is damaged), etc.
Quickly identify the culprit of the problem
Tracing a cause-and-effect relationship makes it much easier to localize the problem, but in about half of the cases, nothing concrete precedes it. If this is the case for you, the following steps will help determine where the failure occurred - in a mobile device, PC, or USB cable.
- Move the cable in the area of \u200b\u200bthe connectors (creases are most often formed in these places) and see if the phone (tablet) is detected in File Explorer or the device manager of the computer. Or connect the devices with another cable that is known to be working and suitable for data transfer.
- Connect your phone to another computer, as well as another mobile device to this PC. If the phone is not defined anywhere, the problem is definitely in it. The same is the case with the computer.
- If the problem is presumably in the computer, check the phone in all USB sockets, the problem may be in one or more of them (for example, only in the front group).
If you have come to the conclusion that the cable is the source of the problem, simply replace it. What to do in other cases, read on.
The culprit is the phone. What to do?
If the diagnostic clearly indicates a problem with your mobile device, follow the steps below in order. Check after each step to see if the issue is resolved. If not, move on to the next one.
- Restart your device.
- Connect your phone to your computer. Once connected, slide down the menu bar quick settings and make sure that "Charging only" is not checked in the "Connect as" list, as well as "camera" or "media device". Select the "USB storage" option.

- Open system android settings(in older versions - "Options"). Go to the section " Wireless networks". Turn on tethering. Or vice versa, if it is on, turn it off. In some editions of Android, this parameter controls not only the modem, but also the connection of the gadget to the PC as a drive.

- Experiment with putting your device into USB debugging mode. Open the "System" and "For Developers" sections in the settings. Uncheck or check the box next to USB Debugging.

- Disconnect the phone from the computer, turn it off and remove the battery from it (of course, if it is removable). After 5 minutes, replace the battery, turn on the device and try to connect again.
- Uninstall applications that fail after installation. If the connection is not working in a specific sync app, clear its cache. If it does not help, reinstall (both on a mobile device and on a PC) or try using an analog.
- Scan your device with an antivirus.
- Reset the operating system of the device to factory settings.
The culprit is the computer. What to do?
- Shut down the OS, turn off the PC from the outlet (or press the key on the power supply) and hold down the power button for 15-20 seconds. This will discharge the capacitances and remove stray static charge that can block detection of the connected device.
- If the phone is not recognized by only one group of USB ports, open the cover system block and make sure their connection is secure. By the way, the normal charging of a mobile device through the port does not mean that the second one is working.
- Download the operating system. Open the device manager and check if portable devices are present in the hardware list, and your phone is among them. If it is present, but marked with a black arrow in a circle (disabled), right-click on the line and select the "Enable device" command from the menu.

- If there are unknown devices in the equipment list (marked with an exclamation point in a yellow triangle), one of them may be a phone. To make sure it's him, disconnect your mobile device from the USB. If the unknown device disappears from the list, then it is. And the reason for the failure is the lack of the necessary driver in the system. How to reinstall and where to download the driver to the phone, we will tell you a little below.
- The problem with recognizing connected devices can also be due to a boot failure, corrupted or missing USB drivers. In this case exclamation points will be in the "USB Controllers" section.
- Did reinstalling drivers help? Scan your computer disks with an antivirus and then temporarily disable security programs. By the way, the latter can block access to a mobile device as a medium if it contains suspicious or obviously malicious software. So it’s worth checking the phone for viruses too.

- Uninstall the programs that caused the problem after installation, or perform a system restore on checkpoint created on a day when the problem didn't exist.
- If, in addition to the phone, the computer does not recognize other devices connected via USB - a mouse, keyboard, printer, flash drives, etc. (whether they are charged or not is not indicative), the source of the failure can be any faulty component of the system unit or something then from the periphery. You can determine the culprit at home by turning off the equipment one by one or replacing the equipment with a known good one.
How to reinstall the mobile device and USB driver on a Windows computer
iPhone
- Connect iPhone to PC.
- Open the folder %CommonProgramW6432%\Apple\Mobile Device Support\Drivers (to avoid manually typing the command, copy it from here, paste it into address bar any folder and click the go button). It contains 2 files (out of four) with the .inf extension - usbaapl.inf and usbaapl64.inf.
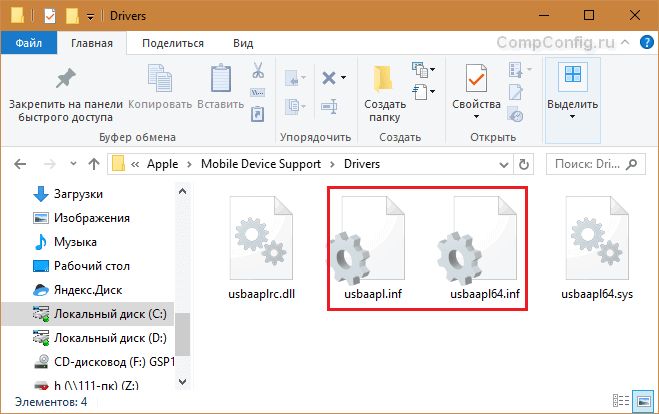
- Open context menu each of these files and execute the "Install" command.
- Restart your computer after installation.
Android
Smartphones and tablets for Android, such as Samsung, Xiaomi, Lenovo, Meizu, HTC, etc., as a rule, do not create separate folders for storing their drivers, and they are often not found on official websites to just download and reinstall. Therefore, for starters, it is worth entrusting the reinstallation of the drivers already present in the system to Windows itself.
How to do it:
- Open the context menu of the problem device in Device Manager. Select the "Update Driver" option.

- In the next window, select automatic search updates. If Windows does not find anything suitable, check the second item - install and search for drivers manually.

- Next, click "Select from the list available on the computer." All drivers will be displayed in a new window mobile devices that are already installed on the PC.

- To narrow your search, in the "Select a driver for this device" section, check the "Only compatible" box. Check the one that best matches your request (if there is more than one item in the list) and click "Next" to proceed to the installation.

For the driver to work properly, restart your computer.
If reinstalling the driver already in the system did not help, you will have to look for something else on the Internet (with the risk of downloading a virus instead of the one you are looking for), so download them only from reliable and trusted sites, like w3bsit3-dns.com, and check with antivirus before installation.
Drivers for the most common models of mobile gadgets are also collected in the USB Drivers for Android application, which is available for free download at Google Play.
USB drivers for Windows are usually easily found on the websites of laptop or desktop motherboard manufacturers. Sometimes they are part of the chipset driver.
If the phone is not recognized in firmware mode
The fact that the computer and the phone do not see each other in fastboot mode, indicates the message "Waiting for device" that appears in the firmware program. Most often, this error occurs due to the lack of a mobile device driver in the system, so the first step is to do what is written above - reinstall the driver or download and install it again.
If it didn't help:
- Make sure you follow the instructions for the firmware installer exactly and that it is running as an administrator.
- Check if USB debugging is enabled on the smartphone (if not, enable it), and the device itself is in bootloader mode. If this mode is blocked, look online for instructions on how to unlock the bootloader specifically for your device model.
- Connect the phone with the shortest possible and known good cable to the rear USB socket, without using any adapters and hubs.
- Your phone may not support USB standard 3 (blue socket), so only connect it to USB 2.0 (black sockets).
- Install all released Windows updates on your computer.
If the problem persists even after doing this, try flashing the phone on another PC. And better - with a different version of the operating system.
When the problem is in the breakdown of the physical interface
Faulty physical interfaces, especially on a mobile gadget, should not be used at all (do not load with current to avoid aggravating the breakdown), even if the phone or tablet has retained the ability to charge through them. You can organize the transfer of content either by wireless communication(Wi-Fi, bluetooth), or through cloud services that are available on both devices. In particular, iTunes and iCloud for Apple technology, Google Drive, Yandex Disk, Dropbox, Microsoft OneDrive and many others - for everyone.
cloud services Convenient to use to transfer photos, videos, music, documents and other types of files. There are enough opportunities to synchronize contacts on Android and PC Gmail. And to control your phone directly from your computer, you can put an application on them like MyPhoneExplorer (consists of 2 parts - for phone and for PC), which supports both wired and wireless connection devices without the need to install drivers. Very comfortably.
 In a word, there is always a way out and often much simpler than it seems at first glance.
Happy owners of any Sony models Xperia, they immediately want to experience all the features, all the pluses and evaluate the correctness of their choice. Immediately you want to try to send MMS or take a photo. Sony, of course, as always, pleases its customers: the form, design, convenience of functions and the fact that this smartphone belongs to you are insanely happy and move you to complete control over all the possibilities presented.
Beginners will deal with the device for a long time and painstakingly, while experienced users will not be difficult to use any functions. Connecting your Sony Xperia to your computer may not be such an easy task.
Like all smartphones, you can connect your Sony Xperia to your computer via a USB cable.. Copying data between a computer and a smartphone via a USB cable takes place in one stream through software(PC Companion) with the drivers installed on the computer. The speed of the copy process is not displayed in Windows Explorer, and if you press the power key on your smartphone in the process, then everything will end immediately - the files will not be copied.
Check your phone's PC connection settings. There are two options: as a device and as a drive.
If, having decided to connect Sony Xperia to a computer, the user encounters the problem of not recognizing the smartphone by the computer, then he should use the following tips:
- Check the reliability of the connection, make sure that the contacts of the cable and connectors fit snugly. Please note that the USB icon is displayed on the smartphone screen (in the status bar) when connected.
- Make sure the cable is intact.
- Restart the computer, turn off the smartphone, then remove the battery and remove (replace another) memory card, then turn on the smartphone and try to connect again.
- Update if needed USB drivers on the computer you are using (especially if you have Windows XP). This is not difficult to do: go to the website of the motherboard manufacturer, download the drivers and install.
In most cases, connecting a Sony Xperia to a computer is not difficult, since the main problems that may arise (incompatibility of the cable, drivers, and so on) are absent, but after connecting, the user may be a little disappointed with the relative slowness of the interaction of the smartphone with the computer.
An alternative option for connecting a Sony smartphone to a computer is to use the MyPhoneExplorer program. The program allows you to connect any android to your computer, both via cable and wifi. You can talk and send SMS from a computer, work with the phone book and save backup contacts on your computer.
Sony Xperia Z error: “External storage emulated”
Many owners of Sony Xperia Z face difficulties in transferring applications to the SD memory card. In device settings given function is not provided, so on the forums there are often questions on the topic: “How to get rid of the Sony Xperia Z error: external storage data emulated?” . To accomplish this task, you will need Root permissions on Sony Xperia and the Directory Bind program.
To get Root rights, you need to install drivers for the phone and activate the “USB Debugging” function (Settings → Features for Developer → USB Debugging). Next, connect your phone and run the “RunMe” script. In the window that opens, enter 1 at the end of the line and press ENTER. Next, you need to log in backup and make a recovery. During the flashing process, the phone will reboot several times. At the end, the Sony Xperia Z menu will appear super program SU, which provides enhanced access to applications and was created specifically to work with devices that need Root rights.
In addition, in order to get rights Root you can use programs such as Unlock Root, Universal AndRoot, Revolutionary, which will cope with the task in two clicks, however, it is worth remembering that when installing them, you will need to disable the Sony Xperia Z security software, as these programs penetrate the system core and can be regarded by the antivirus as a threat to the operating system.
In order to transfer the game to a memory card, you need to go into its cache and copy the name. Then we launch the Directory Bind program, click the “Add new entry” button. The upper line of the window that opens will contain the cache path to the memory card, and the bottom line will contain its location on the phone. To do this, click on the top line and select the mnt folder, then extSdCard, select the cache path, create a folder with the same name and click Select. In the bottom line, you need to select the folder where the game cache is located and also press Select. At the end, opposite the “Transfer files from target to data” function, check the box, and in order for the phone to transfer the cache to the memory card, press the ADD button. The copying process begins, the duration of which directly depends on the size of the cache.
Then, to make sure everything went right, go to Sony settings Xperia Z and check the memory status - there should be more available space on the phone.
Also, to move software to an SD memory card, bypassing the “external data storage emulated” error, you can use one more method:
- Go to settings.
- Select "Applications".
- Open "Manage Applications".
- Select the "All" section.
- Go to app details.
- Use the "Move to memory card" function.
Apparently the manufacturers portable devices, in an effort to present to the public a developed novelty before competitors, they forget to properly control the quality of manufactured smartphones and tablets. Therefore, more and more often you can hear from owners mobile technology about the occurrence of serious problems, in particular with the display.
Smartphone Sony Xperia S went on sale relatively recently. But the joy of many users from a bargain has been replaced by disappointment as a result of the discovered problems of the Sony Xperia related to the display, namely, defective pixels and a patchy greenish glow at the bottom of the screen.
Most users did not discover these shortcomings immediately. Some of them learned by studying information about possible problems this device in the Internet. Others claim that they noticed these low-quality nuances only some time after using the Sony Xperia S. But in order to notice “dead” pixels on a screen with a similar high resolution, you need to look at the display very carefully. The presence of light spots will also not be easy to immediately see, for this you need to use plain background on screen and shaded lighting.
Sony Mobile has responded to a number of complaints regarding this issue, with the company reporting that the smudge issues are related to color calibration, which will be resolved soon through a software update.
And about the drop-down pixels, you can contact the suppliers and exchange the purchased low-quality device. In order for the exchange to be approved, at least 3 defective pixels must be detected on the smartphone screen.
Also found problems Sony Xperia Z Ultra version C6802. Many owners of the model complain about malfunctions while working with the screen, especially with regard to the problem associated with the power button. Some people have to press the button several times to turn on the display, while others manage to turn on the smartphone with ease, but there is no image. But a small number of users managed to solve this problem on their own by applying a combination of a combination of the power button with the top of the volume button.
There is another common drawback of this model - the formation of green stripes on the screen during device activation, but such problems of Sony Xperia have already been resolved with the help of the released update 14.1.B.0.475.