CAM-module or conditional access module is designed to view scrambled satellite or cable channels. It is inserted into the CI slot of a TV or receiver and decodes channels intended for pay-per-view. Some receivers, such as the Skyway Classic 4, have two CI+ slots, allowing you to watch at the same time paid channels two different operators(for example, Tricolor and NTV +). Today, many TVs are equipped with a tuner for receiving a satellite signal and have a slot for a CAM module. However, in order to view the encrypted channels of Tricolor and NTV + operators, the tuner and slot must meet the following characteristics: the tuner must support the DVB-S2 format, and the slot must support the CI + format. Although most brands of TVs meet these requirements, you should carefully study the specifications before buying.

Since modules are a fairly new development, many people find it difficult to initial setup and operation of CAM modules.
I want to start with the fact that installing modules on TVs different manufacturers varies, and sometimes very seriously. LG proved to be the simplest and most loyal to the module. Here it is enough to insert the module into the TV. Select a satellite dish in the menu and search for channels of a specific operator (Tricolor or NTV) and it will automatically and correctly find the channels of the selected operator.
But the most problematic in terms of settings are Sony and Thomson TVs. You need to manually add the name of the satellite to them (recall that the satellite of the NTV-Plus and Tricolor operators is called Eutelsat W4 or Eutelsat 36E), as well as add the transponder parameters (frequency: 12226 for Tricolor and 12322 for NTV +) and the local oscillator frequency of the converter for both operators: upper and lower frequency - 10750. Then you need to select "search on the network", and the TV will find all channels given operator. If there is no “network search” item in the menu, then all transponders will have to be added manually. Full list transporters are available on the operator's website.

Now let's look at the most common problems and errors when working with the CAM module. The first and most common problem occurs during the initial initialization of the module by the TV. When this happens, the TV sees the module, the menu displays all the information about the module and the card, however, when the channel is turned on, it writes an error (the error code and explanation are different for different brands and TV models). In such a situation, you need to act as follows: turn off and turn on the TV. After turning on the TV, the access rights check between the TV and the module will start again. In most cases, this method is more than effective. However, in some cases, for example, after a voltage drop in the network or a sudden power outage, the settings of the module itself may be lost. Then the access rights check will not be carried out until the CAM module settings are reset to factory settings through the TV menu.
Now as for the problems associated with the software modules and TVs. Problems of incorrect work with modules are usually found on TVs early models. But these problems, fortunately, can often be fixed by installing the latest software for your TV. As for updating the module software, it occurs only from the satellite. In the NTV + modules, the update can be forced by simply selecting the required item in the menu. In Tricolor-TV access modules, satellite updates are broadcast limited quantity time (1-2 months), if during this time you did not have time to update the software, you will have to wait for the next one.
Despite the simplicity of the design, the CAM module cannot be bent, disassembled, and it is not recommended to reprogram the module, except for the official operator software. You also need to protect the module from moisture, and if you pull the module out of the TV for a long time, make sure that its connector is not clogged.
Despite the complexity initial setup, CAM modules are the ideal alternative to satellite receivers. Due to their simple design, they are more reliable than a receiver, they do not need an outlet, a remote control, and they do not take up space.
Important! Since Tricolor and NTV + use different encodings (NTV + uses Viaccess, and Tricolor DRE-crypt), therefore, NTV modules do not fit Tricolor cards and vice versa.
So, as I wrote earlier, the classic way to connect satellite TV is as follows:
Satellite dish - satellite receiver - TV.
Benefits of using a satellite receiver:
For this method, you can use any TV, it doesn’t matter if you bought it a year ago or 10 years have passed, the main thing is to choose a cable to connect the satellite receiver and TV;
A satellite receiver can act not only as a satellite signal receiver, but also have other functions, for example: Internet access, Smart TV, DLNA, etc.
Cons of using a satellite receiver:
Inconvenience when using two remote controls (from the TV and from the satellite receiver). Although modern TVs use various technologies to connect all devices and use only the TV remote control (for example, Samsung-e's anynet + technology), these technologies do not fit all equipment and do not always work perfectly.
Connecting satellite TV using the CAM module.
Another way to connect satellite TV is to use the CAM module. CAM module(Conditional Access Module, Conditional Access Module) - electronic device, used as an adapter of a specific coding system to common conditional access interfaces (Common Interface) in TVs and digital television receivers to provide subscribers with access to encrypted media content in digital television(Wikipedia).
in the majority modern TVs a satellite receiver (DVB-S2) is already built in, which only needs to add a device for decoding channels - a CAM module. Since each operator has its own coding system, each operator (Tricolor, NTV +, etc.) has its own CAM module. Thus, using the CAM module of a certain operator, you activate the receiver built into the TV and view the satellite channels of the selected operator without using an external satellite receiver.

pros CAM usage module:
Control from one remote control. It would seem a trifle, but it is VERY CONVENIENT.
TV must support DVB-S2 and the Cl+ module. You can find out this information from the technical documentation for the TV or by saying the model of your TV when buying a CAM module.
How to connect and configure the CAM module?! In fact, connecting and configuring the CAM module is extremely simple and can be handled without the help of specialists. Below is a detailed description of how to install and configure the CAM module, it will be relevant for all popular operators - Tricolor, NTV+, Telecard, Rainbow etc.
Installation and configuration of the CAM module.
The first step is to correctly insert the access card into the CAM module. To do this, turn the access card with metal contacts up and insert it until it stops, while the CAM module should be facing you.

Then turn off the TV and insert the CAM module into a special slot (PCMCIA slot), usually located on the back side of the TV. The module must be inserted facing the wall.

Connect your satellite dish to your TV.

After that, turn on the TV.
Before setting satellite channels, I recommend making sure that the TV "sees" your CAM module, for this go to the TV settings and look at the information about the CAM module. For example, on LG TVs, for this you need to go to "Settings" - "Quickly" - "Search for channels" - "CI data (CAM)"


After that "Module".

Select your module, in my case it is Tricolor CI plus CAM

And see information about it.

If the TV "does not see" the CAM module, then you have not inserted it correctly, turn off the TV and insert the CAM module correctly.
Setting up satellite channels through the CAM module.
Below I will describe how to set up the CAM module on an LG TV, for other TV models (Philips, Samsung, Sony, etc.) everything will be the same.
Go to the TV menu, to do this, press:
1) on a conventional TV remote control, the "Settings" button
2) on the magic remote control the "Input" button
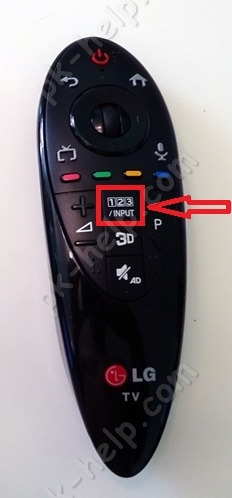
and select the "Settings" button on the TV.
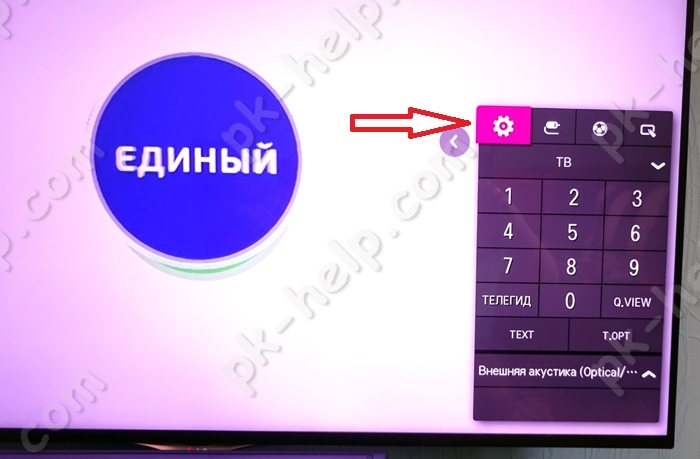
From the "Quick" menu, select "Search for channels".

Select "Auto Search"

Specify "Satellite" in the settings mode and click "Next".

From the list, select the operator whose CAM module you are using, in this case Tricolor.

If you use the popular operator Tricolor, NTV+, etc., then in the next step just click "Next", otherwise click "Settings" and make the settings corresponding to your satellite operator.

The next step, click "Run" to start searching for channels. You can also specify a more accurate search by selecting, for example - Skip coded channels, etc.

An automatic search for satellite channels will start, you must wait a few minutes before it ends.

As a result, you will see the number of channels and radio found, now you can click "Finish".

As a result, you have set up satellite TV using the CAM module.
Video settings of the CAM module Tricolor, NTV +, Telecard, Raduga.
class="eliadunit">
If your TV supports CAM modules, then you can watch paid satellite TV on it, such as Tricolor TV, NTV Plus, TELECARD, Raduga TV, etc. You just need to purchase a smart card from the operator you need , module for this card, and insert the card with the module into the TV's CI slot.
When choosing such a TV, the main thing is not to confuse it with DVB-T2, even if you tell the seller that you want a TV with a built-in receiver, it can sell you instead of DVB-S2, DVB-T2, and these are completely different things. Usually, by the name of the model, you can read what kind of receiver is installed on the TV. For example, in "LG" in the model name "47LM580S-ZA" the letter "S" indicates that the TV has a built-in DVB-S / S2 receiver.
The surest way to determine if a satellite receiver is on a TV is to look back, where all the connectors are located, and find the antenna input "LNB IN".
All such TVs have a "CI" slot for "CAM" modules. The "CAM" module is selected depending on the encoding in which the content is encoded, for example, if it is "Tricolor TV", then the "DRECrypt" module is needed, and preferably the latest version. There are no problems with the module, it can be easily purchased in a special store.
Brief instructions for setting up the CAM module "Tricolor TV" or "NTV PLUS" on LG TVs.
1. Install the Tricolor TV access smart card into the Tricolor TV conditional access module (CAM WEST CI+). Chip to the thick side of the module.
2. We install the conditional access module in the switched off TV.
3. Turn on the TV and watch information about the module and access card, if there is no information or error code 17, check the installation is correct and go through the equipment registration on the Tricolor website.
4. In the TV menu, in the settings, select the type of antenna " satellite". In converter settings satellite dish Tricolor indicate satellite Eutelsat 36A/36B. converter type single. Converter power supply (LNB) - on. LNB 10750. transponder frequency - 12226 MHz or 12111 MHz or 11881 MHz (settings are by default) the flow rate is 27500. We look at the signal quality.
5. Go to channel setting and turn on automatic search(in new generation TVs) transponder frequencies from 11881 to 12418 will be registered automatically. At the same time, it is desirable that the TV be flashed with the latest software version, in this case the Tricolor TV CI + CAM module will work more correctly, all transponders will be up-to-date, and you will correctly scan the desired channels.
6. If everything went well and the channels were found, go to the sound settings on the TV and set it in the " Digital TV sound settings" parameter MPEG. This is done so that the sound on the channels does not disappear when viewing. Go to module settings CI data (CAM) orCI Options > Settings and select " Reset to factory settings". Turn off the TV completely.
9. An important feature of LG TVs is the “Automatic channel update". It must be turned off, otherwise the TV will periodically reset the channel list you configured.Go to settings"Channel Auto Update"and set the parameter:off.Now you can fully enjoy the possibilities of your TV, watching high definition channels. Enjoy watching and bright emotions!
NOTE:
Problems with sound or incorrect switching of Tricolor TV channels on the CAM module were fixed in the CAM module update in December 2014.
For self-updating via the CAM module on the TV, find the service channel in the list of channels of the Tricolor TV operator for updating by - " Telemaster".It usually goes under the number333 according to the operator's list. If it is not in the list, scan the channels again.
After you switch to it, you can update the CAM of the Tricolor TV module via the TV menu CI data (CAM) or CI Options > Settings > Download software>OK. If new software is available and you are prompted to upgrade, click the button OK on the remote control after which the software update percentage will go. It is necessary to wait for the complete download of the module software from the satellite and, after the update is completed, reset the module to factory settings: CI data (CAM) orCI parameters > Settings > Reset to factory settings > OK
After the update, everything works correctly, no glitches are observed, all channels are always in place and with sound. CHECKED!
Also on the menu CI data (CAM) orCI Settings > Information > Smart Card > Providers > Tricolor TV You can view information about packages and their expiration dates.
Subscription class breakdown:
Also on the menu CI data (CAM) orCI Settings > Information > Smart Card > general information you can find out ID numberTricolor TV smart cards for extending and connecting various TV channel packages.
If, after changing the frequencies by the Tricolor TV operator, channels are not scanned on your TV, or the number of channels after scanning is less than 100, do the following: (Thanks to user Dim)
The problem was the same as everyone else. 70 channels, random numbering, etc. etc.
CAM-Module software - up-to-date, TV software (let's say LG MT24) - latest version. Nothing has changed since the software update.
Reset the TV to factory settings. In the settings of the satellite dish and channels, we set the Satellite for Tricolor and NTV + - "Eutelsat 36b" or "Express-AMU1" or "Express-AT1" at position 36 ° E.
In the settings, you can also create a new satellite with the necessary parameters yourself:
Converter Type: Single/Single
LNB Power (ON)
Just add one Transponder/Frequency Tricolor TV: 12111MHz or 11881MHz Horizontal 27500
The most basic thing is to select one of the transponders Tricolor TV 12111MHz or 11881MHz from the list of transponders Polarization-H (Horizontal) Flow rate 27500.
Then we select Manual search, select the home transponder for Tricolor (12111 or 11881) and be sure to check the Network / NIT search box. Click update and wait for a while. All channels must be registered in normal numbering. All the best.
Standard set of equipment for access to satellite television includes the television receiver itself, a satellite dish and a receiver that provides their communication. However, it is quite possible to do without the last device if you purchase a TV with a CI (CAM) module. This module, in fact, performs the functions of a built-in receiver, but at the same time it can be reconfigured, at the request of the subscriber, to any operator, including Tricolor TV. Setting up the ci module for the Tricolor satellite can be done by the subscriber independently, without the involvement of the company's technicians. We'll tell you how to do it.
General information for all subscribers
With the help of the CI module, the subscriber can view both TV programs in standard quality and HD channels. To gain access to broadcasting, it is necessary that the equipment installed in the house meets the minimum standard requirements imposed by the operator.
equipment requirements
TVs equipped with a CAM module can only work with Tricolor content if the subscriber's antenna is set to Eutelsat satellite W4 (in this moment called Eutelsat 36A/36B). In this case, you won’t have to set any special Tricolor TV tuning frequencies for the ci module on the receiver - the devices will find the signal automatically.

In addition to the requirements for the satellite, there is one more nuance - the user's television receiver must be equipped with satellite tuner, which receives a signal in DVB-S2 format. It is also desirable that the TV has support for 4K UHD and HEVC. This will make it possible to view channels from Ultra HD packages on it.
Important! In the absence of support for these formats, even channels from standard packages may not be available.
Well, besides this, to access the broadcast, you will have to purchase a smart card from the operator and connect it to the equipment. When the installation is completed, you can proceed to the settings.
Instructions for TVs of different models
The procedure for carrying out adjustment operations will depend on the model of the television receiver. In detail and with illustrations, all the setup steps are usually described in the instructions for specific device. We will only provide general information.
Important! Subscribers who have already tried to set the module parameters and have not received a result are recommended to roll back the TV settings to the factory settings before any repeated operations.
After installing the CAM module in the appropriate port, you need to go to the TV settings and set the following parameters there:
- antenna - satellite;
- converter - single;
- satellite - Eutelsat 36A/36B;
- converter power – on (then set “LNB”);
- transponder frequency - 12226.
Then you should save the settings and check the signal quality. For normal operation, it must be at least 80%. If the signal level is insufficient, it is worth checking the connection of the receiver with the antenna and, if necessary, reconfiguring the latter.
Next, go to the menu item "Channel settings" and set it auto mode. After the device detects and displays the list of found TV channels, it will need to be saved.

Then go to the "Sound Options" item and set it to MPEG4 mode. This is necessary so that during broadcasting the sound does not hiccup and goes in sync with the image. And the final stage is the transition to the menu section "CI Data" and a rollback to the factory settings.
Next, the receiver is turned off for 5-10 minutes, then turned on again, transferred to one of the coded channels and left for several hours. This is required for the device to receive activation keys from the satellite.
Important! Receiving activation commands should also end with setting up the Tricolor ci module on a Samsung, Sony, Philips TV and other models.
Instructions for Samsung TVs
Owners of Samsung TV receivers should also go to the device menu and select the “Satellite Channel Settings” section. The active satellite will already be marked in it. The mark must be removed, and then ticked at the very end of the list of signal sources, in the line "User Sat1". This is necessary so that the device receives a signal from the Tricolor operator. Setting up the ci module on a Samsung TV continues by setting the LNB parameters in the corresponding section of the main menu. Here it is necessary to set the value of the lower frequency limit to the same as the upper one.
The next section of the menu for setting parameters is “Broadcasting”. It needs:
- go to the sub-item "Channel settings";
- select manual mode;
- find the installed satellite User Sat1;
- click in the line "Transponder" on the word "Create";
- set operating frequencies and transmission speed;
- save settings.
Next, you need to click "Search", evaluate the signal level and start the search again. The equipment must find at least 6 TV channels. To connect the rest of the content, you need to go back to the "Transponder" section, turn on the network search and click the "Search" button again. As a result, the module will find all available channels and make the interface for using television available to the subscriber.

Setting up the Tricolor ci module on a Sony TV
To access the broadcast Sony TVs it is necessary to act according to the following algorithm:
- select the “Settings” item in the device menu;
- go to the "Digital configuration" subsection;
- select the line "Auto-tuning satellite";
- in the "Antenna configuration" window, set "Fixed antenna or DiSEqC";
- leave the default settings in the scan window;
- in the next window, turn on satellite number 1.
Next, the LNB configuration is installed. The upper and lower frequency ranges are set in accordance with the antenna model (the values \u200b\u200bare written in the instructions or directly on the converter case). Now you can return to the list of satellites and click the "Start" button located below it. After that, the module will automatically start searching for available TV channels. At the end of it, it remains only to save the list of found content.
Setting up the ci Tricolor module on a Philips TV
At Philips at the moment there is no agreement with Tricolor on the implementation of their parameters in the software of television devices. Therefore, during auto-search, the CI module of this equipment sees all the frequencies of the working satellite, including programs not only of Tricolor, but also of NTV +. To access the desired operator, you will need to do the following:
- go to the menu item "Installation", then "Search for satellite";
- click "Reinstall channels", then "Start";
- wait for the signal scales to be displayed on the screen;
First connect the satellite dish to the TV. The satellite dish is connected in two ways:
If the TV has a satellite connector, the antenna is connected directly to the TV. The TV will independently receive a signal from the antenna and display the image on the screen.
If the TV does not have a “Satellite” connector, the antenna is connected through a satellite receiver - a device that receives a signal from the antenna and outputs an image to the TV.

Externally, the receiver looks like a regular VCR.
After connecting the antenna, find the channels. Channel search methods depend on the TV and how the antenna is connected.
Step 2. Start searching for channels if the antenna is connected to the "Satellite" connector
Search for channels with the choice of an operator from the list
Works on 2019-2015 Samsung TVs (R, N, M, Q, LS, K, J-series).
The easiest way. The TV will receive a fixed list of channels, it will not be possible to adjust the order or delete unnecessary ones.

Automatic channel search
Works on 2019-2012 Samsung TVs (R, N, M, Q, LS, K, J, H, F, E, D-series).
It takes a long time, the TV will find all available channels. It will not be possible to adjust the order or delete unnecessary ones.
Manual channel search
Works on 2019-2012 Samsung TVs (R, N, M, Q, LS, K, J, H, F, E, D-series)
It takes a lot of time, you need to know the parameters of each transponder. Allows you to find only those channels that you need and adjust their order.
Select " satellite system". Enter your PIN to access this item. The default is 0000.

Open "Select Satellite", select "User Sat" and click "Save".

Enable the "LNB Power" item if it is disabled.

Select "LNB Settings".

Enter data for setting:
Set transponder settings;
Make sure "DiSeqC Mode" is off when not in use;
Set "Upper LNB" and "Lower LNB";
Set "Tone - 22 kHz", depending on the type of LNB.
Check all data with satellite operator.

After entering the data, check the signal quality.

If the signal quality is between 100 and 80, click Close.
If the signal quality is below 80, try turning "Tone - 22KHz" off. If this does not help, check the installation and connection of the antenna. Poor signal quality indicates that a bad signal is coming from the antenna. The TV will not be able to find channels or will show them with noise.
Go back to "Advanced Settings" (using the "Back" button) and select "Manual Setup".

Select "Transponder" → "Create".

-

If you need to find channels on one transponder, in the "Network search" item, select "Disable". If you need to find all channels - select "Enable".

Click the "Search" button.

Wait for the channel search to finish.
Ready. Press the "OK" button and exit the menu.

After connecting the satellite dish to the "Satellite" socket, turn on the TV and enter the menu.
Enter the "Broadcast" section and select " Additional settings". If this item is not there, select the "Channel Settings" item.

Step 2. Start searching for channels if the antenna is connected to the satellite receiver
Before searching for channels, connect the TV to satellite receiver(via HDMI, tulips or other cable). Then set up the receiver. How to do this, see the instruction manual or contact your satellite operator.
Unable to watch scrambled channels. What to do?
To view scrambled channels, connect the CAM module to your TV. Buy a CAM module from a satellite operator or electronics stores.