Setting up the DIR-300 NRU router does not work, help with advice. Bought this router. The store reassured me, they said that it is the easiest to install and almost all Russian Internet providers work with it, and all of them have instructions for installing it on the official websites. Of course, there were no instructions for this model on the website of our provider, and I also realized that the DIR-300 router comes in some different revisions b1-b5 (it turned out I had NRU b5). And for each Internet provider, the router is configured differently, or so it seemed to me. As for the manual that came with the router, there is a description of connecting the DIR-300NRU b5 to the XP operating system. I want to connect it first system unit from the operating room Windows system 7, and then connect my daughter's laptop to the created virtual network, but Windows 7 is also installed on it. I tried to figure it out myself and you know, from all these IPoE and PPPoE, PPTP my head hurt. So I have a question for you, can I still connect two of our computers to the router or immediately call a specialist like you. And yet, explain in Russian, what is the difference between WAN and VPN? Vladimir. Samara.
For a long time my friends have been asking me to buy and set up a router for them. We go to the store, buy and set up step by step, and you are watching everything that happens, everything will be clear even to a beginner. You can connect any router, it all depends on your perseverance and of course patience. Configuring the DIR-300 NRU Router not complicated, this router is very popular due to its inexpensive price of 1000-1100 rubles and good reliability and works with Windows XP, Windows Vista, Windows 7 operating systems. On the official websites of Russian providers, there are instructions for installing it, but as I noticed outdated revisions b1, b2, b3, black-brown settings web interface.
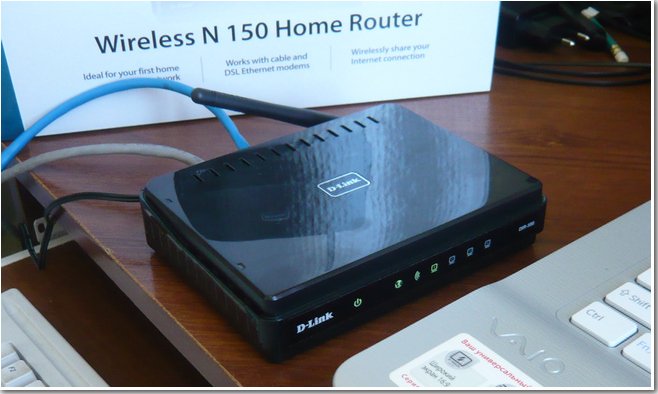
- In 2011, D-Link updated the web interface, now the settings windows of the router (including the new DIR-300NRU b5 model are pale green, and the background is white, of course, the settings have changed a bit. The providers, however, have everything left in their places. These are many users, recently bought a router is confusing. this moment according to my observations, most often buy a model D-Link DIR-300 NRU b5 with Wi-Fi support up to 150 Mbps, using the updated settings interface, built-in between firewall and compatibility with standards without wired connection 802.11b and 802.11g. I advise you to know exactly what you are buying and check everything in the store.
Attention! Setting up the D-Link DIR-300 NRU router (HW revisions: b1, b2, b3) is slightly different from setting up the DIR-300NRU b5 router, but the essence is basically the same, now you will see everything for yourself.

Now about the settings. Before getting into the Internet itself (global computer network) from our house, you and I first get to our Internet provider or provider in a virtual private network (for example, Beeline). There are few real providers in Russia, many sub-providers, in simple terms, intermediaries. But how these providers organize their network also depends on how to configure the router.
What is the difference between all providers (providing Internet services) and how does this affect the settings of the router?
Nowadays, one half of the providers use the modern network protocol DHCP or IPoE for work, where the distribution of IP and DNS addresses occurs automatically (I must say it is very convenient for an Internet provider), and for Internet access they use an outdated tunnel protocol or a new second layer tunneling protocol L2TP (combining PPTP and L2F). The other half of the providers work on an outdated protocol PPPoE mainly related to technology xDSL (for example, Rostelecom ), that is, it uses DSL modems, in the router settings, again, select the PPPoE connection type (information at the end of the article) and already configure it a little differently than in the first case. Of course, sometimes there are other features, so before you buy a router, my advice to you. Call your provider and find out all the information you need to configure the router, ask about which range of router models to choose from, so as not to suffer later with settings, firmware and, as you said, specialists like me. Now, let's take a closer look at the setting, in my opinion very good router D-Link, DIR-300NRU b5 . In general, I configured this router many times in the seven and in , but unfortunately I didn’t look at the accompanying manual, but it turns out, in fact, as our reader said, nothing is written about Windows 7, but there is information about XP. Don't worry, our router works great on both operating systems.

Let's start with the fact that you need to find out what network protocols your Internet provider is using - PPPoE or L2TP , you can find out by looking at the contract with him or you need to call your provider's support service and just ask, by the way, this is best. Let's start with the most common in our time and the easiest customizable network protocol DHCP. You also need to find out how your provider issues an IP address, in the case of the DHCP protocol, this happens automatically, you can make sure of this by looking at the Properties local connection your his network adapter.
Windows XPStart - Control Panel - Network Connections - Connect via local network- Properties - Internet Protocol (TCP/IP) - Properties - Obtain an IP address automatically and Obtain DNS Server Address Automatically.

Windows 7
Start - type View Network Connections - Local Area Connection - Properties - Internet Protocol version 4 (TCP / IPv4) and Properties - Obtain an IP address automatically and Obtain DNS server address automatically.


If you have the Use the following IP address option checked in the Internet Protocol Properties and the addresses are registered, the same addresses must be specified in your contract with the provider, then your Internet provider works using the PPTP or PPPoE protocol. Consider setting up a router with these protocols at the end. But before connecting a router with these protocols, you also need to set the parameters Get IP automatically and Get DNS server address automatically in the Internet connection properties. Let's go to the router settings. If something goes wrong, you can always reset the router to factory settings by clicking on the Reset button. Let's connect conducted by your provider local cable Internet to the WAN port on the router, as we see it says internet , and the router and your desktop computer connect with each other network cable(in our case, blue) via LAN port number 1.
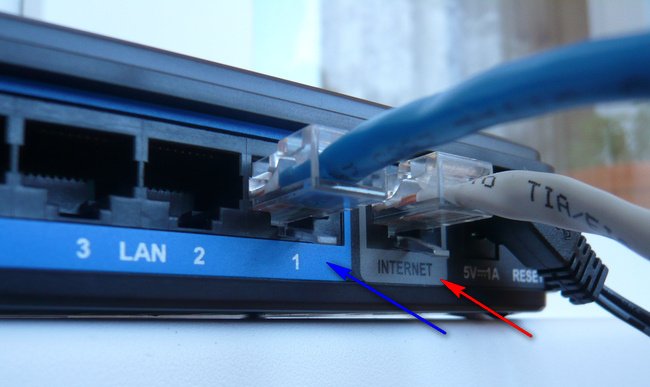
Users to whom the Internet is supplied using ADSL technology need to connect the DSL modem and the router with a network cable, then connect the router with a network cable to the system unit. There are only 4-LAN ports on the DIR-300 router, to which we can connect up to 4 personal computers that do not have Wi-Fi.

Turn on the router, open any browser: Chrome, Opera, Mozilla, Internet Explorer and enter into address bar 192.168.0.1 and press Enter.


And here we are in the initial window of the DIR-300 router. First of all, advanced users download the latest firmware version from the official website ( software) for the router and install it, currently installed on our router latest version firmware, so you do not need to download or flash anything. And my advice to you, even when the firmware is released, first try to set up the router as it is, without flashing it, it's easy for a beginner to make a mistake, and then you can restore the router only in a service center.


Name - Beeline
Connection type - L2TP
Connect automatically- tick the box
Service name - tp.internet.beeline.ru
PPP Username - our login with you in Beeline, starts with 089 ...
Password - Your internet password
Encryption - Usually No encryption
The device configuration has been changed- Save so that after restarting the computer, the changes you made to the router settings are saved.

Next, click again Connections, select the Beeline we just created, Connection type l2tp and assign it Default gateway(we mark this point). Click Save.

Click on the button Status - Network Statistics. In the WAN field, we see information that our router has successfully received the necessary data from the provider and we have the Internet.

Now, via Wi-Fi, we connect a laptop to our router.
Press the Wi-Fi button in the router settings. General settings. We leave everything by default.


PSK Encryption Key: We come up with an encryption key, preferably a 10-digit one, consisting of letters and numbers in random order, it’s more reliable
WPA encryption - AES or you can TKIP + AES, then your network will be available to almost all existing Wi-Fi devices.
WPA key renewal period leave by default.
Sometimes it happens that the router settings crash when you turn off its power, so be sure to upper corner page, open the "System" menu and click on " Save and Reload". Now the changed settings of your router will be saved in its non-volatile memory.

Click OK


Literally right after that, my laptop detected a virtual network. Assigning a network parameter public network or you can Home.

We connect to our network and enter the invented key.


Now our laptop also has internet.
If you have problems connecting your laptop to the resulting network WiFi router, then on the laptop, enter
Control Panel\Network and Internet \ Network and Sharing Center\Wireless Network Management,

double click on the DIR-300 NRU network

Properties wireless network DIR-300 NRU. Tab Connection, you should have a check mark on the item Connect automatically if the network is in range.

In the DIR-300 NRU wireless network properties window, Security tab, check the security settings - Security type, Encryption type , Network security key, everything must match the settings of the router.

Here are friends and all the settings of our router in the network DHCP protocol. As for setting up our router in PPPoE mode, you will need to go to the router settings Network -> Connections and select the PPPoE connection type, then enter the username and password, as well as password confirmation. detailed instructions available on the D-Link website - http://dlink.ru/ru/products/5/728.html
Authorization
In order to get into the web interface of the router, you need to open your Internet browser and type 192. 168.0.1 in the address bar, Username - admin , Password - admin(provided that the router has factory settings and its IP has not changed).
Change factory password
Default: Login admin, password admin.
System, menu Administrator password.
In field Password (New Password) enter New Password.
In field Confirmation (Confirm Password) repeat new password.
After that, the router will prompt you to re-enter its settings.

Internet connection setup
In the interface of the router, you need to go to the tab Net, menu Compound(Here you can add, edit and delete connections). Click on the button Add.

Setting up a PPPoE connection
- In the field select PPPoE
- In field MAC
- Your login from the contract
- Password (Password): Your contract password
- repeat password
- Authentication algorithm: Auto
- keep alive
- Leave the rest of the fields as default.

Setting up an L2TP connection
Main settings
Specify connection type L2TP.
Name - Don't change your name
Allow - Leave a checkmark
Physical layer
Physical interface - Port5
MTU- leave it unchanged
MAC- If your ISP uses MAC address binding, enter the MAC address of your network adapter. If there is no binding, the MAC field; leave it unchanged.

Rest Main settings and Physical layer leave it unchanged.

In the Settings field PPTP/L2TP:
Connect automatically- check the box
How to set a service name- specify URL or IP
Service name- write down the address VPN servers provider
PPP Username- write down the login for accessing the Internet, issued by the provider
Password- write down the password for accessing the Internet, issued by the provider
Password confirmation- password re-entry
Encryption - if the provider does not use MPPE encryption, leave No encryption;. If encryption is used, set MPPE AUTO or check with your ISP for the type of encryption.
Authentication Algorithm- leave AUTO
Keep Alive- the connection will be permanently on.
MTU- change the value to 1450 or less
In field Miscellaneous make sure the checkboxes are checked NAT and Firewall.
If the provider provides an Internet TV service, check the box Enable IGMP.

Setting up PPtP (VPN) when automatically obtaining a local IP address (DHCP)
- In field Connection Type: select PPTP(PPTP and L2TP are point-to-point tunneling protocols that allow a computer to establish a secure connection to a server by creating a special tunnel on a standard, unsecured network.)
- In field MAC enter the number of your network card (you can find it in the state of connection via local network or via command line"ipconfig /all")
- PPP Username: Your login from the contract
- Password (Password): Your contract password
- Password confirmation (Confirm Password): repeat password
- Service name:- IP/Server name of the provider
- Meaning MTU - 1372
- Authentication algorithm: Auto
- keep alive- check the box for permanent connection
- Save the settings with the button and reboot the router.

NAT when automatically obtaining an IP address (DHCP)
- In field Connection Type: select IPoE
- In field MAC enter the number of your network card (you can find it in the LAN connection status or through the command line "ipconfig / all")
- In step IP setting choose get IP automatically
- In step IP setting choose get DNS address automatically
- Save settings with the button Save and reboot the router.

Setting up Wi-Fi on the router
In the interface of the router, you need to go to the tab WiFi, menu Basic settings.
1. SSID the name of your wireless network.

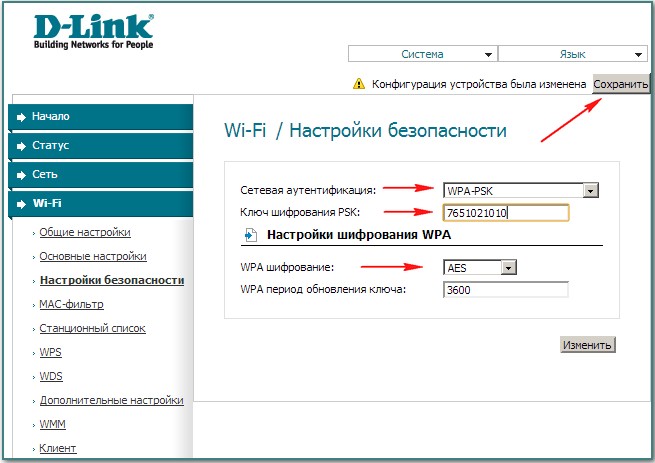
2. Tab WiFi, select security settings.

3. Drop down list Network authentications (Network Authentication): choose WPA-PSK/WPA2-PSK mixed- this is the most safe way protect your wireless network.
Encryption key field PSK You must enter any set of numbers, from 8 to 63 in length. They also need to be remembered so that you can specify them when connecting to the network. Click on the button Change to apply and save your settings.

Checking the Internet Connection Status
In the interface of the router, you need to go to the tab Status,menu Network Statistics

Saving/restoring router settings
- Choose to save the current configuration. To save the current settings of the router, the settings file will be saved to the specified location on the hard drive.
- To restore settings from a file, you must click and select Loading a previously saved configuration to the device, specify the path to the file with settings, then click the button.

At the beginning of the year, I recounted the main points in detail. At that time, I was using a rather old router with firmware revision B1 (orange administrative control panel).
Now the same routers are on sale, but with much more recent firmware - B5. I already described the main advantages in a previous article, so I won’t “pour water”. Compared to revision B1, these devices have a control panel with the Russian language, which is simpler and more intuitive. At $30, the Dir 300 has become a top seller for home and small office use.
In the office of the company where I work, the same router serves 9 computers with DHCP enabled via Kerio (the so-called Relay).
Internet setup on Dlink DIR 300 NRU B5
The most popular Internet connection in Ukraine is virtual private network aka VPN. It is carried out by one of two protocols - PPTP or L2TP. After connecting the router to the PC, you need to make sure that Network Card obtains an IP address automatically. Most often, people forget to update the settings and accordingly Can't login to router control panel.
You can change the network connection settings like this:
- Windows XP: Control Panel - Network and Connections ... - Network Connections - Select adapter properties
- Windows 7: Control Panel - Network and Internet - Network and Sharing Center - Change adapter settings
Screenshot for XP:

After receiving the address, open a browser and enter in the address bar: 192.168.0.1, and then username and password: admin.
The first point we are interested in is Network/Connections. Go to it and click the "Add" button.

I list the settings that need to be made when creating a new connection:
- Name - any;
- Connection type — L2TP for Kyivstar;
- Check the box "Allow";
- Service name - a link to the server, for example tp.kyivstar.net;
- Login and password - issued by the provider, must be specified in the contract;
- For a permanent connection, check the box keep alive;
- Save your settings and reboot your router.
If you cannot log in to the router panel or you have forgotten your password- find the recessed Reset button on the case and hold it with a match for 30-50 seconds to reset the router to factory settings.
Setting up Wi Fi on Dlink DIR 300 NRU B5
Usually, users install routers after purchasing tablets or laptops, so after setting up the Internet, you will need to turn on Wi-Fi. Service Wi-Fi on DIR 300 NRU off by default.
To enable it, you need to go to the "Wi Fi / General" tab and check the box next to "Enable wireless connection»:

Then you need to set up a wireless connection and set a password for it. These parameters are set in the “Wi Fi / Basic settings” and “/ Security settings” items. In the first you need to specify the network name, it is also the SSID:

In the next step, you need to set the encryption type and password for the Wi-Fi network, and then save the settings and reboot router again:

I prefer to use the following authentication type and encryption type - mixed WPA-PSK/WPA2-PSK and TKIP+AES encryption type.
Sometimes such a bundle may prevent some devices from accessing the Internet, including those with operating system Windows. In this case, you can use one of the authentication methods:
- WEPAuto (weakest)
- WPA-PSK
- WPA2-PSK
After the reboot, if everything is done correctly, the local network, Internet and Wi Fi will work correctly for you.
1. Sometimes devices do not connect to IPTV via Wi Fi, check if the IGMP service is enabled in the "Advanced" menu item of the same name.
2. To improve security, do not use the standard router address. Change it to, for example, 87.85.50.100. This can be done in the "Network / Connections" item. Select a LAN connection and change the address in "IP Settings".
3. If you have an antivirus with a firewall installed, then when setting up a WAN connection, you can disable the router's firewall.
4. If you have any problems. Do not rush to blame the router - configure the network correctly.
Firmware Dlink DIR 300 NRU B5
The procedure for flashing devices of this series has been greatly simplified and you only need to choose the right file for updating.
For the B5 revision router, there is an official firmware:
- Number 1.2.94 dated April 14, 2011
Before flashing, be sure to check your revision of the device. You should also remember that you will lose the warranty after flashing.
To access the web-interface of the router, it is necessary in the address bar of any installed on the computer
browser, type the address 192.168.0.1 (the default IP address of the device)
Default device access details:
Login - admin
Password - admin
When you first log in to the router management web interface, you will be prompted to change the default password to your own.
After entering the new password in the appropriate window, repeat the password again in the "Confirm" window and click the "Save" button
Go to the "Network" section and left-click on the line of the WAN network interface
In the "IP Settings" section, uncheck the "Obtain DNS server address automatically" and "Obtain an IP address automatically" checkboxes.
Be careful, you need to uncheck the boxes in this order, and not vice versa.
In the IP Settings section, enter your network details. You can find them in the settings sheet attached to the contract.
After entering the settings, click the "Save" button
You are back in the "Network/Connections" section. Click the "Add" button
In the "Main Settings" section, change the connection type to PPTP
In the "PPTP/L2TP Settings" section, set the following parameters:
"Connect automatically"- check the box
"How to set a service name"- if you have an unlimited data plan (there is a speed limit, but no
by traffic) select the "URL" option. If you use a limit tariff plan, then you should select the “IP” parameter
"Service Name"- enter the name of your vpn server here. For unlimited tariff plans you should specify vpn.site,
for limit tariff plans – 192.168.100.100
"PPP Username"- here enter the login access to the Internet
"Password" and "Password Confirmation" in both fields, enter your password for accessing the Internet
"Encryption"- set this field to "No Encryption"
"Keep Alive"- leave the default value of this field, if the checkbox is checked, uncheck it.
"Additional options"- leave this field empty
MTU- the optimal value is 1460
Make sure that all fields are filled in correctly in accordance with your Internet access details and click the "Save" button
Set the new network interface as "Default Gateway" by clicking the left mouse button in the interactive part of the menu as shown in the picture.
To configure the wireless network, click on the "Wi-fi" tab, "Basic Settings" section.
In the SSID field, enter a name for your network. For example Home-net
In the "PSK Encryption Key" field, enter the password to access the wireless network.
The password must contain at least 8 characters.
Then click the "Edit" button.
Router D-Link DIR 300 NRU - updated model previous version DIR 300. All network devices of the specified brand are different good quality, attractive and simple interface and, most importantly, a nice price. Let's find out what's special about this model with the most common modifications B5 and B7, how to install it for home use and, if necessary, flash the device.
The router is often used for a home network
This router differs from the previous model by supporting the 802.11n standard. AT this device maximum speed is up to 150 Mbps, which is quite enough for home use. Externally, the router looks pretty standard, the interface provides 4 LAN ports for creating a local network, 1 WAN port, a reset button for resetting to factory settings.
Due to the external location of the antenna, the device provides an optimal Wi-Fi signal coverage area. The router is quite easy to configure or reflash for any subscriber, which makes it even more attractive among other models of network equipment. It also has its own zest - in addition to standard functions, it is possible to turn the connection on or off according to a schedule.

Setting up a router
To install the equipment and set up Wi-Fi, you should follow these steps:
- Enter the device settings interface - to do this, enter your IP address in the address bar of the browser (in most cases it is 192.168.0.1), after which you need to enter the word admin in the login field, the password field must be left empty.

Note. These actions will give a result if previously D-link router DIR was not configured. If you need to reconfigure, return it to its original state - before starting the parameters, hold down the reset key for 20 seconds, after which it will return to the factory settings.
- To establish a Wi-Fi connection, select the section with the same name in the menu, select the main settings tab.
- In the window that appears, enter the data to activate the connection - the network name, the country where you are located, the channel and the type of wireless mode.

Internet connection setup
To directly configure the connection to the network, you need to go to the “Network” menu, to the “Connections” tab. If you need to create new parameters, it is advisable to select the “Add” button and fill in the data in the window that appears - their content depends on the provider. For each type of connection PPPoE, PPtP, NAT, you need to enter certain data that is in the contract from the service provider - using the form, you can consistently enter all the necessary information.

You can check the connection status on D-Link DIR in the “Status” section, “Network Statistics” tab.
Setting a password
In order to secure your network, set the key that you will need to enter to connect to the Internet. This is done as follows:
- From the Wi-Fi menu, select the Security Settings tab.
- Check the box to enable WEP, after which data for setting a password will appear.
- In the list of network authentications, from the drop-down list, select the type of encryption WPA-PSK / WPA2-PSK mixed - it is the most reliable for protecting the network from hacking.
- On the next line, enter the passkey - make it complex enough that outsiders cannot connect to your connection.

Additionally, it is advisable to secure not only the network, but also the router configuration menu itself by changing the standard login and password data to your own combinations. It is done like this:
- Go to the “System” section, open the “Administrator password” window.
- Enter new combinations to access the settings, after which you will need to re-enter the options menu using the newly set login and password.

Saving Changes
The router parameters have a separate menu for saving changes or returning to factory settings, it is located in the “System” section, in the “Configuration” line. Here you can save the changes made, return to the initial settings, or save a file with up-to-date data in order to restore the connection later if necessary.

Installing new firmware
If you want to update the router software, follow the steps below:
- Find and download from world wide web firmware file, the main thing is to choose the correct software version, focusing not only on the model number of the router, but also on the hardware revision of the device, the data about which is written on the back of the router in the form of a H / W combination. Exist different versions- B2, B5, B7 and others, they all differ from each other.
- Go to the router menu through the browser using the IP address.
- Open the “System” section, select the “Software Update” tab.
- A line will appear in the window to specify the path to the file new firmware for hardware revision B5, B7. Find it on your computer, then click "Update".
Thanks to the above steps, you can install the D-Link DIR 300 NRU router, configure it to work with the Internet and distribute a signal via Wi-Fi, and if necessary, change or update its firmware for the correct operation of the equipment. As you can see, all this is done quite simply and affordable, the process will not take you much time.