Hello, friends! The topic of the article is cloning hard drive . The tool with which we will do this is Portable Symantec Norton Ghost. What is cloning. This is the creation of an exact copy of the entire hard drive or partition to another hard drive or partition. This is necessary to move to a new, larger disk (or SSD) in order to avoid installing operating system, drivers, programs, do not configure the Internet and everything else and, therefore, do not waste a mountain of time. Another thing is when Windows on the old disk does not work stably, then yes. Reinstalling is a great solution. If the system on the old drive works fine, you can spend half an hour cloning the hard drive and that's it. How to do this, read on or watch the video at the end of the article.
Why will we boot from a USB device? Because on many computers (for example, in my home desktop computer) and laptops (the drive does not work in my home laptop) there are no drives for reading optical discs. Netbooks never had them. But USB connectors are, were and will be. Therefore cloning hard drives it will be more universal to produce by booting from a USB flash drive.
First we need to download USB Flash boot to DOS.7z
- USB Flash boot to DOS.7z [~2 MB]
Install the program with which we will make the flash drive bootable
Go to the unpacked folder and run the file setup.exe


Click Next >

We take one more license agreement Yes

If necessary, change the installation location of the program and / or click Next >

We complete the installation of the program. Davim Finish

The program is installed.
Let's make the flash drive bootable in order to clone the HDD.
We launch installed program from a shortcut on the desktop. In the Device section, select our drive from the drop-down list.
In the File system section, select the file system FAT32

Set the checkbox Quick Format and Create a DOS startup disk.
Set point to position using DOS system files located at: Use the […] button to specify the path to the folder bot
Click start

The program will issue a warning that all data on USB stick will be removed. Save all important data and click Yes

After formatting is completed, the program will issue a report. Press OK

A bootable DOS flash drive has been created.
After, from the USB folder we copy everything to our bootable USB device. The contents of the drive will look like this.

The drive is almost ready.
Now you need to download another archive
- Portable Symantec Norton Ghost 11.0.0.1502.7z [~ 3.5 MB]
This is Norton Ghost itself with which we will clone our disk.
Copy the content to a bootable USB drive.

A bootable flash drive with Norton Ghost under DOS is ready.
Cloning a hard drive (creating an image)
We insert the prepared drive into the computer and reboot.
To clone or create an image (image from the word Image - image), we need to boot from it.
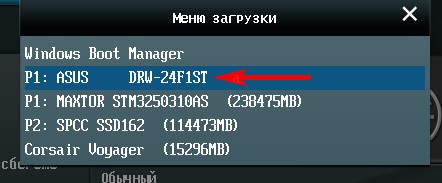
This can be done in two ways. Or set the BIOS to boot from USB or launch the Windows boot menu and boot from the USB device once.
The boot menu, on the experimental computer, is called up by pressing the F9 key when the computer is restarted. On the home computer the boot menu is accessed by pressing F8. The entry procedure is the same as when entering safe mode (F8). When loading, press F9 (F8) several times and get into the boot menu.
Choose USB device and press Enter

Volkov Commander is loading. Select a file in the left pane ghost.exe and Enter

Downloading Symantec Ghost. click OK mouse or Enter

We get into the main window of the HDD cloning program - Ghost. You can control the mouse, but it is more convenient with the arrows on the keyboard. Choose Local Or press the right arrow key on your keyboard.

A menu of three items opens: Disk, Partition and Check. If you need to clone an entire disk or create an image of the entire HDD, select Disk. If we work with a specific partition, select Partition. In our case, we will create an image of the system partition. Choose Partition

If you clone a partition from an old hard drive to a new one, then the partition where you will clone must be larger than the one being cloned. It is important!
Next, another menu opens with options: clone partition to partition, create Image from partition, and restore partition from image. If you have connected two hard drives, then you can immediately clone a partition into a partition - To Partition. In our case, we will create an image from the partition − To Image

Select the disk from which we will clone or create an Image. The figure shows two disks. By the Size(MB) column, you can easily determine which of them is who. Select hard drive and click OK

Select the partition you want to clone. In our case, create an image. Select the first system partition and click OK

If you are cloning partition to partition, then you will select the disk and partition where you want to clone it. In our case, we choose which section to save the Image to. Norton Ghost allows you to select any partition except for the one from which we will remove the image.
It may not be immediately clear which section which letter belongs to. The poke method helps.

When we have decided on the section on which we will record the image, we set the name. I recommend putting the date and designating with the letter Image which section is contained in this file. The extension can be omitted. Save - Save

In the case of creating an image, you can choose compression. It is recommended to choose Fast

To start cloning or creating an image, press Yes

The process of cloning or creating an image. We are waiting for completion.

The image has been created. Continue

We get to the main menu of Symantec Ghost. Click Quit
Click Yes to exit Norton Ghost

We get into Volkov Commander. F10- we get out of it.
Then restart the computer and remove the USB drive.
The image of the system disk has been created. Now it can be deployed on a new HDD or used as a backup for a rainy day.
Conclusion
In an article about hard drive cloning I told you the easiest way to do it in my opinion. A plus! Using Symantec Ghost, you can make an Image of a partition or an entire disk, thereby resolving the issue with backups. This image can be deployed to any hard drive.
If you already have a new HDD and you need to move, then we clone immediately without intermediaries. This will be faster than reading and writing to the same disk. Highlight. The partition of the new disk to which you will clone must be larger than the source partition.
Video "How to clone a hard drive" in which I will show how to create an image of a partition and deploy it to another drive.
Any questions, write in the comments.
In some cases, the user wants to transfer all data from one hard drive to another. This procedure is called cloning. So, hard drive cloning is a process of sequential and complete record data from the original drive to another. For home PC users, this procedure allows quick change HDD or SSD in case of replacement or upgrade. This operation can be performed using simple programs with intuitive clear interface, one of the most famous is TrueImage fromAcronis.
For large companies, the disk cloning procedure allows you to quickly set preferences on a large number of identical machines, when expanding the office or replacing work computers. Then the original instance with a fully configured system and installed work programs for the company's employees. One original HDD or its image becomes a donor for a dozen workstations.
The process of working with the Acronis program interface
All user interfaces media cloning programs are very simple. These programs can be run both in the operating system and with external media: USB stick or DVD. This makes it possible copy data from/to computer without Windows boot
Acronis Complex true image designed for both cloning hard drives, and for transfer operating system from HDD to SSD. He handles it without mistakes, moreover, it has support not only for BIOS, but also for UEFI. First you need to find the latest version and install her on bootable flash drive or CD. Can use any utilities for creating bootable devices, such as USB Flash boot to DOS.
After that, in the BIOS or UEFI interface, you must select download fromUSB drive. At the time of system boot press F2, F8, F9 or Del key. Paragraph "". This is followed by a computer, after which you must select utilityAcronis.
In its interface, you should specify original disk and target, moving sections one at a time. If the target disk has smaller sizes than the original, you must select system partitions, and from user space select only necessary files. Thus, it is possible to carry out transfer operating system from HDD to SSD to speed up your computer. 
After use and successful Windows startup, necessary delete empty partitions on the source disk, using the utility " Hard Disk Wizard". To do this, there is an item for deleting a partition and an item for adding unallocated space.
Transferring a system from one computer to another using True Image
To transfer the system and the contents of the hard drive from one computer to another, the program from Acronis provides the ability to preservation backup of hard disk partitions on external media. It is enough to follow all the above steps and enter the submenu " Backup". If you do not use compression, then such a copy will take up as much space as the original data. For this reason, it is necessary to use external storage
sufficient volume. The maximum backup size can be halved. 
After transferring information to external media launch Acronis True Image on a secondary computer by connecting an external drive to it. Selecting " Restoring a backup»You must follow the instructions and mark the hard drive under the system and user partitions.
Have you ever had to reinstall your operating system? Then you probably know what a hassle it is. After all, you can reinstall the system itself quite quickly, but reinstalling all programs and licenses is no longer so easy and fast. And how to save all the databases or the passage of games? Even if you know how to do it, it won't happen quickly. You'll have to sweat a lot, and it's not a fact that then everything will work well. But what if you make a clone of the hard drive in advance with all the programs, databases or the passage of games?
When I go on vacation at work, I always clone hard drives the most responsible computers. This is especially true for accounting. I have no desire to restore all the treasury and tax programs. Those who work with these programs will understand me.
And the other day, a warning popped up on my daughter's home computer that the hard drive was damaged and was about to crumble. She was seriously nervous, because. she has a lot of all sorts of complex programs on this hard drive, and it will take a long time and hard to reinstall and configure them. And then we decided to clone her hard drive.
We always keep all the most valuable information on other hard drives or even on external media. Several external terabyte drives with photos, movies, music, etc. we have separate. When we need some information from them, we connect them via .
I'm going to make or buy network storage, but the money is sorely lacking. As soon as you think about putting something off, according to the law of meanness, some unplanned expenses will definitely appear.
Of course, buying extra hard drives is not cheap either, but peace of mind is much more expensive, so I always have a small (500 GB) in reserve. Why small?
Because this is quite enough for the operating system, and all other information must be kept on other disks. Then, when reinstalling the system, you won’t have to look for the “fifth corner” and think about how to save your precious data (if there is still an opportunity to save them).
Cloning is done when it is necessary to transfer all programs and data to a new, faster, and most importantly, serviceable hard drive. You don't have to reinstall or reconfigure anything. Even all licenses will work.
In order to make a clone of a hard drive that will immediately work as if nothing had happened: all programs, licenses, etc., we also need a cloning program.
It is advisable to choose a hard disk of the same size as the disk that you will clone or more. If you have an initial disk of 500 GB, and the occupied space on it is only 100 GB, then you can take a disk with a smaller volume for transfer (if you find one now), but then you need to do it on the original disk before transferring, otherwise the data transfer may occur with errors, because all file fragments are scattered throughout the 500 GB disk, and since we will not just transfer data, but clone it, then they will not fit on a smaller disk.
The new disk must be installed in the computer, as or through. After new disk decided, you need to run the program for cloning.


Hard drive cloning software
To create clones, there are many programs, both paid and free. Search your browser for "hard drive cloning software" and choose what you like.
- EASEUS Disk Copy - simple free English-language program for sector-by-sector cloning hard disks of any type and any file system. With this program, you can clone both the entire disk and its individual sections. Hidden, protected and even deleted and overwritten files will also be transferred.
 2. Macrium Reflect - free program on English language to create a copy of the hard drive. Can create partition images as virtual media.
 3. Paragon Drive Backup Personal - paid Russian-language program for Reserve copy and disk cloning. Everything is done with the help of the "master".
 4. Acronis True Image - multifunctional paid program with a Russian-language interface with manual and automatic mode work.
 Personally, I use Acronis True Image. One or two hours is enough and all your data and programs will be transferred to a new disk, which must be connected instead of the old one.
Hard drives need to be monitored and cared for. Sometimes free space on it disappears, and you will find out about it at the last moment. Install at least special utility(program) to determine the temperature of the disk. She will warn you of any problems. And do not forget to periodically defragment the disk. Check disks for and bad clusters.
If you do not yet know your computer and are afraid to climb inside, then buy and store your photos and files on it.
If for some reason you have only one hard drive and you store everything on it, then be sure to do backups your files. Or this disk is several logical ones and keep your files separate from the system ones. Well, if the hard drive tells you about your problems, and you have time to do something. And if not?
Unfortunately, experience shows that only 5% of computer users back up their data. The rest, either do not know how to do this, or hope for "maybe". Although this does not require any money, it is enough to make time or make automatic reservations at a certain time and day.
Take care of your data and don't put it off until later. Everything collapses very unexpectedly and always at the wrong time.
One of the biggest challenges when replacing a hard drive is moving the system and everything. software, which previously functioned on the computer. Installing an operating system from scratch and copying all programs to new media can take up to several hours, or even more.
The Windows operating system, unfortunately, does not include a tool for fully transferring all content from one disk to another, which is simply called "cloning" in its functionality. However, with the help special programs, you can transfer all the contents of the disk in a simple and fast way.
For example, consider cloning a hard drive using the easy-to-use EASEUS Todo program Backup Free.
EASEUS Todo Backup Free is a backup tool, but in our case, we will demonstrate its "cloning" function. The program can be downloaded from the official website legally and free of charge exclusively for non-commercial purposes.
Installing the software is a simple standard process, followed by a step-by-step wizard that guides you through the various installation steps. However, it does not contain any tricks that try to install additional unwanted software.
After installation, the program activation window appears. Here you select Current license: Free, thereby confirming the free non-commercial use. Then in the main window, click on the “Clone” icon. 
The first step is to choose a data source. In the window that appears on the screen, check the box next to Hard Disk 0, because it is labeled as system disk. In addition, the program will display the type of disk (basic, MBR or GPT), as well as its volume. If the destination disk does not contain any partition - as is the case with a new SSD - it will not be displayed in the data source selection window. After selection, click "Next".

In the next step, we must specify the "recipient" for data cloning. It would seem that the window has not changed, because it will only display old hard HDD disk, but at the bottom there is a field for SSD connections. Be sure to check the "Optimize for SSD" option.

The EASEUS Todo Backup Free program will automatically recreate the markup on the recipient from the original media. In case of differences HDD volumes and SSD, the partition played on the SSD will be proportionately smaller (assuming the copied data can fit on the smaller SSD partition). The user will be able to customize the partition structure on the recipient's disk by selecting the "Edit" button in the program window.

In the next step, the program will display the final window of the current settings. At the top is the structure of the original HDD, at the bottom - the structure of partitions and data placement on the SSD. At this stage, you can still make any changes, for this, click the "Back" button. Click "Continue" to start cloning your hard drive. The program will inform you that all data on the recipient's disk will be lost. Since there was no data on the recipient (the new SSD), feel free to proceed.
The next step is hard drive cloning. The duration of the clone operation depends on how the devices are connected (IDE, SATA, via USB cable) and their performance. A copy will be made faster on a computer in which two drives (HDD and SSD) are connected via SATA. The speed of cloning in a laptop depends on the interface used. If the laptop and the SATA-USB adapter that is used to connect the SSD support USB 3.0, copying a couple of tens of gigabytes will take 30-40 minutes at best (depending on the performance of the devices). If there is no USB 3.0 support, and only available USB interface 2.0 - Cloning can take up to several hours.
After SSD cloning the drive will contain the operating system, programs, and user data.
SSD setup after cloning
If you have cloned drives on personal computer, then most of the action is over - the SSD is already in the system unit. You can remove the old HDD or change the settings to boot from the SSD. This can be done in the BIOS/UEFI configuration program by changing the boot device order.
With a laptop it’s more difficult, you can’t do without a screwdriver here. To clone to an SSD, it is usually connected via an external SATA to USB adapter. After completion, you need to remove the old HDD and install solid state media in its place. It happens that with the replacement of the HDD and the installation of a new drive, some difficulties may arise.
How to replace a hard drive on a laptop
Notebook models vary, so slight installation differences may occur.
As a rule, manufacturers place HDD hard drives under a cover fixed with screws at the bottom of the laptop. Therefore, a screwdriver is required, but before that, remove the battery.

The next step is to remove the HDD from the connector. Everything must be done very carefully. We move the drive along the horizons to free it from contacts. If it rests against the case, lift it slightly on the other side, then pull it out of the socket.

The hard drive in a laptop is mounted using a special adapter or mounting frame. After removing, unscrew the HDD from the frame and install the SSD in this place.

Insert the SSD into the slot and connect to the SATA slot. Screw on the cover and connect the battery.
Hello admin. I want to clone the Windows 8.1 operating system in Acronis True Image 2015 from a regular hard disk to an SSD, I think this method is much simpler than all the others, first I specified the Source disk, then the Target disk and that's it. A 500 GB hard drive is naturally larger than a 120 GB solid state drive, but can you exclude unnecessary disks, folders, and even just files in the cloning settings?
Of course, I can do everything myself, but I'm afraid, since I have little experience with Acronis True Image, and you only look at it like this!
How to clone the Windows 7, 8, 8.1 operating system in Acronis True Image 2015 from a regular hard drive to an SSD (the size of the drives varies)
Hello friends! If you often work with Acronis True Image, then you probably noticed that the program settings have such an option called Cloning, and as our reader rightly noted, this option is very finely tuned.
For example, I suggest you clone my Windows 8.1 from a regular 250 GB hard drive to a 120 GB SSD. Simple HDD 250 GB is almost filled with files and naturally all the information from it will not physically fit on the SSD, but when cloning we can exclude unnecessary folders, files and even entire disks, as a result of the cloned information exactly 120 GB will remain, that is, as much as the volume of the SSD. But you need to do everything right, because the Windows 8.1 operating system cloned to another hard drive should start with us!
To start, let's connect to system unit second device SSD solid state drive
For the success of this serious operation, you must be well versed in Disk Management, pay attention to this window of my computer and you will immediately understand what's what.
Disk 0
simple hard SATA drive volume 250 GB.
1 . The first hidden section (we will clone) System Reserved (Reserved by the system), has a capacity of 350 MB. The main purpose of the hidden partition is to store Windows 8.1 boot files. If you have Windows 7 installed, then this partition will be 100 MB in size.
2 . The second section has the letter (C:) (we will clone) 105 GB, installed operating system Windows 8.1.
3 . The third section under the letter (E:) capacity 127 GB, with data files: music, movies, and so on, occupied by 100 GB. We can clone this section not completely, just exclude when cloning large files. Or we can completely exclude this partition from the cloning operation and instead, at the end of the process, an empty partition is formed on the SSD.

Disc 1. Solid state drive SSD, when cloning, all information on it will be deleted
Acronis True Image 2015
For cloning, it is better to use the boot disk of Acronis True Image 2015, as this version works without errors with SSDs and has UEFI support. It is better not to install Acronis True Image on Windows and work with boot disk this program, so you will avoid many mistakes.
You can make a bootable flash drive with Acronis True Image 2015 in the program itself or with the help of this article of ours .
So, we boot from a disk or flash drive with the Acronis True Image program. Who does not know how to boot from a disk or flash drive, read our article - .
For example, I enter boot menu your computer with motherboard ASUS often pressing the Delete key when turning it on, then I select the "Boot Menu" and already in it I select the drive or USB flash drive.
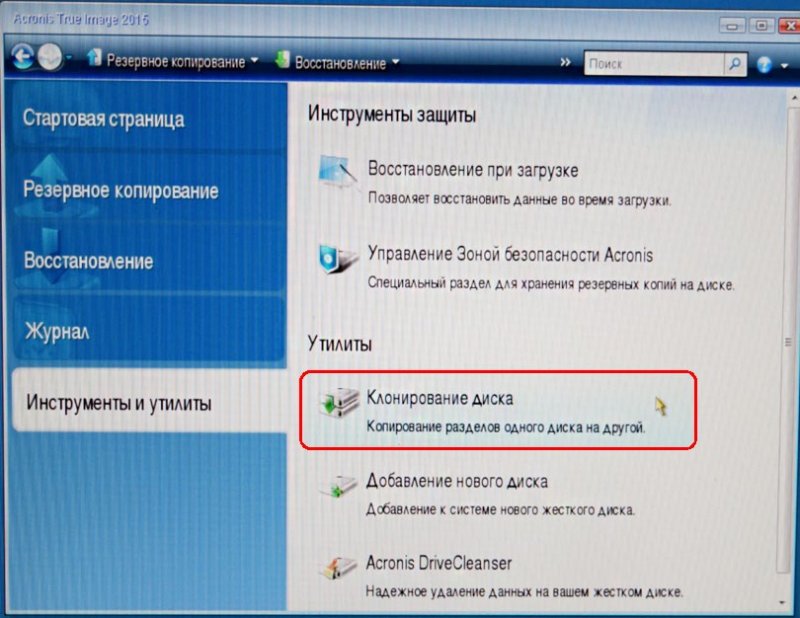
In the main window of Acronis True Image 15, select
Tools and Utilities

Disk Cloning

Select with the left mouse the Source disk (the disk from which you want to clone the Win 8.1 operating system), in our case, a simple hard disk 3 MAXTOR STM 3250310AS and click Next.

Select with the left mouse the Target disk (the disk to which you want to clone the Win 8.1 operating system), in our case, the solid state drive SSD Silicon power and Next

Acronis displays a warning "The selected target hard disk contains partitions that can store data. Click OK to confirm deletion of all partitions on the target hard disk." Click OK and Next.

Window Exclude by files and folders.
In this window, Acronis True Image 15 tells us that in order to clone information from the Source disk to the Target disk, we need to exclude 23.72 GB of files from the Source disk. You can't exclude files from the first section (Reserved by the system) as the Windows 8.1 download files are located there. It is also undesirable to excludefiles from disk installed Windows 8.1. Disk with installed operating system Windows system 8.1 is assigned the letter (D :), if you click on it with the left mouse, the operating system files will open.


So we will exclude files from the disk (E:).
Attention : Friends, you can simply exclude this entire disk (E :) from cloning, as a result, Disk C will be cloned to the solid state drive:(Reserved by the system) containing download filesoperating systemand another drive (D:) containing Windows files 8.1, but you can choose a more difficult option. Let's open the disk(E:) and choose on it junk file or folder. For example, on this disk, the NewVirtualDisk1.vdi virtual hard disk has been an eyesore for a long time, I don’t need it for a long time and its volume is about 50 GB, let’s exclude it from cloning, mark this virtual disk ticked. Program

As you can see, after excluding the file, we still have 30 GB left. free space. Click Next

If you click Proceed now, the cloning process will begin exactly as shown in this window.
Before - what is on the solid state drive now and all this will be deleted.
After - what will be on the SSD after cloning, that is, two small partitions.
I want to say that I personally do not need this state of affairs. I need on SSD drive a hidden partition (Reserved by the system) containing the operating system boot files and another drive (D:) containing the files of Windows 8.1 itself

So I'll be back at the window File exclusion and tick the whole disk
(E:). Acronis True Image 15 restarts cloning space calculation.

Friends, pay attention to the disk (E :), it will be created sooner, since this is a drive cloning operation, but the disk (E:) will be completely empty. After cloning, we simply delete it in Disk Management, and attach the resulting unallocated space to the C: drive, that's all.
Proceed. The cloning process begins.


Disk Clone operation completed successfully.
We restart the computer and enter the boot menu, select the SSD for booting and boot from it.

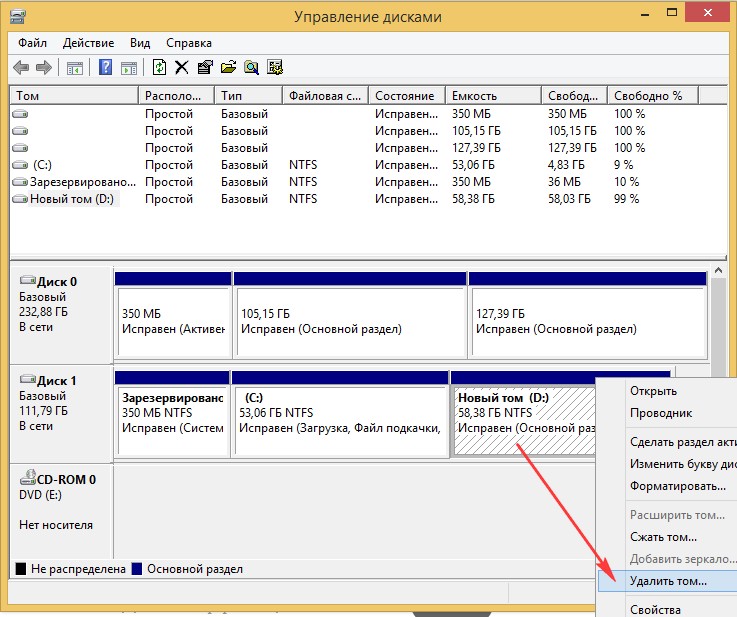
Cloned Windows 8.1 boots fine. Windows activation failed. We go to Disk Management and see this picture.
Partitions on a simple hard drive have lost drive letters, but you can simply assign them and that's it.
On solid state SSD drive As expected, when cloning, there are three sections. The first one is with the operating system boot files. Second drive C: with cloned Windows 8.1. Third disk D: completely empty.


Delete drive D: and attach unallocated space to drive C:.


I would be glad if I could help.