Got me strange HDD, it seems there was linux or MacOS. Deleted all sections, but one, standard means (disk utility and Disk Management) at 200 meters could not.
AT context menu paragraph Delete volume… is inactive.
Delete EFI Encrypted Partition in Windows 7 you can use a console program diskpart.
1. Run cmd as administrator
2. Enter in cmd - diskpart. will start diskpart in a new window
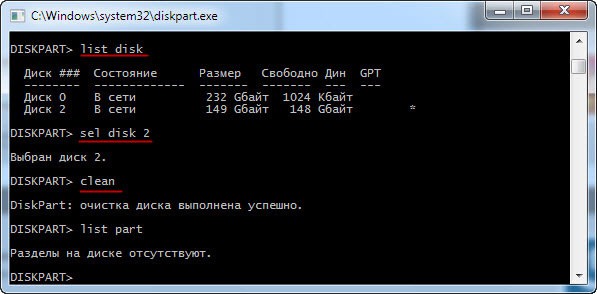
list disk - look at the list of disks
select disk # - select desired disk. instead of # specify the disk number
clean - delete all partitions or volumes on the disk
list partition - check that all partitions are deleted
4. Check the result in Disk Management. 5. All sections are removed.
efi section
efi sections
efi disk partition
efi windows partition
mbr partition table efi system
gpt efi partition
system partition efi
encrypted efi partition
delete efi partition
create efi partition
format efi partition
efi encrypted system partition
efi mac partition
efi partition mac os
boot partition efi
format efi partition fat32
format system partition efi fat32
efi system partition formatted ntfs
create efi partition
format efi system partition with fat32 format
efi system partition installed
efi sections hard drive
efi partition recovery
delete encrypted efi partition
how to recover efi partition
open efi encrypted partition
how to delete efi encrypted system partition
efi partition size
efi partition in linux
deleting the efi partition
mount efi partition
Sometimes ESP.exe and other system errors EXE errors may be related to problems in the Windows registry. Several programs can use the ESP.exe file, but when those programs are uninstalled or changed, sometimes "orphaned" (invalid) EXE registry entries are left behind.
Basically, this means that while the actual path to the file may have been changed, its incorrect former location is still recorded in the Windows registry. When Windows tries looking up these incorrect file references (file locations on your PC), esp.exe errors can occur. In addition, malware infection may have corrupted the registry entries associated with MSDN Disc 2432.6. Thus, these invalid EXE registry entries need to be repaired in order to fix the root of the problem.
Manually editing the Windows registry to remove invalid ESP.exe keys is not recommended unless you are PC service professional. Mistakes made while editing the registry can render your PC unusable and cause irreparable damage to your operating system. In fact, even a single comma in the wrong place can prevent your computer from booting up!
Because of this risk, we highly recommend using a trusted registry cleaner such as %%product%% (Developed by Microsoft Gold Certified Partner) to scan and repair any ESP.exe-related registry problems. Using a registry cleaner automates the process of finding invalid registry entries, missing file references (like the one causing your esp.exe error), and broken links within the registry. A backup copy is automatically created before each scan, allowing you to undo any changes with one click and protecting you from possible damage computer. The best part is that fixing registry errors can drastically improve system speed and performance.
Warning: If you are not experienced user PC, we do NOT recommend editing the Windows registry manually. Incorrect use of the Registry Editor can lead to serious problems and require reinstalling Windows. We do not guarantee that problems resulting from misuse of Registry Editor can be resolved. You use the Registry Editor at your own risk.
Before manually restoring Windows registry, you need to create backup by exporting a part of the registry related to ESP.exe (eg. MSDN Disc 2432.6):
- Click on the button To begin.
- Enter " command" in search bar... DO NOT PRESS YET ENTER!
- Holding keys CTRL-Shift on the keyboard, press ENTER.
- An access dialog will be displayed.
- Click Yes.
- The black box opens with a blinking cursor.
- Enter " regedit" and press ENTER.
- In the Registry Editor, select the ESP.exe-related key (eg. MSDN Disc 2432.6) you want to back up.
- On the menu File select Export.
- Listed Save to select the folder where you want to save the backup copy of the MSDN Disc 2432.6 key.
- In field File name enter a name for the backup file, such as "MSDN Disc 2432.6 Backup".
- Make sure the field Export Range value selected Selected branch.
- Click Save.
- The file will be saved with .reg extension.
- You now have a backup of your ESP.exe-related registry entry.
The next steps for manually editing the registry will not be covered in this article, as they are likely to damage your system. If you would like more information on editing the registry manually, please see the links below.
In this article, we will show you how to manually restore an accidentally deleted Windows boot partition on a UEFI system. Initially, the article described my experience in restoring a bootable EFI partition on Windows 7, but the article is also relevant for modern operating systems. Microsoft systems(from Windows 7 to Windows 10). It has helped me more than once after accidentally formatting or deleting an EFI partition in Windows 10. In this article, we will show you an easy way to manually recreate bootable EFI and MSR partitions in Windows.
So, suppose that somehow accidentally (or not very accidentally, for example, when trying) the boot EFI partition on a UEFI system (not BIOS) was deleted or formatted, as a result of which Windows 10 / 8.1 / 7 stopped loading, cyclically offering to select boot device(Reboot and select proper boot device or insert boot media in selected). Let's see if it is possible to restore Windows to working capacity when deleting a partition with Boot Manager without reinstalling the system.
Warning. The instruction involves working with disk partitions and is not intended for beginners. If the commands are interpreted incorrectly, you may accidentally delete all data on the hard drive. It is also highly recommended that you back up your important data to a separate medium.
Partition structure on a GPT disk
Consider how the partition table should look boot hard disk from GPT markup on the . At a minimum, the following sections must be present:
- EFI system partition (EFI System Partition or ESP - Extensible Firmware Interface) - 100 MB (partition type - EFI).
- Microsoft Backup Partition - 128 MB (partition type - MSR).
- The main Windows partition is the partition with Windows.

This is the minimum configuration. These partitions are created by the Windows Installer when you install the system to an unpartitioned drive. PC manufacturers or users themselves can additionally create own sections, containing, for example, the environment Windows Recovery in file winre.wim(), section with in a backup way systems from the manufacturer (allows you to roll back to initial state computer), user partitions, etc.
EFI section with the Fat32 file system is required on disks with GPT partitioning on UEFI systems. This partition, by analogy with the System Reserved partition on disks with MSR partitioning, stores the boot configuration storage (BCD) and a number of files necessary for Windows boot. When the computer boots, the UEFI environment loads from the EFI partition (ESP) the bootloader (EFI\Microsoft\Boot\ bootmgfw.efi) and passes control to it. If this partition is removed, the OS cannot be loaded.
MSRchapter on the GPT disk is used to simplify partition management and is used for service operations (for example, when converting a disk from simple to dynamic). This is a standby partition that is not assigned a partition code. This partition cannot store user data. In Windows 10, the size of the MSR partition is only 16 MB (in Windows 8.1, the size of the MSR partition is 128 MB), the file system is NTFS.
Manually creating EFI and MSR partitions on a GPT disk
Because the system does not boot correctly, we need an installation disk with Windows 10 (Win 8 or 7) or any other boot disk. So, boot from the installation disk and on the installation start screen, press the key combination Shift+F10 . A command line window should open:
 Run the disk and partition management utility:
List hard drives in the system (in this example it is one, disk 0 . Asterisk ( * ) in the Gpt column means that the drive is using a GPT partition table).
Let's select this disk:
Let's list the partitions on the disk:
In our example, there are only 2 partitions left in the system:
- MSR section - 128 MB
- Windows system partition - 9 GB
As we can see, the EFI partition is missing (deleted).

Our task is to remove the remaining MSR partition so that at least 228 MB is left unallocated on the disk. free space(for MSR and EFI partitions). You can delete the remaining partition using the graphical GParted or directly from the command line (we will do just that).
Select the section to delete:
select partition 1
And remove it:
Delete partition override
Make sure that only the Windows partition remains:
 Now we can manually recreate the EFI and MSR partitions. To do this, in the context of the diskpart utility, run the following commands in sequence:
Select disk:
create partition efi size=100
We make sure that a 100 MB partition is selected (an asterisk opposite the Partition 1 line):
list partition
select partition 1
format quick fs=fat32 label="System"
assign letter=G
create partition msr size=128
list partition
list vol
In our case, the Windows partition is already assigned a drive letter. C:, if it's not, assign it a letter like this:
select vol 1
assign letter=C
exit

Restoring the EFI bootloader and BCD in Windows
After you have created a minimal disk partition structure for a UEFI system, you can proceed to copy the EFI boot files to disk and create configuration file bootloader (BCD).
Let's copy the EFI environment files from the directory on your drive where your Windows is installed:
mkdir G:\EFI\Microsoft\Boot
xcopy /s C:\Windows\Boot\EFI\*.* G:\EFI\Microsoft\Boot
 Let's recreate the configuration Windows bootloader 10 / 7:
g:
cd EFI\Microsoft\Boot
bcdedit /createstore BCD
bcdedit /store BCD /create (bootmgr) /d "Windows Boot Manager"
bcdedit /store BCD /create /d "Windows 7" /application osloader
You can replace the inscription “My Windows 10” with any other.
Advice. In the event that only the files of the EFI environment were damaged on the EFI partition, and the partition itself remained in place, you can skip the process of recreating partitions using diskpart. Although in most cases it is enough to restore the bootloader according to the article. You can manually recreate BCD on regular MBR+BIOS systems.
The command returns the GUID of the created entry, in the next command this GUID must be substituted for (your_guid).

bcdedit /store BCD /set (bootmgr) default (your_guid)
bcdedit /store BCD /set (bootmgr) path \EFI\Microsoft\Boot\bootmgfw.efi
bcdedit /store BCD /set (bootmgr) displayorder (default)
 Further commands are executed in context (default):
bcdedit /store BCD /set (default) device partition=c:
bcdedit /store BCD /set (default) osdevice partition=c:
bcdedit /store BCD /set (default) path \Windows\System32\winload.efi
bcdedit /store BCD /set (default) systemroot \Windows
exit

We restart the computer ... In our case, it did not boot the first time, we had to additionally dance with a tambourine:
- Turn off the power of the PC.
- Disconnect (physically) the hard drive.
- We turn on the PC, wait for the window with a boot error to appear and turn it off again.
- Connect the drive back.
Then in our case (tested on ) I had to add a new boot menu item by selecting the EFI\Microsoft\Boot\bootmgrfw.efi file on the EFI partition.

In some UEFI menus, by analogy, you need to change the priority of boot partitions.
After all the above manipulations, Windows should boot correctly.

Microsoft to the release of the operating Windows systems 10 has simplified the process of its installation on a computer as much as possible. You can install the system from a disk or flash drive, while clicking on a few menu items and waiting for a while. Despite this, after installation, many users are faced with a problem in the form of a new drive with the inscription “Reserved by the system” among the connected devices and disks. As part of the article, we will consider how to remove such a disk, what it comes from, why it is needed, and how to prevent its creation.
Why you need a system reserved disk
At the installation stage windows disk reserved by the system is created automatically unless a forced shutdown is performed. With a well-executed installation procedure, it remains hidden from the user, who is not even aware of its existence. The appearance of the disk is a consequence of the creation of a separate partition of 200-600 MB during the installation of the system.
If after installation you went to "My Computer" and found the presence of a separate drive that says "Reserved by the system", the reason for this may be the following:
- The operating system was not installed from a licensed distribution;
- At the stage of Windows installation, work was carried out to redistribute disk space;
- An operation has been performed;
- On new Windows drive was copied from another medium.
![]()
The system-reserved partition itself is needed to store the boot parameters. Beginning with operating system Windows 7, a separate partition is allocated on the drive for the needs of the system, whereas before it was located directly on the system drive.
In Windows 10, the system reserves from 500 to 600 MB for its needs, while on earlier versions it required no more than 300 MB. This is due to the fact that in the new operating system, Microsoft has begun adding the Windows recovery functionality to this technical section.
 Important:
Professional editions of the Windows operating system include the BitLocker feature. It allows users to encrypt data on a hard drive or external media. The system-reserved disk stores the necessary information to decrypt the data.
Important:
Professional editions of the Windows operating system include the BitLocker feature. It allows users to encrypt data on a hard drive or external media. The system-reserved disk stores the necessary information to decrypt the data.
How to remove a system reserved disk
Availability additional disk among drives can annoy or confuse users. In such a situation, they have a desire to remove the disk reserved by the system. Naturally, Microsoft took care to delete data from it and format the computer user could not even with administrator rights.
If you want to remove a system reserved disk from the list of drives, you need to do this as follows:

After that, the system reserved disk will no longer be displayed in Explorer. At the same time, its work will not be disrupted, and if it is necessary to restore the system, Windows will be able to use information from this section.
Important: If the computer has multiple drives installed, the user may notice that there are two (or more) partitions reserved by the system. This suggests that previously connected disks also had Windows, which created this partition. For the correct operation of the current system, the “old reserve” is not required, and you can safely delete it, and then format the disk, creating a partition that occupies the entire volume of the drive.
How to disable Windows disk reservation

It was noted above that Microsoft specifically thought about creating this partition on the hard drive so that the user can restore the system if serious errors occur on the base drive. Based on this, during the installation of the operating system, it is better not to disable its creation in order to avoid possible problems. Despite this, it is possible to disable Windows disk reservation during system installation, for this you need:
- Run command line before choosing a hard drive for a future system. This is done during the Windows installation process using the key combination Windows + F10;
- Next, in the window that opens, you need to write and activate (with the Enter key) the command diskpart. Then select with the command select disc 0 basic hard drive. And then enter the command create partition primary to create a primary partition before Windows does it automatically;
- After completing the steps, close the command prompt and continue installing the system by selecting the previously created partition among the options offered for its location.
Important: This method cannot be used if it is necessary to preserve the structure of a hard disk divided into several partitions (for example, C and E). After executing the commands described above, all information from partition E will be deleted.
So this is a sister question to my previous question about partitioning for the UEFI bootloader. Deviation for UEFI bootloader, can I use LVM?
Disclaimer: I'm not talking about the data. Windows 8 can die in a fire.
Following the instructions, I have one 400MB device that I believe was previously a Microsoft Reserved partition (I believe it's an MBR partition?). Before I knew what I needed to do, I removed the existing partition with the fdisk utility and created an MBR partition with an ext4 file system and rebooted for the changes to take effect.
Then I realized it wouldn't work for a UEFI firmware, a firmware so hipster and awesome that it has to be different in every way. gdisk this time I went into gdisk and looked for partitions and didn't find any. I created new section The GUID on this device is 400MB with the correct EFI code of type EF00. This turned out to be successful, so I created file system FAT32, mkfs -t fat32 /dev/sda1 and that was successful.
I followed all the instructions to install Arch Linux from a bootable installation CD that was booted in UEFI mode which I could add. I got to the point where I installed gummiboot on the system and it immediately told me that my sda1 device was not a proper EFI partition. Thoroughly confused, I did a gdisk -l on the device and found that it determined that the GPT partition was corrupted and the MBR partition was still there.
Partition table scan: MBR: MBR only BSD: not present APM: not present GPT: damaged
He then introduced three options: MBR, GPT, or pure GPT. I chose GPT thinking it would remove the MBR partition tables, but that doesn't matter.
Realizing that I still don't and don't know how to create a proper GPT partition from an existing MBR partition, I ran Quick Analyze on testdisk and everything looks good and green. The testdisk utility recognizes this as a valid EFI boot partition in every way.
I'd like to fix the GPT partition if possible so I can avoid all the installation and setup steps starting with my Arch install. If that's not possible and I need to destroy this partition and start over, can I keep the data that was already set here and manually add it back after I've fixed the boot partition?
One Solution collect form web for “Creating EFI bootable GPT partition with gdisk on previous MBR, corrupted GPT”
Ubuntu UEFI Community Wiki notation. The same rules apply regardless of distribution.
Creating an EFI Partition
If you are manually partitioning your disk in the Ubuntu installer, you will need to make sure you have an EFI partition set up.
- If you already have an EFI partition on your drive (for example, if your computer has Windows8), it can also be used for Ubuntu. Don't format it. It is highly recommended to have only one EFI partition per disk.
An EFI partition can be created with latest version GParted (the version of Gparted included in the 12.04 disc is fine. Note: I have included a link to the GParted LiveCD) and must have the following attributes:
- Mount point: /boot/efi (note: it is not necessary to set this mount point when using manual partitioning, the Ubuntu installer will detect it automatically)
- Size: at least 100Mib. Recommended 200MiB.
- Type: FAT32
- Other: The "boot" flag is required.
See this screenshot which will give you an idea of the layout. (Notice /dev/sda1 , I apologize for relying on Ubuntu snapshots again.) You can create this partition by resizing your arch if necessary. This is also a layout for OSX, so if you want to dual boot with Win8, you would combine sda2 and sda3 from the screenshot below into 1 ntfs type partition, and then sda4 , sda5 and sda6 will be used for Arch.
As for LVM
I believe LVM can be used, but experience will dictate that the EFI partition and mount point you create cannot exist within a volume group and should not exist as a volume. To keep your EFI partition "clean", create a partition that is not part of any LV.