The topic of the article is tablet does not turn on and do-it-yourself tablet repair. The reasons may be different. A number of reasons may be associated with the "iron" filling of the device. Also, the reasons may be hiding in the failure of the OS. Either way, users can take some action to fix the problem themselves.
The tablet does not turn on - what to do?
It is important to remember when the tablet was last charged. At full discharge sometimes ten minutes of charging is enough for the device to turn on. During charging, you should press the power button with small minute breaks so that the device turns on again. Of course, while Charger should be correct.
If the charging option did not solve the problem, it is recommended that you carefully inspect the tablet for mechanical damage. The presence of chips on the screen or dents on the case may indicate that the device has been dropped. Finally, there is a reason. If there are guarantees, you should go to the service center.
The tablet turns on and does not boot - what to do?

In this case, the cause is hidden in a software failure. For example, the backlight may turn on, and then the inscription “ANDROID” or a picture of a non-working green robot appears. Here the reasons are - incorrect installation applications and force termination system processes. In the end, she got hurt.
You can restore the device using the Hard-Reset or Hard-Reset program. By the way, the program can be found on the Internet. So, using Hard-Reset, you can reset the tablet to factory settings. The principle of action in this case for most models, especially Chinese ones, remains unchanged:
- You need to turn off the tablet.
- Now you should remove the SIM card and micro card.
- It is necessary to hold down the volume up button for ten seconds - while the tablet vibrates.
- Using the volume and power buttons, you need to select the “Setting” settings in the menu, and then “Format System”.
- Now you need to select "Reset Android".
- At this point, the tablet will reboot.
This procedure will result in the data being erased. If clear how to flash a tablet, you can repeat the procedure if it fails the first time. Nuance - sometimes the result can be negative. In this case, it is recommended to think about a complete flashing of the device. On the site you can find information about how to flash android with your own hands.
How to turn on the tablet without using the power button?
There are several reasons why the tablet's power button may not respond. However, the device can be turned on. In this case, you can turn on the device when fully discharged:
- First you need to connect the charger.
- You need to simultaneously press the volume down and power buttons.
- Using the volume down button, in the "bootloader" menu, select the "powder off device" section.
- The option should be selected with the power button.
- After turning off the tablet, you need to disconnect the charger.
- Now the tablet needs to be connected again - a charge indicator should appear on the screen.
Basically, that's all. If now the tablet does not turn on and does not want to be charged, then you should check the charger and power supply. As for the power button, mechanical damage is also possible here. In this case, you should disassemble the device and restore the button (replace, restore paths, eliminate broken contacts, etc.).
No related articles
Today, almost everyone has tablets at home. They are bought for children as a gaming gadget, and not every adult will refuse such a toy. However, tablets are quite fragile. Very vulnerable them big screen, and since the device is mobile, it experiences shaking and crushing to varying degrees in buses, shopping malls and other crowded places. No matter what happens to them. If you leave your tablet on a couch or chair, you run the risk of someone landing on top. The delicate microcircuits inside can be shaken if dropped on the floor or if liquid is spilled if your child accidentally knocks tea on it. In general, there are a lot of questions, so everyone wants to know how to fix a tablet.
Initial inspection
In fact, home repair is possible only in some cases. Regular user can replace the battery in case it has worked out its own. In this case, there is only one catch: you need to know for sure that the problem is in the battery. For example, if the tablet charges as much as possible and discharges just as quickly, and also heats up the wall in the place where the battery is located, the problem may not be in it at all, but in the circuit. Since it is quite difficult to fix the tablet on your own, you can already carry it to the workshop at this stage. Of course, the specialist will take money for the diagnosis, but as a result you will get a quick and reliable result.
Touch screen replacement
And we will continue to consider various breakdowns and tell you how to fix the tablet. The second case when you can try to cope on your own is a replacement touch screen or cracked hull. To do this, you only need to disassemble your tablet, which can be somewhat difficult for a simple user who does not have experience with electronic devices.
Since you need to repair the tablet carefully, without damaging its microcircuits, it is recommended to find a disassembly diagram for your model. Usually they are on specialized websites of the manufacturer. In addition, there are videos on the network, following which you can easily cope with the task. This may require a flat-blade screwdriver or plastic card. Gently insert any of these items into the gap between the case and the lid and gently slide along the case. Now you have all of its insides in front of you. Arm yourself with a Phillips screwdriver and unscrew a few bolts. This must be done very carefully so as not to break the thread. When you get to the touch screen, disconnect all cables and carefully remove the damaged assembly. After that, you need to assemble the device in the reverse order.

If the device does not turn on
There are many cases where no visible reasons breakdowns (impact, water ingress), and the device does not show signs of life. Let's talk about how to fix the tablet if it does not turn on. There can be many reasons, these are problems with the hardware, the network with the internal filling of the device, or malfunctions in the operating system. However, let's sort it out in order. First, remember how long ago you last charged it. It may take at least 10 minutes to fully discharge even when the power is connected. So wait a bit and try turning it on again. If charging did not help, then carefully inspect the case for external damage. Perhaps the device was dropped, but you do not know about it yet.

Tablet won't boot
Is it possible to fix the tablet if the problem is OS failure? Depends on how good you are at software. In this case, the backlight appears first, and then the picture of the non-working robot. Very often this happens if the work of applications was completed incorrectly, for example, there was a forced termination of system processes. As a result, the firmware suffers.
You can fix your tablet at home using special program. It is easy to download on specialized sites, and it is called "Hard-reset". True, if the tablet has a lot important information, it may be fraught with its loss. If, apart from music, there is nothing of value there, then you can get down to business. Since it is possible to repair a tablet at home only in certain cases, and even then, if you do everything right, look at the address of a good repair center in advance.
Turn off the device and remove the sim and micro card. Now hold down the volume up button for at least 10 seconds. Now, additionally using the power button, select setting and format system from the menu. After that, select Reset and reboot the device.

be ready
This procedure will lead to a complete reset of the system to factory settings. That is, you will receive the tablet in the same form as you opened it for the first time. However, the procedure may not work. In this case, you can repeat the manipulations again or think about the full firmware of the device. This procedure is somewhat more complicated, so it would be better to consult a specialist. Programmers know that poorly delivered operating system fraught with many complications in the work, so it's better not to risk it.
If the tablet does not respond to the power button
This happens, and not to say that it is very rare. Therefore, you need to know how to act in this situation. It is recommended to connect the charger and press the volume down and power buttons at the same time. The volume button will access the menu system, where you can select the bootloader and the powder off device section. The power button selects this option. Now turn off the tablet and unplug the charger. Finally, the charging is connected again, and you see a growing indicator on the screen.

If the manipulations did not help
Then you need to look for where you can fix the tablet. Most often, the choice is the address of the service center indicated on the warranty card, even if the period has already expired. Or use the recommendations of your friends. If the tablet does not turn on and does not receive a charge, then the problem may be in the charger or power supply. In rare cases, the power button itself may be damaged. Mechanical damage eliminated by disassembling the device and one of the following actions: replacing the button, restoring the path, eliminating broken contacts.
broken screen
This is one of the most common troubles. The large display does not tolerate negligence, and therefore service centres always overflowing with tablets that need to be replaced. Speaking about how to fix a broken tablet, I would like to say that it is not recommended to do this on your own. You need to find a suitable screen that will cost you more than service centers. It is very likely that the ordered model will not suit you, but it will be discovered only at the time of installation. Finally, the procedure itself is quite complicated and the probability of harming your device is very high. For example, by peeling off the glass, you will damage the matrix, and the cost of repairs will increase in accordance with the saying "the miser pays twice."

Replacement procedure
It may vary depending on the model. Original Apple tablets almost impossible to open on your own. The fact is that their screen is held on special latches, which are very difficult to open without special tools. But even if you have not encountered such a problem, the main thing is yet to come. Separating the touchscreen and display is not easy. They are connected by strong optical glue, which must be heated to 250 degrees. How to achieve this at home, it's hard to even imagine.
However, the difficulties do not end there. After removal protective glass, a new one is installed in its place, on the same basis. No, you do not need to heat it, however, to consolidate the result, the tablet is placed under the press for an hour. A mistake can be costly. A badly glued new touchscreen will peel off, and a too tight fixation will lead to a new breakage. Therefore, it is much wiser not to try to do everything yourself and turn to professionals who have necessary equipment and experience.

Instead of a conclusion
We haven't covered half of the times your tablet might need help. Not everything, even from this list, can be fixed on your own. Therefore, conduct an initial inspection, check the battery and charging, reboot the system, and if nothing helps, contact an experienced craftsman. In most cases, this will be much faster, more efficient and cheaper.
More and more people on earth are starting to use a tablet as a device that is almost indispensable in certain life situations. A constant connection with allows ordinary people to find any information on the network, whether it is a recipe for their favorite dish or step-by-step instruction how to assemble a rocket yourself and send it into space. Everything can be found on the Internet. Tablets are also used for reading the press, a variety of books and watching movies. Tablets are replacing TV, and TV programs can be watched online even in the subway - underground. With the help of a tablet, you can call friends and acquaintances, manage production and create press conferences for meetings of the founders of firms. Yes, you can do a lot of things with a tablet, but what if it breaks? Many are concerned about the question of how to fix the tablet.
How to fix a tablet at home?
If the tablet has been used for less than a year from the date of its purchase and has broken, then there is no need to try to open it and repair it. It is better to immediately take it to the service center under the warranty card for repair. The service center employs professionals who will quickly and efficiently fix it, and for free. If the tablet is more than a year old and guarantee period already ended, then you can try to fix it without leaving your home. It is worth considering the breakdown options and how to eliminate them.
How to fix the tablet if it does not turn on?
If the tablet does not turn on, then there may be two reasons:
- Some part broke.
- One of the installed programs does not work.
If the breakdown is mechanical, you must first check the charger (works or not), whether it supplies current from the right voltage. If everything is in order with charging, you should check the socket, maybe it is loose and the charger does not charge the tablet due to poor contact. If everything is in order with the charger and the charging hole, and the screen does not light up, then this may be the consequences of a fall (if there was one). Or maybe the video adapter is out of order, and it is changed only in service centers.
How to fix a tablet if it is not charging?
If the owner of the tablet is not afraid to disassemble the tablet, knows how to work with a tester and a soldering iron, then he can try to reanimate the charger, or, having disassembled the tablet, ring the circuits in the charging socket and find out the reason for the lack of current in the tablet's charging network. If the reason is that some wiring has come off, then it's okay, and this wire can be soldered into place, only very carefully. If all the wiring is in place, then you need to check the battery itself. Maybe it's about her.
The battery of the tablet should give out 3.7 volts. If the battery gives out less, then you need to buy a new one.
How to fix a tablet screen at home?
In order to replace the tablet screen at home, you need to purchase exactly the same screen in a computer store, the same brand and with the same digital code. Then carefully disassemble the tablet, while carefully disconnecting all cables. After disconnecting the loops, remove the battery, and disconnect all boards.  Then the screen of the tablet warms up with a hair dryer and on the one hand, you need to carefully remove the broken screen from the base by pulling it. Also, heating with a hair dryer new screen, very carefully glue it in place and attach all cables and boards to it in reverse order.
If the owner of the tablet is not afraid of such painstaking work, then he may well fix the tablet at home.
How to fix a tablet if it freezes?
Each tablet has a "Reset" button. It is she who should be pressed if the tablet suddenly freezes and does not respond to commands. If the tablet does not work after that, then it must be carried to a service center for repair.
Series of CHIP articles:how to repair electronics at home
Why do people throw away a smartphone that is only two years old if it just has a cracked screen or no longer charges the battery? These days, progress in technical development is not so rapid that there is a constant need to own latest model. If the warranty period has already expired, then what prevents you from saving money by showing your skills?
It is very convenient that smartphones and tablets have a modular design, so that many components can be replaced without the help of a soldering iron. You just have to be careful not to damage the "delicate" flat cables. Unfortunately, it will not be possible to replace everything that you have dismantled. If, for example, a fingerprint scanner is built into the Home button, then your device is likely to be locked after replacing parts yourself. Safety-relevant components must be individually registered with hardware- and this can only be done by an authorized dealer.
Purchase of spare parts
Reliable and high quality repairsAccording to clickrepair, the minimum repair costs for iPhone owners SE
Many manufacturers, such as Apple or Samsung, send spare parts for their devices only to authorized service centers. What is available in parts stores is at best made by the same Chinese manufacturer as the original part; however, it can also be a used part or a more or less well-made copy. With minimal risk of being scammed, you can get them from major, highly rated parts suppliers or through the iFixit platform, where you also get a performance guarantee and a right to return, which of course comes with a price.
However, for many special details, you have no choice but to try your luck on eBay or AliExpress. Read the descriptions of offers as carefully as you read the terms of contracts. Don't go for the cheapest deals. At first glance, such "bargain" purchases are often indistinguishable from original parts, and only during installation it becomes clear that they do not fit due to too large dimensional tolerances or that the alleged Retina display is actually just an LCD display with large pixels.
How to open any case
 Using a suction cup and a pick, remove the back cover from the frame
 Pentalob, Tri-Wing or Torq - the industry is able to "invent" very ingenious screw heads, but it will be possible to purchase screwdrivers suitable for them very quickly on the Web. Almost all manufacturers, with the exception of Apple, use common profiles, in most cases Philips Phillips (PH) or Torx (TX) sprocket. At the same time, manufacturers willingly hide one or more screws under a company tag or rubber inserts glued to the case. If the case does not open, then it should be inspected for the presence of such "caches".
In the case of tight-fitting screws, you can easily destroy their slots if you loosen the screwdriver. It should be pressed with full force into the head of the screw to achieve maximum grip. However, if the incident has already occurred, then a narrow screwdriver with a flat slot and a significant applied force can help. Or you will have to purchase a so-called "screw remover" on iFixit. Thanks to its crown-shaped tip with sharp edges, it is firmly fixed in every screw. If the screw, on the contrary, scrolls, then clamp the pick or the tip of the tweezers under the head of the screw (as a locking lever) and continue to unscrew the screw.
Mediator to help
 With its crown-shaped tip, the “screw remover” is firmly fixed on the head, allowing the removal of a damaged screw
 Slim cases often connected with small latches. These latches can be elegantly opened with a guitar pick. It is thin and flexible, but strong and non-conductive. Use it to try to get to the corner between the case cover and the bezel, but don't push the pick too far to avoid damaging the hidden flat ribbon cable.
Move the pick in one direction until you feel resistance, and then release the hidden lock by tilting the pick up. As with removing a bicycle tire, things are easier if you use multiple picks to prevent already open connections from snapping back together.
Softening with heat
 Work tips
Work with solvent in gloves and in a room with good ventilation. Support the turning screws with tweezers. Remove the battery without bending it with an insulated tool
To better protect electronics from moisture penetration, more and more devices are additionally glued. Typically, these adhesives are thermoplastic and can re-soften when heated. If your hair dryer doesn't have temperature control, we recommend working with hot/cold compresses. Similar gel pillows are not so expensive in pharmacies. They are heated in a bain-marie or in the microwave (check if three to four minutes of heating will be enough at 750 watts, and add a few more minutes if necessary).
The gel cushion transfers heat to the device over the entire contact surface, which prevents cracks caused by internal stresses in parts due to uneven heat distribution. In addition, it makes it impossible for the components to overheat, as the pad bursts when heated above 90 °C. If you are not yet experienced with compresses, place it in a grocery bag while heated to prevent possible mess if it bursts. When the adhesive seal softens, picks come to the rescue again. Pull the sucker this time back body (or glued top glass) upwards, simultaneously snapping off the latches with a mediator.
Preventing Damage Caused by Electric Shock
When the hull is finally opened, the next step should be the obligatory photographing of its internal elements. Careful documentation will greatly facilitate your subsequent build. In order to open electronic components have not received additional damage caused by static electricity, now is the time to use ESD protection, or at least touch the nearest radiator.
The first step is to disconnect the battery cable to de-energize the gadget, preventing a short circuit. Before the final installation of sensitive parts (such as a display), they must be temporarily connected without assembling the devices and their operation must be checked.
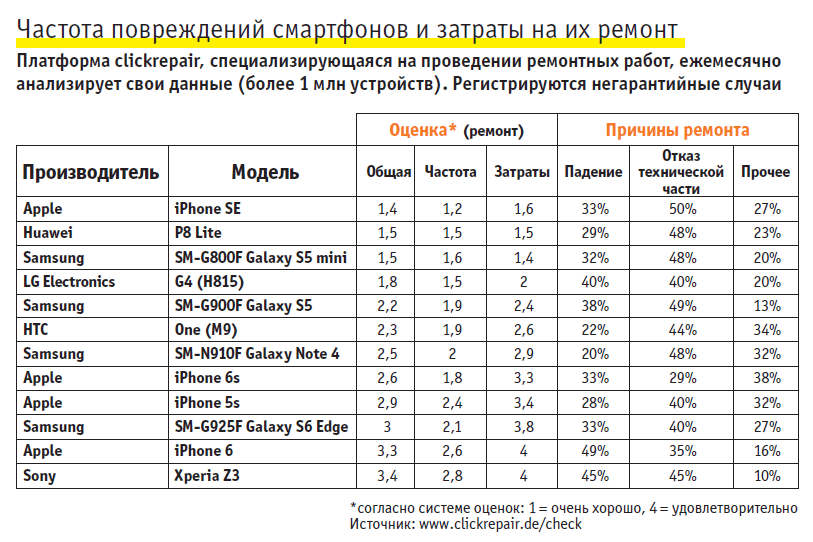 PHOTO: Manufacturing companies, Simon Kirsch, Nikolaus Schäffler, CHIP Studios
tags tablets
Modern life is filled huge amount technologically advanced devices. They make our life easier and richer. However, in the event of a failure, a significant amount may be required to restore the gadget in a service center.
Asus tablets have a reputation for being reliable and fairly affordable gadgets. You can also buy these devices online.
Before disassembling the tablet, it is necessary to diagnose a breakdown. In this case, specialized forums will help. In most cases, breakdowns are similar.
Therefore, the proposed solutions to a specific problem are almost guaranteed to help you.
After the cause of the problem has been identified, and there is a specific plan for its elimination, you can proceed to the analysis of the tablet.
Devices must be opened with great care. For this, any plastic card is best suited (the use of screwdrivers or household knives is prohibited!).

There are cases when a breakdown occurs during the warranty period. Some owners mistakenly believe that their failure is not included in the warranty case and try to repair the tablet on their own.
This is mistake! Self-repair should be started only after the warranty service is officially denied to you.
A non-specialist can only carry out some repairs. To do this, you may need the following tools:
- a set of special screwdrivers;
- soldering iron;
- magnifying glass;
- tweezers;
- hair dryer with adjustable temperature.
As a help, you can use videos from popular video hosting sites. Find a video in which the same tablet as yours and follow all the steps according to the step-by-step instructions.
Modern electronics are incredibly compact. This means that you must be as careful and attentive as possible (not only when repairing, but when assembling / disassembling).
In the video below you will see how to replace the display yourself: