Installing an operating system is a matter that any user periodically has to resort to. Updates, hardware breakdowns, equipment changes - there are many reasons. The most ordinary way windows installation– using a standard installation DVD. However, some have lost it, others are not going to acquire licensed version and downloaded everything you need from the network. Next, you need to write the Windows 7 image to a USB flash drive. This article provides a guide on how to create a bootable USB flash drive, or as it is also called - live usb, using the UltraISO utility.
Learn more about bootable flash drive
When there is no installation disk, to install the system, you need to burn a bootable USB flash drive. How is it different from the usual one? It's all about the special files that the BIOS can recognize and with which it can work. She has her own boot sector, like hard drive and operating system, some live usbs have their own systems installed from which you can boot and work with files. Such devices are called multiboot devices.
In technical terms, it is no different from regular usb carrier. It's all about the data. It turns out that to make a bootable flash drive, you just need to write the correct files there and create a boot sector. Previously, this was done manually using the command line. In fact, some still work this way - the flexibility of settings in this case is very high.
However, today there is great amount programs with which even a person far from computers can create a bootable USB flash drive. For example, in Ultraiso this can be done in just a couple of clicks. Programs differ in functionality and complexity: some are applicable in a wide area, other utilities are only suitable for producing live usb for a specific operating system.
UltraISO - Utility for working with ISO images
UltraISO is a paid utility, but it is completely free to download. During installation, the user activates a trial demo mode, after which the program is blocked and requires a license with unlimited access to all functions.
With this utility, you can edit directly in ISO format and burn it to a finished disc or bootable USB flash drive. The program itself will create all the necessary files, write the boot sectors and place the image for the operating system in the required directory. 
To get started, you need to install it. To do this, follow the instructions:
Now that the UltraISO utility is installed, you can start.
Create a bootable flash drive
First of all, you need to get an ISO Windows image 7. It can be downloaded from the Internet or copied from the installation disk (this can be done using UltraISO). When the image is available, you can proceed:
Modern laptops are less and less equipped with a CD-ROM drive. And such devices as netbooks and disk drives do not occur at all. Discarding the drive allows you to do mobile device lighter and thinner. But, at the same time, users face some difficulties in their work. For example, in order to install Windows 7 on a device without a drive, you have to create bootable USB flash drives. In this article, we will talk about how to write a Windows 7 image to a USB flash drive via UltraISO.
Step #1: Open the Windows 7 image in program UltraISO.
In order to write a Windows 7 image to a USB flash drive through a program, you must first open this image. To do this, launch UltraISO, open the "File" menu and select "Open" from there.
As a result, you will see a standard window for selecting a file. Here you need to select the ISO file with the Windows 7 image that you want to burn to a USB flash drive.

After that, files from the selected disk image will appear in the UltraISO interface. It is better not to touch these files, otherwise the bootable USB flash drive may not work.

Step number 2. We connect the USB flash drive to the computer and start recording the Windows 7 image.
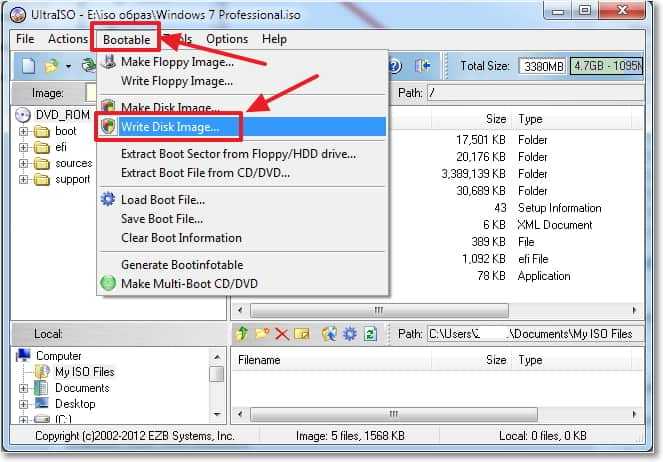
Next, you need to connect a USB flash drive to your computer, on which you plan to burn the Windows 7 image via UltraISO. To do this, simply connect the USB flash drive to any port and wait until the system detects it. After connecting the flash drive, return to the UltraISO program. Now you need to open the "Boot" menu and select "Burn Hard Disk Image".

After that, a window for burning a disk image will open. Here you need to select the flash drive on which you want to burn the Windows 7 image. Select the desired flash drive, and click on the "Burn" button.

After that, the UltraISO program will warn you about deleting all data from the USB flash drive and, if the user agrees, will start writing the Windows 7 image to the USB flash drive.
Step #2: Wait for UltraISO to finish burning the image.
Now you just have to wait until UltraISO writes the Windows 7 image to a USB flash drive. This usually only takes a few minutes.

In this article, I will tell you how to burn an image to a USB flash drive (in this case, a Windows image) for subsequent installation of the system on a computer. Nowadays, many people have laptops and netbooks where there is simply no optical drive, or there is no way to install windows from a disk, and here the creation of a bootable windows 7 flash drive comes to the rescue. First of all, this article is focused on these tasks.
We will write the image to a USB flash drive in two ways. The first method will be implemented using a very good ultra iso program, and the second using WinSetup From USB. We will start by considering the steps for working with ultra iso, since this method is less labor-intensive and the process of creating a bootable windows 7 flash drive will be quite fast. The second method will remain for those who, for some reason, “did not work out” with the first option.
Method number 1
So let's go. To get started, download the program Ultra ISO. After the program has been downloaded, installed and launched (we press the trial period if there is no desire to buy), you can start a fairly simple process of writing Windows to a USB flash drive:
1. You must specify the path to the image that should be placed on your hard drive:
Click "File" => Open (Fig. 1)
Fig.1

Rice. 2

Rice. 3
Method number 2
This method, will also tell you how to burn windows to a USB flash drive. What you need for this option:
1. A little free time;
2. Computer (with iron, which supports booting from a USB flash drive);
3. Program for preparing a flash drive ( download);
4. Actually the flash drive itself (even an SD card will do);
5. An image of the operating system we want to install.
For example, I will show how we will write an image of the operating system to a 4GB SD cardMicrosoft Windows 7Home Premium 64-bit. Immediately I want to draw your attention to the choice of operating system. If your computer has less than 4GB of RAM (RAM), then you should install the 32-bit (x86) version of the operating system, since the 64-bit one will simply clutter RAM redundant processes.
Insert flash drive into USB port and format it in FAT32 or NTFS Windows tools. To do this, you need to go to My Computer, find the USB flash drive there and click right click mouse by its icon. AT context menu select "Format...". In the format window, select the FAT32 or NTFS file system (the latter will be better if the flash drive is larger than 4GB), and also select the cluster size "Standard cluster size" and click the "Start" button. Everything is shown in the picture:

Next, we download a small program in which we will do all the operations we need. There are several programs of this type, but I chose WinSetupFromUSB because it does not require installation, it almost does not take up space on disk and easy to use.
We start the program. First, we need to select the device on which we will write the image. This is done in the drop-down menu at the top (if the flash drive is not displayed in this menu, click on the Refresh button). Next, we need to prepare the flash drive for burning the image, because if we just copy the image, it will be impossible to enter the system installer, because there is no boot sector. To create it, click on the Bootice button.

In the Bootice utility window that opens, press the Process MBR button, then see if Grub4Dos is checked (if not, check it) and press the Install / Config button. In the Config Grub for DOS window, click on the "Save to disk" button, the program will display a window that boot record successfully written to the drive.

We return again to the Bootice utility window, where we press the “Process PBR” button and do the same, without changing anything in the last window, click OK.

Everything, now we just have to write the image to a USB flash drive, this is done in the main program window, which we saw immediately upon startup. It is necessary to put the necessary checkmark in it - if you are going to install Windows XP, then this is the first checkbox, if Vista or Seven - the second. Next, click on the “…” button on the other side of the checkmark and set the path where our unpacked image is stored on the hard drive, or simply mounted in virtual drive using DaemonTools or Alcohol. Click on the "GO" button and wait until the process is completed.

At the end of the program will display the message "Job Done!". All, dear friends, you can reboot and start installing the operating system.
Also, I advise you to read the article on
Greetings, dear readers! When installing a new operating system on a computer, it will be enough to open the DVD drive, then install the installation distribution and perform some operations in BIOS (you can read about what BIOS is), you can begin to complete the task.
However, what if the installation of the operating system needs to be performed on so-called portable netbooks or laptops, which, as you probably know, do not have a disk reader. In this case, the installation of the operating system is carried out from a USB drive.
Herself from a flash drive is no different from installing from a disk, however, the process of writing the installation distribution to a flash drive has some peculiarities. In this article, we will take a look at in several ways. It should be noted here that in addition to writing Windows distribution on a USB flash drive, it can still be written to a memory card, but not all laptops have the ability to boot from a memory card. Therefore, before creating a bootable flash drive or memory card, you should make sure that your laptop or netbook is able to boot from the memory card. And how exactly to check you can find out by reading my article:
In fact, Windows installation from a flash drive is no different from installing from a regular DVD.
I How to create bootable flash media
So, the first way that we will consider is installation using the command line. This means that by specifying special commands, we will create a bootable removable media. But first, we need a flash drive with a capacity of at least 4 GB. This method is, I would say, the most difficult for beginners, since you will have to sequentially enter commands that are not entirely familiar to novice users. Therefore, do not be afraid of these unfamiliar commands, the purpose of each team is described by me below.
1. We connect the USB flash drive to the computer, and then click on start and select the "Run" command. AT command line you will need to enter cmd.exe and click OK. In this case, the command must be run as an administrator.
2. In the window that opens, you will need to type "diskpart" to open the disk management utility. After the utility appears, you need to type the “list disk” command, which allows you to view a list of used disks on your PC. You will need to select your flash drive. Let's say in my example - this is disk 1. So, we write "select disc 1". Thus, we indicate that all executables in further action will be made with this disc.
3. In the next step, we will need to clean up the flash drive that will be written to. Type the "clean" command.
4. After the message “Disk cleanup completed successfully”, the next step is to create a new partition by issuing the “create partition primary” command. Here we indicate to the system that in the future we will work with this particular partition - “select partition 1”.
5. To highlight this section active set the command "active".
6. Then, in the next step, you will need to format the partition we created on the flash drive in the NTFS file system - “format fs = NTFS”.

7. After the formatting of the flash drive is completed (100%), you will need to activate the process of connecting the device by specifying the “assign letter = Z” command and pressing “Enter”.

8. Then after the message "connection succeeded" appears, type "Exit" to exit diskpart to the command prompt.
E - Partition of the disk in which the Windows distribution is present;
Z - Designation of the USB drive.

The copying process itself takes about 50 minutes.
After the copying is completed, all that remains is to restart the computer and enter the BIOS. And then by setting the appropriate settings in the BIOS, it will be possible to proceed with the installation of the operating system.
II How to create bootable flash media
Consider the second way how to burn windows 7 to flash drive. The essence of this method is that to create a bootable USB flash drive, we need the UltraISO program, with which we will create a bootable removable media with the Windows 7 operating system.
If you do not have installed this program, then you can download it from the Internet, and it is distributed on a paid basis. However, you can use the demo version of this program in trial period to use this program.
So, open the program and click "File - open".

In the window that opens, you will need to go to the image of the operating system and click "Open". We will discuss what an image is and how to create it in one of the future lessons. By the way, let me remind you that various contests and tournaments are held on the blog, participate and win cash prizes. In order for you to have a better chance of becoming a WINNER, you should Subscribe to blog updates so as not to miss new articles. You can read about how to subscribe to a blog update by clicking on

Then in top menu click "Boot" and select "Record" from the drop-down menu. hard image disk".


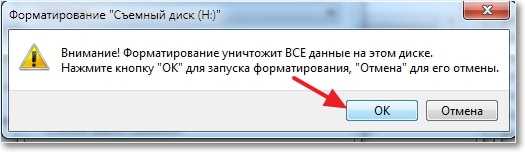
Therefore, before formatting, copy your important data to the hard disk.

After formatting is successfully completed, click "Write".

For a certain time, the image will be written to a USB flash drive or memory card. This method is the simplest compared to the first method.

In general, in addition to the above methods for creating bootable flash media, there are also others. various ways. For example, to write a Windows distribution to a memory card or flash drive, use a utility called WinToFlash.
Plus, I suggest you also watch a live video:
The essence of this utility is similar to the previously discussed UltraIso program. That is, open the program, specify the path for the location of the Windows distribution image, copy and write. What methods of creating a bootable flash drive do you know? In addition, I recommend that you read the article on a computer. From this article you will learn how to install the operating system correctly. Windows system 7.
Having considered in this article the question of how to burn Windows 7 to a USB flash drive, you can thereby independently reinstall the operating system on your netbook or laptop using a flash drive.
With this, I will end this article. I hope the material was useful and interesting for you.
In the next article I will tell you =>
That told how to create a bootable usb drive for windows 7 in Windows program 7 USB/DVD Download Tool. it official program from Microsoft and it seems to work not badly. But there was a comment that it was not possible to create a bootable USB flash drive with this program. Maybe so, anything can happen, so I’ll write another way that you can create a bootable USB flash drive with Windows 7. And this time we will use good program UltraISO, I have already written about it more than once on the blog, in various articles.
I think that we don’t need to tell why we need such a bootable flash drive, if you are reading this article, then most likely you are interested in the question of how to create it, and not why it is.
In this way, you can create a flash drive not only with Windows 7, but also with Windows XP and Windows 8. What’s there, you can burn any image, any boot disk, for example Dr.Web LiveCD. Well, if you have already changed your mind about creating such a flash drive, then the image can be written to disk without any problems, I wrote about this in the article.
How to create a bootable USB flash drive with Windows 7?
We will need:
- UltraISO program. You can download it on the Internet in a couple of minutes, just type in search engine request “Download UltraISO”. After you download it, you need to install it. The installation is the most common, but if you don’t know how, then read the article. The program is paid, but when you start, just select “Trial mode”. And if you want, you can buy it.
- A disk image with Windows 7, or any other image that you want to burn to a USB flash drive. This image must be in the format .iso I hope you have already downloaded it.
- Flash drive size minimum 4 GB(this is for Windows 7, if you want to burn a small image, then 1 GB is enough). The flash drive will have to be formatted, and this will destroy all the files on it, so you need either a clean flash drive, or copy all the information from it to your computer in advance.
If everything is ready, then let's get started.
We start the program UltraISO(there should be a shortcut on the desktop and in the start menu). I will show on the example of the English version, since I had a problem with the Russian one, all menu items are displayed in an incomprehensible font. But there is nothing wrong with that, everything is clear and so.
The program has opened, now we need to select the .iso image of the boot disk in it, in our case with Windows 7. Click “File” (File), and select “Open” (Open).

We find our image, select it and click "Open".

Now our image is open in the UltraISO program, all that remains is to write it to a USB flash drive. Click and select “Write Disk Image…”.
A window will open in which we need to specify some settings. See what's opposite “Write Method:” (Write method), has been set to “USB-HDD+” . And opposite “Disk Drive”, the flash drive we needed was selected.
Now we still need to format the flash drive and we can start recording. Click the button “Format” (Format). Do not look at the fact that I have a 1 GB flash drive, I just don’t have a larger volume at hand. You must have a flash drive of at least 4 GB.

A small window will appear in which we will format our flash drive.
Formatting a flash drive will destroy all the files that are on it. So save them to your computer in advance.
Needed only in paragraph “File system” select NTFS, and click "Start".

A warning will appear, click "OK".
 Everything, the flash drive is formatted. Close the window “Formatting” by clicking on “Close” .