The Windows 7 bootloader stops working for many reasons - if boot.ini is damaged or if you try to install XP along with the Seven, after which the latter does not want to boot. This is due to XP overwriting the boot entry. MBR Windows 7. Usually recovery Windows bootloader 7 carried out standard means systems. You can also use another tool, such as Bootice.
The easiest way to restore the bootloader
If pressing F8 does not open additional startup methods and the troubleshooter, then you will need to use a Windows 7 recovery disc or flash drive. From this drive, you will need to boot the computer into the recovery environment by clicking on the system restore link at the bottom of the OS installation window.
- The computer will automatically try to find a solution to the problem, which will notify you in the window that opens.
- If the recovery utility is up to the task, all that remains is to reboot.
If it was not possible to restore the Windows 7 bootloader after XP, use the startup repair tool, which, along with others, is part of the installation disk or flash drive. Usually these simple ways can handle simple MBR startup problems.
Edit boot.ini
Boot.ini is responsible for starting the system by default. If one of the operating systems is incorrectly installed or removed, its entry in out of order will be stored in the same boot.ini. It is located at the root system partition, so to edit it, the computer must be set to show hidden files.
Sometimes boot.ini can be corrupted by a virus or some program could contribute to it, after which the OS does not start on its own.
The fix is simple - boot from the LiveCD and edit boot.ini with regular notepad. There are only two sections here - boot loader, which controls the boot and operating systems. You should remember the value of several parameters:
- timeout=10 - time in seconds during which the user can select an OS to start;
- multi(0) and disk(0) are parameters that should have null values;
- rdisk(0) — number of the disk with the system partition (counted from zero).
In general, boot.ini from one OS should look like the one in the picture.
Using the command line to restore the MBR sector
You can get into command line mode from the same boot disk or flash drive by opening the system restore tool and selecting the most last paragraph"Command line".
- Type the Bootrec command and then press Enter, it will appear full list opportunities
- Write down the MBR sector, for which there is the Bootrec.exe /FixMbr command;
- On the successful completion of the operation after pressing Enter, the computer will notify the user in the next line;
- Next, carry out the procedure for writing a new boot sector, for which enter Bootrec.exe /FixBoot;
- It remains only to enter Exit and try to restart the computer.
- Enter the command line from the installation disk or flash drive;
- Enter Bootrec /ScanOs, after which the utility will scan the computer for an operating system;
- Write the Bootrec.exe /RebuildBcd command in the next line, the program will prompt you to add all found versions of Windows to the start menu, including XP, etc .;
- It remains to agree with this by pressing Y and Enter in sequence, after which, when the system boots, you will have a choice of which OS to boot - XP or the seven.
You can fix the problem with the MBR with one more command. For this in command line you need to type bootsect /NT60 SYS, then Enter. Enter Exit to exit. As a result, the master boot code will be updated and your systems will appear in the list during boot.
In case of serious problems, it may not be possible to restore the MBR using the described methods, so you should try overwriting the files in the boot storage.
BOOTMGR is missing
Such a message on a black screen is usually displayed by the computer when the MBR sector is damaged or deleted. The reason may not be related to the MBR, for example, if the BIOS has lost the Boot tab settings and the system is trying to boot from the wrong disk. But more often it is the bootloader that is to blame, so we will describe how to restore Windows boot 7.
On a disk with Windows 7 there is always a small 100-megabyte reserved hidden partition for writing OS boot files, including a damaged BOOTMGR. You can simply copy BOOTMGR from the installation media and write to this partition. For this:
- Go to the command line from the recovery disk.
- Enter the diskpart and list volume commands in sequence, after which a list of your disks and the letters that the system assigned to each of them will appear on the screen. We are interested in a 100 MB reserved partition and an optical drive - drives C and F, respectively, as in the picture.
- To exit, type Exit and press Enter.
Type the letter of the installation drive followed by a colon and the command to copy bootmrg to the reserved partition. It will look like this:
- F: and then Enter;
- copy bootmgr C:\ and press Enter;
- Exit, the utility will exit.
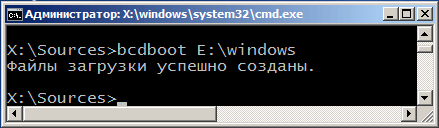
If copying to the hidden partition fails, the download store can be completely overwritten. Restoring the Windows 7 bootloader is done with the bcdboot.exe N:\Windows command, where N is the drive letter with the OS. After you are informed that the files were created successfully, you can exit the tool with the Exit command and restart your computer.
- write the diskpart line on the command line, which calls the utility;
- to list all available physical disks write list disk;
- the required disk is selected with the sel disk 0 command, where 0 is the number of the only installed HDD;
- to display all partitions of the hard drive, enter list partition;
- to select a reserved partition, write the sel part 1 command, where 1 is the partition number;
- make it active by typing active;
- Exit the application by writing exit.
In extreme cases, you can completely manually delete and format the system partition by starting from some LiveCD, and then using the bcdboot.exe command to create the sector again.
Using Bootice
If Windows XP was installed after the Seven, due to the overwritten MBR sector, only XP starts up and you do not have the option to select a system after you turn on the computer. However, both systems are fully operational, and you can return the start menu very easily, for which the Bootice utility is used:

In the new Bootice window on the left you will see the OS boot list, in which you will need to add the missing "Seven" to Windows XP:
- click "Add";
- in the list that opens, select the new line Windows entries 7;
- on the right side in the upper input field, select the hard drive;
- in the field below, indicate the section with the "Seven";
- click on save basic settings.
The program will notify you about the successful change of this element in Boot and you can exit Bootice. The next time you turn on your computer, you can already choose which OS to boot from hard drive- Windows 7 or XP.
Complain about content
Copyright infringement Spam Invalid content Broken links
Restoring the Windows 7 bootloader - performing actions to restore the operating system to working capacity after problems occur when loading Windows. Due to a system failure, the user may lose data, personal files located on the computer.
At one point in time, the operating system will not be able to boot on the computer. Various messages appear on the screen (not always in Russian), which indicate a problem with loading Windows.
The main causes of problems with the Windows 7 bootloader:
- user actions: an attempt to use hidden system partitions, incorrect changes to boot files using EasyBCD, etc.;
- system failure;
- exposure to malicious software;
- the appearance of bad blocks on the hard drive of the computer;
- operating systems installed on the computer in the wrong order;
- hardware problems.
The problem with the bootloader must be resolved, otherwise you will not be able to use Windows, because the system does not start on the computer. Problems can be fixed in a radical way: again on the PC.
If there is, created by a system tool, or using third-party programs, you need to restore from a backup Windows image created in advance. Many users, unfortunately, do not remove due attention backup systems, so these methods will not work for them.
How to restore the Windows 7 bootloader? To restore operating system boot files, use the built-in Windows tools: automatic startup repair, as well as using the BootRec and BCDboot utilities that are part of the operating system and run on the command line.
Before using the operating system tools, you need to know the layout of the hard disk. Modern computers have a GPT hard disk layout style and a new BIOS - UEFI, and in Windows times 7, the disks used MBR partitioning, and the now obsolete BIOS. On some computers, Windows 7 64-bit is installed on UEFI and GPT disks, and in general, Windows 7 PCs use MBR (Master Boot Record) partitioning.
In this article, we will look at instructions on how to restore the bootloader using system tools in Windows 7: first, we will perform automatic repair, and then we will try to restore the bootloader from the command line.
To perform bootloader recovery operations, you will need either an installation DVD with an operating system, or a bootable Windows flash drive 7. Bootable media is needed to be able to boot to personal computer Windows RE (Windows Recovery Environment) Recovery Environment, which can be used to try to solve the problem of the inability to start the system.
Performing Windows 7 Recovery Automatically by System Tool
The easiest way: automatic recovery boot partition on the hard disk by means of the operating system. This action takes place without user intervention, it is only necessary to boot on the computer from the boot disk.
Immediately after starting the computer, using the keyboard keys, you need to enter the boot menu ( boot menu) to select external device For loading: DVD disc or USB flash drives. Which keys to press depends on the equipment manufacturer, check this in advance.
Another way: you can enter the BIOS and set the boot priority from the connected device there: a USB drive or a DVD drive.
In this example, I am using a Windows 7 installation disc, all actions with bootable flash drive are performed in a similar way.
In the first window of the program Windows installation click on the "Next" button.
In the window prompting you to start installing the operating system on your computer, in the lower left corner, click on "System Restore".

In the System Recovery Options window that opens, a search will start installed systems.
After a while, a message appears stating that problems have been found in the computer's boot options.

Click on "Details" to see a description of the fix.

To start the automatic troubleshooting of system boot problems, click on the "Fix and restart" button.
After the bootloader is restored, the Windows 7 operating system will boot on the computer again.
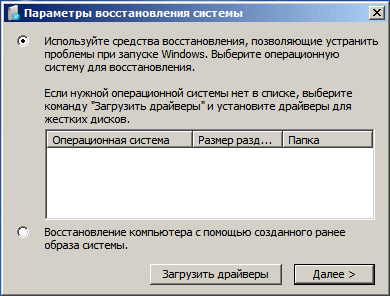
Automatic troubleshooting by system tools can be started a little differently:
- In the "System Recovery Options" window, activate the option "Use recovery tools to fix problems when Windows startup. Select the operating system to restore", and then click on the "Next" button.
- In the window for choosing recovery tools, click on "Startup Repair".

- Wait until the end of the operation to automatically fix problems that prevent the system from starting.
If the problem is not automatically resolved, continue with the following methods, in which the user will have to manually enter commands at the Windows Command Prompt.
Restoring the Windows 7 bootloader using the Bootrec utility
The next method involves restoring the Windows 7 bootloader via the command line. To do this, we use the Bootrec.exe utility. This method only works with disks that have an MBR master boot record.
From the boot disk, you need to enter the Windows Recovery Environment as described above.
In the System Recovery Options window, click on the Command Prompt option.
The Bootrec.exe utility uses the following basic commands:
- FixMbr - The option writes the Master Boot Record (MBR) to the Windows 7 compatible system disk partition, the existing partition table is not overwritten
- FixBoot - using the command, a new boot sector is written to the system partition, which is compatible with Windows 7
- ScanOS - searches all drives of installed systems that are compatible with Windows 7, displays entries that are not in the system configuration store
- RebuildBcd - search all disks of installed Windows 7 compatible systems, select systems to add data to the boot configuration store
The FixMbr command is used to fix the master boot record, as well as to remove incorrect code from the master boot record.
The FixBoot command is used under the following conditions: boot sector corruption, boot sector changed to a non-standard boot sector, an earlier version was installed on a Windows 7 computer Windows version(Windows XP or Windows Vista).
The ScanOS command searches all disks for operating systems compatible with Windows 7. As a result, all entries related to other operating systems installed on the computer that are not displayed in the boot manager menu will be displayed.
The RebuildBcd command allows you to discover and add to the repository the boot configurations installed on the system machine. The parameter is used to completely rebuild the system boot storage configuration.
In the command line interpreter window, enter the command (after entering commands on the command line, press the "Enter" key):
Bootrec /fixmbr

If the problem persists, you may need to enter the following command:
Bootrec /fixboot
The rest of the commands apply if the computer has more than one operating system.
Close the command prompt, and in the "System Recovery Options" window, click on the "Restart" button.
How to repair the Windows 7 bootloader command line using the BCDboot utility
Using the bcdboot.exe utility, you can restore the Windows 7 bootloader on computers with MBR or GPT styles hard disk layout.
Boot from a removable device, go all the way to the window with the choice of the system recovery method, and then launch the command line. Another option: in the very first window, press the "Shift" + "F10" keys on your keyboard to enter the command line window.
In the command prompt window, enter the command to run the DiskPart utility:
diskpart
To display information about the disks on your computer, type the following command:
List volume
We need to find out the drive letter (volume name) on which the operating system is installed.
The volume name (drive letter) in Diskpart may be different from the drive letter in Explorer. For example, in my case, in Explorer, the system partition has the letter "C", and in diskpart it is marked with the letter "E".

To exit the diskpart utility, type:
bcdbootX:\windows
In this command: "X" is the drive letter on which the operating system is installed. In my case, this is the letter "E", you may have a different name for the volume (disk).
Close Command Prompt.
In the System Recovery Options window, click the button to restart your computer.
Article Conclusions
If you encounter problems with the Windows 7 bootloader, you must restore the system boot files by booting your computer from a bootable Windows disk. You can restore damaged or missing files using the operating system tools: automatic Windows boot troubleshooting using the Bootrec and BCDboot utilities launched from the command line in the recovery environment.
Experienced PC and Internet user
MBR is an obsolete hard disk (or flash drive) format,
still in demand (due to its unpretentiousness)
Master Boot Record (MBR) - the main boot record of a storage medium containing information about its partitions. Damage or loss of the MBR makes information on the disk or flash drive inaccessible. For MBR recovery there are special utilities, of the form TestDisk.
TestDisk will "look through" the entire media and create a partition table. The program queries the BIOS or the operating system for information about the hard drives in the system, does quick check disk structures and partition tables for "correctness". If errors are found, TestDisk will help fix them. In addition, TestDisk, when scanning media, can detect long-deleted partitions on it.
TestDisk is a free and open source program for recovering the master boot record of a disk or flash drive. The program is downloaded without problems from the Internet. The interface is English, but - this is the rare case when it is better not to chase the localizers.
TestDisk does not have a graphical shell. Communication with the program takes place in a black DOS window. It is known. If the system "fell", what kind of graphical shell is there. We boot from under DOS and run TestDisk.
TestDisk supports almost all known operating and file systems. The list of the main features of the program looks like this:
- Restoring deleted partitions
- Rebuilding the partition table
- MBR overwrite
For many years, Microsoft has improved the recovery system of the Windows operating system, and in Windows 7 and Windows Vista, it works almost in automatic mode. If you boot from the Windows 7 installation disc and click " System Restore" ("Repair Computer"), the Windows recovery system will start and try to fix any errors it finds on its own. It is able to fix a large number of problems, however, it is quite possible that the bootloader is corrupted, and the recovery system cannot cope with this problem. In this case you can restore the bootloader manually using the Bootrec.exe utility.
The Bootrec.exe application is used to fix errors related to bootloader corruption and, as a result, the inability to start the Windows 7 and Windows Vista operating systems.
Sequencing
Description of bootrec.exe startup keys
Bootrec.exe /FixMbrLaunched with the /FixMbr switch, the utility writes a Windows 7 and Windows Vista compatible Master Boot Record (MBR) to the system partition. Use this option to troubleshoot problems with master boot record corruption or if you wish to remove non-standard code from it. The existing partition table is not overwritten in this case.
Bootrec.exe /FixBoot
Launched with the /FixBoot key, the utility writes a new boot sector compatible with Windows 7 and Windows Vista to the system partition. You need to use this option in the following cases:
- The boot sector of Windows Vista or Windows 7 has been replaced with a non-standard one.
- The boot sector is corrupted.
- Has been installed previous version Windows operating system after installing Windows Vista or Windows 7. For example, if Windows XP was installed, NTLDR (Windows NT Loader, Windows NT boot loader) will be used, the code of the regular NT 6 boot loader (Bootmgr) will be overwritten by the Windows XP setup program.
It should be noted that a similar effect can be achieved using the bootsect.exe utility, also located on the Windows 7 boot media. To do this, you need to run bootsect.exe with the following parameters:
Bootsect /NT60 SYS
The boot sector of the system partition will be overwritten with BOOTMGR compatible code. You can learn more about using the bootsect.exe utility by running it with the parameter /help.
Bootrec.exe /ScanOs
Launched with the /ScanOs key, the utility scans all disks for installed Windows Vista and Windows 7 operating systems. In addition, when using it, a list of found systems is displayed that, in this moment are not registered in the Windows Boot Configuration Data (BCD) Store.
Bootrec.exe /RebuildBcd
Launched with this key, the utility scans all drives for installed Windows Vista or Windows 7 operating systems. The found operating systems are displayed in a list from which they can be added to the Windows Boot Configuration Data Store. Also use this option if you want to completely rebuild the boot configuration data store. Before doing this, you must delete the previous storage. The set of commands in this case can be as follows:
bcdedit /export C:\BCDcfg.bak attrib -s -h -r c:\boot\bcd del c:\boot\bcd bootrec /RebuildBcd
In the above example, the current boot configuration store is exported to the file C:\BCDcfg.bak, the system, hidden, and read-only attributes are removed from it, after which it is deleted with the DEL command and rebuilt with the bootrec /RebuildBcd command.

Enlarge picture
Of course utility bootrec.exe very functional, however, it will not help if, for example, the Windows bootloader file bootmgr damaged or physically missing. In this case, you can use another utility, also included in the Windows 7 distribution media - bcdboot.exe.
Restoring the boot environment with BCDboot.exe
BCDboot.exe is a tool that is used to create or restore a boot environment located on the active system partition. The utility can also be used to transfer download files.
The command line in this case might look like this:
bcdboot.exe e:\windows
Replace e:\windows with the correct path for your system.
This operation will repair the corrupted Windows Boot Environment, including the Boot Configuration Data (BCD) store files, including the bootmgr file mentioned above.
Syntax of bcdboot command-line options
The bcdboot.exe utility uses the following command line options:
BCDBOOT source]
source
Specifies the location Windows directory The used as the source when copying the boot environment files.
Optional parameter. Specifies the language of the boot environment. The default is English (United States).
Optional parameter. Specifies the drive letter of the system partition where the boot environment files will be installed. The default is the system partition specified by the BIOS firmware.
Optional parameter. Enables the mode of detailed logging of the utility operation.
Optional parameter. Combines the settings of the newly created and existing storage boot record and writes them to the new boot record. If an operating system bootloader GUID is specified, combines the bootloader object with the system template to create a boot entry.
Summary
The article discussed the principles of working with the bootrec.exe and bcdboot.exe utilities, which are used to resolve problems associated with the inability to start the Windows 7 operating system due to a damaged or missing bootloader.
Page 8 of 8
Chapter 7
Data recovery on hard drives
Finally, we have come to a description of the situation, in the event of which even advanced users start to get a little worried.
Restoring the logical structure of a disk
Damage to the logical structure of a hard drive includes:
damage or removal of the master boot record;
damage or removal of the partition table;
damage or removal of one or more boot records of the main partitions;
corruption of partition tables on an additional partition;
erroneous resizing or deletion of a partition or logical drive.
To successfully eliminate these problems, it is useful to know the causes of their occurrence, as well as to have a certain amount of patience and composure.
NOTE
You will need much less time and patience if you manage to remember at least the most basic disk parameters: the number, order and size of partitions, as well as the type file system on each of them.
Restoring the master boot record
First of all, you need to determine the cause of the damage to the boot sectors. If it is caused by a user oversight or a software or hardware failure, you can proceed directly to the recovery procedure. If the damage to the boot sectors occurred due to the activity of a virus or other malware, you must first "find and destroy" the attacker.
Now about the recovery procedure itself. As you know, the master boot record (MBR) is present on any configured physical disk. However, the bootstrap code in the MBR depends on which OS created the MBR. That is, the MBR created when Windows installations 98 is different from the MBR created when you installed Windows XP or Linux (see Chapter 5, Troubleshooting Boot Problems for more on this). The content of a partition's boot record also depends on the type of file system created on that partition. When choosing tools for recovering MBR and BR partitions, these factors must be taken into account. Therefore, the recovery procedures for MBR and BR are discussed below separately for Windows 98 and Windows XP.
"Treatment" of sectors must be carried out only if there is no virus in random access memory. If the memory copy of the virus is not cleared, it is likely that the virus will re-infect the floppy disk or hard drive after the virus code is removed.
MBR Recovery for Windows 98
Before trying to restore the MBR, you should make sure that this procedure is necessary. To check the status of the MBR, it is advisable to use the Norton DiskEdit utility.
NOTETo access all the features of DiskEdit, you need to run the program in DOS mode. Therefore, you must first prepare a bootable floppy disk.
Despite the emergence of more and more software tools for "healing" file systems, many experienced users prefer to use Norton DiskEdit to fix serious errors. This is explained by the fact that DiskEdit provides convenient means of viewing all elements of the file system structure, and, in addition, is able to prevent incorrect changes to these elements during the recovery process. For this reason, we will use "snapshots" of the file system structure obtained using DiskEdit as illustrations for the material presented. This will help you explore the possibilities of DiskEdit at the same time.
ADVICE ____________________To use DiskEdit to select a hard drive to scan, follow these steps:
If your version of DiskEdit is on CD, you should have a "standard" bootable floppy that supports the CD drive. If you intend to run DiskEdit from a floppy disk, you can either create a "truncated" version of the boot disk and write the DiskEdit.exe file (it takes about 700 KB) to it, or prepare a separate floppy disk with DiskEdit.
1. Boot the computer from the floppy disk in DOS mode and run the DiskEdit program; the program will warn you that it is working in Read Only mode (Read Only) in order to protect data from accidental editing (how to change the mode, see below).
2. Click the Continue button to continue. Disk-Edit will scan the disks to determine the structure of the file system.
3. After the scan is complete, DiskEdit will display a list of detected devices (Fig. 7.1). By default, DiskEdit displays a list of logical drives. If the partition table is so damaged that none of the logical disks are recognized, a list of detected physical disks is displayed.
4. In list Type (Type) put the switch in position Physical Disk (Physical disk).
5. In the list of devices, select the physical disk that you want to examine.
Rice. 7.1 List of devices detected by DiskEdit
Physically, the MBR occupies the very first sector of the hard drive (cylinder 0, head 0, sector 1).
NOTETo navigate to the desired sector, follow these steps.
In what follows, for brevity, we will use the following designations: C is the cylinder number, H is the head number, and S is the sector number.
1. From the Object menu, select Physical Sector.
2. In the additional window (Fig. 7.2) enter the sector number and click the OK button.

Rice. 7.2 Selecting a physical sector
By default, DiskEdit displays the contents of the sector in hexadecimal code (as Hex mode) (Fig. 7.3).

Rice. 7.3. MBR representation in hexadecimal code
In this representation, each pair of hexadecimal digits corresponds to one byte.
ATTENTIONThe first bytes of the sector must be occupied by the bootstrap program. It is very difficult to visually distinguish a “normal” program from a damaged one (especially if you see it for the first time at all). The presence of text diagnostic messages in it (such as Geom. Hard. Disk) can serve as an indirect sign of the correct state of the boot program. They can be seen in the far right column of the window, which contains the character (text) representation of the data. Another indirect sign is the size of the program. It should occupy approximately three-quarters of a sector (446 bytes, or 1BE bytes in hex) and be separated from the partition table by null bytes.
If the value of some parameter occupies more than one byte, then in the hexadecimal representation of the parameter, its high byte is on the right, and the low byte is on the left. For example, the partition table termination signature, AA55, is 55 AA in hexadecimal.
The distribution of the space of the first sector of the hard disk is presented in Table. 7.1.
Finally, the presence of a correct partition table may indicate that the first sector (sector 0) is generally not damaged (or slightly damaged). How to evaluate the status of PT is discussed below.

If you think the bootstrap program needs to be "healed", the following methods can be used:
if there is an electronic copy of the MBR (“taken”, for example, from a similar hard disk), you can replace the corrupted MBR with it;
exit DiskEdit and enter the FDISK /MBR instruction at the command line; this is
will update the MBR, but the partition table will remain the same;
if you have a "reference" version of the program, recorded, for example, on a sheet of paper, and minor distortion, you can edit the MBR manually.
In most cases, to restore the MBR, it is enough to update it with the FDISK /MBR command. The procedure consists of the following steps.
1. Using the BIOS Setup program, make sure that the first boot device the FDD drive is specified.
2. Boot your computer using a bootable floppy disk.
3. At the command prompt, type FDISK /MBR.
4. Remove the floppy disk and reboot the system.
ATTENTIONWhen using FDISK, be aware that this utility cannot work with disks larger than 64 GB.
Be careful when using FDISK /MBR if the MBR is corrupted due to a virus. The fact is that this command rewrites the system loader code and does not change the Partition Table. If the virus encrypts the Partition Table or uses non-standard methods of infection, FDISK /MBR can lead to complete loss of information on the disk. Therefore, before running FDISK /MBR, make sure the Partition Table is correct. To do this, you need to boot from an uninfected DOS floppy disk and check the correctness of this table (the procedure for checking and restoring PT is described in the "Restoring the Partition Table" subsection).
In order to "manually" edit the MBR, you must put DiskEdit into edit mode. To do this, follow these steps.
1. From the Tools menu in the main window, select Configuration.
2. In the settings panel that opens, uncheck the box next to Read Only and click the OK button.
NOTEAfter additional confirmation about the mode change, DiskEdit will save the new settings and rescan the disk. To return to the first sector, follow the above sequence of actions again.
To change the state of checkboxes and radio buttons in DiskEdit, use the key<Пробел>.
MBR Recovery for Windows XP
The FDISK /MBR DOS command cannot restore an MBR that was created when Windows XP was installed.
To solve this problem, use the fixmbr command, which is available from the Windows XP Recovery Console. The command has the following format:
fixmbr [drivename], where drivename is the name of the drive on which you want to write the new MBR. The disk name might look like this: \Device\HardDisk0.
This is how the new MBR is written to the specified disk: fixmbr \Device\HardDisk0.
NOTE
To get the disk name, you can use the map command, which is also available in the Recovery Console environment (Fig. 7.4).

Rice. 7.4. Representing drive names with the map command
ATTENTIONIf an incorrect or non-standard partition table signature is found when the fixmbr command is executed, a confirmation message is displayed asking if you want to continue. If access to disks is carried out without failures, then the request should be answered in the negative.
If the device_name parameter is not specified, the new MBR will be written to the disk from which the main OS is loaded.
ATTENTIONChecking and repairing the partition table
Writing a new MBR to a disk with a system partition can corrupt the partition tables, making the partitions inaccessible.
To evaluate the state of the partition table (PT), follow these steps:
1. Using DiskEdit, open the first sector of the disk, as described earlier.
2. From the View menu, select as Partition Table.
The information that appears on the screen depends greatly on the status of the PT. In either case, DiskEdit will try to present the data located where the PT should be in the form of a table. If the PT is more or less correct, then it should look something like the one shown in Fig. 7.5.

Rice. 7.5. Partition table representation in text form
The columns of the table output by DiskEdit mean the following:
System (System) - type of file system or partition; an extended (extra) partition is referred to as EXTNDx; the additional partition table entry referring to the next logical drive has the EXTEND label;
Boot (Download) - a sign of the boot partition; if the partition is bootable, Yes is displayed for it, otherwise No;
Starting Location - the address of the first sector of the partition, given by the number of the head, cylinder and sector;
Ending Location - the address of the last sector of the partition, given by the number of the head, cylinder and sector;
Relative Sectors (Relative sector) - the number of the first sector of the section in accordance with the LBA addressing (that is, with "end-to-end" numbering by heads, cylinders and sectors);
Number of Sectors (Number of sectors) - the size of the section, measured in sectors (recall, the sector has a size of 512 bytes).
To view the chain of links to logical drives located inside an extended partition:
1. Move the cursor to the line corresponding to the extended section.
2. From the Link menu, select Partition.
3. If a link element appears in the System column (labeled EXTEND), repeat steps 1 and 2 for it to move to the next logical drive (Fig. 7.6).

Rice. 7.6. View additional partition tables in text form
If the PT parameters displayed by DiskEdit indicate the presence of errors in it and you know the geometry of the hard disk partitions, then you can edit the PT entries "manually" (that is, using DiskEdit), right in the table.
If the damage to the PT is so great that the information presented in the table does not lend itself to reasonable interpretation at all, another method of analysis can be tried. Open PT as a hexadecimal code (to do this, select the View as Hex command) and compare the data contained in PT with those given in Table. 7.2.

Of all the listed fields, only the byte containing the section type code can have some predefined value. For example, for a primary FAT32 partition, this code should be 0Ch, for a FAT32 logical drive in an extended partition, it should be 0Bh, and for NTFS, it should be 07h.
ADVICE
You can get a fairly extensive list of the most common codes if you select the Change partition id command for any partition in the ParagonPartitionManager program (Fig. 7.7).

The logical disk table sector, unlike the master boot record sector, is practically empty. All bytes in it from the beginning to the byte at offset 1BDh inclusive must contain a zero value. Starting from the next byte (at offset 1BEh), an additional partition table (Extended PT) is located, consisting of two elements. At the end of the sector, there is a signature already familiar to you - the value AA55h. The structure of the Extended PT elements is completely similar to the structure of the elements of the main partition table.
In some (especially severe) cases, the following rather extreme method can be used, which, however, often gives positive results.
1. Using DiskEdit, copy the contents of the MBR and Partition Table from any healthy disk to the boot sector of the disk being restored. Then, having cleared (by writing zeros) all PT records except the first one, edit it by introducing deliberately distorted information about the final location of the partition (for example, the 9999th cylinder) and the total number of sectors (for example, 99999999).
2. After that, launch the DiskDoctor utility, which, like DiskEdit, is included in the Norton Utilities suite.
3. Start checking the disk being restored by clicking the Diagnose Disk and Diagnose buttons successively in two windows (Fig. 7.8).

Rice. 7.8. DiskDoctor start screens
4. Answer the request to eliminate the errors found in the Partition Table with your consent by clicking on the Yes button (Fig. 7.9).

Rice. 7.9. Despite DiskDoctor's formidable warning, agree to everything
5. After making corrections to the partition table you artificially created, DiskDoctor will offer to search for possible additional DOS partitions (that is, partitions with the FAT family file system). Give your consent to this, and if the data on the disk is not damaged, the additional partition will be found and restored after your confirmation.
As a rule, after restarting the computer, the data of the additional partition becomes available without additional recovery operations.
Recovery of deleted and "lost" partitions
Partitions and logical drives can be "lost" as a result of partition table (PT) corruption. Therefore, the procedures for “repairing” a PT and restoring “lost” partitions are often links in the same chain: by restoring one of the PT records, you can find the next partition on the disk, add its data to the corresponding PT record, and so on.
The situation becomes somewhat more complicated if the partitions themselves were deleted (for example, using programs like Paragon Partition Manager) or if the entire hard drive was formatted.
A special case is the loss of partitions as a result of converting dynamic volumes to basic volumes.
However, the technology for recovering deleted and “lost” partitions depends not so much on the cause of the loss, but on whether the deleted partition is (was) a system one. If not, then all partition recovery operations can be performed directly in the Windows OS environment. Moreover, if it is Windows XP, then the Disk Management utility can be used as the main tool. Windows 98 will require a program that can create partitions and logical drives without changing the partition's data area. These are, in particular, Norton Partition Magic and the mentioned Paragon Partition Manager (but not the FDISK utility, which, when scanning an available disk space writes the F6 code to the first sector on each track, which leads to the loss of information in these sectors).
In addition, you will need to remember (and the more accurate, the better) the size of the restored partition.
So, to recover a lost non-system partition without losing the data stored on it, follow these steps.
1. Re-create a partition of exactly the same size in its place without formatting the new partition.
2. In the zero sector of the partition, place a copy of the boot record (BR) of the "former" partition (how to find it and what BR is, is described in the next subsection).
In addition, the Drive Rescue and EasyRecovery programs discussed in Chapter 6 have very powerful tools for finding and restoring "missing" partitions.
Data recovery in FAT32 file system
The procedure for checking the state of the file system generally depends on the nature of the damage. For example, there is no need to deal with the MBR if the root directory of a logical disk or the FAT table is damaged. However, if you cannot determine the cause of the system's inoperability, or the general nature of the situation gives the impression that "everything is lost", it is better to start diagnosing from the "very top".
We will assume that with the help of the material of the previous section, all problems with the MBR have been successfully overcome. In this case, the procedure for checking the status of the partitions presented in the partition table should be as follows.
1. Checking the boot record (Boot Record) of the partition (logical disk).
2. Checking the status of the root directory.
3. Examining the file allocation table (FAT).
4. Checking the status of subfolders and files.
Checking and restoring the Boot Record
The boot record of a partition (as well as a logical disk in an extended partition) is located in the first sector of this partition (within a partition, this sector has a relative number of 0).
As already mentioned, the content of the boot record depends on the type of operating system that should be loaded from this disk (if it is a system one), and on the type of file system under which the partition is formatted.
Nevertheless, in any case, BR contains two data areas: the operating system boot program and the BIOS parameter block (BPB).
Using the DiskEdit program, you can go to the sector of the boot record you are interested in in two ways.
The first method is available if all information in PT is correct. In this case, you can simply select the desired disk in the table, and then select the Partition command from the Link menu. DiskEdit will display the contents of the entire BR sector in text form (Fig. 7.10).

The second method involves using the information obtained when viewing the partition table, or rather - absolute address of the first sector.
Do the following.
1. Using the textual representation of the partition table, follow the links to the required drive.
2. To get the absolute address of the first sector of the disk, add the relative number of the first sector of the disk presented in the Relative Sectors column (in the EXTEND link line) with the absolute number of the first sector of the previous disk; For example, for the chain of disks shown in Fig. 7.6, the address of the first sector of a logical disk with FAT32 will be equal to: 8 193 150 + 63 = = 8 193 213; for the next FAT32 drive: 24,579,450 + 8,193,213 = 32,772,663.
3. From the Object menu, select Physical Sector.
4. In the additional window, enter the number of the first disk sector and click the OK button.
NOTE ____________________DiskEdit will display the contents of the entire BR sector in hexadecimal code (Figure 7.11).
In fact, the number indicated in the Relative Sectors column is the size (in sectors) of the previous disk (partition), and only the name of this table column forces it to be called the relative number of the first sector of the next disk.

Rice. 7.11. Representation of the first sector of a logical disk in hexadecimal code
To get the textual representation of the BPB block only, follow these steps.
1. Allocate the fourth byte from the beginning of the sector (the first three bytes of the sector are occupied by the command to jump to the beginning of the boot program), as shown in fig. 7.11.
2. From the View menu, select as Boot Record(32) (in the form of a boot record for FAT32).
The distribution of the space of the first sector of the logical disk is presented in Table. 7.3.
NOTE
BPB fields with an offset from the beginning of the sector of 44 bytes or more do not fit on the first screen of the DiskEdit utility. Use the scroll bar to see them.


Restoring the BR system and/or boot partition for Windows 98 can be performed in "manual" or "automatic" mode.
NOTE ____________________To "automatically" solve the problem, you can use one of two commands:
Restoring the boot record of the system partition must be done by booting the system using a bootable floppy disk. For other sections, compliance with this requirement is optional, but desirable.
SYS <букеа диска> – provides BR writing to the boot sector of the partition, as well as copying to the root directory of three system files: Msdos.sys, Io.sys and Command.com;
FORMAT <букеа диска> – ensures the formation of the file structure of the specified disk partition with the reconstruction of BR, clean FAT tables and the root directory (Root Directory); the data area is not affected.
If it is impossible to restore the boot record using the SYS and FDISK commands, you should try to replace the boot sector either with its backup copy taken from sector 6 of the same partition, or (in extreme cases) with a copy of the boot record of another partition with identical geometry.
To perform the replacement procedure, it is advisable to use the Norton DiskEdit utility. Use it to do the following:
1. After DiskEdit has finished scanning and displays a list of detected devices, in the list Type (Type) put the switch in position Physical Disk (Physical disk).
2. In the list of devices, select the physical disk that you want to examine.
3. From the View menu, select as Partition Table.
4. In the line of the partition table corresponding to the partition being restored, look and write down the number of the first sector of the partition (the value in the Relative Sectors column). If you are interested in a logical drive on an additional partition, get to the desired entry in the corresponding additional partition table, as described above.
5. Add 6 to the fixed sector number to get the absolute sector number with the BR backup.
6. From the Object menu, select Physical sector.
7. In the additional window (Fig. 7.12) enter in the field Starting Sector (Initial sector) the calculated number of the backup boot sector, and in the field Number of Sectors (Number of sectors) - the value 1 and click on the button OK ^ u get a hexadecimal representation of the backup boot sector sectors.

Rice. 7.12. Going to a Boot Sector Backup
8. To verify the integrity of the spare sector, switch to text view mode, and then return to the hexadecimal view.
9. From the Tools menu, use the Configuration command to put DiskEdit into edit mode.
10. From the Edit menu, select the Mark command and then use the cursor keys to select the contents of the entire sector (if the sector was opened correctly, DiskEdit will not let you go beyond it).

Rice. 7.13. Selecting the type of object to replace
11. In the Tools menu, select the Write Object To ... command (Write an object in ...) and in the additional window (Fig. 7.13) move the switch to the To Sectors ... position (In sectors ...). Note that if you select the To Physical sectors option here. (To physical sectors.), then in the next window you will have to specify the address of the recoverable boot sector in CHS addressing.
12. In the next window (Fig. 7.14), enter the relative address of the boot sector to be restored (it is 0) in the Starting Sector field (it is 0) and, in response to the DiskEdit prompt, confirm your intentions. The boot sector will be replaced with a copy of it.

Rice. 7.14. The final step in boot sector replacement
To make sure that the procedure was successful, open the restored boot sector in text mode and check the field values in accordance with Table. 7.3.
Exploring the root directory
Following the boot record are two copies of the FAT file allocation table and the root directory. It makes sense to proceed to FAT research only if the corresponding partition (or logical disk) is correctly recognized by the system, that is, the partition table contains correct information for it, and the disk boot record is correct.
Therefore, to study the internal structure of a partition, it is advisable to use another DiskEdit mode - working with logical devices (Logical disk).
To switch to the new mode, select Drive from the Object menu. After DiskEdit has finished scanning, set the mode switch to Logical disks and then select the one you are going to work with in the list of logical disks (Fig. 7.15).

Rice. 7.15. List of logical drives
After that, DiskEdit will start scanning the disk in order to determine the structure of the file system and build a complete tree of folders and files. To get information about FAT and the root directory, it is not necessary to wait for the complete completion of the scan, you can interrupt it a few seconds after the start by pressing the Esc key. After receiving confirmation from you to stop scanning, DiskEdit will display the contents of the root directory in text form (Fig. 7.16).

Rice. 7.16. Root directory
If for some reason DiskEdit couldn't find the root directory on its own, try navigating to it at the relative address of its first sector. The number of this sector can be determined from the value of the First cluster of Root field of the BPB block. In addition, the following must be considered when searching for the root directory.
The root directory (like any other directory in FAT32) contains 32-byte elements - descriptors that describe files and subdirectories.
The first descriptor of the root directory contains information about the logical drive (more precisely, about the root directory itself), including: volume label, date and time of creation, directory attributes as an element of the file system. The remaining descriptors, stored in the root directory, contain more information about their associated data items. All of them do not fit on one DiskEdit screen. To scroll through them, use the command More (More), located in the menu bar of the window.
We will limit ourselves to describing only the most important fields of the descriptor, which are presented on the first screen:
Name – name of the data element (file or folder); if the data element is marked as deleted, then the E5 byte is used as the first character of the name (in text format DiskEdit replaces it with the letter x);
Ext – file extension (for folders this field is empty);
ID – data element type; possible values:
Vol - volume;
Dir - directory;
LFN is an abbreviation for Long File Name, a long file name (for LFN, see Chapter 3, the section “Choosing Folder and File Names”);
File - file;
Erased - deleted (specified only for files);
Del LFN – remote long name (the flag is set after renaming a file or folder);
Size - size (in bytes);
Date - date of creation or modification;
Time - time of creation or modification;
Cluster – number of the first cluster;
A, R, S, H, D, V – data element attributes (archive, read-only, system, hidden, directory, volume); the values of all attributes are stored in one descriptor byte.
To view the contents of a subdirectory, move the cursor to the appropriate line and press the Enter key.
If the information about the root (or sub) directory presented by DiskEdit seems “suspicious” to you, you can try to interpret the data written in it yourself by switching to the hex code view. To do this, select as Hex from the View menu. The directory descriptor format is shown in Table 1. 7.4.
By analyzing the received information, you can detect suspicious changes in the file size, date and time fields. If necessary, they can be corrected "manually".

In addition, for each file, the Cluster column displays the number of the first cluster assigned to it. You should browse the entire directory to the end: you need to check that there is no extraneous data in the directory. They can be written there by a virus.
If you switch to raw view mode, you can verify that the free directory entries contain null values. If there is any data after the free elements, there is a very high probability that they are written there by a virus or by a program protection system against unauthorized copying (if the directory under investigation contains such programs).
In the event that the directory is completely or partially damaged, links to the files described in it will be lost. If you find in one way or another sectors containing the file you need with a destroyed descriptor, then using the method described below, you can restore the descriptor and gain access to the file.
The procedure is based on using DiskEdit's search functions. various elements FAT file system.
For example, to find orphaned directories (those that are not referenced from other directories, including the root), you need to do the following.
1. From the Tools menu, select Find Object, and from the secondary menu, select Subdirectory.
2. The DiskEdit program scans the sectors of the disk looking for one that begins with the byte sequence 2E 20 20 20 20 20 20 20 20 20 20. This sequence corresponds to a descriptor containing a directory link to itself.
3. By pressing the key combination Ctrl + G, you can continue searching for the desired directory until you find the one that contains the files you are interested in.
4. As soon as the required directory is found, it is necessary to write down the physical address of the disk sector containing the directory, and then find or calculate the number of the cluster corresponding to the directory.
To search for the number of the cluster in which the found directory is located, switch to the text view directory by selecting as Directory from the View menu. Then select the Cluster chain (fat) command from the Link menu. The contents of the FAT table will appear on the screen in text view mode, while the desired cluster number will be highlighted.
Knowing the cluster number of the lost directory, you can create a new directory descriptor, for example, in the root directory of the disk, and make a link to the found directory in this descriptor. After that, the lost directory will become available again.
FAT Study
Between the boot sector and the FAT file allocation table, there may be reserved sectors that are service to the file system or are not used.
The number of sectors reserved on a logical disk can be found in the BIOS settings block (BPB or Extended BPB, depending on the version of the operating system). The value to look up is in the Reserved sectors at beginning field of this block (offset 3 bytes).
If only one sector is reserved, then the first copy of the FAT file allocation table is located immediately after the boot sector. It is the boot sector in this case that is reserved.
When several sectors are reserved, there may be several more sectors containing zero values between the boot sector and the first copy of the FAT table. If the computer is infected with a virus, these sectors may contain the body of the virus or a copy of the original boot record replaced by the virus.
The information provided in the root directory must match the data area cluster allocation information stored in both copies of the FAT.
To compare the values of the Cluster and Size fields of a descriptor of some item with information in the FAT, follow these steps.
1. Open in text mode the root directory of the logical drive you are interested in and move the cursor to the appropriate line.
2. From the Link menu, select the Cluster chain command.
DiskEdit will open the first FAT copy and highlight the number of the object's first cluster in it with a black rectangle, as well as highlight all other clusters allocated to the object in red (Fig. 7.17).
Visually, the file allocation table should contain mostly monotonically changing sequences of cluster numbers, zero values corresponding to free clusters, and the value 0xFFFF (0xFFF for FAT12 or 0xFFFFFFFF for FAT32), which is a sign of the end of the cluster chain.
As a result of a software error or a virus, the FAT table can either be completely destroyed or changed (for example, encrypted or written with zeros). If the cluster chain for the file you need is partially or completely destroyed, restoring such a file can be a daunting task. In this case, you can try to use the data recovery tools discussed in the fourth chapter of the book.

Rice. 7.17. Browsing FAT
If they don't help, go back to working with DiskEdit. To find a FAT table not by address, but by its contents, do the following.
Select the Find Object command from the Tools menu and then the FAT line. DiskEdit will search for the first copy of the FAT table and display its dump, highlighting the first three bytes in it.
If you now move the text cursor down or press the PgDn key, and then select the Find Object FAT command again from the Tools menu, a second copy of the FAT table will be found.
If any of the copies of the FAT table is correct, then to quickly jump to one of them, you can use the 1st FAT and 2nd FAT commands available in the Object menu.
Data recovery in the NTFS file system
As you already know from Chapter 3, the NTFS file system contains whole line mechanisms designed to improve the reliability of data storage. This, in turn, leads to a significant complication of the structure of NTFS compared to FAT32. Even a detailed study of the structure of records stored in the MFT (master file table) does not guarantee the possibility of recovering data "manually".
The situation is aggravated by the fact that today there are practically no tools that provide convenient means of viewing and editing MFT.
For this reason, we will limit the scope of our consideration to the following situations:
restoring a partition table entry containing information about an NTFS partition;
recovery of the boot sector of a logical disk with NTFS;
recovery of service information in MFT.
These tasks can be solved by sharing tools already familiar to you: Norton DiskEdit and Paragon Partition Manager, as well as the Partition Table Editor utility, which is part of the Norton PartitionMagic package.
Restoring a Partition Table Element
This refers to the situation when the operating Windows system XP fails to recognize a logical drive with NTFS at boot due to a corrupt partition table entry that describes it (the drive). To get a better idea of the situation that has arisen, it is advisable to run the Norton Partition Table Editor utility.
NOTEAfter launching PTEdit, a dialog box will appear on the screen, with the help of which you can view and edit the main parameters of any element of the partition table of the selected physical disk(Fig. 7.18).
The Norton Partition Table Editor utility (hereinafter referred to as PTEdit for brevity) consists of a single executable file, PTEDIT.exe. Its peculiarity lies in the fact that at startup it ensures that the system is switched to single-tasking mode (by loading its own DOS). However, to work with NTFS partitions, it is better to run it either from the Windows 98 environment, or from a "real" MS DOS environment, for example, from a floppy disk. The size of the PTEDIT.exe file is about 500 KB.
Selecting a physical disk is done using the Hard Disk drop-down list ( HDD).
The rows in the table below correspond to the four entries in the main partition table. The columns display the following information:
Type (Type) - type of file system or partition; displayed as a hexadecimal code;
Boot (Download) - a sign of the boot partition; for boot active partition, as you know, should be set to 80;
Starting - the address of the first sector of the partition, given by
number of cylinder (Cyl), head (Head) and sector (Sector);
Ending - the address of the last sector of the partition, also given by the number of the cylinder, head and sector;
Sectors Before (Preceded by sectors) - the number of hard disk sectors preceding the first sector of the partition in accordance with LBA addressing (that is, with "end-to-end" numbering by heads and cylinders);
Sectors - The size of the partition, measured in sectors.

Rice. 7.18. The start window of the Partition Table Editor utility
To view a chain of extended extended partition (EPBR) additional tables, follow these steps:
1. Move the cursor to the line corresponding to the extended section (its code is 0Fh).
2. Click the Goto EPBR button below the table.
If you know that the NTFS partition being restored is in the same place, but the corresponding line indicates the wrong partition type, you can try to set the correct value forcibly. To do this, click on the Set Type button and select the required value in the window that opens (Fig. 7.19). For an NTFS partition, it is 07h.
If you know the correct values of other section parameters and they differ from those presented in the table, you can (after remembering or writing down the current values on paper) enter them into the fields of the table. To save your changes to disk, click the Save Change button.

Rice. 7.19.You can force the required partition type
ADVICE
If the partition being restored is generally recognized as empty, you can try to create a new one in its place, of the same type as the partition being restored, and (required!) Exactly the same size. To perform this procedure, you can use either Paragon Partition Manager or Norton PartitionMagic (described in the third chapter).
Restoring the boot sector of an NTFS partition
The composition of information contained in the boot sector of an NTFS partition is largely similar to the composition of information in the boot sector of a FAT32 partition: its first three bytes contain the command to switch to the OS boot program, then comes the file system code, and after it the fields of the BIOS parameter block (BPB). To evaluate the correctness of the contents of the boot sector of an NTFS partition, move the cursor to the row of the corresponding partition and click on the Boot Record button located below the table (see Figure 7.18). An additional window will display the contents of the BPB in text format (Fig. 7.20).
Compared to the BPB of a FAT32 partition, the following specific fields are present here:
Total NTFS Sectors (Total sectors in NTFS) - total number sectors in the section;
MFT Start Cluster - the number of the first cluster of the MFT table;
MFT Mirror Start Cluster - the number of the first cluster of the copy of the MFT table;
Clusters per FRS (Clusters in FRS) - the size of one entry in the MFT table (in clusters);
Clusters per Index Block - The size of the index block (in clusters).

Rice. 7.20. NTFS Boot Record Dialog Box
If the damage is minor, you can edit the field values directly in the NTFS Boot Record window. After making changes, click on the Write button to transfer them to disk.
If the boot sector is significantly damaged or you do not know the correct field values, you should replace the boot sector with its backup copy. For the version of NTFS used in Windows XP, a copy of the boot sector is stored in the most recent sector of the logical drive.
The operation of copying a sector can be performed either using Norton Disk-Edit or using Paragon Partition Manager (more precisely, using the View Sectors utility included in it). It should be noted that in this case the second option is even preferable, since Partition Manager is more familiar with NTFS than Norton DiskEdit.
So, to replace the NTFS boot sector with its backup using the Sector Viewer utility, follow these steps.
1. After loading Paragon Partition Manager, right-click on the image of the restored partition and select View Sectors from the context menu.
2. In the View Sectors utility window (Fig. 7.21), enter in the edit field Absolute Sector|Type the expression for evaluation: the number of the last sector of the partition (it is displayed to the right of the drop-down list) and press the Enter key.
3. Click the Save button located in the right part of the utility window, and in the additional window specify the address and name of the binary (.bin) file into which the contents of the sector should be written.
4. Return to the zero (boot) sector of the partition by entering 0 in the Absolute sector|Type the expression to evaluate:.
5. Click the Settings button and, in the additional window, check the Allow recording box. After you close the window, the Restore button will become available.
6. Click the Restore button and in the window that opens, specify the .bin file from which the contents of the sector should be read.

Rice. 7.21. Boot sector representation in the Sector View utility window
After two confirmations from your side about the correctness of the replacement, the disk will be written.
If damaged and backup copy boot sector, there is only one way out: edit the contents of the boot sector manually. The Sector View utility is also suitable for this operation, but Norton DiskEdit can also be used. The distribution of the boot sector space of an NTFS logical disk is shown in Table. 7.5.

For successful recovery work in an NTFS partition, it is necessary to determine its geometry, which is characterized by a set of the following parameters:
sector size (in bytes);
cluster size (in sectors);
numbers of the initial cluster of the MFT table and its copy;
MFT table entry size (in clusters).
The first of these parameters is completely similar to the parameter of the same name for the FAT32 partition.
As for the cluster size, like for FAT32, it depends on the size of the partition, but can be changed by the user when formatting the partition (or using the appropriate functions of tools such as Norton PartitionMagic or Paragon Partition Manager, discussed in Chapter 3).
Recovery of service information in MFT
As you already know, the MFT table is a metafile called $MFT, which stores records with attributes of other metafiles and records with attributes of user files (see Chapter 3 for more information about the logical structure of MFT).
For partitions of several gigabytes and with a large number of data files, MFT sizes can reach tens of megabytes. In this case, the MFT boundary can change dynamically depending on the amount of data written to the disk and the availability of free space.
In addition, each file in NTFS can have its own set of attributes (this was also discussed in some detail in Chapter 3); some of them are set by the user.
All this significantly complicates the analysis and recovery of MFT at the level of individual records.
However, if the MFT is corrupted, you can try to recover the metafile records and then entrust file and folder recovery to one of the software tools discussed in Chapter 4.
MFT table lookup
The number of the first cluster in the MFT table is contained in the Clusters to MFT field of the boot sector. If you managed to restore it, then using the Sector Viewer utility you can go to this cluster and check the correctness of the records related to metafiles.
To navigate by cluster number, do the following:
1. Open the first (boot) sector of the disk.
2. In the Absolute Sector section, in the Type an expression to evaluate field, enter the formula for calculating the number of the first MFT sector:
3. Press the Enter key.
Characteristic signs of a "serviceable" MFT:
each entry begins with the word FILE0 located in the first five bytes of the sector;
for most metafile records, the metafile name is stored in bytes at offset F2h, which always begins with the $ character;
the first entry describes the $MFT metafile itself.

The sequence of placing records of other metafiles is given in Table. 7.6.

Next in the $MFT file are entries with information about all other files and directories.
In the event that the Clusters to MFT field of the boot sector is corrupted or the transition by cluster number led to “unknown where”, you can try to entrust the MFT search to the Sector View utility itself.
To do this, click the Go button and in the menu that opens (Fig. 7.23) select the NTFS4MFT command. Please note that the sector number (relative to the beginning of the section) from which the MFT begins is also indicated here.

Rice. 7.23.Searching for the MFT table using the View Sectors utility
If this technique also fails, the last way out remains: return to working with the Norton DiskEdit program and try to find the MFT table using a full-text search for the topic. You can use the metafile name $MFT as the search key. However, keep in mind that NTFS file names are represented in two-byte UNICODE encoding, while Norton DiskEdit works with one-byte ASCII code.
If the main MFT table is damaged, you should check the status of its copy. Recall that NTFS does not provide for the creation of a complete copy of the MFT. The reduced copy, MFT Mirror, contains only the first four entries from the main table, referring to the $MFT, $MFTMirr, $LogFile, and $Volume metafiles.
Recall also that the copy of the MFT in the NTFS version for Windows XP is always located in the middle of the partition. Therefore, if the address of its beginning is absent in the boot record, it is easy to calculate it based on the number of partition sectors.
You can also try moving to a sector with a copy of the MFT using the Sector Browser utility using the NTFS MFT Mirror command from the Go menu (see Figure 7.23).
If the copy has survived, it is necessary to find its last sector and then transfer the contents of the “mirror” to the corresponding sectors allocated for the main MFT.
Using the Sector Viewer utility, this operation is performed in the same way as transferring a copy of the boot sector.
Size and structure of the MFT table entry
In view of the above, the correct determination of the size of the MFT table entry is of great importance. Its value is stored in the Clusters per FRS field of the boot sector.
Many disk utilities, including PTEdit, display this value as a positive decimal integer in the range 0-255 (typically 246, see Figure 7-20). In reality, this value should be treated as a signed hexadecimal integer, with the most significant digit reserved for the sign. If the number is positive (that is, less than 128 in decimal representation), then it means the number of clusters occupied by one entry in the MFT table. If the number is negative (greater than 127 decimal), then the following formula must be used to determine the MFT record size:
FRS= 2(256 - Clusters_Per_FRS)
Where FRS is the number of bytes occupied by the MFT record and Clusters_Per_FRS is the value of the Clusters per FRS field.
For example, if the Clusters per FRS field is 246 (that is, F6 hexadecimal), then the above formula would have an exponent of 2 of 10, and FRS would have a value of 1024, which means the MFT record size is 1 KB. Similarly, a Clusters per FRS value of 245 (F5h) corresponds to an MFT record size of 2 11 = 2048 bytes, or 2 KB.
An MFT entry contains a list of variable length regions, each corresponding to one of the file's attributes. The size of this list and the composition of the attributes stored in it can be different for each file.
If all the attributes of a file or directory do not fit in the base entry, one or more additional entries are created. In this case, the base entry contains an attribute that lists all the attributes of a given file and directory, as well as an indication of which entries (base or additional) store certain attributes.
Each MFT entry consists of a fixed format header followed by a list of variable length attributes. When starting to examine an MFT record, we first need to analyze its header. The MFT record header format is shown in Table. 7.7.

A few words about the so-called adjustment array. Before saving an MFT record, the operating system replaces the last two bytes of each sector with a special value - an adjustment pattern, which must be the same for all sectors of the same MFT record, but different for different MFT records. The original content of the last bytes of the MFT record sectors is stored in the second and subsequent cells (two bytes) of the adjustment array. In this case, the value of the adjustment template is written to the first cell of the array.
The procedure for "manual" byte-by-byte recovery of MFT records can require painstaking work for several hours (if not more). You can decide on such a step only in case of loss of really "vital" data. An alternative way is to contact the services of special recovery services. Their addresses can be found on the Internet. Of course, not everyone can be trusted with their data. Among the recovery services that have a fairly high authority, we can include, in particular, the service of Ontrack, the creator of the EasyRecovery data recovery package described in the book.