For those users who have multi-core processors, it may be useful feature, which allows the program to use only one specific kernel. Most processors now have multiple cores and are expected to be much faster than single core processors. To a large extent, the speed of information processing depends on cpu frequency, however, if you correctly set the load distribution across several cores, you can greatly increase the speed of information processing.
How to find out the number of cores
There are several ways to find out the number of processor cores. To get started, you can click on the computer right click mouse and select its properties. After that, you should go to device Manager, and select the processors section. 
This item should be expanded, how many names will be under it, there are so many cores. You can also go to Task Manager(Ctrl + Shift + Esc) and go to the performance tab, the load on each core will be displayed there, and you can determine the number of cores by the number of windows. 
Mapping Kernels in Windows
These actions can be carried out not only for dozens, but I for early systems, starting from the seventh version. In any case, first you need to open Task Manager, in 7 you need to go to the Processes tab, and in other versions to the Details tab. 
Now you should right-click on the utility for which the kernel will be set, and select the item. After that, a window will pop up in which the user can specify which core the application will use, for example, only the second core can be enabled. 
Now the utility will be able to work on one core, the problem is that after a reboot, all settings will be reset.
How to enable all cores
In Windows 7, 8, 10, all cores are always enabled by default. Only when loading the OS, not all the power of the processor can be used. To fix this you should:

Attention! The maximum memory should be set at the rate of - at least 1024 MB random access memory per core, otherwise it will affect the performance of the computer.
Launching a program with a binding to the kernel
In order for the application to use a specific kernel immediately after launch, you will need to start it with the necessary parameters. For this, you can go to command line(Win + R and enter cmd) and specify the appropriate options, for example c:\windows\system32\cmd.exe /C start /affinity 1 software.exe. This will launch the software.exe application on core 0. This specifies the core number+1. 
The same command, the user can write to the application shortcut, which will allow you to run the utility without additional steps. For the same actions, you can use third-party applications. 
Bill2's Process Manager App
A very interesting utility that will help the user to better control the resources on his computer. With the help it will be possible set priorities execution for each of the utilities on the computer, which will allow optimal use of resources. 
Here you can restrict programs on consumed resources. If there are utilities that take up a lot of memory, then you can impose a limit on them and allocate only a certain amount for their execution. The same program will allow you to create rules not only for active programs, but also for minimized ones, which will allow you to optimize your work even better. It is also possible to configure what to do in case the program freezes. You can wait a while, or you can restart it. 
Mz CPU Accelerator Program
A good program that automatically adds the highest priority the window that is used in this moment. This allows you to make sure that the current process does not slow down and runs without delay, so that it will be convenient for the user to work, and resources will be allocated to other programs on a residual basis. 
AT section Exclusions you can set exceptions for some processes, the program will not change their priorities in any case. But in CPU Manager, just the function of interest to the user is found. With help, it will be possible to distribute programs across cores, which can improve efficiency, and can also be much more convenient for users who often have many programs running in the background.
CPU Control Utility
The installation is standard and you can not change anything. After installation, you should immediately go to options and select the Russian language, as well as tick the items minimize, automatic launch, as well as kernels for devices that have more than 4 cores. 
After that, you can proceed to the main settings window, in which you can make several profiles for distributing processes among the cores, they can be changed, depending on which one is needed more today. 
Can you turn on auto mode and leave everything to the discretion of the program.
The program does not see the processor
In some cases, there may be no processes in the list. It means that utility is not compatible with the processor type set by the user. In this case, it would be best to use one of the alternative programs.
In 2005, Intel released the first 2-core CPU for personal computers, the Intel Pentium D, laying the foundation for multi-core computing for home programs and applications. Modern CPUs have more cores and computational threads than back in 2005. For example, Intel Core The i7-8700 has 6 cores and 12 threads. In this article, we will show you how to enable all processor cores on Windows 10.
Run all CPU cores Windows 10
Default, Windows systems use the full power of the CPU to achieve the best performance. But if your computer crashes or is exposed to viruses, the number of running threads may differ from the maximum.
First, let's check the CPU for "multi-core".
Open Device Manager (Win+X) and expand the Processors list.
If you do not have a multiprocessor system (when the motherboard allows you to use more than one CPU, it is found in the server segment of computers), but the number of all processor cores (and physical and logical threads) will be displayed.
You can also check the specification of your CPU on the manufacturer's website - Intel or AMD.
You can also check the quantity through the editor Windows Registry. Open the registry editor (regedit) and follow the path:
HKLM\HARDWARE\DESCRIPTION\System\CentralProcessor
This branch will contain information about the version, model, revision, frequency and other CPU parameters.

You can configure the number of cores on Windows 10 in the System Configuration settings. To do this, open the Run window (Win + R) and enter the command msconfig.


We will see a window for configuring memory and processor cores.

By default, all checkboxes should be unchecked (the number of cores is indicated as 1) and these options are inactive. To activate all cores Windows processor 10, check the "Number of processors" box and in the drop-down menu, select the maximum available number (in our case it is 8).
Click OK and reboot to apply changes to the system.
You can enable the second core of the Windows 10 processor in the same way by setting the value to 2 or unchecking the "Number of processors", in which case the number will be determined based on the UEFI (BIOS) data.
Connect all Windows 10 CPU cores via UEFI
You can change the number of cores not only in the system parameters, but the UEFI (BIOS) of the motherboard can also help with this.
Depending on the parameters of the CPU and the manufacturer of the motherboard, the settings may vary significantly. Motherboards above the budget level allow you to fine-tune the operation of the internal processes of the system, from the speed of coolers to overclocking the CPU and memory.

Using the Asrock Z68 motherboard as an example, the Advanced - CPU Configuration settings will allow you to configure the number of active cores and enable / disable Hyper-Threading and set desired settings for the CPU.
Hyper-Threading is an Intel multi-threading technology. Allows you to use on one physical core - 2 logical computation threads. On four - 8 threads, etc.
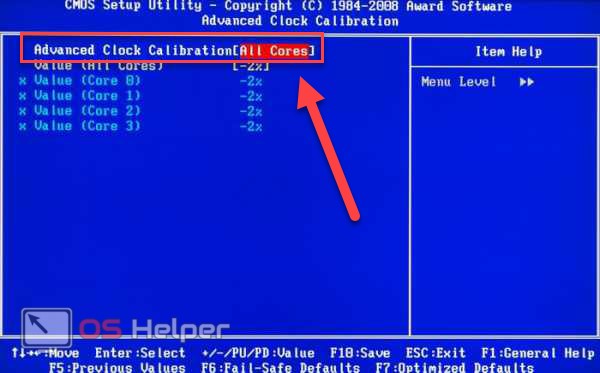
The Active Processor Cores setting is responsible for the number of active CPU cores. The image shows a choice between All (All), 1, 2 and 3, since the i7 -2600 is a quad-core.
By selecting the All value you will be able to use all the processor cores.
If you are wondering how to enable 2 or 4 cores on Windows 10 using UEFI, then in advanced settings CPU can be configured not only the number of cores, but also the number of threads.
It is worth noting that the functionality depends on the manufacturer of the BIOS version.
Unlock cores for applications
It is worth noting that applications are built on the basis of tools provided by Microsoft. Therefore, the application is created with the necessary conditions for using multithreading or a single core. If an application is built with a single core in mind, unlocking them all won't make any difference in performance.
But there are different cases where unlocking them helped fix some performance and lag issues. To do this, open the Task Manager (Ctrl + Shift + Esc) and go to the Details tab. Among a large number of applications, find the one you need and press RMB. Then, select set affinity and in the next window select "All Processors".

How to disable the processor core in Windows 10?
Using all the methods described above, you can disable the CPU cores. This can help you with overheating, but only in extreme cases. We do not recommend disabling or enabling kernels unless necessary, otherwise you may encounter multiple system errors and BSODs.
How to unlock cores on AMD processors?
CPUs of the Phenom II, Athlon X2, Athlon II, Sempron families have hidden potential in the form of locked cores. The essence of hidden cores is to reject CPUs with more of them (indicators do not fit into the standard, errors, overheating, etc.). For example, you buy a 2-core CPU, which has 4 of them physically, but they are not active.
Unlocking and activation depends on several factors, such as the desired CPU model, chipset, or motherboard northbridge. Most detailed information on this topic, you will find on the overclockers forums.overclockers.ru. There is a lot of information provided there and in case of questions or difficulties, you can clarify immediately on the forum.
Have a great day!
Hello everyone, my dear friends and guests of my blog. Today I will tell you how to enable all cores in windows 10 on your computer in order to slightly improve the startup speed of your computer. By the way, a question for you right away: Do you know how many cores your PC processor uses when you work on it? Two? Four? Eight?. The answer is waiting for you in the article.
Probably, none of you will be surprised by such a phrase as the processor core. And rightly so, because now is not the time. Therefore, in this article I will not tell you what it is, what they are for, etc. I just want to ask you if you know how many cores you have specifically? If not, then I will tell you several ways.
Windows Internal Tools
AIDA64
You can also refer to third party program, for example AIDA64. After downloading and running it, go to the item « Motherboard» - "CPU" - "MultiCPU". Count the number of positions in this paragraph, and you will find out the total number of cores.
Speecy
Another wonderful and free program — Speecy. I already considered it when we checked. Here you will need to go to the CPU section, and then pay attention to the "Threads" item. This is exactly what we are looking for

Enable all cores
In order to use all the kernels you have to boot the system, you will need to call ( Win+R) and write msconfig there. After that, we are looking for a tab, where we click on the button « Extra options» .

As you can see, by default there is no check mark next to the item "Number of Processors", which means that only one is used by default. In order to change this whole situation, you need to check the box and select the desired number of processors from the drop-down list.

Will the PC speed change after this manipulation?
I hasten to upset you, no matter what myths go about this method, it does not affect the speed of work in any way. This feature only affects the system boot, since by default only one processor is used for this business. But when the system is already loaded, but all the other cores come into play, and each of them works in its own way, at a different frequency.
That is, if one core is enough to complete a task, then there is no point in using the rest. And if the tasks are more difficult, then other comrades come into play.
In general, if I were you, I wouldn't bother with this at all. It is better to pay attention to other points so that yours.
That's basically all I have. I hope you enjoyed the article and don't forget to subscribe to my blog updates if you haven't done so yet. Good luck to you. Bye Bye!
Sincerely, Dmitry Kostin.
Personal computers and laptops with multi-core processors have enormous computing power. Thanks to the parallel operation of all cores, the device is able to show impressive performance in computer games and programs. In this article, we will figure out how to enable all cores on Windows 10, which applications can be used to view information about the processor, and so on.
Depending on the workload of the computer, the level of employment of each core may differ from the others. In addition, each core is able to operate at a separately set frequency due to BIOS settings or software motherboard. The load on the computer is distributed evenly, which is why you get high performance.
There is only one case where a dual-core processor will not use the second core, and this is the PC power-on procedure. The BIOS uses only one core to start the operating system and make the computer ready. You can use all the resources and speed up the process of turning on the computer a little. However, you should not expect significant changes - you need to achieve faster PC turn-on by other methods (for example, install it on an SSD).
Ways to turn on
You can activate all 4 cores in a 4-core processor when you boot your computer in the following ways:
- through standard means systems;
- through settings
The instructions below are suitable for 32 bit and 64 bit OS. Home, Pro and Enterprise editions are supported. In order for the computer to start using all the power at startup, you must perform the following operation:
- Go to the Run app Win keys+R. Enter the line "msconfig" and press Enter to run.

- In the window that opens, you will see the "Download" tab.

- In it, you need to select your OS and click on the "Advanced boot options" button.

- Check the "Number of processors" checkbox and set maximum amount nuclei. You also need to increase the "Maximum Memory". The "PCI Blocking" setting must be disabled in order for the computer to distribute the load among all the number of cores evenly. To complete the settings, close the window with the OK button.

Tip: you can not set the maximum amount of memory below 1024 MB, so as not to achieve the opposite effect - slowing down the computer.
After saving the settings, you need to see how many cores are working now. If all parameters are reset, then reduce the "Maximum Memory" and test again. In order not to repeat this procedure, in the "System Configuration" window, check the box next to the item "Make these boot settings permanent" and complete the work with the "OK" button.
In BIOS
It is worth warning that changing the BIOS settings is only recommended if your personal computer has stopped booting. Without minimal knowledge, we do not advise you to use this method if the above works.
So, to enable a multi-core processor, you must:
- Launch the BIOS menu. This is done when the computer is turned on. On different motherboards a separate key is responsible for launching. On most computers, these are Del , F1 , F2 , F10 and the like system buttons. On the loading screen, you will find information about your key.

- In the BIOS menu, you need to open the "Advanced Clock Calibration" section. Here you need to set the parameter "All Cores".
- To save and reload, press F10 and confirm with the Y key.
Now you know how to make a computer boot using all processor cores.
How to find processor data
You can find out how many cores your PC has and what characteristics the CPU has in the following ways:
- standard OS tools;
- third party utilities.
First, let's deal with the built-in features operating system.
general information
You can view information about the processor and its characteristics as follows:
- Go to "Settings". To do this, right-click on the "Start" icon and click on "Settings" in the menu.

- Next, go to the "System" section.

- Now open the subsection "About the system".

- In the list of all information, find the marked line. Here are the name and frequency of each of the nuclei.

You can learn more about the equipment through the "Device Manager". All ways to open this program are presented below:
- To open the "Device Manager", in the search bar, enter the appropriate query.

- You can also run the program through the "Control Panel". Open it in any convenient way, and then go to "Hardware and Sound" (1).

- Next, click on "Device Manager".

- AT command line you need to type "mmc devmgmt.msc" to start the "Device Manager".

The application window looks like this:

In it, you need to expand the "Processors" branch. The screenshot shows a 4-core device because you see 4 identical lines. Right-click on one of the lines and select "Properties". In the window that opens, you can find all the information on the processor.
Third Party Utilities
If you are not satisfied with the functionality of the "Device Manager", you can install one of the third-party utilities. The most common are CPU-Z, AIDA64 and Everest.
CPU-Z can be downloaded from the official website at the link. When you first start the utility will collect data about your PC configuration. In the first tab, all information about the CPU:

In the remaining tabs you will find a detailed description of other equipment. For example, the SPD will contain a detailed description of the RAM (Module Size, Manufacturer, and so on).
The AIDA64 program is downloaded from the creators resource. In the left part of the window, you need to open the "System board" branch and go to the CPU subsection. The Multi CPU column will indicate the number of processors:

The last utility is Everest. It is very similar to the previous software. It also contains all the information you are interested in about the CPU located in the "Motherboard" section:

Results
Enabling multithreading is only possible for the start operation personal computer. In all other cases, the CPU uses all resources at the same time, so the need manual setting disappears.
Video
Below is a video tutorial with detailed description all actions and operations from this article. With the help of a visual aid, you can understand the points and steps of the manual that are incomprehensible to you.
Like
Like
tweet
Optimizing cores and memory with MSConfig
The advice is based on the assumption that Windows does not use all of the processor cores and megabytes of RAM when it boots. Allegedly, you need to specify the right amount so that the computer turns on faster using the "secret" setting.
It is done like this: Start - Run(Windows 10 has a search field instead of Run) - msconfig OK.
The program will start system configuration(msconfig.exe) tab :
Need to press Extra options, to open Windows Boot Options:

Until the crazy pens got to the settings, nothing will be indicated here, no checkmarks will be marked. Why would Windows developers limit system performance?
But people who are not familiar with critical thinking think differently: initially, the checkbox is not set, so the restriction is enabled. Allegedly, the absence of checkmarks prevents the operating system from knowing how many cores the processor has and how much RAM is installed. And supposedly you need to specify manually:

And after rebooting, the computer will start using all the resources.
This advice has several options. I went through the sites dedicated to Windows optimizations by selecting multiple.
For example, a certain Yuri believes that the default is to boot from one core:

Others remember about RAM. PC Master's Blog claims it has the same problem.

The beginning of the council
I cut off part of the text so that there is no long screenshot, but even so it is clear that the author knows nothing about the stages of loading the operating system, nor, in principle, about how modern computing devices work. Here's what he advises next:

Here it is advised to specify not only the number of cores, but also the size of the memory. And at the end they say you cantake off tick.
Where is the logic? An option is set, then disabled, how can this affect anything in principle?

Where is the myth from? I suppose the point is not only in the ignorance of the advisers' materiel, but also in the ambiguous official MSConfig help. See the article MSConfig the System Configuration Tool on the official Microsoft website. The description of the options really leaves room for speculation if you don't know the context:

Translation: “If you click on Advanced Options (in any OS), you can set options such as the number of processors allocated to the operating system at boot or the maximum amount of RAM. (As a rule, usually not noted).
The text does not contradict the myth: indeed, you can specify how many processors and RAM to use at boot. But these options are not intended to improve performance.
In fact Windows always uses all processors and processor cores and all working memory. No one thought to limit the system, and even at boot time.
Options in msconfig are needed by programmers to test programs in order to restrict available PC resources.
In what delirium can it be argued that Windows does not use all possible resources when loading a computer? After all, it is in the interests of Windows developers to make the computer turn on as quickly as possible. Restrictions are stupid.
Some "geniuses" are trying to prove that the "Number of processors" option speeds up the computer, because with the value 1 games start to slow down. There is no logic to be found in this. When the limit per core is enabled, performance decreases (this is especially noticeable in games), but restrictions are disabled by default and programs are free to use all the cores as they please.
Fortunately, this advice is harmless. Setting the maximum values does not affect the operation of the computer in any way, because the result is the same as with the settings turned off. That's when you add RAM to your computer or install a processor with a large number of cores, you will again have to change the settings in msconfig to the maximum.
Force game to use all CPU cores
The next myth is more difficult to explain. The fact is that programs do not work at all as it seems to PC users. The work of software with processor cores and multiprocessor systems is the topic of books that are of no interest to non-programmers.

Therefore, people just look at the CPU consumption in the Task Manager and do pointless attempts to optimize something. For example, they try to adjust parameters like the previous setting so that their favorite program loads all the processor cores at 100%.
It's akin to using phone cases to protect the body from harmful radiation. People who know physics will only twist a finger at their temples, while the rest buy cases in packs and recommend them to friends.
But back to the work of programs on multi-core processors. On the border of knowledge and ignorance, a crazy idea arose use CPU program Control to assign games to all cores.
The Council met ten years ago. For example, when discussing the game Gothic 3:

In the screenshot above, the user s063r considered that the game does not use the second processor core. cipherval replied that you need to use the CPU Control program.
What is this miracle beast?, which gets into programming code and forces the program to change the logic of its work? Here's what the utility looks like:

Seeing this miracle Yudo, I grabbed my head: how stupid the developers did, making it so that at startup everything running programs are automatically "assigned" to the first processor core!
See the "CPU" column when starting CPU Control:
One and three zeros mean that only the first processor core is assigned to the program. And it's happening after launch most utility. What before the startup situation was different, you can’t see it with CPU Control. You can, of course, start the Task Manager before all the manipulations and look at the assignment of processes to the cores, but who nowadays thinks critically and checks the operation of programs?
The false advice goes like this: programs run on only one core, as can be seen by running CPU Control. And there you can assign the program to use all the processor cores.
This one is like shooting yourself in the foot and being treated with bandages. Or maybe you should not shoot at all and everything will be fine?
The myth is very tenacious, because sometimes it helps: if the running software heavily loads the processor (most often these are viruses), the assignment to only one core limits the resources available to the malware and allows the rest of the processor cores to work for the benefit of the game. But this is a symptom treatment, not a solution to the problem.
In fact, before the launch of CPU Control, there were no restrictions on one core. The program puts it on startup. Installing a separate program on all cores returns the default setting. Only and everything.
How should you really set it up? But no way. Ask the authors of the program / game to rewrite their creation for multi-core systems. Not all software can use all processor cores, this cannot be influenced from the outside. Better get busy