There are hundreds of image formats, but only a few are supported by web browsers. In this article, we will describe the various graphic file formats that are available to web designers and in which case they should be used.
Graphic file formats that are supported by most popular web browsers are: Graphic Interchange Format (GIF), Joint Photographic Experts Group (JPEG), Portable Network Graphics (PNG) and Vector graphics. Some properties of graphic files:
- Transparency - this property allows the image to be in varying degrees of transparency from a solid state to completely transparent.
- Compression - this property allows the image to be saved in much smaller file, using mathematical algorithms to treat a group of pixels as a single element.
- Weave - allows the image to be loaded first on odd lines and then on even lines. This allows the visitor to see the image sooner.
- Animation - creates the appearance of movement through a series of successive shots. Animated GIF does not require a browser plugin and can work on almost all devices.
- Progressive loading is similar to weaving in that it only loads part of the image initially, but not based on alternating lines.
GIF was founded in 1980 and adopted by web designers in the early 1990s as the main graphic format for web pages. GIF files use a compression algorithm that makes the file size small for fast loading. GIF is limited to 256 colors (8 bits), supports transparency and interlaced graphics. It is also possible to create animated graphics using this format. All browsers can display GIF files without problems.
Benefits of GIFs:
- Most widely supported graphics format
- Diagrams look better in this format
- Transparency support
The files are compressed but support "true colors" (24 bit) and are the preferred format for photographs where quality is very important. JPEG supports the progressive format, which allows you to almost instantly see the image, which will improve in quality when the download is complete.
Unlike GIF files, web designers can manage compressed JPEG files, which allows for different levels of image quality and file sizes.
Advantages of JPEG:
- Greater compression means faster download speeds.
- Produces excellent quality for photographs and intricate drawings.
- Support for 24-bit color.
PNG is a relatively recent format that has been introduced as an alternative for GIF files. PNG supports up to 24 bit color, transparency, weave and can contain a short text description of the image that is used by search engines.
Benefits of PNG:
- Overcomes GIF's 8-bit color limitations
- Allows text description of images for search engines
- Supports transparency
- Schematics look better than JPEGs
Vector graphics
Most web graphics are bitmap or a pattern that consists of a grid of colored pixels. Illustrations must be created in vector graphics, which consists of a mathematical description of each element that makes up the line shapes and colors of the image. Vector graphics are created by using programs such as Adobe Illustrator or CorelDRAW. Vector graphics must be converted to any GIF, JPEG or PNG format for use on web pages.
What format should be used?
A web designer can choose either GIF or JPEG format for most uses. But, since GIF files tend to be small compared to JPEG file sizes, most web designers will use the GIF format for backgrounds, boxes, frames, and any other graphic that looks great with 8-bit color.
Most designers will choose the JPEG format for photographs and illustrations where compression does not compromise the visual quality of the image.
A single tag is used to insert an image into the text of a Web page. (Table P 1). The attributes of this tag set all the parameters of the image placed on the page. Mandatory is the SRC attribute, which specifies the address and name of the graphic file. If the SRC attribute is not set, then only a blank image icon will be displayed.
Tag Structure with the SRC attribute looks like:
.
If the graphic file named Institute is located in the same folder as the Web page, then to place it, you should write:
.
File name Format
To place a graphic file named MINSK, located at D:\Collection\Cities\MINSK.GIF, write .
With a tag the Web page hosts a graphic file located on another computer in the global network "Internet".
To create a Web page with a photograph of our institute, which is shown in fig. 4.1, you need to enter the following HTML code:
Our Institute

Rice. 4.1. Web page with a photo of the Institute
In the above example, the height of the photo (HEIGHT) is 200 pixels, and the width (WIDTH) is 300 pixels. To place the photo, a paragraph is created with center alignment.
horizontal lines
Placement of horizontal lines on a Web page is carried out using a single tag
. The SIZE, WIDTH, COLOR, and ALIGN attributes change the thickness, width, color, and alignment of lines, respectively.
Consider a few examples explaining the placement of horizontal lines:
1.
- horizontal line full page 2 pixels thick.
2.
WIDTH = "200" ALIGN="RIGHT"> – horizontal green line 15px thick, 200px wide, right-aligned.
3.
- a horizontal line of blue color on the entire page with a thickness of 25 pixels.
4.
WIDTH = "300" ALIGN = "LEFT"> – a red horizontal line 20 pixels thick, 300 pixels wide, left-aligned.
The line mapping for the four recorded examples is shown in fig. 4.2.

Rice. 4.2. Lines on a web page
TABLES
Creating tables
The table is created using paired tag
in HTML code.
Every table is made up of rows, and rows are made up of cells. The following tags are used to form table rows and cells:
These tags are written inside the pair tag
The table is formed line by line - first one line is specified and the required number of cells is indicated in it, then the second line, etc.
In order to get the table shown in Fig. 5.1, you need to type the following HTML code:
| Cars | Price | Ford | 5000 | Golf | 6000 |
|---|

then the thickness of the outer border will be 6 pixels. In order for the table borders not to be displayed, it is necessary to assign a value equal to 0 to the BORDER attribute, or simply omit this attribute.
As mentioned, HTML today is the basis for writing any web page in world wide web. At using CSS generating code for HTML language changes radically. Can say goodbye to repurposing clumsy HTML tags just to get one or the other visual effects. About certain HTML tags or attributes, such as the deprecated tag...
home
Order a website and do business!
This phrase can be heard and seen on many sites, and it's not in vain!
Website — is the face of the company. And it is the most modern and effective channel of communication with a potential consumer. Only the capabilities of the Internet site allow you to fully use all the ways to convey an information message to the user. Text, audio and video information can be submitted within one site to familiarize the consumer with them.
By using software site, you can accept payments, talk on the phone, maintain databases, send and receive faxes, exchange SMS messages and do many other things. A modern website is an information center not only for any company, but also for any Internet user.
And this is a win-win way of effectively and at the same time simple and visual presentation of your ideas or developments to the widest audience. And today, Web documents written in the HTML hypertext markup language continue to be the main form of data representation in the Web environment.
The main advantages of HTML are:
- simplicity that allows you to learn HTML in the shortest possible time.
- the ability to create your own web pages
- and HTML works exactly the same on all platforms that exist today, no need to buy additional hardware. And it is enough to use any available text editor, such as Notepad.
In this site, I tried to describe in detail the entire process of creating my own Web site, namely, publishing a finished project on the Internet in order to provide access to it to all users.
I hope many of my articles will be very useful, because I myself am not a programmer, but I am very inspired by this work.
This tutorial looks at how to decorate a web page by adding graphic images. We will get acquainted with the most common image formats, find out which tag is used to add images to the page, deal with alternative captions and text and graphics alignment. We will also get acquainted with the main attributes of images and learn how to adjust the width and height of the image. Next, a few words about using images as links and what image thumbnails are. We conclude with a few general tips for using graphics on a web page.
Adding images to a web page
If the web page contains nothing but text information, it may seem interesting to someone, thanks to the information presented on it, but it is unlikely that anyone will turn their tongues to call it attractive. Adding images to a web page is very easy. Adding graphics that can give the page a professional look requires some knowledge. What, in fact, is the subject of today's lesson.
The two most commonly used image formats on the Internet are GIF and JPEG. Developed and named by the JPEG (Joint Photographic Experts Group) group, it is generally used to save images with smooth color transitions, such as photographs.
Almost all other graphic elements are saved in the GIF (Graphics Interchange Format) format, a graphic data interchange format. There is currently another new graphics format that is gaining popularity: PNG (Portable Network Graphics). network graphics). It is expected that over time it will replace the GIF format. However, do not rush to resave all your graphic files in this format, while it is still not supported by all browsers.
All images are added to a web page using the same tag, called the image source tag  . Probably by now you can already determine what this entry consists of the actual tag
 , its attribute (scr) and the value of this attribute (location). However, since the use of the scr attribute is required, it is more convenient to refer to this entry as a single generic tag. You probably also noticed that there is no corresponding end tag for the image source tag. This is a separate self-contained tag, so don't forget to add a trailing slash at the end of it:
.
#1058;D XHTML 1.0 Transitional//EN" "http://www.w3.org/TR/xhtml1/DTD/xhtml1/transitional.dtd"> First Images e> This graphic has been added to my first web page.p > 

Adding Alternative Labels
While surfing the Internet, you have probably noticed more than once various inscriptions displayed when you hover the mouse pointer over some graphic element of a web page. These inscriptions usually communicate some Additional information about the image itself or about the area of the page it occupies.

The following HTML code example shows how the alt attribute is added inside the tag . Like the src attribute, the alt attribute tells the web browser some additional information about the image, and it can also always be used in conjunction with a tag.
.
The alt attribute defines alternative text for a graphic added to a web page. This text is called alternative text because it can be displayed on the screen as an alternative to the image itself. The alt attribute has another very important purpose. Many Internet visitors using low data rate access channels can instruct their browsers not to download or display graphic information. This allows them to speed up the loading of web pages on their computers.
Also, remember that not all browsers are capable of displaying graphics in their windows. For example, the Lynx browser does not support this feature at all. Thus, the alt attribute allows the web designer to be sure that if the visitor to his web page does not see an image on his screen, he will at least be able to read the text information added to this image.
Although the alt attribute can be defined for each tag , be careful not to assign inappropriate text messages to some graphic elements. For example, it does not make sense to add alternative text labels to various elements external design web pages. To avoid such errors, you can set the alt attribute of such elements to an empty value (alt=” ”). If you don't set any other attribute values, the browser will render the image at its original size, aligning the top edge of the image with the top edge of the adjacent text string. You can change both of these settings using style sheet tags.
Image attributes
For Tag Attributes are provided that allow you to change the size of the image. Some of these attributes are listed below.
height- Specified in pixels or percentages - Specifies the height of the image
width— Specified in pixels or percentages — Specifies the width of the image.
Image Height and Width Adjustment
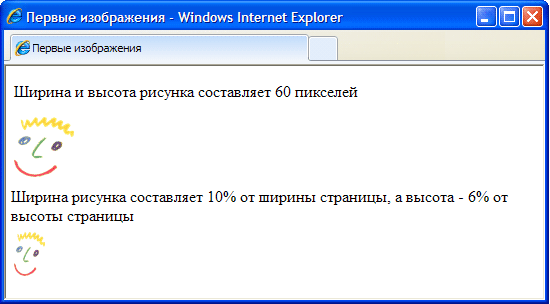
The dimensions of an image placed on a web page can be specified using the height and width attributes. 3the values of these attributes are set either as fixed quantities pixels, or as a percentage relative to the page dimensions. Take a look at the HTML code below. In the first tag sizes original image, which you have already seen in the previous images of this tutorial, are set to 60 pixels vertically and 60 pixels horizontally. In the second tag, the width of the same image is set to 6% of the page width and the height to 10% of the page height. The figure shows how both of these images look in the browser window.
When displaying an image in its window, the browser handles both pixel and percentage values equally well. Be aware, however, that your web page visitors' computers may be set to a different screen resolution than the one set for your monitor. What follows from this? For example, the monitor resolution is set to 800x600. In the previous example, the graphic added to the web page was set to a width of 6% of the page width, which would be 48 pixels at this resolution. If you view the same image on a monitor with a resolution of 1024x800, the specified 6% of the page width will already correspond to a width of 61 pixels.
When resizing an image, remember to set both values to match its height and width. If you change only one of these values, the image itself will be stretched vertically or horizontally on the screen. Alternative option consists in adjusting the size of the image by means of a graphic editor.
You can create the illusion of faster image loading. Regardless of whether the image is resized or not, always specify values for the height and width attributes, as they will tell the browser important information about how much space should be allocated on the page to accommodate a given image. In this case, the browser will be able to indicate the space required for the image and continue building other elements of the page without stopping loading the image itself. In this way, the page appears to load faster because its visitors don't have to wait for the image to fully load to finally see the other information presented on the page.
If you really want the image to take up a certain amount of space across the width of the page, use percentages. In this case, on the screen of any monitor, the image will occupy the same part of the page as on your screen. If you want to keep the resolution of the picture itself (its size in pixels) constant, use values expressed in pixels.
Aligning text and graphics
The align attribute of the tag allows you to align the image to the right (right value) or left (left value) edge of the text string. Examples of how to use this attribute are shown in the figure.
The same attribute can also be used to align the image vertically (again relative to the text line). It can take three other values top, bottom and center. If the align attribute is set to top, the top of the image is aligned with the top of any surrounding text. If the align attribute is set to bottom, the bottom edge of the image is aligned with the bottom edge of the surrounding text. If the align attribute is set to center, the center of the image is aligned to the center of the text string.
Using Images as Links
Images are good for more than just web page design. They can be successfully used as hyperlinks to other documents. In HTML, this task is easy, because images are converted into hyperlinks in exactly the same way as labels. To do this, you must also apply the tag, enclosing the element of the web page in it, which should become a link to another document. Thus, if a hyperlink is to be followed after clicking on some image, the tag must be enclosed in the tag of this image.
In this case, after a web page visitor hovers over this image, the text message "This is my self-portrait!" will be displayed next to the cursor. Clicking on the image will open the DOC2.htm document pointed to by the hyperlink.
Image thumbnails
Another common way to use HTML's hyperlinking capability is to use one image to navigate to another. What is it for? The fact is that quite often the size of the images that you want to publish on a web page is too large, and there is no guarantee that visitors will have the patience to wait for them to finish downloading. In such cases, a smaller copy of the original image, called a thumbnail, is created, which the browser can load much faster. If the visitor is interested in the image and wants to download its full copy, he will only need to click on this thumbnail. Here's what the corresponding HTML codes look like.
As you can see, clicking on the thumbnail.jpg image will open another image file (image.jpg). Text string, given as the value of the alt attribute, tells the visitor how to open the main image.
Secrets of successful use of images
Images are interesting and attractive, carry a lot of visual information and they are very easy to add to web pages, but there are still some rules that you should follow if you really want to create a site that will become popular among Internet users.
The larger the image file size, the longer it will take to download it to the user's computer. Since the majority of Internet users still use low-voltage communication channels to access the network throughput, the sizes of uploaded files are still of fundamental importance for them. Be sure to take this into account and try to place images on your web pages as small as possible.
Not only the file sizes of an individual image are important, but also the total file size of the entire HTML document. The more images that are added to a web page, even if they are small, the larger the file size of the final document will be. Complete preview your page in different browsers and estimate how long it takes each browser to download it.
Since the alt attribute is so important (because it is recommended to define it for each tag , be careful when using it. Make sure that the content of the text message always matches the image itself, otherwise your page visitors may be misled. The same remark applies in reverse: make sure that the images correspond to the textual information presented on the web page. A photo of an airplane would be appropriate on an air travel site, but completely redundant on a wildlife site.
On the Internet you can find many interesting images and easily save them to your computer. However, many of these images are protected by copyright. If you find an image you like on a commercial site, check if there are any copyright notices there and if the image is available for free use.
If the image displayed on the web page is not protected by copyright, you can copy it to your computer's memory. To do this, simply click on this image right click click and select Save Image As from the menu that opens. After saving the image on your computer, you can use it further like any other drawing.
Adding an image takes place in two stages: first, a graphic file is prepared in desired format and the desired size, then the file is displayed on the page using the element Two formats are widely used for web graphics - PNG and JPEG. Their versatility, versatility, small volume source files with sufficient quality for the site, they have served them well, in fact, defining them as the standard for web images. In addition to them, GIF and SVG formats are used on sites. PNG-8 (Portable Network Graphics, portable network graphics) is a free format created to replace GIF, in which for a long time proprietary algorithms were used.
.
File formats
PNG-8 format
Peculiarities
- It uses an 8-bit palette (256 colors) in the image, for which it received the number eight in its name. In this case, you can choose how many colors will be saved in the file - from 2 to 256.
- Unlike GIF, it does not display animation.
Application area
PNG-24 format
PNG-24 is a format similar to PNG-8, but uses a 24-bit color gamut. Similar to JPEG, preserves the brightness and tint of colors in photographs. Like GIF and PNG-8, preserves image details such as line art, logos, or illustrations.

Peculiarities
- Uses approximately 16.7 million colors per file, which is why this format is used for full color images.
- Supports multi-level transparency, this allows you to create smooth transition from the transparent area of the image to the color area.
- Due to the fact that the compression algorithm used keeps all colors and pixels in the image unchanged, when compared with other formats, PNG-24 has the largest final size of the graphic file.
Application area
Photos, drawings containing transparent and translucent areas, drawings with a lot of colors and sharp image edges.
JPEG format
JPEG (Joint Photographic Experts Group) is a popular image file format that is widely used to create websites and store photos. JPEG supports 24-bit color and keeps the brightness and hue of colors in photos intact. This format called lossy compression because the JPEG algorithm selectively rejects the data. The compression method can introduce distortion into the image, especially if it contains text, fine details, or sharp edges. JPEG format does not support transparency. When you save a photo in this format, transparent pixels are filled with the specified color.

Peculiarities
- The number of colors in the image is approximately 16.7 million, which is quite enough to save photographic quality Images.
- The main characteristic of the format is "quality", which allows you to control the final file size. Quality is measured from 0 to 100, the higher the value, the better the picture is, but the file size also increases.
- Supports a technology called progressive JPEG, in which a low-resolution version of an image appears in the viewport before the image itself is fully loaded.
Application area
Mainly used for photographs. Not very suitable for drawings containing transparent areas, small details or text.
GIF format
GIF (Graphics Interchange Format) is a graphic file format widely used for creating animated images. GIF uses 8-bit color and effectively compresses solid colored areas while retaining image detail.

Peculiarities
- The number of colors in an image can be from 2 to 256, but it can be any color from the 24-bit palette. GIF file may contain transparent areas. If a background other than white is used, it will show through "holes" in the image.
- Supports frame-by-frame change of images, which makes the format popular for creating simple animations.
- Uses a lossless compression method
Application area
Text, logos, illustrations with sharp edges, animated graphics, images with transparent areas, banners.
SVG format
SVG (Scalable Vector Graphics) - vector format, in which the image does not consist of pixels, but of objects and curves. For this reason, it is not suitable for raster photographs consisting of dots, but it is excellent for illustrations containing distinct outlines.
Peculiarities
- Images in SVG format can be scaled as much as you want without losing image quality.
- The file size is usually small.
- Supports animation and interactivity.
Application area
Text, logos, illustrations with crisp edges.
Adding an image
An element is used to add an image to a web page. , whose src attribute specifies the address of the graphic file. The general syntax for adding an image is as follows.

Both the src and alt attributes are required.
The src attribute sets the path to the graphic file; both absolute and relative addresses can be used to specify it. Next, consider a few different ways, how to determine the path to an image to place it on a web page. As an example, let's take a file called target.png , which is stored in the images folder of the site root.
http://example.ru/images/target.png
If the address begins with a protocol (http:// or https://), then it is an absolute address. The image will always load from specified address on the Internet, even if you save the web page to your local computer.
//example.ru/images/target.png
This is the absolute address of the image without specifying the protocol. The browser will independently substitute the required protocol on which the site is running (http:// or https://). Please note that these types of addresses do not work on local web pages, but only on the Internet under the control of a web server.
/images/target.png
If there is a slash (/) at the beginning of the address, it means that the images folder is located in the root of the site. One folder may be nested within another, so the path may increase. For example, /assets/images/target.png means that the assets folder is located at the root of the site, it contains the images folder, inside which the target.png file is located.
../images/target.png
The two forward slashes (../) indicate that the image folder is one level higher in the folder structure than the HTML document. On fig. Figure 1 shows the source.html file in which the target.png image needs to be inserted.

Rice. 1. File placement
images/target.png
The folder name without any dots at the beginning of the address indicates that the HTML document and the folder with the image are on the same level (Fig. 2).

Rice. 2. File placement
target.png
The single file name indicates that the image and the web page are located in the same place (Figure 3).

Rice. 3. File placement
Example 1 shows several ways to add a picture to a web page.
Example 1: Adding images
![]()
![]()


Alternative text
Alternative text is an important part of the images and is intended for visually impaired people who cannot see the pictures and receive information from the site using their hearing. Special screen readers read text from the site, and instead of images, they pronounce the text written in the alt attribute. In normal browsers, the alt content is shown only when images are not displayed on the web page for some reason.
The alt attribute should describe the content of the image, and if the image performs a decorative function and does not carry any meaningful meaning, then leave the alt empty (example 2).
Example 2: Using alt
![]()

If images require a visible cue, then you should use the global title attribute, which can be added to any element, not just images. When you hover over the image, text will appear containing the value of the title attribute (example 3).
Example 3: Using title
The appearance of the tooltip depends on the specific browser and cannot be changed. On fig. 2 shows a tooltip in the Firefox browser.

Rice. 2. Type of tooltip
Resizing a picture
To resize an element's image attributes width (width) and height (height) are provided. Pixels or percentages are used as the value. Example 4 shows how to add these attributes to
.
Example 4. Drawing dimensions
![]()
The width and height attributes are optional, after loading the image, the browser will automatically set its original size. Basically, these attributes are used for the following purposes:
- reserve a place for a picture;
- reduce the size of large photos;
- improve image quality for Retina displays.
If the image dimensions are specified explicitly, then the browser uses them to display the empty area corresponding to the image during the loading of the document. Otherwise, the browser waits for the image to load completely, and then changes the width and height of the image. In this case, text reformatting may occur, since initially the size of the picture is not known and it is automatically set to small.
The width and height of the image can be changed both up and down. The browser will automatically remove the extra pixels, or vice versa, complete the missing ones in order to get an image of the appropriate size. The quality of the resulting picture depends heavily on its content, in any case, we must remember that it is only possible to enlarge an image without loss of detail in a movie.
Retina displays have a high pixel density and image detail, so normal images look a bit washed out. To improve their quality, the pictures are doubled in size. For example, if a web page requires a photo with a width of 400 pixels, then we take a photo with a width of 800 pixels, but leave a width of 400 pixels in the value of the width attribute.
The width and height attributes do not have to go together. If any of these attributes is not specified, then the browser will automatically substitute the desired value based on the aspect ratio of the image.

Due to the fact that we independently substitute the width and height of the image, we can intentionally distort its proportions by stretching the image vertically or horizontally.
![]()
In addition to pixels, percentages can be used as sizes. In this case, the width is set relative to parent element.

There are difficulties with the height in such cases, because the height of the image as a percentage is only considered when the height of its parent is explicitly defined. If the height of the parent element is not specified in any way, then the entry like height="100%" is ignored.