Bootable flash drive with operating system image Windows systems, can be created using the UltraISO program. Why is it necessary to have such a bootable USB flash drive with the image of the operating system recorded on it?
When using the Windows operating system, unexpected problems may occur. The operating system may start to work, at best, with failures, and in the worst case, it will stop loading altogether. From such possible problems no one is insured, it is impossible to predict this in advance.
Sometimes, problems with the operating system can be corrected using the restore function of the Windows operating system. To do this, you will need to run, if, of course, this feature is currently functioning.
If you cannot start such a recovery using the standard means of the Windows operating system, then you can try to restore the system using a disk with the image of the operating system recorded on it, or use a bootable USB flash drive for this.
In most cases, serious problems can only be solved by reinstalling the operating system, if you have not done your data in advance. Therefore, it is always necessary to have a disk with an image of the Windows operating system. This disc can be used for new installation operating system, to restore the operating system, or reinstall it.
Benefits of a flash drive over a DVD
Usually, the distribution kit with the operating system is recorded on an optical DVD disc. But, storing an image with the operating system on such a disc is problematic, due to the fact that such a DVD optical disc is subject to mechanical damage. Just one scratch can cause an optical disc to fail.
The way out of this situation is to use a bootable USB flash drive with the image of the Windows operating system recorded on it. Installing a Windows operating system from a USB flash drive is no different from installing an operating system from a DVD.
A flash drive with an operating system written on it is more protected from mechanical damage than a DVD disc. In addition, it has a much smaller physical size, and can be moved more easily without fear of mechanical damage.
You can create a bootable USB flash drive using the UltraISO program, which is designed to work with disk images.
The UltraISO program is paid, but it has a free trial period. you can use free version UltraISO programs with a 300 MB image file size limit. You can find a solution to this problem on the Internet, where you can also find portable (portable) versions of the UltraISO program.
How to create a bootable USB flash drive in UltraISO
Now you will learn how to create a bootable USB flash drive on which the image of the Windows 8 operating system will be written. In exactly the same way, using the UltraISO program, you can write the image of the Windows 7 operating system to a USB flash drive.
In order to create a bootable USB flash drive in UltraISO, you need to open the UltraISO program as an administrator. After opening the program window, you should click on the "Open" button on top panel in the UltraISO program window.
Then, in the Explorer window that opens, you need to select the image of the Windows operating system for its subsequent recording on a flash drive.
In the "Open ISO file" window, select the operating system image file, and then click on the "Open" button. In this example, I chose to create a bootable USB flash drive with an image of the Windows 8 Pro operating system.

In the UltraISO program window, on the right side of the window, an image of the Windows 8 Pro operating system appeared.

Now you can insert the USB flash drive into the appropriate slot on your computer if it has not been inserted there before.
A flash drive that is designed to record an image of the Windows 7, Windows 8, or Windows 10 operating system must be at least 4 GB in size and formatted in file system FAT32. You can also format the flash drive immediately before recording the image of the Windows operating system using the UltraISO program.
Attention! If there is data on this flash drive that you do not want to lose, then you will need to copy it to a safe place. During the formatting of a USB flash drive, all data on the USB flash drive that has been formatted will be deleted.

After opening the "Write Disk Image" window, you will need to check that you have selected the correct disk to create a bootable USB flash drive. You will need to make sure that the flash drive drive is under the correct letter of the alphabet.
You can check the Check box to check for errors after burning to make sure that the system image is written without errors.
In the "Write method" item, you need to select "USB-HDD +", and then proceed to format the flash drive or burn the image of the Windows operating system.
If the USB flash drive has already been formatted before the process of creating a bootable flash drive, then you will need to click on the "Burn" button.
If the flash drive was not formatted in advance, then you should click on the "Format" button. Now let's look at the formatting process USB disk in UltraISO.

In the "Formatting" window, you must select the file system - FAT32, and then click on the "Start" button.

In the warning window, click on the "OK" button. After formatting, all data that was previously on the flash drive will be destroyed.

After formatting is completed, a window will open informing you about the successful completion of this operation. In this window, click on the "OK" button, and then close the "Formatting" window.
Now you will need to click on the “Burn” button in the “Write Disk Image” window to write the image of the operating system to start creating a bootable USB flash drive.
A Hint window will open, warning you that all the information on USB drive will be erased. In this window, click on the "Yes" button.

After that, the process of writing the operating system image to the flash drive begins. A bootable USB flash drive for the Windows operating system is being created.

The speed of creating a bootable flash drive depends on the readability of the USB flash drive and the power of your computer. After a while, the image of the Windows operating system will be written to the USB flash drive.
In the "Write Disk Image" window you will see a message - "Write completed!". A bootable flash drive for Windows 8 has been created.

Now you can close the UltraISO program, it has already done its job.
After that, you should open File Explorer and make sure that the image of the Windows 8 operating system has been written to the flash drive.

If you open the disk of the flash drive, then there you will see a recorded image of the Windows 8 Pro operating system.

The process of capturing an image of the Windows 7 operating system is exactly the same, and it is no different from capturing an image of the Windows 8 or Windows 10 operating system.
To install the Windows operating system, you will need to enable the BIOS boot priority for the operating system from a USB flash drive.
Article Conclusions
The UltraISO program will allow you to burn Windows on a USB flash drive to install the operating system on your computer. It is necessary to have a bootable USB flash drive, because no one is immune from sudden failures of the operating system or equipment. Therefore, an image of the operating system is needed so that you can use it in case of unforeseen circumstances.
Creating a bootable USB flash drive in UltraISO (video)
The UltraISO program quickly gained popularity among users due to its wide capabilities. Users can use it for free (by choosing a trial period) to burn, create, mount and convert images. Full version disables some restrictions that do not actually affect the above functionality.
This article will tell you how to use the UltraISO program. We have already used some of the program's capabilities earlier to create a bootable USB flash drive or create a disk image. And also UltraISO supports many various formats images, which makes it already very popular.
Before proceeding to write the system image to a USB flash drive, we recommend downloading a clean Windows image 10. Modified versions of the system several times reduce the security of the user and his data. You can only capture a system image in UltraISO if . It is recommended before recording in order to save all the necessary data earlier.
Select the system disk image by clicking File > Open. Go to section Boot > Burn Hard Disk Image… Then, if necessary, you can format the USB flash drive, then just click burn.
Mount image to virtual drive
Users have the opportunity not only to create virtual drive, but also mount images of various formats on a previously created drive. After mounting the image into a virtual drive, you can open it in Explorer. For more details see:.
- Go to section Tools > Mount to virtual drive(just press the F6 key).
- Specify the location of the disk image file and click the button mount.
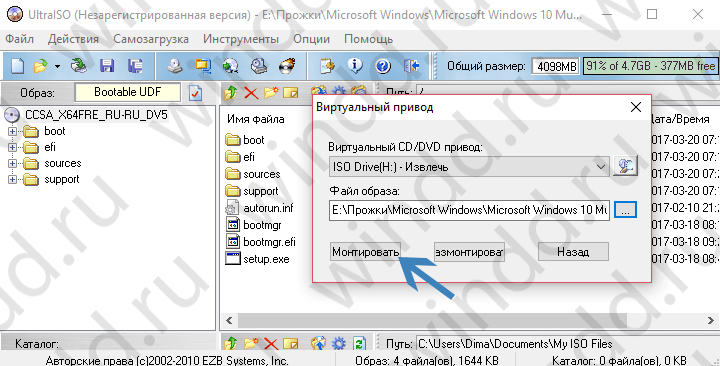 You may have to create a virtual disk in the UltraISO program settings. If there is no virtual drive, just go to Options > Settings > Virtual Drive, and specify the desired number of virtual drives. Then you will need to repeat the above steps to mount the disk image.
Convert disk image
The ability to convert unknown disk image formats to popular ones has been added to UltraISO. If you do not know what program to open an unknown disk image for you, you can try to convert it to a standard ISO file. A similar solution was offered when needed.

Create an image of any disk

Conclusion
Now most often users use the UltraISO program to write an image to a USB flash drive. Windows disk 10. A bootable flash drive allows users to perform complete reinstallation or surface installation of the system. Users, if necessary, also have the opportunity to burn disc images themselves to compact discs.
UltraISO is one of the most popular programs, designed to work with disk images. With its help, you can create, edit composition and properties, as well as extract files, make images from CD / DVD or files located on your hard drive. The program has clear interface Explorer style.
First, let's look at the installation process of the UltraISO program.
Double-click to launch the downloaded installation ISO file, the program installation start window will appear, click the Next button.
In the next window, you need to select a location to install the program (by default - C:/Program Files/UltraISO).

Then select the folder name from the Start menu and click the Next button.

Select additional tasks that should be performed during the installation of UltraISO, then click the Next button.

Settings completed. Click the Install button to start the installation process. Here you can still change something by clicking on the Back button.

After the installation process is complete, click the Finish button.

Working with UltraISO
- Ultra ISO has a number of advantages over other programs:
- The speed of creating and recording an image;
- Convenient interface;
- Wide functionality, with minimal load on the computer.
- Let's take a closer look at what UltraISO can do:
- Create images of CD/DVDs, USB flash drives, floppy disks, and images hard drives(image size no more than 50GB);
- It is possible to edit images (adding, deleting, changing folders and files);
- Ability to recognize more than 30 image formats;
- Optimization of the structure of the disk image, it speeds up its work and the time of creating an image from any files, CD / DVD disk or hard disk;
- Does not conflict with other emulators (Alcohol 52%(120%), Daemon Tools and etc.);
- Ability to create multi-boot disks, floppy disks, USB flash cards;
- The ability to write both a regular image and a bootable image to CD/DVDs;
- Support for most famous operating systems.
The functionality of the program is impressive, regardless of its simple interface.
Let's move on to working with the UltraISO program. Having launched the program, double-clicking on the program shortcut on the desktop, we will see the main working window UltraISO.

Above is the main menu of the program, a little lower - the panel quick start.

Now let's look at the most requested features of the UltraISO program.
1. Create a disk image.
We insert into the drive the CD or DVD disk, the image of which you want to make. Then we launch the UltraISO program, click the top menu item Tools -> Create CD Image, click on it and see the image creation settings menu.


Also this menu can be called from the quick launch bar by clicking on the Create CD image icon or by pressing the F8 key.
In the window that appears, select the CD / DVD drive (if there are several), just below we select the place where to save the created image. Next, specify the output format (I recommend *.ISO or .MDF/.MDS) and click the Make button. The speed at which an image can be created depends on the speed of the drive, the characteristics and type of the disc, the amount of data on the disc, and the power of the computer.


2. Download the disk image.
Before download virtual disk you may need to set the number of virtual drives (if you have enough 1 drive, you can skip this setting). Go to Top Menu in Options -> Settings. In the window that appears, select the Virtual drive tab at the top and in the Number of devices line specify the number of virtual drives. For my version of the program maximum amount virtual drives - 8. Select the number of drives you need, for example 2. By default, after installing UltraISO, 1 virtual drive is created.


Now, let's mount the image to the UltraISO virtual drive. Top menu, click Tools -> Mount to virtual drive, you can also click the desired icon from the panel quick access or press the key (F6).

In the window that appears, select the virtual drive where the image will be mounted, then select the image file, to do this, click the Browse button (the button with the image of three dots). Next, click Mount. It may take 2 clicks.

As soon as the inscription to load appears opposite the drive you have chosen, the window can be closed.

To open the mounted image, go to my My Computer and click on the virtual drive, you can also click on the virtual drive right click mouse and from the menu that appears, select UltraISO -> Auto play.

To eject a virtual disk that has become unnecessary, you need to right-click on the drive and select UltraISO -> Eject from the menu that appears.

3. Burning the created image to a CD/DVD.
This function very useful as it allows you to create personal boot disks operating systems, anti-virus boot disks, full game disks, etc.
To capture the image, you need blank disk and finished image. Then in the top menu, select the item Tools -> Burn CD image, or click the corresponding icon on the quick launch bar or press F7.


In the window that appears, select a drive to burn the image, write speed, write method - you can not change. In the Image file field, specify the path to the image that should be written. Then press the Record button and observe the recording process. At the end of the recording, your drive will open automatically, and an UltraISO warning will appear on the computer screen about the end of disc burning.
Often, when downloading games, programs, operating systems, users are faced not with the usual Install.exe / Setup.exe, but with files with the extensions iso, mdf / mds, nrg and others. Windows does not have applications to work with them and therefore requires a product from a third party. One of these is the UltraISO program.
It is worth noting that Windows 8 and 10 allow you to mount and view files with the iso extension. But you cannot edit or perform other actions with them.
What is UltraISO and where to download it
UltraISO is a program that allows you to create, edit and burn virtual CD images to physical media. It provides an opportunity operate on files ISO, MDS\MDF, NRG and others. In total, it supports about 30 different formats.
Minimum system requirements applications are very low:
- all versions Windows since 98;
- CPU: 166 MHz or better;
- RAM: 64 MB;
- CD/DVD drive;
- 10 MB free space on the winchester.
You can download the installation package of the program from the corresponding section of the official website.
Installing and activating the application
After downloading, you can proceed to install UltraISO. It is done like this:

When you first launch the program, a small window will appear prompting you to purchase license key , enter it or use trial period. To activate UltraISO you need:

This completes the activation procedure.
Interface
The Ultra ISO program window consists of 5 elements:

The menu bar provides access to all the functions of the application and consists of 6 sections:

The Quick Access Toolbar includes the most frequently used commands. Unfortunately, adding or removing buttons is not provided. To the right of the panel is an indicator showing the size of the image compared to the size of the physical disk.
The work area is divided into 2 parts. In the left the tree structure of the image is displayed. In the right- the contents of the folders selected on the left side with detailed information about each file. Above the right area there are several buttons that allow you to edit the contents of the directory. The Explorer area is similarly arranged.
AT status bar displays information about the developer and the total size of the files in the folder opened in the structure tree of each area.
Capabilities
An activated copy of UltraISO allows the user to perform the following operations:
- Create images from data located on a hard or optical drive, flash card, floppy disk.
- Edit content downloaded copy of the drive: rename, add, delete, move files and folders.
- Mount Image into a virtual drive and use it like a regular CD.
- Create bootable and multiboot media and flash cards.
- Convert one format to another.
- Compress files by converting to ISZ format.
The trial version also has these features, but maximum size The processed file is limited to 300 MB.
How to create a flash drive to install the OS
This is done according to the following instructions:

Wait for the end of the procedure. It takes an average of 10-15 minutes.
How to burn an image to a CD
This one is quite simple:

Creating an image from a CD/DVD
You need to adhere to the following algorithm:

Creating an image from files on a hard drive
It is done like this:

Mounting an image to a virtual drive
To "paste" an image optical disc in the virtual drive you need:

This completes the mounting procedure. If a copy of the drive contains autorun elements (installing a game, for example), then it can be called up with the "" button located to the right of the list of virtual drives.
How to extract files from an image
In order to do this you need:

This completes the process of extracting documents from the virtual disk.
This popular software allows users to work with ISO images. With it, you can modify the downloaded images of programs and operating systems, as well as create your own. Particularly convenient is the ISO editing function without first unpacking. This allows you to significantly save time spent working with files. This article describes how to use the UltraIso utility, as well as install and activate it.
Download and install the application
Before using UltraIso, it must be installed. For this you need:

Activation
This utility is paid, so you need to activate it to use it. Together with the exe-file in the archive is Text Document named "activation". Open it and run UltraIso. Click on the "Enter registration code" button, then copy any pair of name and code into text fields registration window. Click "Ok" to complete the process. 
Using UltraISO
The interface for is quite simple. Click "File", hover over the very first item - "New". Specify the type of image you need. After that, you will be prompted to select the files and folders you want to zip. 