Disable update in tenth Windows versions became much more difficult than previous versions systems: Microsoft developers are releasing more and more patches that prohibit leaving the system without updates. Read below for the most up-to-date method on how to disable Windows 10 updates.
After the release of major Windows updates in the past six months (Fall Creators Update and April Update 1803), many users are faced with the fact that the system continues to install updates, even if they are disabled through the Update Center, registry or task scheduler. So far, we have found an almost one hundred percent way to prevent Windows 10 from updating.
Disable Windows 10 Update via Stop System Service
Most so far effective way- complete shutdown of the Windows Update system service and reconfiguration of its autorun rules. To do this, use the following "hack":
1. Click Win+R and in the window that appears "Run..." enter services.msc, then press Enter. A window will open "Services".
 2. Find a service in the list "Windows Update"(or windows update) and double click on it. The system service properties window opens.
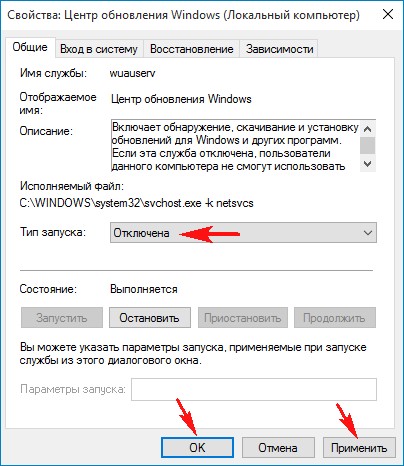
3. Tab "General" in field "Startup Type" select "Disabled" and click on the button "Stop".
 4. Tab "Login" select item "With account" and press "Review".
 5. In the next window, click "More" > "Search" and select the user from the list "Guest". Click "OK".
 6. Remove the password for the user "Guest" tab "Login" and apply the changes.
 What we did: completely stopped Windows Update and configured it to start in such a way that after a reboot it starts as a user without administrator rights (Guest).
Even if the update service is turned back on with the new patch, it will not affect anything. Since updates in the system can only be installed as an administrator, Windows 10 can no longer download and install them - this is prohibited by the system security policy itself.
A quick review shows that this way to disable Windows 10 update in this moment works for most users - both at the level of local computers and at the level of entire organizations. In the second case, start the Center service windows updates should be configured at the domain level.
At any time, you can start the Update Center back by changing the user under which the service runs to account with administrator rights.
This article details how to disable the Windows 10 update that is carried out in automatic mode. You don’t always know what Microsoft is slipping in the next update package, but to refuse to download and install updates in the top ten without using administrative capabilities or special utilities, it is forbidden.
With a stranger software By the way, you should be careful, because such utilities can perform other operations in the background, in addition to disabling the update center.
Constant downloads of updates and notifications about it, their installation and requirements, the computer will restart, errors that accompany any of the stages, as well as the consumption of precious traffic from users with wireless internet- these are just the main reasons to refuse automatic update Windows 10.
Deactivating the Update Center
Let's start, perhaps, with a method that will be more understandable to novice users due to the absence of the need to delve into system tools, and is suitable for any edition of Windows 10.
Note that the following way to disable updates (using a group policy editing tool) does not work on the home edition of the "dozens" - this administration tool is simply not available in the Home version.
The essence of the method is to stop and disable the service responsible for downloading and installing update packages. To do this, we perform the following steps.
1. Launch the "Services" snap-in.
The easiest way to do this is to run the "services.msc" command through the command interpreter, which is opened using the Win + R hotkey combination.

After that, a window with the name "Services" will appear. Its functionality will allow you to disable the automatic start of the service and terminate its operation in the current session.

2. We find a service with the name "Windows Update" (in some editions, the English name "Windows Update" may be found) and double-click on the element to call its properties.
3. Click "Stop" to end the service.
4. In the "Startup type" drop-down list, select the "Disabled" item.

5. Apply the new system configuration.
Changes take effect without restarting the system. Automatic updating of Windows 10 is turned on in the same way: first we set the automatic start of the service, and then we start it.
Let's use the functionality of the Group Policy Editor
As it was said, the owners of the home version of the "dozens" this section won't help when using Pro and Enterprise versions of Windows 10, this option is recommended to disable auto-update of the system.
Let's look at how to disable Windows 10 automatic updates through the administration tool, which is the most reliable method for disabling updates.
1. Run the "gpedit.msc" command.

This is done through the command interpreter, command line or the Start search string - the result will be the same.
2. Open the "Computer Configuration" section.
3. In the subsection, go to "Administrative Templates", where we open the " Windows Components».
4. Go to the "Windows Update" directory.
5. We call "Properties" of the option "Configure automatic updates".

6. Move the switch to the "Disabled" position.

7. Click "Apply" to write changes to Windows registry 10.
8. Close the tool window and check for updates.
If they were found in manual mode- this is the norm, new settings may work in a dozen or two minutes, although automatic check updates are disabled immediately after checking for updates is disabled.
The result will be similar if you go to the registry key HKLM\SOFTWARE\Policies\Microsoft\Windows WindowsUpdate\AU and create a DWORD key in it with the name "NoAutoUpdate" and the value "1".
Using metered traffic
One of the dozens of updates introduced an option into its functionality, the activation of which prevents the download of updates when using a wireless or other method of connecting to a network whose traffic is limited. This feature allows you to specify which WiFi connection is limiting, even if it is not.
The method works on all editions of Windows 10.
1. Go to "Settings" and open the section that provides access to the network settings.
2. Go to the Wi-Fi tab.
3. Expand "Additional settings".
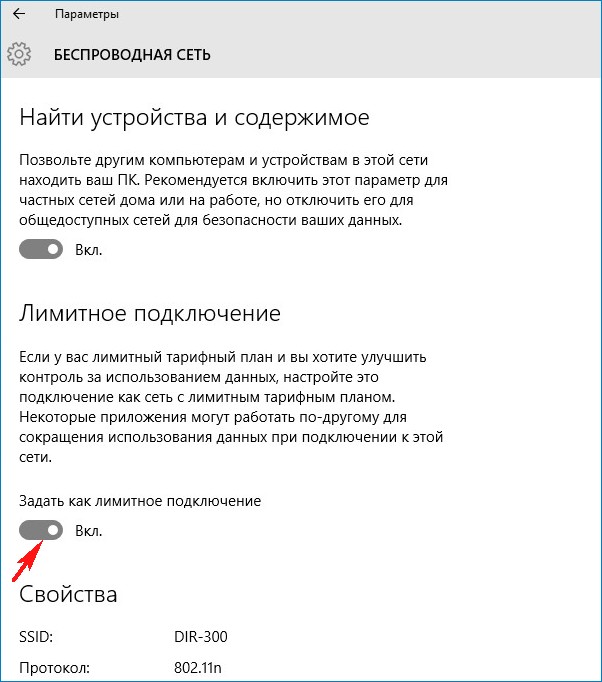
4. Activate the item "Set as a limited connection", so that the operating system considers the connection with paid or limited traffic.

Applications to quickly turn off the automatic update feature
Many are familiar with applications for disabling spyware in the top ten. But such programs also exist to disable the auto-update function. operating system. Sometimes one application combines both those and other functions.
One such utility is called Win Updates Disabler. To avoid problems, download the application from site2unblock.com and check the downloaded file with an online scanner, such as VirusTotal.

Working with a portable program is simple: run it, check the first item "Disable Windows Updates" and apply the settings. The program requires administrator privileges to function.
How to disable Windows update - this question is asked by users who need to prevent the installation of system updates on their computer. With default settings, the operating system automatically searches for, downloads and installs updates released for Windows on its own.
Microsoft releases service packs for the operating system approximately once a month. Windows systems. From time to time, Microsoft makes unscheduled updates designed to solve problems that arise in the operation of the OS, or close the gaps found in the Windows security system.
The main part of the updates concerns the security of the system. When updates are installed, system fixes are applied or some new features are added.
In addition to regular updates, Windows 10 comes with so-called major updates, after the application of which, in essence, the computer is installed a new version Windows 10: These major updates come out once or twice a year.
Some users disable system updates for various reasons. The main reasons for not updating Windows are:
- sometimes it happens that after installing updates, the regular Windows operation and installed programs
- if the user has a limited Internet connection, downloading updates affects the amount of traffic consumed
- lack of free disk space on the computer
- after applying the update, the user is afraid of losing the activation of the operating system
How to turn off automatic updates? You can solve the problem using the system tools, or using third-party software. In this article, we will look at 3 ways to disable updates on Windows 10 using the operating system.
Simply disabling Windows Update on Windows 10, as in Windows 7 or Windows 8, will no longer work. The maximum that can be done in this way is to pause updates for up to 35 days.
How to disable automatic updates in Windows 10 (1 way)
Windows 10 tools automatically detect, download, and install updates on your computer.
On Win 10, you can disable updates in a way that will disable the Windows Update service. This method works in all versions of Windows 10, it ensures that Windows updates are permanently disabled.
Log in to "Administration" from the Control Panel, or using more easy way: In the "Search Windows" field, enter the expression: "administration" (without quotes), and then open the "Administration" window.
In the Administration window, double-click right click click on the "Services" tab.

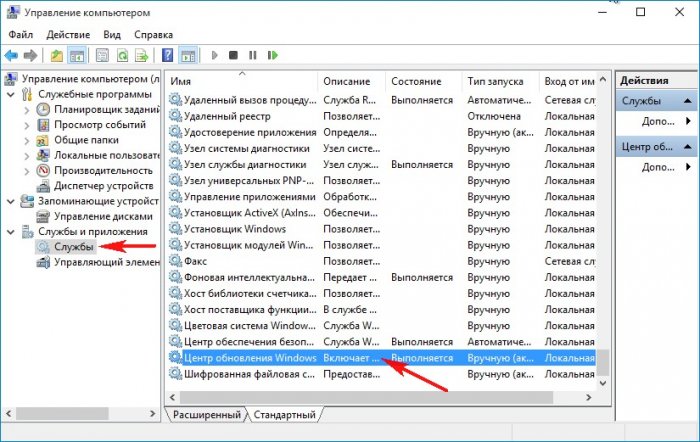
In the "Services" window that opens, in the "Services (local)" section, find the Windows Update service.

In the Windows Update Properties window ( local computer)", in the "General" tab, change the "Startup Type" setting to "Disabled".
In the "Status" setting, click on the "Stop" button to stop the service windows updates 10.

After that, Windows 10 updates will stop coming to your computer.
To enable the automatic update feature, in the Properties: Windows Update (Local Computer) window, select the preferred startup type: Automatic (Delayed Start), Automatic, or Manual.
How to disable Windows 10 updates using the Local Group Policy Editor (method 2)
Now let's see how to disable Windows 10 updates in the Local Editor group policy.
note that this method Not suitable for Windows 10 Home (Windows 10 Home) and Windows 10 Single Language (Windows 10 Home Single Language). This feature is present in older versions of the operating system: Windows 10 Pro (Windows 10 Professional) and Windows 10 Enterprise (Windows 10 Corporate).
You must first log into the Local Group Policy Editor. Enter "gpedit.msc" (without the quotes) in the "Search Windows" box, and then launch the editor.
In another way, you can enter the Local Group Policy Editor in the following way: press the "Win" + "R" keys, enter the expression "gpedit.msc" (without quotes) in the "Open" field, and then click on the "OK" button.
In the "Local Group Policy Editor" window, follow the path: "Computer Configuration" => "Administrative Templates" => "Windows Components" => "Windows Update".
In the "Windows Update" section, find the item "Configure automatic updates", right-click on it, and in context menu select Edit.

In the "Configure automatic updates" window, activate the "Disabled" setting, and then click on the "OK" button.

After that, the operating system will not search for, download and install automatic Windows 10 updates.
Disabling Windows 10 updates in the Registry Editor (method 3)
The third way to disable Windows 10 updates is to make changes to the Registry Editor. This method works on all versions of Windows 10.
In the Windows Search box, type "regedit" (without quotes) and then run the command.
In the "Registry Editor" window, follow the path:
HKEY_LOCAL_MACHINE\SOFTWARE\Policies\Microsoft\WindowsWindowsUpdate\AU
In the Registry Editor window, right-click on free space. In the context menu, select "New" first, and then "DWORD (32-bit) Value". Give the parameter a name: "NoAutoUpdate" (without quotes).

Click on the "NoAutoUpdate" parameter with the right mouse button, select "Change ..." in the context menu.
Enter the parameter "1" (without quotes) in the "Value" field, click on the "OK" button.

To enable updates in Windows 10, you need to change the value of the parameter to "0" (without quotes), or simply remove the "NoAutoUpdate" parameter from the registry.
Conclusion
If necessary, the user can permanently disable automatic updating of Windows 10 using the operating system tools: by disabling the Windows Update service, in the Local Group Policy Editor, or in the Registry Editor.
Hello admin! Windows 10 is installed on my laptop, I am completely satisfied with the system, except for one thing, I can’t turn off automatic updates. I work as a manager and travel all day with laptop in Moscow, the Internet is connected via a USB modem, and when you open a page of any site, the laptop freezes terribly, and after a reboot, this window appears with a message"Working with updates. Completed 100%. Do not turn off the computer "and so it hangs for half an hour,
apparently the system has received updates and is now processing them, and I'm sitting and waiting stupidly!
Another thing at home, I connect to the router and everything flies. A familiar wizard recommended disabling automatic Windows 10 updates, but how to do this, and is it possible?
Hello friends! I would advise our reader to wifi settings switch to a metered connection and Windows 10 will not download all the updates in a row. This option the most acceptable for owners of laptops with installed Windows 10 (details later in the article), of course, you can completely disable updates, but the fact is that Windows 10 was released with minor flaws and the outgoing patches should bring the operating system to mind in the next month or two.
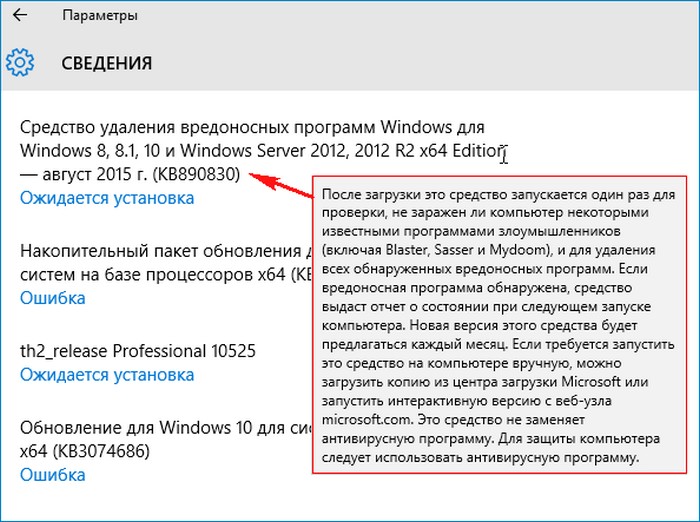
Also, do not forget that updates bring important fixes to all components of the operating system, including security, if you have antivirus program is used, please note that it will not be updated either. In addition, along with the updates, various tools will come to check your computer for the presence of rootkits and other dangerous malware.
- Note: To be honest, sometimes the opposite happens - updates designed to fix problems lead to other errors. Also, updates may conflict with drivers and third-party programs, as a result, the system may freeze and even fall into a blue screen.
Well, I warned you about everything and let's move on to the most important thing. There are five ways to turn off automatic updates in Windows 10.
Switching to a metered connection in Wi-Fi settings
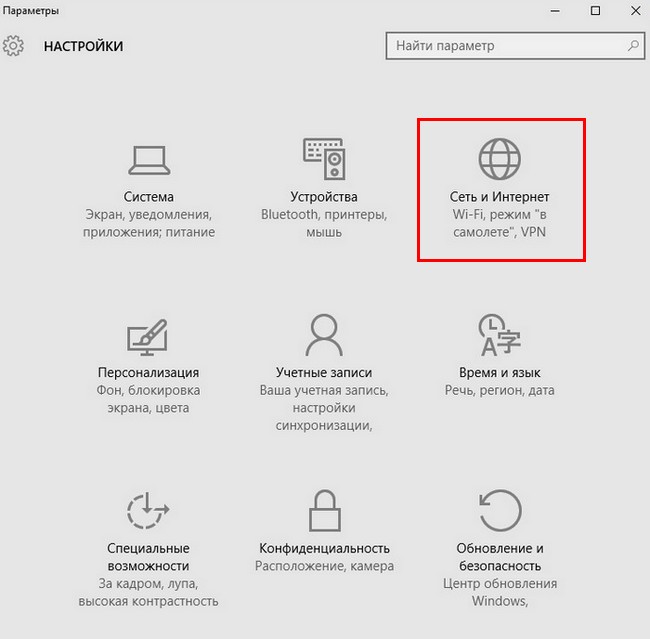
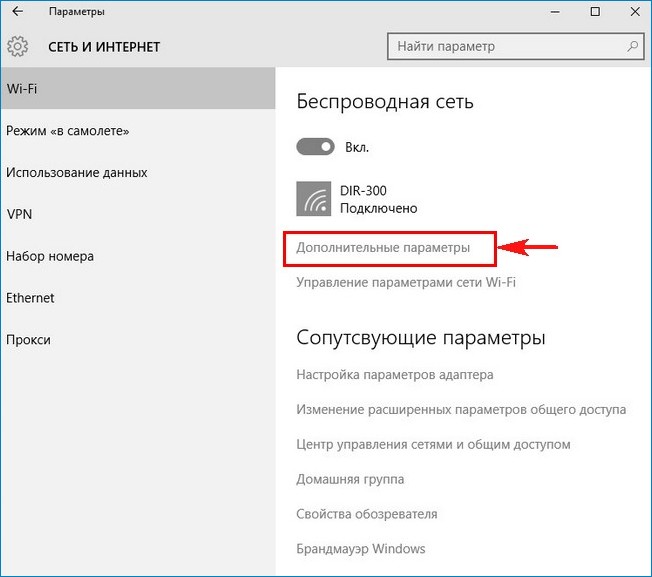
Left mouse click on the menu Start and click on Options Network and Internet Wi-Fi
Put the switch in position Set as metered connection
Disable operating system updates completely in computer settings
Left mouse click on the menu Start and click on Options
Go to the section
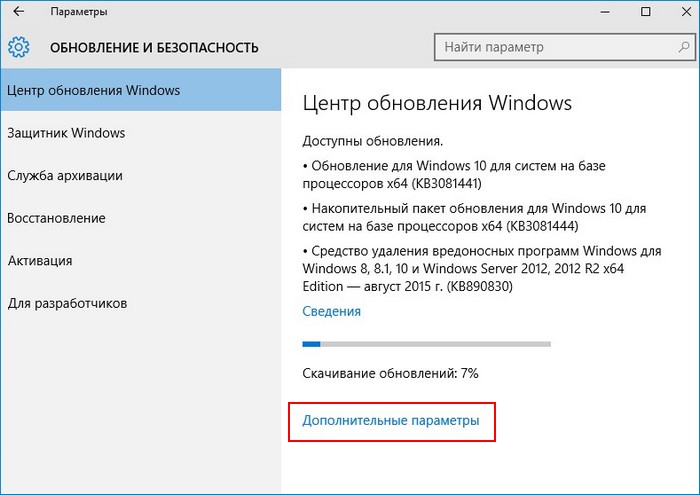
Update and Security
Windows Update,

We see that there are new updates that are immediately installed on our computer
Click on the button Extra options
In this tab, disable receiving updates:
Choose how to install updates
We set the parameter Notify when a reboot is scheduled
Check the box Postpone updates.

Let's take a step back out the window
Update and Security
Windows Update,
and we see that the updates are no longer downloaded and installed automatically, but are waiting for your permissions. The installation of updates will start if you click on the button Install now.

Disable updates in Windows 10 by disabling the Windows Update service
Right click on the Start menu and select Computer Management

Left-click on the Services item, and in the list that opens, select Windows Update, double-click on it with the left mouse
and exhibit Launch type into position Disabled.
Apply and OK.

Disable updates in Windows 10 using the registry
I consider this method unnecessary, but, as they say, everything will fit in the economy.
Start->Run
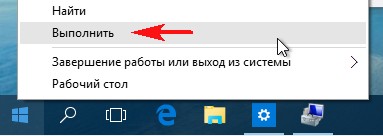
Enter the command in the input field regedit

The registry opens. Finding a branch
HKEY_LOCAL_MACHINE\SOFTWARE\Policies\Microsoft\Windows
Right mouse click on Windows section and select Create - Section.
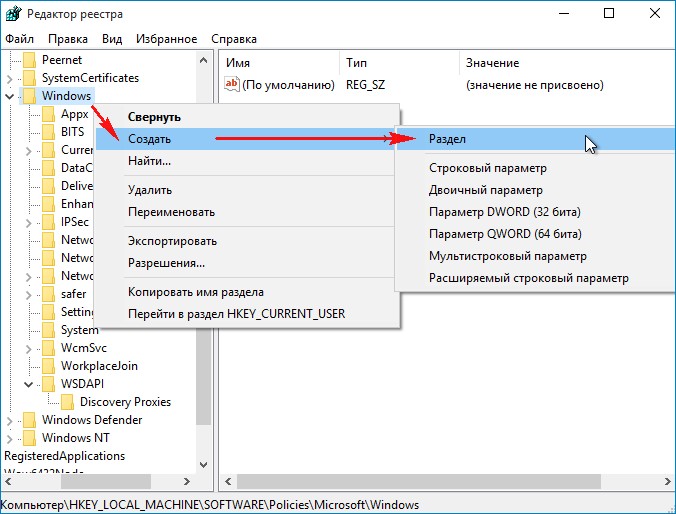
Enter the name of the WindowsUpdate section and right-click on it and selectCreate - Section, enter the name of the section AU.

Right-click on the created AU partition and select New - DWORD Value (32-bit)
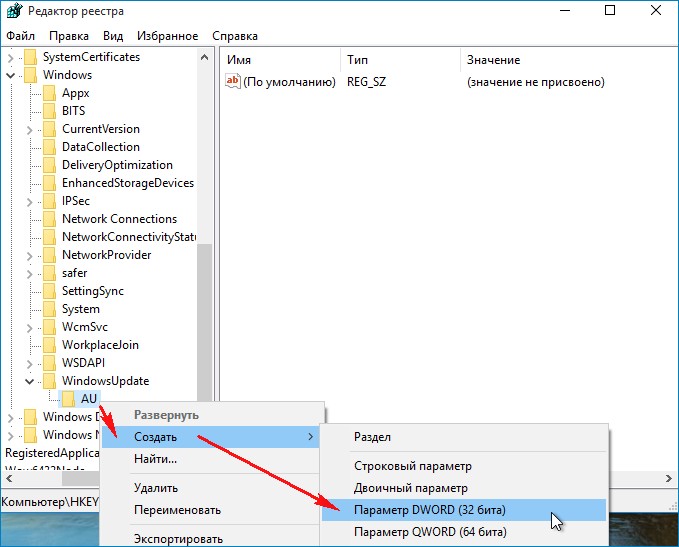
We name the parameter NoAutoUpdate and assign the value 1 to it.

If after this operation you reboot and enter the parameters:
"Update and security
Windows Update", you will see that the update download failed. Click Advanced Options.

As you can see, not a single option for installing updates is available to us.

Friends, the fifth way is to use the Group Policy Editor, if you are interested in it, I will talk about it in the next article.
Everyone knows that whenever a new update is available, Windows 10 automatically downloads and installs it in the background. If a restart is required after an update, Windows 10 automatically schedules a restart outside of active hours.
With default settings, Windows 10 automatically checks for updates and downloads them when available. The problem is that you may notice that web pages open slowly while downloading updates.
Users who have high-speed Internet access may not notice the discomfort, but users with slow Internet connections often complain about this problem. It would be nice to be able to pause current download Windows 10 updates!
On the this moment, Windows 10 does not offer easy way pause the current download of updates. If, for some reason, you want to pause the download of Windows 10 updates, either temporarily or permanently, you can use the tips below.
Important: We always recommend installing updates when they become available. Windows 10 gets fixes and new features with Windows Update, permanently stopping Windows Updates is not recommended, we advise pausing Windows Updates for a short time.
Method 1 of 6
Pause Windows update download using command prompt.
With a few simple commands, you can disable Windows 10 update services. By following three simple commands, you can easily manage the Windows 10 update process.
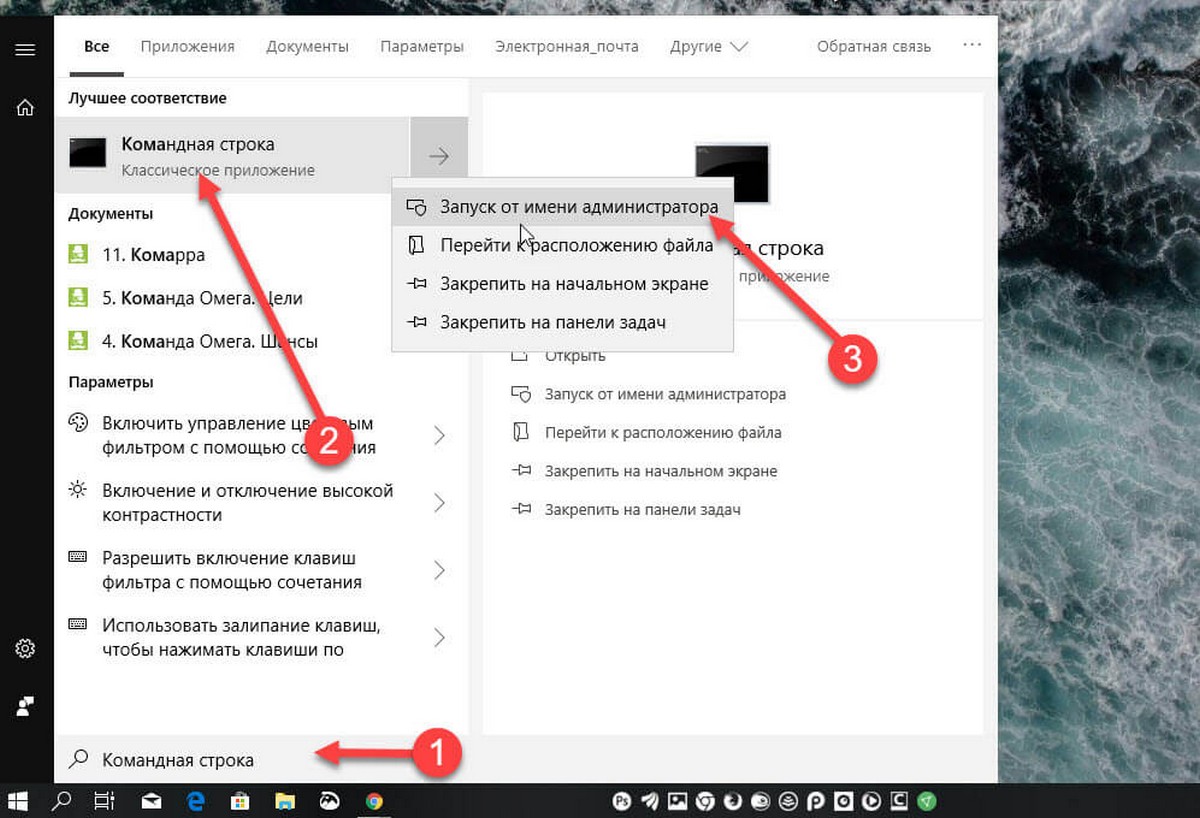
Step 1: Open command prompt as administrator. To do this, in the Start menu, start typing "Command Prompt" or "CMD", right-click the top result and select "Run as Administrator". If you see a User Account Control prompt, click Yes.
Step 2: Enter the following commands one by one, and don't forget to press the key Enter after each command entered.
net stop wuauserverIt may take some time for the Windows Update service to stop.
net stop bitsStop the Background Intelligent Transfer Service.
net stop dosvcStopping the Delivery Optimization service.

Step 3: Windows Update should now pause and stop installing updates, but you can turn it on at any time.
Enable downloading Windows 10 Updates.
Step 1: Open a command prompt with administrator rights.
Step 2: Run the following commands to start all stopped services and resume Windows Update downloads.
- net start wuauserver
- net start bits
- net start dosvc
Step 3: Go to app " Windows Settings» → « Update and Security" → "Windows Update". You should see the download of Windows Updates resume. If not, wait a while.
If Windows 10 does not automatically check for updates when they are released, you may need to clear windows update cache. Using the built-in Windows 10 troubleshooting tool for Windows Updates.
Method 2 of 6
Turn on Dial-up Connection.
Because Windows 10 does not download updates when enabled Limit connection, you can set your current internet connection to metered to pause the download of Windows updates.
Go to " Options"→ « Network and Internet"→ « WiFi" or "Ethernet", click on current network and then turn on the option - " Set as metered connection".


Method 3 of 6
Pause updates using the Settings app.
Windows 10 does not offer an easy way to pause the current download of updates. Starting with Windows 10 build 14997 October 2018 Update, the system allows you to pause updates. A dedicated option has been added to the Update & Security page of the Settings app. Once enabled, updates will be paused for 35 days.
- Open the app "Options"
- Go to section "Update and Security" → "Windows Update" and click the link "Extra options"(see picture).

- On the page, go to the section "Pausing Updates" and move the switch slider to the position "On".

When this option is enabled, updates will be paused for 35 days. If you are a Windows Insider and your PC is configured to receive pre-assemblies OS, updates will only be suspended for 7 days. In addition, some important updates, such as definitions for Windows Defender, will continue to be downloaded and installed regardless of the state of the " Pausing updates».
Method 4 of 6
Disable automatic updates (do not check for updates) in Windows 10 using the registry.
Method 5 of 6
Using the Win Update Stop tool.

This tool can stop auto-updating with the click of a button. It offers an easy way to disable updates on any Windows. You do not need to manually make changes to settings or the registry. With just one click, Windows 10 updates will be disabled on your computer. But you can turn them on whenever you want.
Not only Windows 10, Win Update Stop supports all versions of Windows, including Windows 8 and Windows 7. So in any version, you can stop all kinds of updates with this tool.
To disable updates, simply click the "Disable" button. To check that all system updates are disabled, you can go to "Settings" → "Update and Security". You will be informed that Windows was unable to download updates, indicating that the tool is working fine on your computer.
Win Update Stop is undoubtedly a time saver and a great handy utility for download page you can download Portable version that does not require installation.
Method 6 of 6
Using the StopUpdates10 tool.
StopUpdates10 is a tool that needs to be installed to block Windows 10 updates. Although there is a manual way to disable updates. But for some users it is too difficult. Take Windows updates under your control!
This utility has three interaction options:
First button "Disable Windows Updates"- Blocks all Windows 10 updates.

Second button "Allow Windows Updates". After pressing the button Windows Service Update works as usual.
Additional option "Pause Updates" will give you the option to specify a date until which updates will be suspended.

You may be interested in: