The article discusses ways to uninstall all updates at once in Windows 7. Since the OS developers have not built in such a function, third-party software is indispensable here.
SpoilerTarget"> Spoiler: Why are updates needed?
Any person who heard the word “updates” for the first time will say that these are certain measures aimed at improving the product. Their task is to fix bugs and shortcomings in any program, not necessarily in Windows 7. For example, a year after the release of the application, the company decided to improve the interface and released a package of updates that the user must download and install, after which he will see these changes.
Updates in Windows 7 are usually aimed at fixing security issues, compatibility operating system with drivers and software. This also includes compatibility issues with programs that require installation. software platform Microsoft .Net Framework, etc.
Unfortunately, you can’t do without problems with updates - after a while they become irrelevant, as new ones appear that replace them. In this regard, there is a "dump" in the section with installed updates, and on the hard drive I want to have more free space.
There is only one solution: remove all Windows 7 updates and reinstall only the ones you need. But what if you have a thousand of them? Windows 7 does not have a feature that allows you to uninstall all updates at once, so third-party software is indispensable here.
SpoilerTarget"> Spoiler: Problems that may arise during de-update
After launch, we see a list of programs available for removal, but there are no updates here. To fix this, in top menu click on the “Tools” tab and select the section with options (Alt + O). In the navigation bar on the left, click on "All Programs" and check the box necessary settings: show system updates, show system components, click "OK" and you can notice significant changes in the list of programs - applications will appear, the name of which will contain the update number.
Select them and click Remove. Of course, this method requires certain actions from the user, but you don’t have to manually click on each component in the Windows 7 Update Center.
Updates help ensure that the system is as efficient and secure as possible, keeping it up-to-date with changing external events. However, in certain cases, some of them can harm the system: contain vulnerabilities due to developer flaws or conflict with the one installed on the computer. software. There are also cases that an unnecessary language pack, which does not benefit the user, but only takes up space on the hard drive. Then the question arises of removing such components. Let's find out how you can do this on a computer running Windows 7.
You can delete both updates already installed in the system, and only their installation files. Let's try to consider various ways to solve the tasks, including how to cancel the update of the Windows 7 system.
Method 1: "Control Panel"
The most popular way to solve the problem under study is to use "Control Panels".
- Click "Start". Go to "Control Panel".
- Go to section "Programs".
- In the block "Programs and Features" choose "View Installed Updates".

There is another way. Click Win+R. In the shell that appears "Run" type in:
click OK.
- opens "Update centre". On the left side, at the very bottom, there is a block "Cm. also". Click on the inscription "Installed Updates".
- A list of installed Windows components and some software products, mainly by Microsoft. Here you can see not only the name of the elements, but also the date of their installation, as well as the KB code. Thus, if it is decided to remove a component due to an error or conflict with other programs, remembering the approximate date the error occurred, the user will be able to find a suspicious item in the list based on the date it was installed in the system.
- Find the item you want to remove. If you need to remove exactly the Windows component, then look for it in the group of elements « Microsoft Windows»
. Click on it with the right mouse button ( PKM) and select the only option - "Delete".

You can also select a list item with the left mouse button. And then press the button "Delete" located above the list.
- A window will appear asking if you really want to delete the selected object. If you act consciously, then press "Yes".
- The deletion procedure is in progress.
- After that, a window may start (not always), which says that for the changes to take effect, you need to restart the computer. If you wish to do so immediately, please press "Reboot Now". If there is no great urgency in fixing the update, then press "Restart later". In this case, the component will be completely removed only after a manual restart of the computer.
- After the computer is restarted, the selected components will be completely removed.


Other components in the window "Installed Updates" are deleted in the same way as deleting Windows items.


It is important to note that if you have automatic installation, then the remote components will be loaded again after a certain time. In this case, it is important to turn off the automatic action feature so that you can manually select which components should be loaded and which should not.
Method 2: "Command line"
The operation studied in this article can also be performed by entering a specific command in the window "Command line".
- Click "Start". Select "All programs".
- Move to directory "Standard".
- click PKM on "Command line". Choose from the list "Run as administrator".
- A window appears "Command line". You need to enter the following command into it:
wusa.exe /uninstall /kb:*******
Instead of symbols «*******» you need to install the KB code of the update you want to uninstall. If you do not know this code, as mentioned earlier, you can see it in the list of installed updates.
For example, if you need to remove the security component with the code KB4025341, then the command entered in command line, takes the following form:
wusa.exe /uninstall /kb:4025341
After entering, press Enter.
- Extraction begins in the standalone update installer.
- At a certain stage, a window appears where you must confirm the desire to extract the component specified in the command. For this click "Yes".
- The offline installer performs the procedure for removing a component from the system.
- Upon completion of this procedure for complete removal you may need to restart your computer. You can do it in the usual way or by pressing the button "Reboot Now" in a special dialog box, if it appears.


In addition, when deleting with "Command line" You can use additional installer attributes. You can view a complete list by typing in "Command line" following command and pressing Enter:

A complete list of operators that can be used in "Command line" while working with offline installer, including when removing components.

Of course, not all of these operators are suitable for the purposes described in the article, but, for example, if you enter the command:
wusa.exe /uninstall /kb:4025341 /quiet
an object KB4025341 will be removed without dialog boxes. If a reboot is required, it will happen automatically without user confirmation.

Method 3: Disk Cleanup
But updates are in Windows 7 not only in the installed state. Before installation, they are all loaded onto the hard drive and stored there for some time even after installation (10 days). Thus, the installation files take up space on the hard drive all this time, although in fact the installation has already been completed. In addition, there are cases when a package is downloaded to the computer, but the user, updating manually, does not want to install it. Then these components will simply “hang out” on the disk uninstalled, only taking up space that could be used for other needs.
Sometimes it also happens that the update was not fully downloaded due to a failure. Then it not only unproductively takes up space on the hard drive, but also prevents the system from being fully updated, since it considers this component to be already loaded. In all these cases, you need to clear the folder where Windows updates are downloaded.
The easiest way to delete downloaded objects is to clean up the disk through its properties.
- click "Start". Next, move on the inscription "A computer".
- A window opens with a list of storage media connected to the PC. click PKM on the drive where Windows is located. In the vast majority of cases, this section C. Select from the list "Properties".
- The properties window launches. Go to section "General". Click there "Disk Cleanup".
- An estimate is made of the space that can be cleared by removing various insignificant objects.
- A window appears with the result of what can be cleared. But for our purposes, we need to click on "Clean up system files".
- A new estimate of the amount of space that can be cleared is launched, but this time taking into account system files.
- The cleanup window opens again. In the area of "Delete the following files" the various groups of components that can be removed are displayed. Objects to be deleted are marked with a checkmark. All other items are unchecked. To solve our problem, you need to check the boxes next to the items "Cleaning Windows updates» and "Windows Update Log Files". Opposite all other objects, if you no longer want to clean anything, you can uncheck the boxes. To start the cleaning process, press OK.
- A window is launched asking if the user really wants to delete the selected objects. It also warns that the deletion is irreversible. If the user is confident in his actions, then he must click "Delete Files".
- After that, the procedure for removing the selected components is performed. After its completion, it is recommended to restart the computer yourself.


Method 4: Manually deleting downloaded files
Also, components can be removed manually from the folder where they were uploaded.
- In order for nothing to interfere with the procedure, you need to temporarily disable the update service, as it can block the process of manually deleting files. click "Start" and go to "Control Panel".
- choose "System and safety".
- Next click on "Administration".
- In the list system tools choose "Services".

You can switch to the service control window without using "Control Panels". Call utility "Run" by clicking Win+R. Drive in:
click OK.
- The service management window opens. Clicking on the column name "Name", arrange the service names in alphabetical order for easy retrieval. Find "Windows Update". Check this item and click "Stop Service".
- Now run "Conductor". In his address bar copy the following address:
C:\Windows\SoftwareDistribution\
Click Enter or click on the arrow to the right of the line.
- AT "Explorer" opens a directory containing several folders. We are particularly interested in catalogs Download and "data store". The first folder contains the components themselves, and the second folder contains the logs.
- Go to folder Download. Select all its contents by clicking Ctrl+A, and delete using the combination Shift+Delete. It is necessary to use this particular combination because after applying the pressing of a single key Delete the content will be sent to the Trash, that is, it will actually continue to occupy a certain disk space. With the same combination Shift+Delete will be permanently deleted.
- True, you still have to confirm your intentions in a miniature window that will appear after that by clicking the button "Yes". The deletion will now take place.
- Then move to the folder "data store" and in the same way, that is, by applying pressing ctrl+a, and then Shift+Delete, delete the content and then confirm your actions in the dialog box.
- After this procedure is completed, in order not to lose the opportunity to update the system in a timely manner, move again to the service management window. Check "Windows Update" and press "Start Service".


Method 5: Uninstalling downloaded updates through the "Command line"
Downloaded updates can also be deleted using "Command line". As in the previous two methods, this will only remove installation files from the cache, and not roll back installed components, as in the first two methods.


In the examples described above, we saw that it is possible to remove both already installed updates by rolling them back, and boot files that are downloaded to the computer. Moreover, for each of these tasks, there are several ways to solve it at once: through a graphical Windows interface and through "Command line". Each user can choose the most suitable certain conditions option.
Windows updates- these are additional software modules, which are created by the developers of the operating system to fix critical errors leading to malfunctions, fixing vulnerabilities in system security, as well as adding to Windows new features and stability improvements third party applications. In rare cases, due to developer errors, updates may contain critical bugs and cause crashes in Windows or programs installed in it. To restore normal operation, such failed updates must be removed and in this guide we will talk about various ways uninstalling updates in operating rooms Windows systems 7 and 8.
Configuring Update Download Options
To begin with, you need to keep in mind that not all updates are important and required to be installed. Many updates do not contain important fixes and improvements for the OS, but the changes they make can cause various failures. Also, many optional updates are large and take up a lot of hard drive space.
To avoid installing unnecessary updates to the operating system, you need to properly configure Windows Update, because by default the operating system automatically downloads and installs all updates released by Microsoft without exception. However, this can be fixed by enabling the ability to self-select and install only the most important updates.
To change the rules for downloading updates, open the menu Start and sign in Control Panel(in Windows 8 you can use hotkeys Win+I to open the Settings panel and click on the Control Panel link in it).
Opening the Control Panel through the Options Panel in Windows 8

Opening the Control Panel from the Start Menu in Windows 7
Next, go to the section system and safety (The control panel must be in Category, which can be selected in the upper right corner in the drop-down list located next to the caption View) .

Select an item Windows Update:

In the left vertical menu chooseSettings:

And finally, in the window that opens, select the option from the drop-down list. Look for updates, but the decision to download and install is made by me.

Hiding and restoring unnecessary updates
Updates detected by the system, but not yet installed, which are not needed, can be hidden so that they do not appear in the list for installation in the future.
To do this, open again Windows Update and choose desired section: Important or Optional updates.

In the list that opens, left-click to select an update that is not required to be installed, then right mouse button open the dropdown menu with options and select the item Hide update.

You can restore hidden updates in the same Windows Update by selecting the appropriate link in the left vertical menu.

In the list of hidden updates that opens, select the one you need and click on the button Reestablish, after which the update will return to the list available for download and installation.

Cleaning the disk from temporary files of downloaded updates and deleting the update history
On the local disk C can be cleared system folders, which store temporary files for downloaded but not installed updates, and delete the update history log.
To do this, open Conductor and go to:C:\Windows\SoftwareDistribution . In this directory, find two folders:Download(contains update files) anddata store(stores update history logs). Delete the files in them with a combination Shift+Del(without moving to the trash).

How to uninstall installed updates
Now let's talk about different ways removing already installed updates from the system.
Uninstall via Control Panel
To uninstall updates installed in the operating system, open Control Panel and go to section Programs.

In chapter Programs and Features select item View installed updates.

In the list of installed updates that appears, select the required update with the left mouse button, then right-click and select the item in the drop-down menu Delete. To complete the operation, confirm your intentions by pressing OK and restart your computer for the changes to take effect.

Uninstall via command line
This the way is fine confident users, and involves manual entry of commands. Run a command prompt with administrator rights. To do this, in Windows 7, click on the menu icon Start and in the search bar enter the command: cmd, then in the search results window, right-click on the icon cmd and select command Run as administrator. In Windows 8, just press the key combination Windows + X and in the appeared context menu select item Command Prompt (Admin).

Running Command Prompt as Administrator in Windows 7

Running Command Prompt as Administrator in Windows 8
To view a list of installed updates, enter the command:wmic qfe list brief /format:table

To remove any update, enter the command: wusa /uninstall /kb:update number(For example: wusa /uninstall /kb:3185331).

How to uninstall all updates at once
Unfortunately, the developers did not provide such an opportunity in the functionality of Windows. It's a pity, this function can really be useful in some situations, since deleting in manual mode a large number of updates is inconvenient and too long. Fortunately, there are some simple and available ways solve this problem.
Removing via .bat file (batch file)
Create new file using the program Notebook(right click on an empty space on the desktop and select the option Create a text document).

Copy the following code into an empty document:
@echo off
color 0A
mode con: cols=40 lines=12
setlocal enabledelayedexpansion
Set templist=%TEMP%\listTMP.txt
set list=%USERPROFILE%\Desktop\uninstall_updates.cmd
echo.
echo.
echo Please wait
echo.
echo.
if exist %templist% del %templist%
if exist %list% del %list%
wmic qfe get hotfixid>>%templist%
call:1 "KB" "KB:"
echo DONE
timeout /t 3 /nobreak > nul
exit /b
:1
for /f "tokens=1* delims=]" %%a in ("find /v /n "" ^ if not "%%b"=="" (set line=%%b) else (set line= not)
set newline=!line:%~1=%~2!
set newline=!newline:not=!
echo wusa.exe /uninstall /!newline!/quiet /norestart>>%list%
::set templist=%list%
goto:eof
Save the generated file with the extension .bat by giving it any name (for example: new.bat). Pre-In Options File type choose an option All files. Then run the batch file.

After launching the created file, a window will open asking you to wait, which will close automatically upon completion of the deletion . All updates installed in Windows 7 and 8 will be removed.
Removing updates using special programs
Nowadays, a large number of different uninstallers and system cleaners have been developed, which are quite capable of removing updates from Windows. For example, you can use the well-known Revo Uninstaller program, which can be downloaded for free on our website.
Run Revo Uninstaller and sign in Settings. In this section, select the tab Uninstaller and check the boxes next to the options Show system updates and Show system components.

Click OK to close the settings window and refresh the list by clicking on the corresponding icon on the program toolbar. After that in the list installed applications there will be Windows updates. It is very easy to identify them - they are marked with a special icon and, as a rule, have serial number KB:xxxxxxxxxxxx.

Hold down the key to uninstall ctrl and highlight the necessary updates with the left mouse button, then click on the icon Delete.

After the uninstall is complete and the computer restarts, the selected updates will disappear from the operating system.
How to remove old update files
Not many people think that every time updates are installed, Windows downloads update packages from Microsoft servers, after which it starts the process of installing and updating system files, but the package file itself, which is no longer needed, remains in service folder. In the case of timely installation of updates, such files accumulate a lot and in total they can take up tens of gigabytes of space on system drive. And if you remember that in our time, ultra-fast SSD drives of a relatively small volume are often used to operate the operating system, the issue of freeing up space often comes to the fore and deleting obsolete update package files can significantly help to significantly increase the amount of free space.
To remove obsolete service packs, open Conductor by clicking on the special icon next to the menu Start (or keyboard shortcut Win+E) . Right-click on the C drive and select the item in the context menu Properties.

In the window that opens, click the button Disk Cleanup.

In the next window, select a function Windows Update Cleanup, click OK and wait for the procedure to complete.

Many computer scientists consider this method the fastest, most efficient and safest, which is quite logical - the operating system will deal with its obsolete system files better than any third-party utilities.
The article discusses ways to uninstall all updates at once in Windows 7. Since the OS developers have not built in such a function, third-party software is indispensable here.

Why are updates needed?
Any person who heard the word “updates” for the first time will say that these are certain measures aimed at improving the product. Their task is to fix bugs and shortcomings in any program, not necessarily in Windows 7. For example, a year after the release of the application, the company decided to improve the interface and released a package of updates that the user must download and install, after which he will see these changes.
Updates in Windows 7 are usually aimed at fixing security issues, operating system compatibility with drivers and programs. This also includes compatibility issues with programs that require the installation of the Microsoft .Net Framework software platform, etc.
Unfortunately, you can’t do without problems with updates - after a while they become irrelevant, as new ones appear that replace them. In this regard, there is a “dump” in the section with installed updates, and you also want to have more free space on your hard drive.
There is only one solution: remove all Windows 7 updates and reinstall only the ones you need. But what if you have a thousand of them? Windows 7 does not have a feature that allows you to uninstall all updates at once, so third-party software is indispensable here.
Problems that may arise during de-update
It is recommended that you create a system restore point, as the methods discussed in this article can lead to unpleasant consequences, for example, certain programs may fail to work, the OS may begin to "slow down", as a result of which a system failure is possible, etc. The only way to fix this is to roll back Windows 7 to the point where the updates were installed.
Not all updates will be removed, but only those that do not require user action. The remaining updates will have to be uninstalled manually.
First, consider a simpler method that will take just a few minutes of your time, while the second is a longer one that requires certain software. All these processes will not interact with the update center in any way. Just in case, temporarily disable the search for updates to successfully complete operations.
Removing Windows 7 updates through a batch file
Do you know a method for uninstalling updates via the command line? So, this method simplifies it: now you will not write the command “wusa.exe / uninstall / update number” every time - all possible updates will be automatically removed from your computer.
Let's create a file with the extension .bat (batch file). To do this, write the following code in notepad:
- @echo off
- color 0A
- mode con: cols=40 lines=12
- setlocal enabledelayedexpansion
- Set templist=%TEMP%\listTMP.txt
- set list=%USERPROFILE%\Desktop\uninstall_updates.cmd
- echo.
- echo.
- echo Please wait
- echo.
- echo.
- if exist %templist% del %templist%
- if exist %list% del %list%
- wmic qfe get hotfixid>>%templist%
- call:1 "KB" "KB:"
- echo DONE
- timeout /t 3 /nobreak > nul
- exit /b
- for /f "tokens=1* delims=]" %%a in ("find /v /n "" ^<"%templist%"") do (
- if not "%%b"=="" (set line=%%b) else (set line=not)
- set newline=!line:%~1=%~2!
- set newline=!newline:not=!
- echo wusa.exe /uninstall /!newline!/quiet /norestart>>%list%
- ::set templist=%list%
- goto:eof
Then save by ending the file name with .bat and selecting "All Files". After launching it, uninstall_updates.exe will appear on the desktop. To start the procedure for uninstalling updates, run it and wait for the process to complete (the command line window will automatically close).
In my case, when the program finished its work, only 90 modifications out of 233 remained. We can safely say that its task has been partially completed. Restart your computer to reconfigure Windows.
Uninstalling updates with Revo Uninstaller
To complete the update removal process, we need the Revo Uninstaller program. You can buy it on the developer's site for $39 or download it somewhere, it's up to you.
After launching Revo Uninstaller, we see a list of programs available for removal, but there are no updates here. To fix this, in the top menu, click on the "Tools" tab and select the section with options (Alt + O). In the navigation panel on the left, click on the “All programs” item and check the necessary settings: show system updates, show system components, click “OK” and you can notice significant changes in the list of programs - applications will appear, the name of which will contain the update number.
Select them and click Remove. Of course, this method requires certain actions from the user, but you don’t have to manually click on each component in the Windows 7 Update Center.
Downloaded, frozen, and installed updates are stored in the computer's memory. Over time, they take up a large amount of memory and crash the system. One part of Windows updates is removed automatically, and the other half will have to be cleaned manually.
We clean the computer: ways and means
Remove installed updates
Already installed updates can be removed, thereby rolling back the version of the operating system to the moment when these updates have not yet been received. To completely remove a particular update, as well as to install it, the computer must be restarted at the end of the process. Removing some updates will cause the system to install the previous version of the update, the one that was in use before the installation of the update being removed.
There are several built-in ways to get rid of installed versions. Deletion options through additional programs will be discussed in a separate paragraph, so if the standard methods do not suit you, you can use a third-party application. So, we consider internal means of removal.
Using the update center
- Open your computer settings. Opening computer settings
- Select the Update & Security tab.
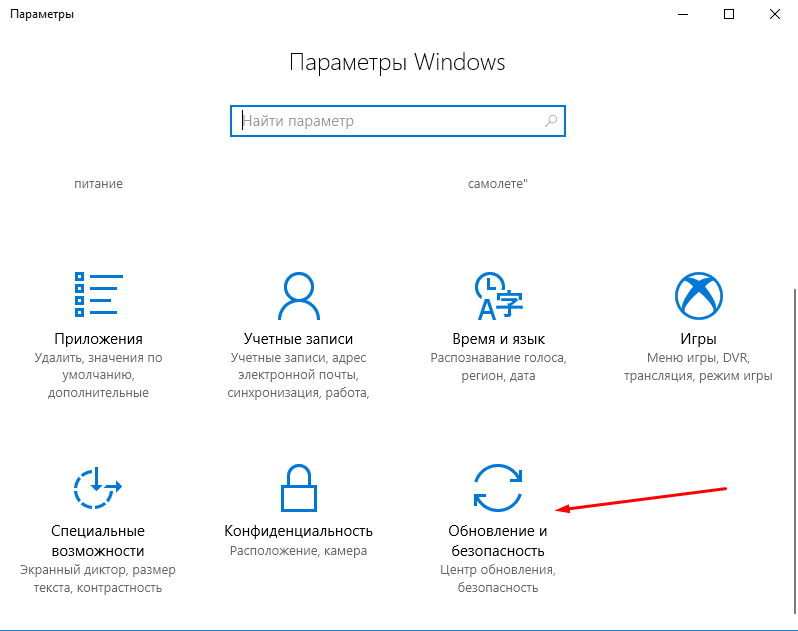 Go to the "Update and Security" section
 - Go to the update log, which contains all the information about the installed updates.
 Opening the update log
 - Click the Uninstall Updates button.
 Click the "Uninstall Updates" button
 - The control panel will open. A list of installed updates will appear on the screen, it can be sorted by one of the columns. To delete an update, select it and use the Delete button.
 Select the update and click on the "Delete" button
 - You will be asked to confirm the action, do so by clicking the "Yes" button. After removing all unnecessary updates, restart your computer.
 Press the "Yes" button
Video: Remove updates using Update Center
Using the control panel
In the previous paragraph, we got to the desired section of the control panel through the computer settings, now let's look at how to do it directly:

Video: Remove updates using Control Panel
Using the command line
- Find and open the row using admin rights.
 Open command prompt as administrator
 - Please note that in order to remove updates through a command, you must first find out the unique number of this update. It always starts with KB, you can find it in the update log, when viewing the list of installed updates, on the official Microsoft website, or using the wmic qfe list brief / format:table command, which calls up a table with dates and update numbers.
 We execute the command wmic qfe list brief / format: table
 - Once you know the correct numbers, use the wusa /uninstall /kb:unique_code command to start uninstalling a specific update.
 We execute the command wusa / uninstall / kb:unique_code
 - You may be asked to confirm the deletion, do so by clicking the "Yes" button.
 Select the "Yes" option
 - To complete the procedure, you must restart your computer. This can be done immediately or later.
 Choose whether to restart the computer now or later
Cleaning up the folder with old updates and copies
Restore points and versions of previous updates are stored in the computer's memory so that in the event that a new update causes an error or any other problem, the system can be rolled back. In no case should you delete the WinSxS folder, as this may cause Windows to stop starting, and it will not be possible to roll back or restore it without this folder. It is recommended to clear the folder only when its weight exceeds 8 GB.

Clear downloaded updates and cache
Downloaded, but for some reason not yet installed or recently installed updates are also stored in the computer's memory. Some downloaded updates hang, because of this they cannot be installed. All such updates are located in the PrimaryDrive:\Windows\SoftwareDistribution\Download folder. By going to this folder, you will find subfolders with long names, you can delete them all or only certain ones, focusing on the code in the name and the date of creation. Deletion is carried out by the usual movement to the trash, that is, right-click on them and apply the "Delete" function.
 Delete the contents of the folder in Primary_disk:\Windows\SoftwareDistribution\Download
 It is worth clearing the DeliveryOptimization subfolder, located in the same SoftwareDistribution folder, it stores the update cache. You cannot delete the folder itself, only its contents.
 We clear the folder in the Main_disk:\Windows\SoftwareDistribution\DeliveryOptimization
 Purging from a previous build
After installing the Anniversary Update, the build version of the system changes. In order for the user to be able to cancel the transition to a new global version of the operating system, the Windows.old folder is created, containing all the necessary files for 30 days. After this period expires, the folder will self-destruct, but if you do not want to wait, follow these steps:
- Run Disk Cleanup.
 Open Disk Cleanup
 - Select drive C and wait for it to be scanned.
 Choosing a disk to clean
 - Proceed to clean up system files, this will require administrator rights. Windows will ask you again to select the drive that needs to be scanned.
 Click the "Clean up system files" button
 - Check the boxes for "Previous Windows installations" and "Temporary installation files".
 Check the boxes "Previous Windows installations" and "Temporary installation files"
 - Start the uninstall process and agree to all the warnings that appear on the screen.
 We indicate that we still want to delete files
Cancel automatic update
By default, all available updates are downloaded and installed automatically, notifying you only that the system is up to date. The negative side of this action is that at any time there may be a load on the Internet. The traffic spent on downloading updates is not controlled. There are several ways to deactivate automatic system updates, the easiest and fastest way is to close the update center:

Third party software to manage updates
There are several third party software to help you manage updates, one of them is Windows Update MiniTool. In it, you can select updates to download and install, remove installed and downloaded versions, block certain updates. The application is set to Russian, almost all actions are performed in the main menu using the list and action icons on the left side of the window. It is recommended to download the program distributed for free from the official website of the developer.
 Manage updates through Windows Update MiniTool
 Another program, IObit Uninstaller, is designed to remove various Windows components, including updates. The application has built-in support for the Russian language. The trial version can be downloaded for free from the official website of the developer. In the "Windows Updates" section, you can remove each update individually or erase them several at once. The application allows you to create restore points that will help you set up the system if failures occur after uninstalling the next update.
 Uninstall updates with IObit Uninstaller
 Error uninstalling updates
Updates may not be removed for the following reasons:
- they are currently being downloaded or installed;
- the update being removed is involved by some process or application;
- update stuck.
First of all, disable all unnecessary processes, programs and disconnect from the Internet. If this does not help, then boot into safe mode and try to uninstall the update through it. Try to uninstall updates using the different methods described above in the article: through the control panel, command line, third-party applications, and clearing folders.
To enter Safe Mode, follow these steps:

If all else fails, then there are two ways out: roll back the system to the point where the update has not yet been installed, or reinstall the system using the image of the desired version. When you manage to remove the update, do not forget to deactivate its automatic installation, otherwise the update will get up again the first time you connect to the Internet.
If Windows updates or lack of memory lead to uncomfortable work, then it is worth uninstalling harmful updates. To do this, in Windows 10, there are many system methods, such as uninstalling using the update center, uninstalling using the control panel, and using the command line. Third-party programs are also suitable, the functions of which are not limited to this. Remember, if auto-updates are not disabled, the data will again fall on your computer.