Even big disk space If you work on the computer for a long time, it may end. You can delete files and programs to free up some space, but this is a temporary workaround. You can replace the hard drive, then you have to reinstall the OS and set up the computer. It is easier to connect a second drive, which will significantly increase the storage space for photos, games and movies.
Buy at the store computer technology HDD sufficient capacity and a SATA data cable to connect it. The volume of the disk depends on the desire of the user, but it is better not to save money and purchase a disk of at least a terabyte so that you do not have to think about increasing the memory again soon. The hard drive of a modern computer is most often connected using a SATA interface. The IDE format was used on computers until 2000. To make sure that the disk and motherboard are compatible, consult the seller or read the instructions for the computer. Completely shut down your computer and all of its additional devices from the power source. Lay the system unit on its side and remove it sidebar. Consider the motherboard. Modern boards can have several SATA controllers, up to 6 pieces. An IDE connector may be missing or used to connect a CD/DVD drive. In finding the right controllers, the computer board diagram will help you.


Elevated temperatures can cause rapid surface wear hard drive. If it is not possible to separate the hard drives by space, then there is one way out - to put a second fan to cool the drives. If all SATA controllers on the board are occupied, then buy PCI controller with SATA connectors for connecting a second drive.
A hard drive is a solid-state drive, which is what it is called in contrast to a floppy - floppy disk, which has not been used by users for a long time. The operation of connecting a hard drive is not so complicated and in many cases the user can do everything on his own, without resorting to computer specialists.
In what cases it is necessary to connect hard drives?
- When upgrading - replacing the old drive with a more powerful and voluminous one.
- To expand disk space. For example, to place computer games and some applications on a separate hard drive.
- When repairing - replacing a failed drive with a workable one.
- For reading previously recorded information of a large volume.
Key points
If in system unit with an IDE interface, there is more than one hard drive, then one of them on the bus is assigned as the main one, and the second one as the auxiliary one. The first is called Master, and the other is called Slave (Master - Slave). Such a subdivision is required so that when the operating system is loaded after turning on, the computer knows exactly which disk is bootable.
In all cases, the settings in the BIOS can set the boot sequence from the drives. And in IDE, this is done by setting jumpers on disk cases according to the diagram shown on the case.
By interface type hard drives differ on IDE - the old model and SATA - in all new computers. If you have an old system unit model and you are going to connect a new SATA hard drive, you will need to purchase a special adapter.
junk
It happens that you pick up this junk and you can’t understand what and where to connect. The old IDE interface (1986) is put on a parallel loop of wires. Usually there are either 2 or 4 connectors on the motherboard. Always an even number, because the Master / Slave rule (master and slave) works. Settings can be set by jumpers (example):
- Master - the presence of a jumper between the leftmost contacts (7 and 8) of the control connector.
- Slave - the absence of any jumpers.
This configuration may vary depending on the manufacturer, as well as the set of allowed functions specified by the connector. The IDE interface made it possible to conveniently connect a hard disk and a CD drive to the computer at the same time. This was enough for most users. The disadvantage of the parallel interface was the low transmission rate. In a different way, IDE is referred to in a professional environment as parallel ATA or ATA-1. The transfer rate of such devices does not exceed 133 Mbps (for ATA-7). With the introduction of the serial SATA interface in 2003, the outdated information transfer protocol began to be called parallel PATA.
The name ATA-1 was assigned to the IDE interface in 1994 when it was recognized by the ANSI organization. Formally, it was an extension of the 16-bit ISA bus (the forerunner of PCI). It is curious that in modern world there is a tendency to use video card interfaces to create ports for attaching hard drives. This was followed by accelerated ATA-2 and packet ATAPI. The IDE has not been officially supported since December 2013. Connecting such a hard drive to a new motherboard is only possible with an expansion card.

With the help of such devices, it is possible to perform the exact opposite function: to install hard drives of the past generation on new motherboards. So, for example, on the old A7N8X-X there are only two IDE ports, but there are 5 goals PCI slots 2.2 for expansion cards. The universal adapter is just right for this case. And you can put a modern hard drive up to SATA3, but its speed will, of course, be several times lower than the maximum.

Hard drives for standard IDE interfaces are already mostly out of order. And there are not so many of them left in the world. It remains to add to this that the configuration of ATA devices is changed by jumpers, and the explanatory picture is located right on the device case. Unscrupulous suppliers sometimes keep jumpers for themselves, and in this case not any configuration can be carried out by the user. Jumpers are usually not enough.
Today there is a new fad: for some time supplanted by cards PCI Express traditional PCI is reappearing on motherboards. This means that the "junk" with the help of an adapter can now be connected to a modern system unit.

SATA drives
Experts generally distinguish between three generations of SATA. Grading is carried out according to the speed of information transfer:
- SATA - 1.5 Gb / s.
- SATA2 - 3 Gb / s.
- SATA3 - 6 Gb / s.
A standard SATA drive has two connectors, one of which is used for power supply, and the second serves as a data transfer cable. It is not recommended to swap hard drives by connecting them to different SATA ports. There are keys on the plugs, thanks to which it is impossible to carry out an incorrect docking of the connector.

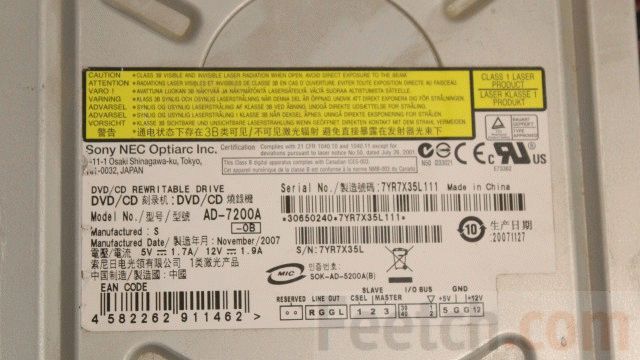
Sometimes a hard disk can contain useful information that any advanced user can understand. But sometimes the designation tends to be so ornate that only a true professional can comprehend it. Like, for example, in this case.

There is information about the brand, serial number, technical data, and even measures of disk capacity. But its interface remains unknown. This is important when choosing hardware for a computer with limited capabilities. If the disk would have a SATA3 interface, then it is useless to put one in an old system unit. There are many other similar examples. Let's say in advance that this drive is a SATA 2.6 interface. Therefore, its information exchange rate in the limit is 3 Mbps.
If there is HDD interface type information
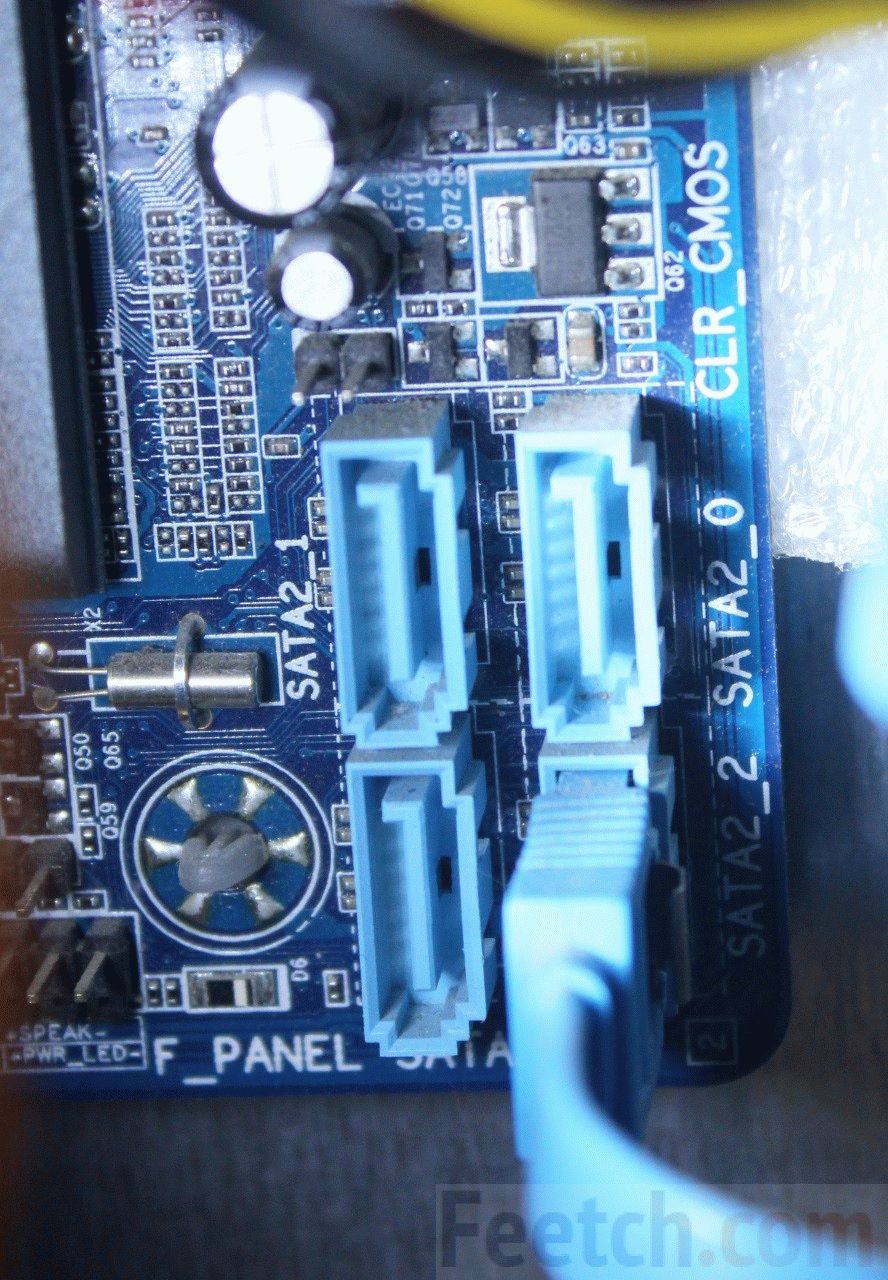
How to distinguish? First, you can look at the body. Here is an image of an old disk that already supports two speeds, therefore, is a SATA2 device.

When removed from the system unit, it was equipped with a jumper that reduced the speed.

The jumper was immediately removed, therefore, now the device will function twice as fast. On the SATA 2.0 bus of the GA-H61M-D2-B3 motherboard.
This once again suggests that it is not enough to buy a system unit, you also need to study its entire device in general and hard drives in particular. The drives inside were paired using a special hinged frame.

This achieves the best maintainability of the structure. Both hard drives were promptly removed from the case. As an alternative, a bay installation option is used, where the case is screwed on both sides, and two side covers must be removed for dismantling. Which is not very convenient, given that each of them usually sticks. Cases of system units are rarely found, where the sidewalls are removed by simple methods.
If there is no HDD interface information
Sometimes the hard drive may not have information about the data transfer rate. In this case, you can, of course, stock up on AIDA, but it's even easier to look at the information on the Internet. By price or appearance case, the brand of the drive is determined.
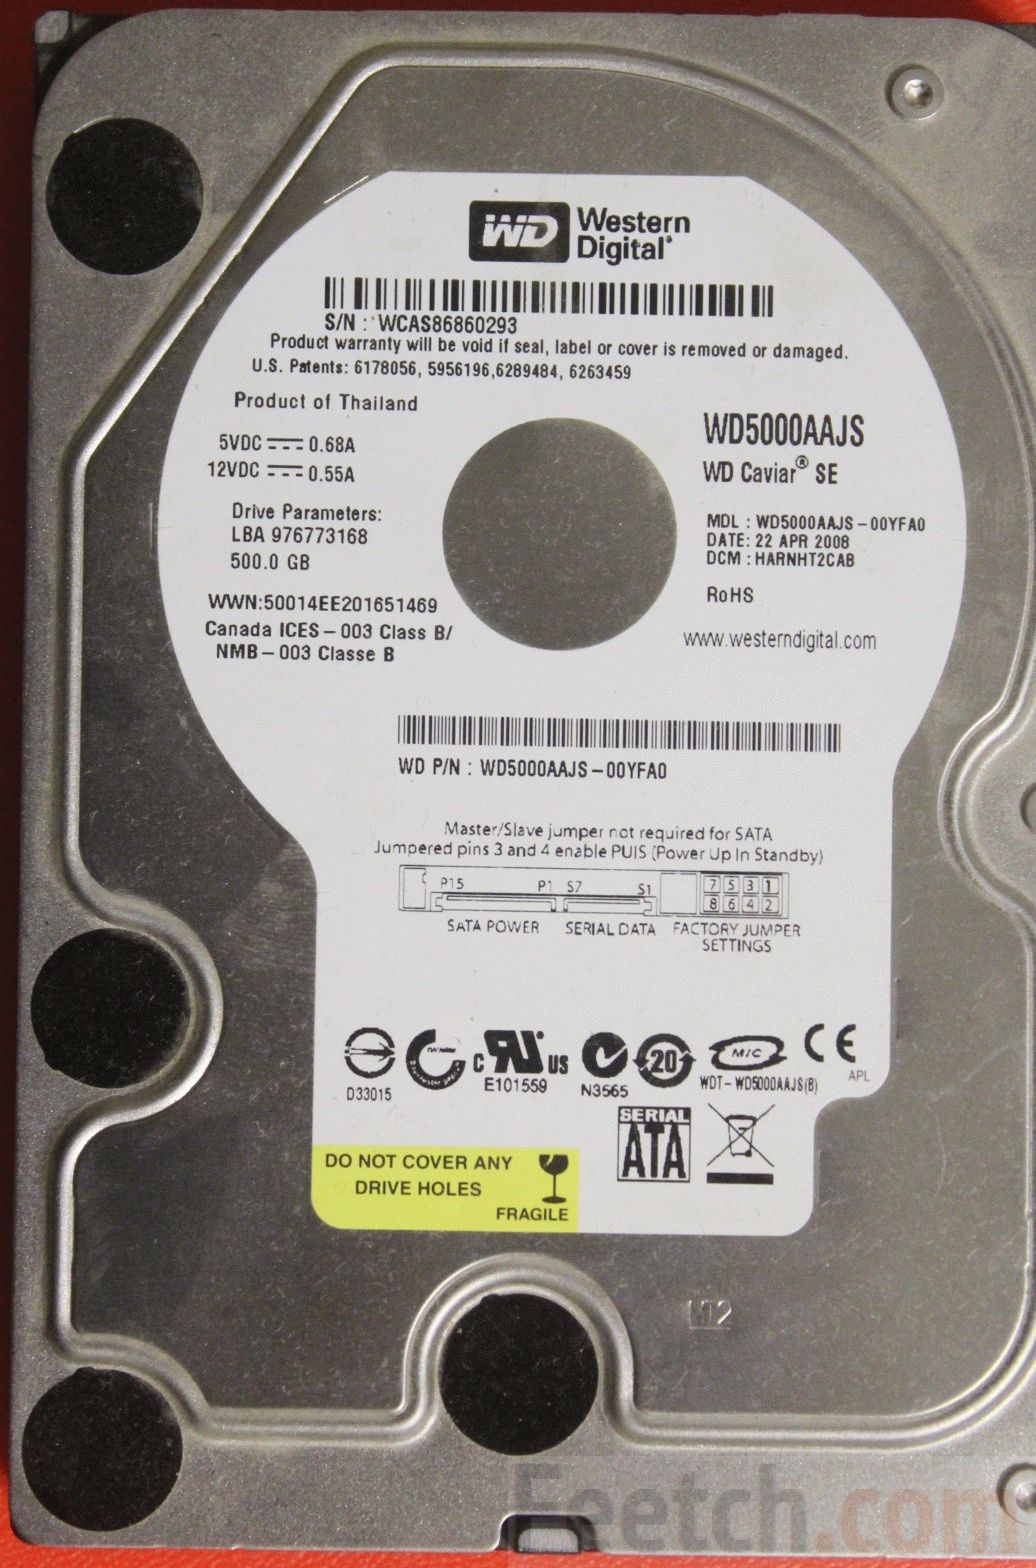
Let's say we have a WD5000AAJS in our hands. Only one thing is known - at lunchtime he will be a hundred years old. Therefore, you need to familiarize yourself with the historical reference on the Internet. Since the models are constantly updated, you need to enter the code that goes through the dash - 00YFA0. The search engine quickly gave an answer, and now there is every reason to assert that throughput the channel is 3 Gb / s (SATA 2.5 generation).

It has already been said above how to connect such equipment to an outdated motherboard that does not have a SATA interface. So let's move on to new products.
Connecting SATA to exSATA bus
When engineers approached the problem of increasing SATA speeds up to 12 Gb / s and above, it turned out that this is not economically viable. Energy efficiency drops sharply with a simultaneous increase in price. Someone noticed that the graphic bus PCI cards Express works seamlessly with high speeds, and then it was decided to make a kind of hybrid between it and the outdated SATA. To do this, the connector was divided into two parts:
- specific. Small port on the side.
- Standard. Two ports for SATA connections 0.

The figure shows a dual exSATA port. This can include 4 hard drives with SATA interface, or 2 exSATA, or 1 exSATA and 2 SATA. The following is an example of including two SATA drives in one exSATA port.

Due to its large size, covering three exSATA slots at once, the plug is called a hub among professionals. You need to start by checking the BIOS. It turned out that some motherboards can turn off SATA support, switching completely to Express, which supports speeds up to 16 Gb / s.

At the same time, you can see the BIOS capabilities regarding RAID arrays. Recall that in the latter case, several hard drives can duplicate their information for reliability, or turn on alternately, which significantly increases the speed of work. The size of the article does not allow talking about this topic in more detail.

The selected AHCI is the default mode for most systems. It provides maximum compatibility with older hardware in a completely transparent manner to the user. For safe "hot" connection of disks, it is recommended to set the appropriate option in the BIOS settings.

When installing a new operating system, the sequence for connecting bootable media is set. The hard drive is not put in the first place. Instead, the lead is given to a flash drive or DVD drive.
Before connecting

How to connect an IDE hard drive
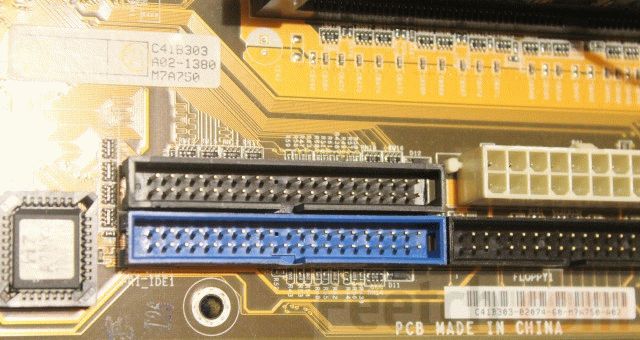
On the motherboard, the IDE connector is visible from afar. You can recognize it by a characteristic slot with many contacts and a key located approximately in the center of the block.
A splitter loop is usually hung on each port, so that both the master and the servant are on the channel at the same time.
Before connecting the disk on its case, you need to correctly configure the jumpers - Slave or Master. There will definitely be a diagram on the case on how to do this.

For discs from different manufacturers the insertion order of the jumpers will be unique (they seem to compete in this). The disk must be the bus master, otherwise it will not be possible to start the operating system from it (No IDE Master detected). Therefore, the slave jumper must be set on the CD drive.
After setting the jumpers, insert the hard drive into a suitable cage and secure it with four screws on both sides. Connect the single data cable connector to the corresponding connector on the motherboard. Connect power cables. Here the order does not matter.
Now you can close the covers of the system unit and connect the computer. The system itself should detect new connections and configure everything. The user will only have to confirm the operations in the Found New Hardware Wizard.
If the system is confused, where is the Master and where is the Slave, then it is necessary to make assignments in the BIOS. Immediately after turning on the power, repeatedly press the F2 key or Del (differently) to open BIOS settings. Find the order description interface boot devices, set the options. The first is the CD-drive from which the system is installed. Save the settings with the F10 key. After that, the operating system will start loading.
How to connect a SATA hard drive to an old motherboard
An adapter is used to connect a SATA hard drive. PCI bus. It may have one or another number of ports, respectively, there are several hard drives installed.

Insert the card into the slot, connect the hard drive, put it in the bay and fasten it with screws on both sides - only two or four screws. It is advisable to choose the location of the modules inside the system unit in such a way that, if possible, there is enough free space between them to ensure ventilation. And then when the computer overheats, it will automatically turn off.
Now connect the power cable to the hard drive. If the old-style power supply is for IDE, you will need an adapter to connect to SATA. Now you can connect the data cable to the hard drive. Once the system has booted, install the driver from the included DVD and the new drive will be visible through Explorer.
Sometimes there is no disk other than SATA. And then you need to install Windows again through the PCI adapter. The bootloader will not see the drive, but will give you the opportunity to manually find it. Here you will need to find it on DVD correct driver for the current operating system. After that, the installer will notice the disk, and it will be possible to create partitions for the new operating system. This is absolutely accurate, because the authors put the “seven” in this way on an old system unit.
External hard drive to USB 3.0
The serial interface has become so fast (up to 5 Gb / s) that USB 3.0 external hard drives are now being released. The motherboard usually has 20-pin sockets, in addition, some of the ports are located on the rear wall. But if you plan to put an operating system on the hard drive, it makes sense to place it inside the system unit. Adapters from 20-pin to microUSB 3.0 typeB are usually not found, but intermediate adapters can be used for docking.
(5
ratings, average: 4,60
out of 5)
Today there was some kind of near-computer quiz on the radio. The prize is an 8 GB flash drive. Question: what is the name of the place where all computer memory? Answer options: driver, clipboard or hard drive (yes, the announcer read exactly the hard drive). Let's talk about hard drives.
Many people ask: how to connect a second hard drive to a computer? If we are talking about a modern computer and a SATA screw, then there are no problems: turn off the computer, fix the hard drive with 4 bolts, insert the power cable and the SATA cable. Plug the other end of the cable into any free port on the motherboard and turn on the computer. In general, it is better to print this article and keep it on paper, because if you need to read it, the computer will be turned off.
If IDE hard drives, you will have to dance a little with a tambourine, or rather, with a jumper.
IDE hard drives coexist on one computer only under the condition of subordination: one must be the main (master), the rest - slaves. This is set using a jumper - a tiny plastic "key" that closes certain contacts.
Features of the jumper installation are always indicated either on top cover hard drive (the sticker should have the inscription Jumper Settings or similar), however, there are cases when the jumper positions are indicated directly on the board next to the contacts.
Please don't change jumper position and do not disconnect (connect) the hard drive when the computer is on! And don't say later that I didn't warn you.
Just in case: the hard drive with the operating system and programs should be "chatlanin", and music, films and other documents can safely live on the "patsak".
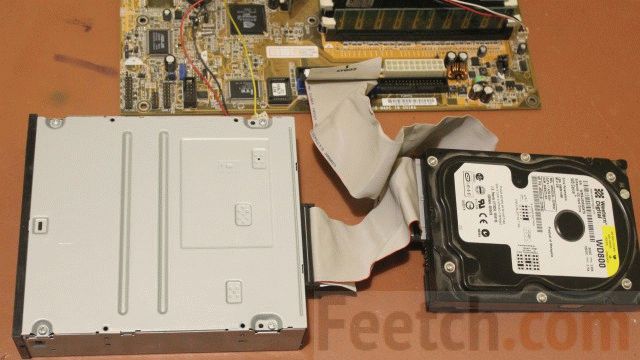
The dances with the jumper are over, let's move on to the train. There is one connector on one side of it - it is ONLY for the motherboard. Insert it carefully into the corresponding slot on the motherboard as shown in the picture.
Attention! Insert IDE cable only one side can be inserted into the connector on the motherboard: the “key” must fit into the groove. On the other hand, there is no groove and the insertion will not only be wrong (will entail undesirable consequences), but also problematic.
There are two connectors on the other end of the cable. Important! At the far end of the loop, there must be a main hard drive, the jumper of which is on master. The middle connector, respectively, is only for the slave.
Finally food left. The 4-core cable ends with a connector that is connected with characteristic notches upwards, it is very problematic to plug in the power with the reverse side.
Many thanks to the members of the Computer Literacy Subscribe group, Sergey and Elena (Kazak7 and Greta*), for their comments, thanks to which the article found a logical continuation. Sometimes comments contain a lot useful information. Good luck with your connections!
Windows RegistryFriends, I can explain to you in a nutshell why this happens, for example, you installed Windows 8 on one hard drive, and then Windows 7 on another, so Windows 8 commands the loading of both operating systems and all the files responsible for loading are in it, if You remove it or dismantle the disk on which it is installed from the system unit, then you will no longer boot Windows 7. Why? Because...
1. The partition from which the operating system is loaded is not active.
2. Or the partition from which the operating system is being loaded is active, but there are no operating system boot files on it. For Windows 7, 8, the bootmgr file and the Boot folder with boot configuration (BCD) files.
4. If you permanently disconnected one hard drive, then restore the download remaining on the second Windows disk 7, 8.1, 10 is possible according to our article.
5. Also you can produce.
Note: The EasyBCD 2.0.2 boot manager is best used if you have two or three operating systems installed on the same hard drive.
- If you want to install several operating systems with independent bootloaders on different hard drives, then you need to do everything so that each installed Windows does not know anything about its neighbor located on another hard drive installed in the same system unit. That's all. Another question, how to do it and how to manage computer boot afterwards? The answer is yes, very simply.
Look at my working system unit, it has four hard drives and operating systems are installed on all hard drives, they all start and work being in the system unit together or one at a time. There are no special boot managers installed on any system: EasyBCD 2.0.2 or MultiBoot.
solid state SSD drive SiliconPower (120GB) - Windows 8 installed
SSD ADATA SSD S510 (60GB) - Windows XP installed
SSD Kingston HyperX 3K (120 GB) - Windows 7 installed
simple hard drive western digital Caviar Blue (250 GB) - Ubuntu Linux installed


The secret is simple, install any operating system on the computer, then simply disconnect the hard drive with this Windows from the system unit and connect another hard drive, and install another operating system on it, if you have a third hard drive, do the same with it. And now the most important thing, when you install everything and connect all the hard drives to the system unit, how to manage the loading of operating systems?
If there are several hard drives in the system, the BIOS (AMI) parameter appears Hard Disk Drives,

And in BIOS (Award) parameter Hard Disk Boot priority,

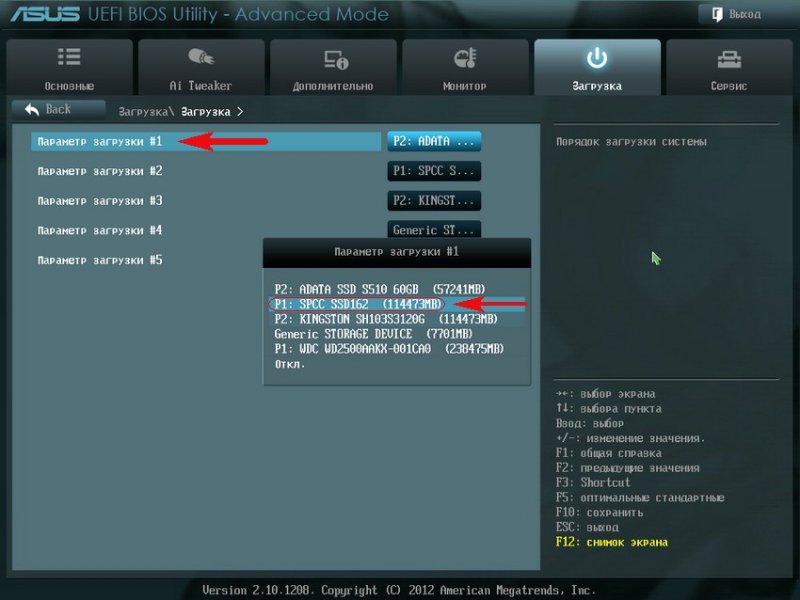
In BIOS UEFI option Hard Drive BBS Priorities, all of them are responsible for the supremacy or priority of hard drives in the system.

If in any of the above parameters the first is a certain hard drive, then the computer will boot from it in the first place by default, since it is the main one. But for rapid change hard drive priority, it is not at all necessary to climb into the BIOS every time and look for these parameters, you can make everything easier.
Press the Delete or F8 key at boot and enter the boot menu, then use the arrows on the keyboard to select the hard disk with the operating system you need and press Enter, the Windows you selected will load.


If you most often use a particular operating system, then you need to make it bootable by default.
Boot option #1 is that hard drive operating system which is loaded by default first. Click on the parameter with the left mouse

And in the menu that appears, select the hard drive with the Windows we need. For example, I will choose a SiliconPower SSD with installed Windows 8 as it is my primary operating system.

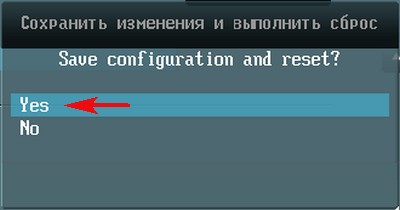
And Yes, the computer restarts and boots Windows 8 on the hard drive of my choice. SSD drive SiliconPower.
If during the day I suddenly need Windows XP, then I reboot, press Delete, enter the boot menu and select the hard drive with Windows XP installed and that's it.
When assembling a PC, upgrading and repairing it, sometimes it is necessary to install a hard drive on the computer. Let's consider the basic rules and requirements that must be taken into account in order to get an excellent result by spending a minimum of time.
Basic steps for installing a hard drive
The most common cause, prompting the installation of a new hard drive - failure of the previous one. In this case, the replacement process is surprisingly simple. To begin with, of course, you need to open the cover of the system unit, for which first unscrew 2 fixing screws on each wall of the rear side of the case (it is better to put the screws in plain sight so as not to lose them). Next, you need to disconnect the burnt hard drive from the power cable and data bus, release it from the mounting screws and remove it.
Having it as a sample, go to the store. And having bought a new analogue, remove the hard drive from the package, inspect for the moment there are no serious external damages and scratches. If you haven't found one, then proceed to install it. You need to connect everything in the reverse order. After completing this procedure once, you will already know how to install a hard drive on a computer.
It is important to note that all work is done with the power off, also for convenience, disconnect all cables connected to the PC case and put it on the table.
Features of installing hard drives of different formats
Let's take a look at how to install a new hard drive if this is your first time doing this. Attaching a hard drive will not be much more difficult, but for those who do not have the relevant experience and are faced with this task for the first time, the information presented will be useful.

First of all, it must be remembered that different generations hard drives have different connection standards, and, accordingly, different connectors.
Installation rules
Based on the opinion of most experts on how to properly install a hard drive, then first we advise you to make sure that the motherboard supports the hard drive being installed, and also confirm their compatibility. On some motherboards, two types may be present at once: SATA and IDE, but usually in such motherboards DVD drives are connected to IDE cables. Although they are suitable for hard drives.
Previously, in computers, the emphasis was on the proven IDE format, which proved its reliability and compatibility with many well-known models. But as technologies are constantly evolving, outdated ones are gradually abandoned, they are replaced by new, more modern ones. With the introduction of the new SATA format, IDE is already becoming a thing of the past, and although disks with it are no longer sold, it is still widely used.

Format Features
The electronic-mechanical basis of both formats is identical, the differences are in the type of interface used. has a maximum of 133 MB/sec. Existing SATA1, SATA2 and SATA3 standards provide up to 150, 300 and 600 MB/s respectively.
The advantages of IDE include the ability to connect two devices to one cable (with the total shared between them), and each SATA device is connected with a separate interface cable.
Another disadvantage of the IDE is the need to manually select and use jumpers to set the modes - Master / Slave, as well as enter into the BIOS settings which of the hard drives should be considered the main one if the second one is connected.
Features of installing a new disk in the system unit
Consider the question of how to install a new hard drive. First you need to insert our hard drive into a specially designated place for it, usually it should be looked for closer to the front of the case.
Choose its location in the bay for you to install it where it is best provided with cooling by PC coolers. Its optimal position is in the center. Install the new hard drive horizontally and fix it firmly. Fasten with screws well so that they are located on both sides.
Reliable fastening will prevent the occurrence of vibrations of the hard drive itself during operation. Vibrations for a hard drive that has moving mechanical elements are detrimental. In addition, with tight contact between the disk and the case, the walls, like a radiator, remove the heat generated by the hard drive. Next, connect the power and data cables.
How to install a new SATA drive
Unlike the outdated IDE, the more advanced one is much easier to connect. As we already know, in this standard, each of the hard drives is connected using a separate cable.

The SATA hard drive interface also consists of two connectors: narrow and wide. But here the question of how to install a new hard drive is the presence of a different connector through which data is transferred from the motherboard, and through the wide one voltage is supplied.
The SATA cable is connected to the data connector. They are different: straight and angular, without latches and with them. But it is impossible to confuse and plug the cable with the wrong side, so there is nothing to be afraid of.
The hard drive can be connected to the SATA connector arbitrarily. Although there are variants of the SATA-1, 2 and 3 standards, they differ only in the speed of information transfer and are absolutely compatible both at the level of physical connection and logically.
The second end of the cable is connected to the connector on the motherboard. They can also be angled or straight and are usually brightly colored and easily recognizable.
Connecting power to the drive
After the most time-consuming operations have been completed, and we have figured out how to install a new hard drive, now it remains only to connect it to power.

It is supplied to both IDE and SATA hard drives directly from the PC power supply. It comes to IDE drives through Molex connectors, while the SATA standard has its own connector - a wider one.
Keep in mind that SATA power supply not always initially present in the set of connectors on the computer power supply itself. It may turn out that you have a PC with an old model block, and this connector is not there. How to install a hard drive on a computer in this case?
It all depends on specific model power supply. In this case, an IDE-SATA adapter will help you. They come in various designs, and sometimes some instances also act as splitters for several devices. Basically, that's all it takes to know how to install a hard drive on a computer. But what if you have one hard drive, but want to add a second one?
How to install a second hard drive

Sometimes a situation arises when, when downloading new files, you suddenly find that your hard drive does not have the necessary free place. Of course, there is a way out - to delete old unnecessary documents and defragment, but all these attempts to free up a few hundred megabytes (or gigabytes at best) are only a temporary success. After some time, it turns out that the disk is again packed to capacity, and you have no room for new movies or music.
How to proceed in this case? There are several ways to solve the problem. You can change your old hard drive for a new one that has a much larger amount of memory. How to install a new hard drive has already been described above. But you need to understand that this entails an abundance of additional problems. It is necessary to reinstall the OS, and, accordingly, all previously downloaded drivers, applications and programs. You will also have to transfer all important information from the old disk to the new one. A lot of time will be spent on this operation.
But there is another way to solve the problem - to purchase a second, additional hard drive. How to install a second hard drive, consider next.
Installing an additional SATA hard drive in practice proved to increase the speed of the system. Interacting with heavy software complexes, you can qualitatively feel the superiority of the new format. Applications and programs do not slow down at all, and the download occurs instantly. In addition, the power consumption and power of SATA drives are minimal, which practically does not lead to a possible overheating of hard drives.
How to connect a second hard drive?
The procedure for connecting a second, additional, hard drive is no different from how to install a hard drive on a computer for the first time, and corresponds to the previously described process.
When connected second hard IDE format disk there is a small nuance - a jumper. You need to set its status using a special jumper. For the main hard drive, it must be set to the Master position, and for the additional hard drive, to the Slave position. With newer SATA drives, this is no longer necessary.

Each hard drive in the system unit has its own compartment. It is only necessary to take care that the distance between the installed devices is sufficient to ensure good ventilation. Do not place them close to each other, it is better to leave a free span. If it is not possible to distribute two disks on different shelves, you can install an additional fan to prevent overheating of the media, which negatively affects the durability of the elements and the safety of your information.
Then secure each hard drive carefully to the chassis to avoid vibrations. If, after turning on the second hard drive, they nevertheless appeared, this indicates a clear problem. Vibrations threaten you with hard disk errors and the possibility of losing information. Therefore, do not neglect fasteners. This will help minimize the possibility of vibration.
What to look for after installation
Recently, the appropriate instructions have been attached to the hard drive, which says how to install a hard drive on a computer, so if you look further there, there should not be any difficulties in the process. After the work done, take care not only to connect the cables correctly, but to lay them carefully so that they do not stick out. If possible, bring them further inside, and if necessary, fasten with tape or plastic ties.