Error 9 occurs in iTunes when users are unable to restore their iPhone device. Full error message: "The iPhone "iPhone" cannot be restored. An unknown error has occurred (9)."
Apple manufacturers acknowledged the error message and even published the necessary documentation on their website about this. According to them, this error occurs if the Apple device is disconnected during an update or restore. We have put together some solutions that include basic fixes to help you solve your issue. Follow our recommendations consistently.
Error 9 is one of the most common errors that users encounter when using the iTunes app. Here are some of the reasons why this error message might appear on your computer screen.
- USB cable or port problem: Since this error means there is a connection problem, you may have a defective USB cable or port that is interfering with the connection.
- Device in error state: it is known that on Apple devices There are always some errors. A simple restart will update the configurations and fix the issue.
- Security Service: Your computer may have security mechanisms enabled that may block the connection to your device.
- Old version of iTunes: Apple often releases new iTunes updates to fix bugs and improve features. Your iTunes application must be up to date before you attempt to restore or update it.
Before you run the solutions, make sure you are logged on to your computer as an administrator. In addition, you must have an open active internet connection. Network without proxy and VPN.
Solution 1 Replacing the cable or changing the port
If you have a faulty cable, chances are that the process of restoring or updating your iPhone may be interrupted. iTunes requires iPhone to remain connected to your computer during the entire update or restore process. If the connection is interrupted, the process will stop.
You must replace the cable that you are using as a means of communication between your iPhone and iTunes. In addition, you should also try to change the port you connect the cable to. After replacing the cable or port, start the process again and see if this error is gone.
Do not switch to other solutions if you have a defective cable or USB port.
Error message 9 can appear in your iTunes if the paired device has a misconfiguration or incorrect settings stored on it. This is a common reason not only for the iPhone, but also for other devices. With a large number of applications and modules, the smartphone very often goes into an error state. Force restart your device and see if that fixes the problem.
For iPhone X/8/8S/Plus:
Press the volume up button, then immediately the volume down button, and then press and hold the power button until the Apple logo appears on the screen.
For iPhone 7/7S/Plus:
Hold down the on/off and volume down buttons at the same time until the Apple logo appears on the screen.
For iPhone 6/5/S/more early models and iPad:
Press and hold the Home button and the Power button until the Apple logo appears on the screen.
After a successful restart, reconnect your iPhone to your computer and check if the issue is resolved.
Solution 3 Disabling antivirus software and firewall
If both of the above methods did not work, then you can try disabling your antivirus software and make sure iTunes has the appropriate permissions in the firewall. Antivirus quite often conflicts with applications or blocks them (false positive). You can temporarily disable your antivirus software and check if that fixes your problem. Make sure you disable firewalls on your computer (if any).
Solution 4 Update iTunes to the latest version
If all of the above methods fail to resolve the issue, then there is probably a problem with iTunes itself. Apple releases frequent iTunes updates to fix bugs and make improvements. If you try to perform the restore or update function after more than old version iTunes, you should update it immediately.
- Open the iTunes app. Click on the "iTunes" button on the left upper corner screen and select Check for Updates.
- Now let the app connect to remote servers and download the latest updates. Then restart your computer and check if the issue is resolved.
Solution 5 Using Third Party Software
There is another workaround for finding a solution for iPhone giving error code 9 when restoring or updating is to use third party software to complete this task. There are a few free apps that are designed to help you take back control of your iPhone. One such application is ReiBoot. We studied some of the reviews and in most cases they were positive. You can find other options, but first of all, make sure you have a backed up copy of your data in advance.
Solution 6 Using recovery mode
iTunes has a built-in restore feature that allows a phone that is in recovery mode to connect to your computer and perform basic operations, including updating or restoring your iPhone. This solution will delete your data, which is why we give this solution a very low priority. Proceed only if your important data is securely stored elsewhere.
- Make sure your iPhone is up to date. Put it into recovery mode.
- Once the iPhone enters recovery mode, connect it to your computer and wait for iTunes to detect it.
- Now, when prompted, select Update and wait for the process to finish. This may take a few minutes, so please be patient.
We hope that with the help of the above methods, you still managed to resolve the error 9 in iTunes and you restored / updated your device from Apple.
Found a typo? Select the text and press Ctrl + Enter
Despite the fact that the technology of the Apple brand is of high quality, even in its operation failures and errors often occur. This is especially true for failures in service applications, when error messages may occur due to incompatibility of firmware, an outdated version of the application, and other trifles.
In most cases, problems occur when updating or restoring the system.
Let's take a look at what some of the problems that appear when working with products on the iOS platform mean and how to fix them. We are most interested in error 9, error 3004 and error 3194 - they are among the most. It is worth clarifying that most of them can be completely eliminated by yourself, as you will see for yourself later.
When does she appear? Error 9 occurs not only when using the iTunes service, but also when using another Apple application on iOS.

Why does iTunes error 9 occur? There are several reasons:
- Incomplete installation or wrong download iTunes on iPad
- Damage to the registry when it is updated or changed;
- A virus that has entered the system;
- Deleting files necessary for the program to work.
How to remove error 9?
There are several ways to troubleshoot error 9:
Check iTunes for updates. Probable Cause, due to which you see error 9 - an outdated version of the program. Check if there are any updates for the application, if there are, install them.

Did not help? Next option, which helps in most cases - uninstalling and reinstalling the application. First, go to the Control Panel, find the Programs section. Select Add/Remove Programs, find iTunes in the list, and click Uninstall. Then download the latest version of the app again.

Sometimes error 9 can mean a glitch in the core of your gadget's iOS system. The problem appears when you use unofficial firmware. Therefore, in order to fix it, you should replace the device software.
Error 9 when restoring a device
If error 9 did not occur while using iTunes or another product, but in or iPad recovery, it is removed in the following way:
- Install the latest version of iTunes;
- Restart your PC;
- Check for updates for your computer, install them, and then restart.

If the steps did not work and you still get error 9 during recovery, use a different USB input or change the cable. Did not help? Try to restore on another PC.
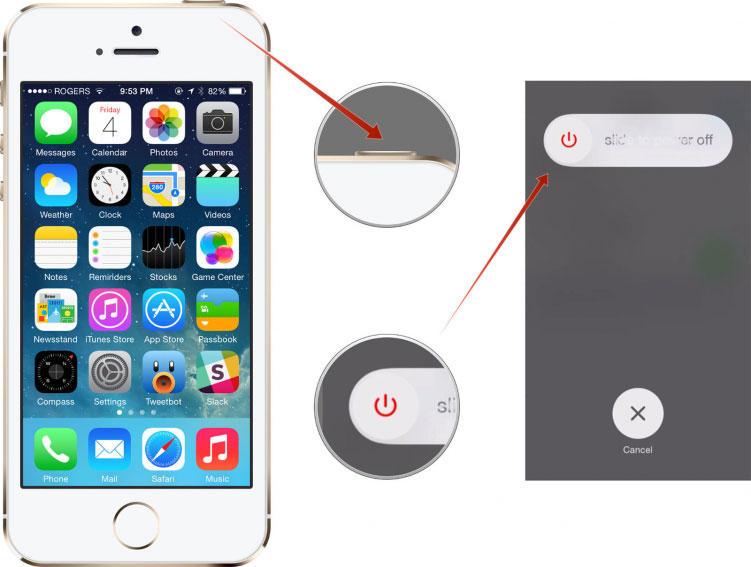
Last option - forced reboot iOS on iPad. To do it, for example, on an Apple phone, you need to press and hold the on / off button until the slider appears on the screen - about 10 seconds. Next, move the slider to the “Turn off” item, then repeat the operation so that the company logo reappears and the device reboots.
Error 3004
iTunes errors can seriously ruin your experience with Apple products. Another error that often occurs when updating is error 3004.

Why does error 3004 appear when updating iOS? Most often due to a poor Internet connection or errors in the Windows firewall. If restarting your hardware and iTunes doesn't work, check for an update to the app - most problems only appear because it's outdated. If all the same, the update did not help, let's look at other ways to fix error 3004.


Error 3194
Error 3194 also pops up during iOS updates when using iTunes.

How to eliminate it? There are three options for removing the error:


Note. Often, error 3194 appears when restoring the firmware when the user tries to install on the iPhone or iPad previous software version. In this case, all the above methods will not work for you. For such an operation, you need to JailBreak on the phone, which is unsafe and can lead to its inoperability. If you do not have knowledge of the intricacies of this process, it is better to contact a specialist.
Thus, we examined the common iTunes errors that appear on the iOS system - error 9, error 3004 and error 3194. We can conclude that often to fix them it is enough to update iTunes or check the Internet connection, in other cases you need to perform a few simple manipulations. Be that as it may, all of them are quite simple to fix on your own both on the iPad and on other Apple equipment, as you can see thanks to the above recommendations.
Error 9 iPhone is a problem that can only disturb the user for specific reasons. It usually appears when the phone is restored or updated. Consider what could cause a malfunction and what to do in this case?
The problem in question appears when the data transfer between the USB port and the phone is disrupted. That is, when the user performed the restore or update procedure by connecting the smartphone to the PC. Error 9 on iPhone means a broken device connection. You may have manually turned off your phone while it was installing an update, or the cable may have been damaged. There are several reasons for the occurrence of a malfunction.
The reasons
If you pay attention to the reviews from the owners of the presented smartphones, you will notice that the problem associated with the inability to restore the system often appears on the iPhone 5S. Today, the following factors are distinguished due to which a malfunction occurs:

What to do if you could not restore iPhone "Error 9"
Error 9 when restoring an iPhone mainly occurs among owners of older smartphone models, or rather, up to 7 iPhones. Let's explore ways to solve the problem.
Update iPhone again
The first way to correct the situation is to re-update the system. The solution will be effective if the wire connecting the PC to mobile device, has come loose, or has been accidentally removed from the connector. Instruction:

Perform recovery via DFU mode
If after the instructions you started the device, and it turns on in recovery mode, then you must:
- Open the program again on the PC, hold down two keys on the mobile phone and connect it with a cable;
- At the end, when iTunes offers two solutions, you should select the second option - Restore .;
- The procedure involves a complete cleaning of the smartphone. That is, all stored user information will be deleted. But, it is easy to return it if you use a backup copy.
Hardware problem
Pay attention to the health of the USB cable and the connector itself in the computer. Connect another device, try a different port, or find a suitable cable
Checking the hosts file
The error might be related to hosts file, which is located in system files Windows. To troubleshoot, go to the folder - C:\Windows\System32\drivers\etc\. Then open a file called hosts. 
Delete all data below the command - 127.0.0.1 localhost. Finally, send the computer to reboot. If the file cannot be edited, then run it with admin rights enabled.
Virus check
Sometimes the reason may be hiding in the presence of viruses sitting in the PC. Use the antivirus or Firewall provided in Windows as a standard system defender. After checking the computer for malicious software, repeat the procedure again with updating or restoring the iPhone.
Contact the service center
If the described solutions did not bring the desired result, then the malfunction belongs to the hardware. That is, the battery, gyroscope cable, memory could be damaged. Take your smartphone to service center where specialists will diagnose and, if necessary, replace faulty parts.
Method 2: Update iTunes to Fix Error 9
Step 1. Open iTunes on your Windows or Mac computer.
Step 2 Get the latest version to update iTunes.
Mac users: Select "iTunes" from the toolbar at the top. Click "Check for Updates" and follow the instructions to update iTunes.

Windows users: Click "Help" in the menu bar and select "Check for Updates". Select the latest version of iTunes to update.

Later, you can update or restore iPhone from using iTunes. If the iTunes 9 error is still appearing, you can try the next solution.
Method 3: Change another computer
If iTunes keeps getting error 9, you can borrow a computer from your friend. Then you can try to update or restore your iOS device using iTunes. Also, you can try another computer if you have iTunes error 4013 and other iTunes error codes.

Method 4: Check the USB cable and ports
Step 1 Check if you are using the original standard USB cable.
Step 2. Disconnect and reconnect your iPhone or iPad to your computer.
Step 3 Connect the USB cable to another USB port on the computer.

Method 5: Check your security software and firewall
Step 1. Open your antivirus software to see if iTunes is blocked or not in the exclusion list.
Step 2 Find windows firewall and make sure iTunes is in the exclusion list.
Step 3. Disable virtualization applications and update your Windows or Mac OS version.

Solution 6: Get the Best iTunes Alternative: iPhone Data Recovery
By using Apeaksoft iPhone Data Recovery, you can get rid of iTunes flaws and restore iPhone or iPad from iTunes Reserve copy safe and selective. In other words, you can restore and extract data from iTunes backup without data loss. Even if you have not previously made a backup a copy of the iPhone with iTunes, iPhone Data Recovery also allows users to restore data from the iPhone itself or from a backup iCloud copies without erasing the original files. In a word, this iPhone Data Recovery is your the best choice to avoid iTunes 9 error and recover lost iOS data easily.
Step 1, Accessing iTunes Backup Files
Download and install iTunes alternative software on your Windows or Mac computer. Make sure you have already synced your iPhone or iPad with iTunes on this computer. Select "Recover from iTunes Backup File" to view all iTunes backup files automatically.

Step 2 Scan your iTunes backup
Choose the most relevant backup iTunes, then click the "Start Scan" button in the lower right corner. It takes a few minutes to scan the iTunes backup. Later, you will see all the categories displayed on the left panel.

Step 3 Preview and data recovery from iTunes
Select a specific file type to see the containing files. You can click one item and then view detailed information on the right side. Check all iOS data you want to recover. Later, click "Restore" to restore iTunes backup to PC without data loss.

With the above 9 error fixing solutions and iTunes alternative software, you can get more options to update and restore iPhone than before. If you have any other iTunes errors such as iTunes Error 3194 Please feel free to contact us.
Part 2: Five Common Ways to Fix iTunes Error 9 and 9006
There are several ways to try and fix it. When you receive a message prompting you to restore the system and click the "restore" button. Nothing happened. In fact, you have encountered a hanging telephone. Here are 5 of the most successful ways to get rid of iPhone error 9 and iPhone error 9006.
Solution 1: Recovery Mode
We can try to enter recovery mode to fix the iPhone 9 error, but this method will result in data loss. So it's better to think about this method. And in order to fix iPhone error without data loss, we will show you the method in . You can choose the right one for you.
- Turn off your iPhone.
- Try the reboot program.
- Turn your phone back on.
- Restart iTunes.
The system should recover. Try the method once or twice before trying others.
Solution 2: Updata to the latest version of iTunes
Check if the latest iTunes version installed on a Mac or other computer. If not, then update to the latest version. But this method is not 100% effective.
For A Mac
- Launch iTunes.
- On your computer's top menu bar, click on iTunes > Check for Updates.
- Follow the steps below to install the updated version.
For Windows-based computer in
- Launch iTunes.
- Enable Help > Check for updates in the menu bar. If you don't see it, click on CTRL keys and B.
- Follow simple instructions by update.
Solution 3: Make sure the USB connection cable is
The USB cable may be damaged if you choose to use a cable that did not come with your device. Here are the steps to ensure that USB cable fine.
- Make sure you are using the original USB cable. You can also try a standard Apple USB cable.
- Make sure the cable is not dislodged or disconnected. You may get iPhone error 9006 as well.
- Plug the cable into another USB port. It should connect directly to the computer, not to the keyboard.
Solution 4: Checking the USB connection
The connection to the computer may be faulty. Perform the following checks to enable correct connection. Testing the process at every step.

- Check cable connections at both ends of the firm. To be sure, unplug the cable from the computer first and plug it in. Then unplug the cable from iPhone or other IOS devices and again.
- Disable any third party battery.
- Connect the USB cable directly to the device port.
- If you find a 30-pin or lightning cable connected to a USB hub, keyboard, or display, unplug it and plug it into your computer's USB port directly.
- If any virtualization application is running, such as VMware or Parallels, disable them. This can interfere with your USB communication, especially if they are not up-to-date or configured incorrectly. If the method works, quickly complete the app update.
- Restart your computer.
- Restart your iPhone or other iOS device.
- If a iTunes error 9 (iPhone error 9) or iPhone error 9006 still persists, see if any software updates are needed. For example, an OS X update can be called on a Mac or you can download the latest version of iTunes.
- If you are using a computer with Windows control, based on, check if your USB stick or computer firmware update is required. It can be downloaded from the manufacturer's website.
- Finally, connect your iPhone or iOS device to another computer.
Solution 5: Check Security Software (Complex)
It is possible that the security software installed on your iPad cannot communicate with Apple on its update server. This problem can also occur when you try to sync device content or downloads like songs and you get an iPad error message 9.

- Check your security software settings and make sure Connect to Apple is enabled.
- Make sure your iPad or other device is recongnised by iTunes.
- Now check if the time, date and time zone are set properly on the computer.
- Using the computer as an administrator, not in guest mode.
- Make sure that latest version iTunes is available.
- Update version operating system on a Mac or Windows based computer.
- Make sure your security software is up to date.