In this article I want to tell you how to turn a simple scanner into a network scanner. The program "Remotescan" will help us with this.
Let's say your office has one printer with a built-in scanner and copier (MFP), and about 10 users use this device. Any workflow is accompanied by scanning documents, converting them into electronic form. And now the poor accountant to the computer, which is connected to the MFP, constantly jumps and is distracted from his work, because he is constantly asked to scan a document and put it in the exchange folder. Agree, the accountant's nerves will start to fail in a month, and the authorities, when asked to buy another MFP, say that there is no money. Familiar situation? In order to save the nerves of the user to whom the MFP is connected, the Remotescan program was developed.
In this article, I will not go into the details of installing and configuring the MFP itself, let's say you have already done it. Now let's move on to installing and configuring the Remotescan program.
Installing RemoteScan
First we need to download this program. By the way, it is paid, but if you download it here, it will turn free, and even the crack will be in the archive. Magic!!!
This program is installed in two ways, where the scanner itself is connected, we must select the “server” installation option during installation.
Unzip to any convenient place for you and go to this folder. There you will see two files,

we are still interested in a file called "setup.exe", run it:

Select English and click the "Next" button.

Here we click on the “Next” button, the following window will appear:

We agree with license agreement, and click the "Next" button.

Click the "Next" button again and the following window will appear:

And here it’s more interesting, we need to choose the type of installation, server or client.
- Client - if you install the program on a computer with which you want to use the scanner in the future, then select this item.
- Server - if you install the program on the computer to which the scanner is physically connected (by wires), then select this item.
We put it on the computer to which the scanner is connected and therefore select the second type of installation “install Server Software”. We press the "Next" button.
Attention.
You can choose both options, but if you are not a confident computer user, then you may have difficulties later when specifying the server.

We choose where the program will be installed, you can leave it by default, click the "Next" button:

Here you are asked: "Do you want to start the remotescan server server after installation", check the "Yes" box and click on the "Next" button:


Click on the "Install" button. During the installation process, you will see the following window:

This will create an allow rule on your firewall, check the box indicated by the arrow and click on the "Allow Access" button.

All installation is over, now click on the “finish” button.
We go into our folder, which we unzipped:
And we launch the “RemoteScan_client_rusificator” file, everything is simple here, first click on the “Accept” button, and then “Extract”.
- Then we restart the computer.
After you restart your computer, the RemoteScan program will start automatically, and the program icon will appear next to the clock.
Click on this icon, which appeared in the tray next to the clock right click mice, you will have context menu, in which we select the topmost item (choose a scanner / select a scanner). In the list, select your scanner, what it's called can be seen on top cover devices. This completes the server setup. On this computer, as you worked, and continue to work, as you used to scan, and scan.
- Installing the client side
We pass to another computer and begin to install the client part. I will not repeat the installation process, we do the same as when installing the server part, only in this window:

You need to select the "install Client Software" checkbox. This completes the installation of the client part.
No shortcuts will appear in the tray or on the desktop, you can not search. Just open the program in which you are scanning, and in any case there should be a “select scanner” field, and an item with the name “remotescan (TM) (TWAIN)” should appear there, but I will show how it looks on the example of the program “ FineReader.
So, I start the program in which I usually scan any documents.

In the window that appears in the upper left corner there is a “File” button, if you click on it, a context menu will appear in which there is an item “Select Scanner”, click on this item and the following window appears:

In this window, we observe this line that interests us: “remotescan (TM) (TWAIN)”.
The program can be downloaded here.
It happens like this =)
On this, perhaps, everything! Thank you all for your attention, do not forget to actively comment on my posts and be added to VKontakte friends =)
27sysday.ru
How to set up a scan to a printer
Article created: 2014-11-02. updated: 2016-03-07
What is a scanner
A scanner is a device that helps to translate a variety of documents, including texts. spreadsheets and photographs in electronic form. Every year there is an improvement in scanner models. Their prices are getting more affordable. More and more people are using this modern technology.
In order to take advantage of all the features of your scanner, you need to properly configure this device. Of course, with the advent of Plug and Play technology, which allows automatic mode It has become much easier to configure and connect various devices to a personal computer. Accordingly, the device is quite simple to connect to your computer. But in other situations, you may need to perform a series of installation steps in the following sequence.
How to set up the scanner
- Connect the scanner to your computer. At the same time, the operating system installed on your computer will try to recognize the connected device, configure and install it.
- From the Start button's Control Panel menu, locate the Scanners and Cameras folder. In the folder, you will see all the imaging devices that are already paired with your computer. If the scanner to be connected is in this list, then this device is connected automatically. If it is not in the folder, then you need to run the scanner installation wizard.
- AT manual mode find the model name of your device. If your model is not listed, then you need to install the disc that came with the scanner. When inserting the disc into the computer's drive, select the "Install from disc" command. Then you need to select the path where the scanner driver is located. Usually installation driver located in a folder that contains the model name of your device. If there are no driver discs available, download them online from the manufacturer's website of the scanner you are installing. In this case, you need to specify the path to the folder where you will save the downloaded drivers.
- Next, the installation wizard will ask you to specify the port to which you connect the device. When in doubt about the choice of port, select the command " Automatic detection port."
At the end, you need to give a name to the device in the system. Now the device can work with any of the image processing programs.
Additional information on the topic
This article describes in an accessible form how to configure the printer without calling the wizard.
elektronikss.ru
How to make a network scanner in Windows XP, 7, 8, 10

Comments on the entry: 19
Hi all! Today I encountered such a problem, how to make a scanner over the network in Windows? The printer is then easily added, because. Windows has a built-in print server, but no scanning.
How to set up a scanner over a local network?
Having searched a little, I found a program that makes a scan server and, accordingly, can share usb printer over the network!
Now see how it works:
1. Install this program on the computer to which the scanner is connected. Set up as a server.
2. Now on a computer that does not have a scanner, install the program in Client mode.
3. To scan a document, select RemoteScan as the device.
1. Install as a server
I won’t explain to you how to install, everything is simple further, further, but most importantly, install as is and during installation, check the server box.

At startup, select the scanner through which the scan will be performed. We select the scanner so that the program can share the scanner over the network.

All. The server is minimized to tray and will start when the computer starts. You don't need to turn it off. If necessary, you can change the scanner in the tray if you have several of them.
2. Install the scanner as a client
Now install the scanner on the computer where you will scan.
The installation is similar, only during installation you need to select the Client checkbox.

After installation, if the firewall asks, again select which networks you will use it on.
All. Now how to scan.
3. How to scan over a network via USB
Now choose a program to scan. If you do not have it, you can download it in my article about free programs for scanning. I took the second one, which can scan several pdf pages into one file.
Select RemoveScan as a scanner

And we scan, as usual) This is how you can scan over the network via a usb scanner!
Many people may need to connect the printer to virtual machine, attached to this video)
AlexZsoft.ru
How to set up a scanner in an MFP on a computer if the printer is working and connected
Connecting the MFP via WiFi
Connecting the MFP to a computer
MFP setup
- You need to open the device settings and go to the Fax Settings menu, where you need to fill in all the fields. Be sure to specify the number and disable the "Error Correction" option.
- Then you need to configure the settings for copying and saving pages.
- If a multifunction device used in the office, and there is a PBX, then you need to update software apparatus. This is done on the official website of the manufacturer of this device. After downloading the firmware file, you need to run it by first selecting your device and specifying the file.
Now you know everything about how to connect an MFP to a personal computer, as well as wireless device through the use of WiFi. This will help you quickly set up your work in the event of a move or purchase of a new machine. In this case, you do not have to wait for the master or spend money on calling him.
elektronikss.ru
How to set up a scanner on a computer if the printer is working and connected to the MFP
An MFP or multifunctional device can print, scan, and make copies of documents at the same time. This is possible because this device combines a printer, an integrated scanner and a fax machine. A lot of users face a variety of problems associated with setting up and connecting such equipment. The methods of how to connect an MFP to a laptop or computer are no different from the methods for connecting conventional printers. If the MFP will be used to work over a network of several computers, then it is worth purchasing network MFPs, because. all functions - both printer and scanner will be available on all computers. Such devices should have WiFi connectors, this will facilitate the setup for a wireless connection.
Connecting the MFP via WiFi
Usually, this device connects via WiFi only through a special access point. Especially when connected to a laptop. You can connect a printer or MFP via Wi-Fi directly to a laptop only using a USB cable.
- Before connecting the MFP via WiFi, you first need to set up an access point.
- After that, you need to configure WiFi on the device itself and then connect to an access point. Next, drivers for the MFP or printer are installed on the computer and the printer or MFP connected to the network is located.
- You need to turn on the MFP and enter a number of parameters. After that, you need to select the next item to connect the MFP wirelessly WiFi networks and click "YES" in the dialog box.
- Next, select " Quick Setup».
- When the device detects a suitable network, you will need to enter an encrypted WiFi networks, which is set in the settings wifi router.
- Then you need to check and confirm the entered network code. While the all-in-one is connected to the hotspot WiFi access indicator should turn blue.
Connecting the MFP to a computer
When connecting the printer to a computer, you must use a special installed drivers. Before connecting the MFP to the computer, you need to install the drivers for the fax and scanner. Otherwise, the installation of the printer and MFP is similar.
- Before installing the device, it must be connected to the mains and, accordingly, to the computer. Then the device driver is installed. If the printer or MFP is new, then, according to the instructions, it is necessary to remove the yellow or orange color, they are clearly visible.
- Then tediously turn off the device and connect with USB port computer using USB cable. After that, turn on the device.
- The computer will detect the MFP or printer, and the operating system at the bottom right will display the message “Found new hardware” in a new window, with the specified device name. Then a window for installing new hardware will open - "Found New Hardware Wizard", which will indicate further how to install the MFP. Namely, you need to click the "Next" button, naturally after inserting the driver disk into the drive.
- After you install all the necessary drivers, you need to open the Start menu. There you need to go to the "Printers and Faxes" tab. You can also do this in the "Control Panel", where in the "Printers and Faxes" window you will see if the MFP is installed. In the event of a failure, this device will not be displayed at all.
- If the installation was successful, then you need to check the print quality. To do this, right-click on the name of the device or printer and call "Properties" that opens from the drop-down list. Then, in the dialog box, click the "Proof Print" button.
- It is possible to install the software and the MFP driver directly from the disk that came with the device. To do this, insert the disk with the driver software into the drive. After autorun of the disk, a menu should open where you need to activate the installation of programs and drivers by clicking on the inscription or the corresponding button.
- In addition, device drivers can also be installed from Printers and Faxes. To do this, double-click on the inscription "Install Printer". After that, the device installation wizard starts and the corresponding dialog box opens. In this window, you must click "Next" and in another dialog box, click " local printer connected to this computer." If you want the OS to find the connected device on its own, then you need to check the box next to "Automatically detect and install a PnP printer". After that, the search for the device and installation of its drivers begins. The driver disk is in the drive.
- If there are no drivers suitable for the device, then you need to visit the website of the MFP manufacturers and from there download the appropriate OS or Windows versions driver. For this it is necessary in address bar your browser, type the name of the company - the manufacturer of the equipment, preferably on English language, specify "ru" after the dot and then press "Enter". Thus, you will be taken to Russian version manufacturer's website. Drivers for download are usually presented as a self-extracting archive that automatically starts the installation. Thanks to this, there will be no difficulties during installation.
MFP setup
Before setting up the MFP, you need to familiarize yourself with the operation parameters.
- Follow the prompts of the Installer Wizard and click "Next". We agree with the license, and in the options window, check the box "Install Server Software".

- The program instance will be installed in server mode, allowing other PCs to use the network scanner.
- At the next stage, you need to make sure that the checkbox is ticked, as in the screenshot.

IMPORTANT! The firewall may issue a permission request for the program. In this case, it is recommended to allow the application on all networks.
Launching the server version
You just need to select a scanning device so that RemoteScan can share it. Double click on the required device.

The program will be minimized to tray and will continue to run itself when you turn on the computer.
If it becomes necessary to reconfigure the scanning device, you can always do this by right-clicking on the RemoteScan program icon and selecting "Chose a Scanner".

As you can see, using the program is quite simple.
Installing the client version
Installing the client part is similar to the server part, with the only difference being that now you should tick the "Install Client Software" box.

You also need to allow work on all networks if the firewall asks.
IMPORTANT! Firewalls (firewalls) of some antiviruses block ports 6077 and 6078, which are necessary for the program to work. It is necessary to add the exe-file of the program itself (on the server) and the above-mentioned ports (both on the server and on the client) to the exceptions.
Network Scan
Use a scanning program you know or, for example, install WinScan2PDF. It is very small and does not require installation. Designed for scanning images to PDF files only.
It often happens that in addition to a remote printer, you also need a remote scanner to work. And if you set the printer to local network is not difficult, then with the scanner everything is much more complicated. The fact is that Windows does not provide tools for providing public access scanner. This is done at the level of its drivers. Therefore, to open access through the local network, you need to use third-party programs.
The Blind Scanner utility is great for this, which works exclusively with scanners, making them visible to all computers on the network. The program is installed on each computer in client mode, and on the computer to which the scanner is connected - in server mode.
After installation, the program will automatically start the server service and will work minimized to tray. By opening the program window, you can see the operating mode of the service, its status (active or not), as well as scanners connected to the computer.
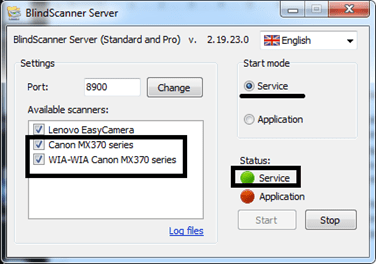
The utility is active and available over the network. Now it needs to be installed on all computers from which the scanner will be accessed, in client mode.
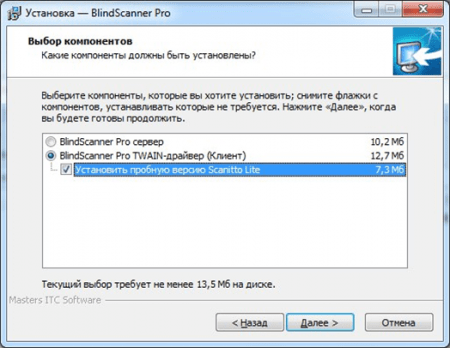
After the installation is completed, the "Scannito lite" program will start, in which you need to select BlindScanner Pro.

A scanning window will open, in which you need to search for the program server. To do this, you need to open the settings (as in the screenshot) and enter the local address of the computer to which the scanner is connected.

The connection will then be attempted. If everything is entered correctly, then in a couple of seconds you can see the scanner itself in the field.

Select the scanner model in the drop-down menu, after which you need to set the settings: resolution, color mode, paper size, and contrast and brightness settings.
Now you can start scanning. Upon completion, the result will be displayed in the preview window, after which you can save it to any directory. As with a printer, only one computer can access the scanner, the second must wait for the first to finish.
This is the simplest yet most reliable way to share a scanner. It can be used both in the office and in home network when it is not possible to move the scanner from place to place. Also, any program that supports scanning, for example, ABBYY FineReader, can act as a client.
The local network provides various advantages for working with data: copying, transferring information, sharing programs and technology. For example, one device can work with several computers on the network.
You will need
- - a computer;
- – configured local network;
- - scanner.
Instruction
1. Download RemoteScan 5 to share the scanner over a network in Windows. You can download it here http://www.remote-scan.com/. Install the server version of the program on the computer to which the scanner is connected. Install the client version of the application on other computers on the network. When installing latest version the program will give a message that the scanner is not found, don't worry, this is typical. After installing the server version, the program icon will appear in the tray. Click on it with the right mouse button, go to the "Settings" item in order to connect the scanner to the network. Select a scanner and set up ports. The scanner may not immediately decide, it will take from one to 3 minutes.
2. Open your firewall/antivirus and allow access to port 6077 if you have NOD antivirus 32, enter the personal firewall, go to interactive mode in the settings and make a separate rule for the RemoteScan program. Later, install client versions on other computers. The installation of the network scanner in Windows is now complete.
3. Set up a network scanner in Ubuntu OS. Go to the terminal, enter the command #apt-get install and enter the name of the required package - sane-utils, then open the scanner configuration file, the one that can be located in the /etc/sane.d/ folder with the name saned.conf, add to the end file address of the computer to which you want to share the scanner. Edit the #nano /etc/inetd.conf file, add the line sane-port stream tcp nowait saned:saned there and specify the further path /usr/sbin/saned saned.
4. Make a Scanner group: #groupadd scanner. Add users to this group group with the following command: # #usermod -aG scanner "User name"; usermod -aG scanner saned. Edit the 40-libsane.rules file located in the nano /lib/udev/rules.d/ folder and find your scanner there. Bring the line with the name of the scanner approximately to this form: # "Name of the scanner"; ATTRS(idVendor)==”03f0″, ATTRS(idProduct)==”4305″, ENV(libsane_matched)=”yes”, MODE=”664″, “Group Name”=”scanner”.
5. Set up the client computer: install the sane-utils package with support for the standard package installer apt-get install, edit the net.conf file located in the nano /etc/sane.d/ folder, add the address of the scanner computer to the end of this file. The network connection of the scanner is completed.
In contrast to Windows, which is characterized by ease of installation and configuration, Linux has become a symbol of the complexity and complexity of installation, which can scare away anyone who does not consider himself a virtuoso. command line and a high-class programmer capable of writing the missing driver for an unknown device on his own.
However, installing and configuring ubuntu - especially the Linux distribution famous among beginners - is no more difficult than any other operating system. This distribution kit is immediately ready for launch after installation and includes everything you need to work: a customer for communication via the ICQ protocol, a customer Email, photo tool, audio and video player, office suite openoffice. In addition, a mechanism for tracking software changes is implemented here, freeing the user from the need to monitor the release of new versions. Here is a schematic instruction for the installation process: 1. Download the distribution from http://ubuntu.ru/get, burn the disk image to CD, install it into the drive and boot. To do this, you may need to set bios priority boot from CD drive.2. In the installed installer, select the Russian language. Navigation through the list of languages is allowed with the support of arrows on the keyboard.3. In the menu that appears, select the item "Install ubuntu"4. You will again need to prefer the language for communication during the installation process, specify the time zone.5. Select a keyboard layout and check if it works correctly by typing a few words.6. A particularly important stage of installation is the definition of disk partitions for operating system. If you want to leave Windows and set up Ubuntu as an alternative operating system, you need to be very careful not to lose valuable data and keep Windows running. As usual, for the root partition containing system files, 5 GB is enough, for a swap partition, a volume equal to the volume is usually enough random access memory computer, or one and a half times higher than it. The home directory home containing user data should ideally be located somewhere else. physical disk and have a volume of 8-10 GB.7. Specify the username and password, as well as the computer name, click "Install". After the reboot, the system is ready to work.
Related videos
A scanner is a device necessary for converting a wide variety of documents into electronic form, ranging from texts and tables to photographs. Scanner models are constantly being improved, their functional probabilities are growing, and prices are falling, so that the scanner more and more often finds a place for itself on the table next to the home computer.

To take full advantage of the possibilities of modern special scanning technologies, you need to configure the scanner. Fortunately, with the origins of modern USB models and operating systems, setup is often done mechanically by simply plugging the scanner into a computer. However, in other cases, the user may also need primitive actions to configure the scanner. Their approximate sequence might be as follows: 1. First, connect your device to your computer. The operating system will try to recognize it and install it mechanically required drivers and configure the scanner.2. Open the Scanners and Cameras item in the Control Panel. It lists all imaging devices connected to the computer, as well as a shortcut to launch the New Device Connection Wizard. If the connected scanner is already in this folder, then the connection was made successfully in mechanical mode. If it is missing, run the scanner installation wizard.3. Manually select the scanner manufacturer as well as the specific model name and click Next. If your scanner model is not in the list, then install the driver disk that came with the device into the drive and click the "Install from disk" button. You will need to specify the path to the device driver on disk. As usual, the required driver is located in a folder whose name contains the name of your scanner model and the name of the operating system in which you work. If there is no driver disk, try downloading them from the scanner manufacturer's website and specifying the path to the folder where you will save them.4. On the next step the wizard will prompt you to specify the port to which the scanner is connected. If you are in doubt about which port to specify, select Mechanical Port Detection.5. It remains to set the name of the new device in the system, and the installation is complete. Now it can be used from any program that supports working with images.
The local network has a number of advantages for use within the same organization: universal access to files and applications, as well as the sharing of equipment: printers, scanners.

You will need
- - the local network;
- - scanner;
- - the Internet.
Instruction
1. Use the RemoteScan 5 application to share the scanner over the network. Download this program at the link http://www.cwer.ru/node/6585/. Then install it on computers. Accordingly, to the computer to which the scanner is connected, the server version, to the other PCs to which the scanner needs to be connected via the network, the client version.
2. Please note that when installing the client version of the program, a message about the absence of a scanner may appear, do not pay attention to it. After the conclusion of the installation of the server part of the application, right-click on the program's tray icon. To access the settings.
3. Select a scanner, configure ports to access it. Please note that it may take from one to 3 minutes to determine the device. If this does not happen, then your scanner model is not supported by the application.
4. Wait until the strikethrough icon disappears from the icon. Open anti-virus/firewall. Allow access to the scanner port, by default it is 6077. If you have NOD32 antivirus, then go to your personal firewall, open settings, select interactive mode, make a separate rule for the RemoteScan program. Install client applications on the desired computers, add special software there, and perform network scanning.
5. Use another program to share the scanner over the network if your scanner was not detected by the previous application. To do this, download the Blindscanner program. Follow the link http://www.masterslabs.com/ru/blindscanner/download.html, select the required version, download and install the server and client versions of the programs on your computers, respectively. The setup is done in a similar way.
It is unlikely that there will be at least one user computer technology, who would not be nervous about the tangle of wires connecting all kinds of peripheral devices to a computer. Cables are extremely inconvenient when working with a laptop; they negate all the advantages of computer mobility. It is not without reason that connecting devices without wires - all kinds of wireless keyboards, mice, printers and more - have acquired such a swift and strong celebrity.

You can also get rid of one more wire - a network one, by organizing a wireless wi-fi network in your home or office. It will provide high-speed Internet access anywhere in the room without wires, making both work and leisure even more convenient. In addition, such a network will be available not only for computers, but also for other equipment that supports wi fi, say, phones and printers. In order to set up wi fi, you will need an access point or, if the Internet is supplied using special ADSL technology, an ADSL modem router.1 . Connect and set up your wireless router. This process quite primitive and available to any user. Follow the instructions in the documentation for your model. We only note that if this is permissible, then it is better to make the distribution of IP addresses mechanical. This will simplify the procedure for entering the network for new technology.2. Set up the entire computer to work in wireless network. Many laptops have a built-in wi-fi adapter, while a desktop computer may require a wireless Network Card which will need to be purchased separately. Setting up a wireless network is slightly different from setting up an ordinary network. The only thing that needs to be done additionally is to enter a special secret network code generated by the router. The code will allow you not to worry that third-party users will be able to connect to your wireless network.3. To connect to a wireless network of a pocket computer, it is easier for everyone to use the built-in iPAQ Wireless utility or a similar one, depending on the model of a pocket computer or phone. Here you will also need to specify the secret network key. Later, after you managed to set up wi fi, it becomes possible not only to use the Internet from any of the devices on the wireless network, but also to use the local network: provide public access to folders, share a printer and scanner etc.
Related videos
You probably know firsthand the situation when there are two or more PCs at home. The exchange of information between them, the use of one printer or scanner, as well as other peripherals requires the existence of a network. But tea PC users need not only access to local sources, but also to the vastness of the global network. In view of this, you should figure out how to configure exit in the Internet from the general modem.

You will need
- Personal computers, modem.
Instruction
1. Open the control panel of the whole PC, find the icon called "System" and click on it. In the "System" properties, go to the "Computer Name" tab, select the "Change" option and write down your name for the entire personal computer, as well as one universal group.
2. For the changes to take effect, restart both electronic devices a.
3. After restarting the PC, open the control panel, click on the item " Network connections” and select the properties of “Local Network”.
4. Perform the "Protocol the Internet a (TCP/IP)". To do this, you need to connect the modem used to the hub, manually enter the IP address, the mask of the subnet made, as well as the "Rod Gateway".
Related videos
Note!
When assigning an IP address to all of the computers on the local network, check them observantly to avoid duplication, from the fact that the coincidence of the IP address of electronic devices can become a reason for their contention and, as a result, the impossibility of working on the same network.
Useful advice
On the "Rod Gateway", that is, the modem, write the 1st address (for example, 212.120.0.1), and select the IP address for PCs included in the local network from the range 212.120.0.2 - 212.120.0.255. The subnet mask for all devices will be identical.
Several PCs in an apartment or office does not mean at all that you need to connect to all of them scanner or a separate printer. To make scanning and printing devices available to everyone, connect office equipment via networks .

You will need
- – Several computers;
- - scanner;
- - driver;
- - the local network.
Instruction
1. Equip computers with a network scanner ohm. The probability of using office equipment on equal terms will be received by all participants of the local networks. Set up and install the equipment positively. To avoid complications in the operation of the network scanner but consider some of its features and subtleties.
2. Please note that the network is connected scanner at ease to the switch through the hub. If there are enough USB ports, then a hub is not indispensable. The main difference between network scanner ov from ordinary ones - lack of binding to one PC.
3. Complete the setup steps networks in the following sequence:- Install the drivers for scanner a, from a disk from the manufacturer to all computers connected to networks;- execute driver setup;- assign network scanner at your IP address; - connect the equipment to the switch; - enter the IP value into the again made TCP port. The network equipment will be connected to the server. The scanner will be able to send finished images on the specified computer, or email address.
4. Consider the probability of customizing an ordinary scanner and with WSD service support. To do this, connect the equipment to networks, make sure that scanner included. Click "Start" and go to the "Network" tab. Detect Icon scanner and, by clicking on it with the mouse (right button), select the item "Install" (Install). In the User Account Control dialog box, click Continue. Click on the line "Your device is ready to work", check the settings and click on the item "Close" (Close).
5. Now click "Start" again, find the "Control Panel" option, go to "Devices and Printers". Make sure the network icon is present. scanner a. Now perform a scan using the WSD service. Network name scanner but will be displayed on all computers participating in the connection via local networks .
Note!
The WSD service is in Windows systems Vista.
Useful advice
The network scanner icon will be displayed with the name of the hardware being used.
At a certain stage in the formation of a retail trade entity, the manual form of accounting ceases to meet the needs of this trade enterprise. At the same time, the lack of an automated accounting system often leads to financial theft caused by employee abuse. Consequently, an automated accounting system "1C: retail" is being introduced at a trading enterprise, which must be positively configured.

You will need
- – Personal Computer;
- - "1C: retail".
Instruction
1. Carry out preparatory work. To do this, configure the "Store" (enter the name of the store and configure account). "Warehouses" can be represented not by a solid warehouse, but by a whole structure (utility rooms, trading floors and other objects).
2. The “Products” setting implies entering the maximum detailed information about the products sold: contractor, expiration date, composition, and more. Set up the "Prices" section. The pricing mechanism in this automated system is elastic and primitive: if a price metamorphosis is planned, a date can be set in 1C: Retail, from which new prices will begin to be made.
3. When setting up "Discounts", consider the fact that there are three types of discounts: when buying a product for a pre-specified amount, when buying a certain number of goods, using a discount card.
4. Perform the "Permissions" setting: this will allow any user who will be granted access to this integrated program, determine only the actions corresponding to his position. This will eliminate fraud on the part of the employees of this trading enterprise.
5. In order to increase the efficiency of the retail trade enterprise, perform the correct setting of the equipment used. The choice of commercial equipment requires a responsible approach. Among the most common equipment, a fiscal registrar, a barcode scanner, and label printers are distinguished.
6. The final stage of setup is operational management. An inseparable stage of effective management is reporting and its review.
Note!
If important tasks arise while working with 1C: Retail, immediately contact the system manager for support.
Useful advice
The 1C: Retail program is designed to minimize routine work. Due to the fact that it owns most of the functions, this software is easy to customize "for yourself."
The scanner allows you to decide whole line problems with the digitization of information, quickly and conveniently turning a physical medium into electronic document. After purchasing this device, a dilemma arises, how to connect the scanner to a computer so that it works without failures. In this article, we will also consider the option of creating a home network that will allow you to use one scanner for several devices.
Connection order

You can configure the device operation parameters in the "Hardware" menu.
 If you know how to connect a keyboard or how to connect wireless mouse, then you must have already visited this section in the "Control Panel" and are familiar with its capabilities.
Installing a network scanner
If there are several computers in the room, and there is only one scanner, then you will have to create a network to work with it. In this case, the scanning equipment will be connected directly to network switch.
The first step is to install the drivers and assign an IP address.
To complete this step, the scanner must first be connected to one computer. After carrying out the above procedures, the equipment can be turned off.
After the preparatory work, connect the device to the network switch. Then configure each computer on the network by creating a connection. For this:

Similarly, you can connect a printer or other office equipment. Don't forget to install drivers for all devices working group. Otherwise, the equipment may not work correctly or even refuse to perform its functions.
>