DLNA - allows compatible devices such as a computer, TV, laptop, phone, tablet to transmit, receive or play various media content files. The function gives great opportunities for playing media content. The video file downloaded to the PC can be watched on the TV, and the music downloaded to the phone can be listened to on the audio system. It is very comfortable. You just need to create a DLNA network.
How to create a DLNA network
There are many programs to install home network DLNA, but you can just use windows native tools.
Installation on windows 7:
- Enter the "Start" menu and select "Control Panel".
The "Start" menu is located in the lower left corner of the monitor, in it you need to select the "Control Panel" item
- On the tab "All Control Panel Items" there is an item " home group", click on it.
On the "Control Panel" tab, select the "Homegroup" item, it is indicated by a red arrow
- A new window will open, in it go to the "Change advanced settings" tab public access».
The item "Change advanced sharing settings" is located on the tab "Homegroup"
- Check the connection of all positions.
All items on the "Change advanced sharing settings" tab must be in the active position
- Return to the "Homegroup" window in its lower part there is an item "Create a homegroup" click on it with the mouse.
The Create HomeGroup button is at the bottom of the HomeGroup window
- In the next window, enter the name that you came up with for the DLNA server and click the OK button.
In the Media Streaming Options window, enter a server name and click OK
- Write down the password that appears in the window, you can print it (it will be needed when adding other devices to the home group), click "Finish".
The password that appears in the window must be written down or printed
- In the HomeGroup window, click on Choose your media streaming options.
In the "HomeGroup" window, you must select the item "Choose media streaming options"
- A media server window will appear, in it you need to mark the types of content for which sharing will be open.
In the media server window, it is necessary to mark the types of content that will be available to the home group
- Press "Next".
DLNA windows 7 server is connected. On the "Computer" tab, the "Network" icon will appear, by clicking on it, you can see all connected devices. By choosing desired device, click on it. All available media content files will open in the media player window, they can be viewed and transferred to other devices.
On windows 10, everything is simpler, it is not necessary to create a "Homegroup" here.
Installation on windows 10:
- In the "Search" window of the control panel, type "Media Streaming Options", open this item.
In the search box, type "media streaming options"
- On the open tab Click the "Turn on media streaming" option.
In the Media Streaming Options window, turn on media streaming
- On the next tab, in the "Media Library Name" item, write the name of your DLNA server, click OK.
In the "Enable media streaming" window, you need to enter the name of the future media library
Make a note of the generated password and click Finish.
After making the settings, from the devices on your home network, you can access the media content files contained in the folders of your computer, view them and play them.
Equipment for building a home network with DLNA
To create a DLNA network, you will need a computer or laptop with a media server configured on it. With wired or wireless wifi connection, it connects to the router, which, in turn, distributes a signal to other devices.
DLNA network turns your home into a media center
Such devices can be: TVs, laptops, tablets, phones, music centers. If there is no router, signal distribution can be configured directly from the computer, but in this case, the computer will need a Wi-Fi adapter. The principle of building a DLNA home network, like the Internet.
As a result, you will need:
- computer or laptop;
- Wi-Fi router or adapter;
- at least one other DLNA-enabled device.
It is better to connect the TV to the computer with a cable connection. Wireless connection convenient and modern, but when viewing powerful media content files, streaming data may be lost and, as a result, the TV may malfunction.
Connecting a DLNA-enabled TV to a Wi-Fi router
You can connect a TV to your DLNA home network, this step will make it possible to fully use installed server. First of all, the TV must be connected to a Wi-fi router. You can do this in one of two ways.
It is enough just to connect the TV and the router with an Internet cable with LAN connectors:

Location of LAN jacks on different models TVs are different, but they are signed everywhere and they cannot be confused with outputs for other purposes.
You can connect your TV to your router wireless network wifi. As a rule, new TV models already have a built-in adapter. If the model is older, you will have to use an external wifi adapter ohm. It must be inserted into the usb connector of the TV, while the system itself will detect it and turn it on.
Wi-fi adapter must be connected to the TV via USB port
- Take control of the remote remote control TV, press the Menu key.
- In the menu that opens, click "Network", then "Network settings" and select "Wireless (general)".
- Select yours from the list that appears and click Next.
- In the window that opens, enter the password for your home network.
- If everything is done correctly, the connection will be established.
Adding other DLNA compatible devices to your home network
By setting up a DLNA server on your PC, you can connect to wifi router on other devices. Connecting to your home network, possibly through a wireless connection, and through a cable.
Laptop or other PC
To add a laptop to your home network, you need to set up its connection to the router. In the case of a wired connection, it is enough to connect the LAN connectors of it and the router. At wireless connection you need to pay attention to the lower right corner of the monitor. There you will find an icon in the form of gray sticks of different heights.
The icon on the panel indicates that the laptop is currently disconnected from the wi-fi network
Clicking on it will take you to the settings menu network connection, all networks with connectivity are displayed here. Select the desired network, click the mouse.
On the Sharing Center tab, connect desired network wifi
If the network is without a password, the connection will take place in automatic mode. Otherwise, a window will pop up asking you to enter your password.
Enter your home network password, click Finish.
Video: how to connect a laptop to a wi-fi network
Before you can stream media content to other devices, you need to configure the media server.
To add a laptop to your home network, you need:

media player
To embed the media player in your home network, simply connect it to your router. The player automatically connects found DLNA resources. It is enough on the device acting as a media server to share folders with homegroup devices.
DLNA setup on TV
TVs connected to the home network find the server and folders with content allowed to be viewed in automatic order. On LG TVs, available media server folders appear in the same row as pre-installed programs and features.
There are many alternative programs for creating a media server. The LG TV comes with a CD with a program called Smart Share, which can also be downloaded from the Internet. This program allows you to create a media server without using windows tools. It is enough to download it to your computer, click on its launch shortcut and wait for the installation to complete.
A folder with the Smart Share logo will appear in the Programs and Connections panel of your TV. On the computer, in the program settings window, you can assign folders for playing content. You can view photo and video files in these folders on the TV.
Smart Share good program for those who are too lazy to dig into windows settings. It puts quite a load on the system. Even when the TV is off, on a weak computer, her presence can be felt. For some reason, it does not always update the folder with the added files. Sometimes you have to do it manually. It is better to set up a normal server using windows.
Exists universal program, which allows you to link any TV that supports DLNA to your computer. It's called Home Media Server.
Video: instructions for installing and configuring the Home Media Server program
Using DLNA on Android OS
To use an android device, first of all you need to connect it to the router:
- To do this, enter the settings and toggle the slider WiFi connections to the "on" position.
When enabled wifi functions the slider is in the "on" position
- Next you need to go to the wi-fi settings.
- You will see a list of networks currently available.
AT wifi settings devices on Android OS, select the desired network
- Select the one you want and enter the network password.
- After a while, the connection will occur.
In the wi-fi settings, you can see information about the network to which the Android device is connected
Devices on the Android OS have great functionality; with their help, you can not only view files with media content, but also allow you to transfer them to other devices. On the Play Store You can download a program that will greatly expand the capabilities of your smartphone or tablet. It's called a DLNA server.
Download the program and install it on your phone, then follow these steps:
- Go to the program and click "Add > DLNA Server", so you create a DLNA server.
The program will help you create a server in an Android device
- On the next tab, you set the server name in the Server Name item, the port item remains the default.
In the Server Name item, you need to specify a name for the server
- Go to the Roots tab, select and assign a folder with content to be viewed.
Going to the TV menu you will find new media server created on an Android device
Video slows down and other problems
Sometimes annoying interference and malfunctions interfere with watching your favorite movies, do not allow you to appreciate all the benefits provided by using the DLNA network. Possible problems and methods for solving them, see the table provided.
Table: errors that occur when playing media content and methods for their elimination
| № | Errors and malfunctions. | Causes of errors and malfunctions. | Possible Solution. |
| 1 | The devices cannot discover the network. | there may have been an error in work wi-fi router. | Try restarting your wi-fi router. |
| 2 | Low data transfer rate with a wired connection. | Damaged cable or poor fastening in the LAN connectors. | Check the integrity of the cable and the tightness of its fastening in the connectors. |
| 3 | The media server is unavailable. | Errors in the media server. | Restart the media server. |
| 4 | The media device is not available. | Errors in the operation of the media device. | Reboot your media device. |
| 5 | Video slows down. | Insufficient data transfer rate for watching a movie. | Temporarily stop watching a movie to download enough data to watch. |
| 6 | The system stops watching movies indicates the reason - insufficient disk space. | Not enough space to store temporary files. | Choose lower quality videos from smaller size frame. |
| 7 | A message appears - the movie format is not supported by the media device. | The media device does not support this movie format. | Find a movie in a supported format. |
Often the reason for the slowdown of the TV when watching movies are easily removable small parts. The main reason lies in the unstable operation of the media server. For normal operation, periodically optimize and clean the system. Don't overload your computer unnecessary programs.
Everyone can set up DLNA-enabled home devices. It's not hard at all. A TV connected to a home network takes on a second wind. After spending half an hour to connect to the DLNA network, you can view on big screen any content from your devices. Movies, photos, videos taken on the phone, now all this can be viewed simply by pressing a couple of buttons.
In this article, we will look at how to install your own DLNA server on Windows using the Home Media Server (HMS) program as an example.
Nowadays, it is increasingly required to have a DLNA server in the home network, since most modern TVs does not support data transfer protocols such as SMB or NFS, but only works via DLNA.
What is DLNA?
DLNA (Digital Living Network Alliance) is a set of standards that allow compatible devices to transmit and receive various media content (images, music, video) over a home network, as well as display it in real time. That is - a technology for connecting home computers, mobile phones, laptops and consumer electronics into a single digital network. Devices that support the DLNA specification, at the request of the user, can be configured and networked automatically. (Source - Wikipedia)
Installing DLNA Home Media Server (HMS)
The installation of HMS is very simple, but we will still explain in detail how it works.
First you need to download the installer. At the time of writing, the official website was down. And it didn’t work a month before, so below is a link to download from our server latest version HMS:
(47.2 MB)
Let's get started with the installation.
We start the installer:
Here we are prompted to select the directory in which the installation files will be unpacked. Select a directory and click the " Run". After unpacking, the installation will start automatically.
Attention: Unpacked files are not automatically deleted after installing the program, I advise you to delete them manually after the installation is completed
After unpacking, we automatically start installing the program:

There are not many settings here. In this window, you select the directory where the Home Media Server (HMS) program will be installed and "Program Group" - the name of the folder in the Start menu.
After selecting the installation folder and folder name in the Start menu, all that remains is to check the box “create a shortcut to launch the program on the desktop”, if necessary, and click the “ Install«.
At the end of the installation, which takes less than a minute ( depends on your hardware), we are offered to immediately launch Home program Media Server (HMS).
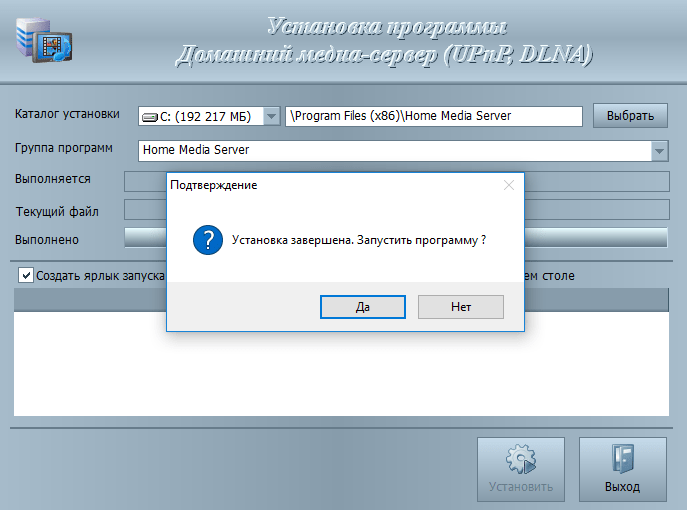
This completes the installation of the program.
DLNA Home Media Server (HMS) initial setup
So, we have a freshly installed DLNA server, let's run it and see what it first offers us to configure, and we'll also do a couple useful settings. Let's get started.
After the first launch of the program, we see the window initial settings.

In this window, we are prompted to select the device to which the media content will be broadcast. There are many templates in the list.

If you have not found your device or a device similar to yours, then you can leave the standard DLNA Device, as practice has shown, this does not greatly affect anything. Once selected, move on.

And then a choice of folders appears before our eyes, from which we will take media content. Folders with your media content can be selected now, or you can add them later. We'll take a look at how to do this below. After selecting the folders, click the " Ready«.

After the initial settings, we are prompted to do backup settings, image cache, database, set up an automatic backup schedule. Let's not dwell on this now and move on. To do this, press the button " close«.
After that, the main window of the program appears in front of us. Let's move on to a few "important" settings at once.
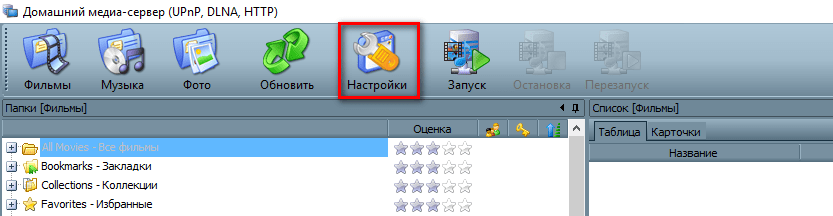
On the left are the types of settings, on the right are specific settings.

Let's jump straight into additional settings and configure the autoload of the DLNA server with the PC turned on.
To do this, select points 2 and 3.
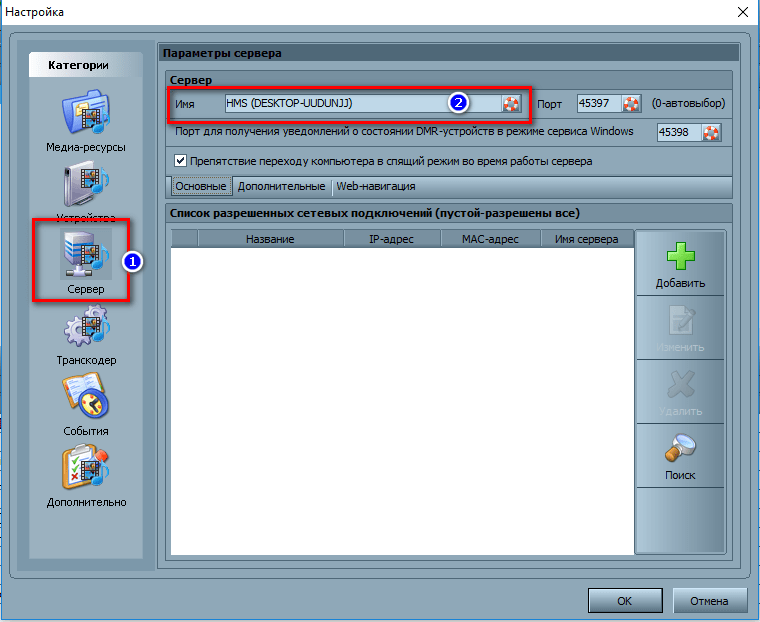
Now let's go to the tab " Server” and write down the name of our DLNA server. As we will see it online.

After changing the name, you need to add folders with media content (if you didn’t do this in the “initial setup or decided to add more folders. Everything is simple here. Press the button “ Add» (2) and select the folder you want to add. After that, it needs to Scan» (3) to get the files from the folder/folders to the server.

If you did everything right, then you should have your files on the right side (as in the screenshot highlighted in yellow).
If you have your files there, then we have quite a bit left. Launch and use. Everything is very simple here - press the button " Run«.
If you have " Windows Firewall”, then the system will ask you whether to allow it access to the network. Choose which ones to allow access to and click " Allow access«.

Conclusion
We have installed the Home Media Server (HMS) program, or, to put it simply, we have set up a DLNA server on the Windows operating system.
It remains only to start the playback device (TV, media set-top box, mobile phone etc.) and check if our device is on the network and if it contains the files we need.
We hope this article has helped you. If something does not work out for you or you have questions - write comments, we will try to help.
I have already published more than one article on the topic of setting up DLNA. We launched a DLNA server different ways, on the different devices, and for different TVs. In this tutorial, I'll show you how to enable a DLNA server in Windows 10. Let it be a computer or a laptop, it doesn't matter. The main thing is that Windows 10 is installed on it. There are many different programs, which can run a media server on a computer. But in this tutorial, we will not use any third-party programs. We will use only standard Windows tools 10. By the way, this feature is available in both Windows 8 and Windows 7. There are few differences.
And so, for starters, let's figure out what DLNA is, why run this server on a computer, laptop, and what to do with it. Everything is very simple. Using DLNA technology, you can transfer media content (video, photo, music) between devices in local network. Most often, this technology is used to view on Smart TV TV video, or photos that are on the computer. I wrote more about this technology in the article:. If interested, you can read.
How it all works: TV with Smart TV must be connected to our router. By WiFi networks, or by cable. It doesn't matter. The computer on which we want to run a media server must be connected to the same router, and from which we want to play video, photos, or music on the TV. The main thing that devices were on the same local network (were connected through the same router). This does not mean that there should be only one computer and one TV, there may be several. Moreover, there may be other devices on the network that support DLNA. For example: gaming consoles, TV boxes, satellite receivers etc.
Before proceeding with the setup, make sure that your computer and TV are connected to your Wi-Fi network, or use the network cable to the router. Check if the Internet is working on the TV. If you do not know if your TV supports DLNA, then this information can be found in the specifications. I will say this, if the TV has Smart TV, then everything will work.
Also in the browser Microsoft Edge Windows 10 has the ability to display videos, photos and music on TV directly from the browser. How to do this, I wrote in the article.
I think we figured out all the nuances, now you can start setting up.
We display video from Windows 10 to the TV: a quick and easy way
A video clip, a movie, almost any video recording can be displayed from a computer to a TV set in a few mouse clicks. Turn on the TV. Make sure it's connected to the internet (to your router).
On the computer, open the folder with the video, and right click mouse click on the file that we want to play on the TV (Smart TV). Next, hover over the "Transfer to device" item. Our TV should appear there. If there is an inscription "Searching for devices ...", then you need to wait a bit. Leave the menu open, or try again in a couple of seconds. As you can see in the screenshot below, Windows 10 found two TVs for me: LG and Philips.
We choose a TV. The player control window will immediately appear. In it, you can control video playback on TV, add other files to the playlist, see information on TV, etc.

The TV will immediately start playing the running movie.
We have just launched watching video from a computer to a TV using DLNA technology. As you can see, everything works. And all this without wires, over the air. It's over if you have both devices connected via Wi-Fi.
Running a DLNA server on Windows 10 using standard tools
Above, we examined the method when you can send files to a TV from a computer. But, there is still a great opportunity when we can view all the files from the TV (to which access is available) that are stored on our computer. I think that's exactly what you need.
To start the DLNA server, you can use third party programs, such as "Home media server (UPnP, DLNA, HTTP)". I wrote about setting up using this program in an article. This program is suitable for all TVs. But each manufacturer, as a rule, has its own program. LG, for example, is Smart Share. About the setting of which I wrote.
Well, on the other hand, why do we need third-party programs, if in Windows 10 everything can be configured with built-in tools.
1 First of all, we need to open "Media Streaming Options". This item is located in the control panel. You can simply start typing its name in the search and run it.


If your TV is not on the list, then wait a bit. Or close and reopen the media streaming settings.

Near each device there will be a button "Configure ...". If necessary, you can set individual settings for each device.


As you can see in the screenshot above, access will immediately be open to three standard folders: "Video", "Pictures", "Music". All files that are in these folders, you can view on the TV.
These three folders are on system drive. Agree, it is not very convenient to copy the necessary films and other files there all the time in order to watch them from the TV. Therefore, you can simply share other folders.
How to add folder for DLNA server
Launch Player Windows Media.

If you want to add a video folder, for example, then click on the corresponding item on the left and select "Manage Video Library".

In the new window, click on the "Add" button. Select the folder to which you want to open access via DLNA, and click on the "Add Folder" button.

Everything, the required folder will appear in the list and will be displayed on the TV. For example, I opened access to the "Video" folder, in which I store movies.

You can add any folders in this way, or remove them from the list.
1 If you need to open media streaming settings, you can do so from Windows Media Player. Just click on the menu item "Stream", and select " Extra options streaming...".

Several articles
Somehow it so happened that the tag DLNA server more common in question posts than in answers. And if some user experience has been accumulated in matters of installation on a home Windows PC, then it turned out to be difficult to decide on the choice of software for a home server / NAS / media center. Having distributed among the sandboxes, the people separately solve the problems of each program separately. And to understand which of them is worth what and whether it is necessary at all - I personally did not succeed.
And so, armed with a link from Wikipedia How to choose a DLNA server under Windows, Mac OS X or Linux - I tried almost everything that is under Linux.
DLNA - its place in the home network
Most probably this path has already been taken by the majority - new media devices appear in the house, the number of family members consuming media content is growing, the very base of films, music and photographs is swelling.At the same time, everyone builds a media infrastructure in their own way. Someone has a computer with TV-OUT, someone has a netbook or HTPC. Someone shares folders from the NAS via NFS, someone connects the HDD to a media player, someone uses the capabilities of Sony PS ...
There is confusion about storage locations, formats, codecs, and so on.
So, in my case it turned out:
- Plasma in the living room is better served 720p than FullHD
- it is better not to feed more than 15Mbit / s to a Sony TV in a nursery connected via Wi-Fi, it needs a maximum of Profile 4.1 for H.264, and it does not see files on network storage at all
- the Openbox satellite receiver cannot play audio tracks in DTS, it does not pull more than 30Mbit / s via SMB, it does not display Cyrillic via NFS
- Nokia Lumia and iPhone are generally limited everywhere and everywhere
Theoretically - he and the content from different places it will reduce it into one folder tree, and adjust the resolution and check codec compatibility and, if necessary, recode. The beauty…
What to bet on
home computer- as a rule it is a Windows-machine. Watching a movie with recoding while someone is playing will not work; 24/7 is not even close. Not suitable for the role. That's why Windows versions I didn't even look at the programs.Router flashed with DD-WRT/OpenWRT- there are packages for these firmware and they work. Hardware resources are very limited - transcoding is unrealistic, access speed to USB port and network folders is severely limited. However, it suits many people.
NAS or home server with Linux- the most versatile solution. Lots of programs. There are no protocol restrictions. The performance of 5-year-old x86 processors (in my case, Athlon X2-6000) is enough for simultaneous on-the-fly transcoding of two films of any format.
Personal experience, program evaluation
MiniDLNA, uShare and xupnpd
These are different projects, but in essence they are one and the same. Lightweight and fast. The only function they perform is to provide network access to media files via DLNA/UPnP protocol. Everything else the player or TV should be able to do themselves. DLNA is not fully supported and many devices simply do not see these servers.Very massive. They work everywhere. Packages exist for all sorts of Linux distributions, routers with DD-WRT/OpenWRT firmware, and NASes. The installation procedure is simple and well described on specialized forums. There are no GUIs
If you, and only you (otherwise, complaints from family members are inevitable):
- only watch/listen from one omnivorous device (such as a Samsung TV)
- Your device cannot directly download files from network folders or does it too slowly (such as sony tv Bravia
- store movies/music on an inexpensive NAS or router with a USB drive
- select content in advance desired format or don't be lazy to recode manually
- media files are already well sorted into folders or you don't care at all
Media Tomb
The developers unequivocally write that "this is not a DLNA server, it only supports part of its functions." And although there may be some compatibility issues, this is quite a noteworthy project.There is already a GUI working through the built-in http-server here - you can manage folders with content in it. Add new ones, create shortcuts to existing ones, set scan intervals, etc.
Well distributed - no problem to install on any Linux distribution, no heavy dependencies. Customizable only text file. Very stable in operation, not resource intensive.
You can use transcoding, but it is implemented in a simple way. Thus, profiles are bound to the input file format, and not to the output device. The server does not distinguish at all who is connected to it. Accordingly, there are no ready-made profiles for devices - everything needs to be configured manually:
- which formats to transcode and which to transfer directly
- set the encoder according to the situation: ffmpeg, vlc, mplayer or something else
- set bitrate, number of audio channels, H.264 profile and other encoding options
- apply a video filter, such as clipping margins or crop
At the same time, when viewing a transcoded stream on a TV, rewinding and selecting an audio track will not work. Screwing subtitles is also a separate song.
In general - MediaTomb is a very brutal tool for true Linux users. You can’t call it universal, but you can customize it perfectly for yourself and your hardware.
Rygel
Mass, there is almost everywhere. But it is very crookedly placed in daemon mode (you need to write an init script yourself, create folders and a user). It is part of the gnome project and pulls gstreamer (or even pulseaudio). If someone has KDE or something else on their computer, it is completely inconvenient. The icons for the video are generated via tumbler from the XFCE project, and even then with nuances. Falls regularly.Before studying the features of transcoding, my hands did not reach. My verdict is " unfit".
PS3 Media Server
A very old project. And although from its initial application: “Share movies / music from a home Windows PC to Sony PS”, the project has evolved a lot. But the JAVA code and the requirements to run an X server turned me away from it.XBMC
It has a DLNA server. But keeping this combine for the sake of just one module is stupid.Moreover, it was from XBMC that a separate project of the Plex media server was born.
Universal Media Server
He's kind of crooked. Showed me the entire directory tree instead of the selected folder. Files opened only a few and regularly poured errors into the console. I didn't understand transconding at all.Quite heavy due to JAVA code. Definitely needed running X server You can't make him a demon. " Unfit."
GMediaServer
Project abandoned. Not worthy of attention.LXiMedia
A simple and convenient implementation of a DLNA server. It is enough to select folders with files, hard-code transcoding parameters, audio track, subtitles. No profiles, settings. In addition, this is a GUI application, do not install it as a demon.In my opinion, it is useless in this form - one of many and far from the best.
Serviio
Probably the fastest growing project right now. Updated regularly. Actively overgrown with plugins, profiles and applications for mobile OS.It is a JAVA application running as a daemon. Support for the DLNA protocol is complete. Quite skillfully scatters content into folders and categories. Can create movie previews. Easy to connect different channels on-line broadcasting.
Transcode with ffmpeg. The database of device profiles is already quite large (and continues to grow) - the server correctly selects encoding parameters for any of the home hardware. What I didn’t recognize - it’s not difficult to pick up a profile or write your own.
Due to the fact that ffmpeg is used - the same problem as in mediatomb - there is no rewind in the transcoded stream and the audio track does not change.
All this is controlled either from a JAVA client, or a web-muzzle written in PHP, or a smartphone (there are applications for Android and WP).
Unfortunately not available as a .deb or .rpm package. You need to set it manually: create folders, user, unpack, take an init script from the support forum, register it in autorun. "There is a ready-made package for Synology NAS.
In general, it may well become a single point of access to media content at home. All that is needed - he knows how.
Skifta
Not included in the Linux repositories and therefore rare. But it has a graphical installer and carries a jre with it, and therefore will be on almost any system. It is inconvenient because it starts in two steps - first the utility in the SystemTray, then the media-server itself. Without x and a demon will not work. Very simple and concise, but heavily loads the system (JAVA code).TVMOBiLi
Costs $30 (or subscription fee 1.5$/month). Available as .deb and .rpm packages. Not in Ubuntu/Fedora it is rather difficult to install - the built-in vlc and ffmpeg will surely find the missing libraries and refuse to work. I couldn't find the USE flags for vlc in Gentoo. It didn't work at all, I had to redo the profiles so that only ffmpeg was used.In general, transcoding profiles are its forte. You can set any logic and any parameters.
Managed through a nice WEB-muzzle. It has a rich database of transcoding profiles. There are files to play through the built-in http-server. Can't generate thumbnails.
Works fast and beautiful. Good candidate.
TwonkyServer
Installed by unpacking tar.gz. or through the installer. It's not in the Linux repositories. Very fast code, instant launch, user-friendly web-interface. Well and competently scatters content into folders. There are ready-made init scripts. Able to extract meta-data from files and generate previews. All liked it. One trouble - $19.95.But still: " I recommend".
Plex
As the developers write - "A complete Media Solution". I confirm.This monster grew out of XBMC and can do everything and more. For films, it will find posters, ratings and a bunch of data. The series will also be distributed by seasons and episodes. Music collection will order from any source view.
Transcoding makes everything for everything. The settings can be controlled directly from the TV's OSD menu. For smart devices like LG Smart TVs and Apple TVs, support goes far beyond the DLNA protocol.
There is support for your own cloud service, which allows you to watch home videos remotely - the server will adjust the parameters of the sent video to the capabilities of the device and the communication channel.
There are separately written clients for mobile OS and Windows 8 tiles.
There are packages available for Ubuntu, Fedora, CentOS and mainstream NAS models. For everything else - it is installed by simple unpacking. Of the dependencies, only Avahi-daemon requires.
Unfortunately, the transcoding mechanism does not allow interference with work - profiles can be corrected, but the possibilities are very limited.
It is able to solve any problems within the framework of the topic, while it is free, stable and, oddly enough, fast.
I would love for someone to add to this list and / or make changes.
Today you will learn how to properly connect a TV to a computer and about all the possibilities of such a connection, as well as how to organize viewing of your media library on Smart TV and other devices that support home DLNA server.
What is DLNA?
Consortium of integrated digital network(DLNA) is a group of companies that have come together to create a generally accepted open standard for connecting devices so that all DLNA-enabled clients can automatically receive media viewing from each other while on the same network.
What devices support DLNA?
DLNA technology is compatible with any device:
- smart TVs;
- smartphones and tablets;
- PC and laptops;
- media players and Blu-ray players;
- game consoles;
- home media servers (NAS);
- wireless printers;
- photo and video cameras;
- audio systems.
All DLNA-enabled devices have an appropriate logo or sticker indicating the type of digital content supported (eg audio, video, photos) and the destination: server, printer, player, etc. DLNA is supported by most devices from major manufacturers such as Intel, HP, Motorola, HTC, Microsoft, Samsung, Sony, LG, Panasonic, etc. Apple has developed its own standard - AirPlay. If you have an Apple device, then it is not possible to use it in your media network consisting of clients from other manufacturers.
How does the DLNA network work?
As you already understood, DLNA devices are designed for interconnection: creating a multimedia network between themselves. Each device is assigned its own type depending on its purpose. For example, any storage device: smartphone, media player, TV or PC can belong to both the Digital Media Server and Digital Media Player types. media player), because they are capable of both receiving and playing digital content from another DLNA device.
How to create a DLNA network?
A wireless router (or wi-fi router) is the central element in a network and is used to connect devices to each other in a common home wireless network.
Equipment for building a home network with DLNA
You will need:
- TV with DLNA support;
- DLNA digital media server (for example, file server, PC, laptop or media player with HDD);
- wifi router.
I will talk about building a DLNA network not only with a wireless connection, you can also use the wired method of connecting devices, instead of a wi-fi router, use a regular router (switch) to connect the file source (home server - DLNA server) to the display device (DLNA client). You can also use (to distribute the Internet through the power grid), in addition, you will need Ethernet cables to connect devices to your network.
How to set up a DLNA home media server?
1 Connecting a TV with DLNA support to a wi-fi router (for example, Samsung with Smart TV).
Option 1 - wired connection. Connect using an Ethernet cable to the router. It is enough to connect one end of the cable to the LAN port of the TV, and the other to a free port on the router (or switch, depending on the structure of your network).
Option 2 - wireless connection . If you are using a wi-fi router ( wireless router), it is enough to connect the TV to an existing wireless network via the built-in or external (USB) wi-fi adapter, directly to the router. If the TV is very far from the router, then you can install a wireless bridge (use the router in Bridge mode or buy) to connect the TV to the router. I also recommend reading the article about. Wireless bridge connects to the TV in the LAN port, and to the router via wifi hotspot access.
Option 3 - Connecting with Powerline adapters. This type connection uses the power grid without running Ethernet cables. This method will help you set up your home network using existing electrical wiring and cables to connect DLNA clients are no longer required. Powerline adapters are produced by almost all manufacturers of network equipment: TP-Link, Netgear, D-Link, etc. They are called Powerline devices. Next, you simply plug the router, TV and other devices into the power outlet as usual, but now all your devices will form a DLNA network.
2 Adding other DLNA compatible devices to your home network
Now you can connect DLNA servers (devices from which you want to play files on a smart TV) to the router - PC, laptop, phone or media player. All servers will be displayed on the smart TV, as they are on the same network, and you can play the content that is stored on their media. Exist various ways settings for various types of devices on the DLNA network.
PCs and laptops on a DLNA network
Connect your computer or laptop to your router or router using any of the above options. Most important point in setting up DLNA on a PC or laptop: the need to install the appropriate program - a media center (media shell). The most popular of them (each program has a link with information about it and settings):
- Serviio
It is possible not to resort to installing media center applications to create a DLNA server, but to use Windows Media Player 11 or 12. To use them as a DLNA server, you must allow access to files on your laptop or PC: open Windows Media Player, go to Options menu, then click the Sharing tab Windows files Media and activate media sharing.
Kodi media center interface windowYou can select a media shell to use as a DLNA server from the list above. After installing the program you like to create a media center (DLNA server), you should configure it and select files (photos, videos, music files) to transfer to a TV or other display device.
Mobile devices on a DLNA network
3 DLNA setup on TV
After you have connected all DLNA devices, turn on the TV and go to the home screen of your Smart TV (for example Samsung TV). Find and launch the AllShare application, which will allow you to find the music, photos and videos stored on your DLNA devices your network.
If you have a Sony TV (model before 2015), then you need to turn it on, press the "Home" button and turn on "Media Player". After you select the type of content: music, photos or videos, you will be able to see the DLNA servers on your home network.
4 Using DLNA on Android OS
To watch videos from your computer on smartphones and tablets with operating system Android needs to be installed special application. There are quite a few such applications, I can recommend MediaHouse or Bubble UPnP, which can be downloaded for free on Google Play.
After you install the application, you need to take a few simple steps:
- select the source - your computer or other device with DLNA support and installed from which you will watch the video;
- select a receiver, that is, your Android device;
- select a video from the list of available files.
In addition to universal applications, manufacturers mobile devices offer their own software with DLNA support. Samsung has AllShare, LG has SmartShare, etc.
Using DLNA-enabled apps on Android devices does not require any configuration. It is enough to launch a DLNA server (for example, Kodi on a computer), and it will immediately appear in the list available connections app on your smartphone or tablet. Select your computer from the list, click "Browse" and select the required folder. Do not forget that your smartphone can also act as a DLNA server.