Good afternoon dear readers!
Today I will tell you how to set up a TP-LINK router using the TL-WR841N (d) model as an example.
My thoughts on this model:
I think that this model TP-LINK turned out very well, as it is easy to set up, it has a good price / quality. It is perfect for regular home user who just needs to have internet and Wi-Fi. I advise you to take this model if you are the same simple user who does not need more from the router. Many of my friends have this model (according to my recommendation) for more than 3 years. Works stably, performs its function on 5+
!
So, if you have already purchased this router, then let's set it up. Our course of action:
- Setting WiFi networks on TL-WR841N(d)
Connecting the TL-WR841N(d) Router to a PC
First, connect the power supply to the router and plug it into a power outlet. If the indicators on it (on the router) do not light up on you, then turn it on with the button on the back.
You probably noticed the disk that came with the router, and so, we will configure without its use.

We insert the second end of the wire into the network card of the laptop / computer from which we will configure the router.

If you did everything right, then we can move on to the next step.
Internet connection setup (WAN connection setup) on TL-WR841N(d)
We need to go to the settings of the TL-WR841N (d) router. To do this, on the computer to which it is connected, open any browser, and in address bar go to address 192.168.1.1 , or 192.168.0.1 . You should be prompted for a username and password. Specify admin and admin (default password and username). By the way, how to enter the router settings, the standard IP and standard login / password are indicated on the bottom of the router on the sticker

So, we entered everything correctly, entered the username and password. We should open the router settings page.
The most important thing is to set up your router to work with your ISP. If this is not done, or done incorrectly, then the Internet through the router will not work. A Wi-Fi network will appear, but without internet access.
In settings go to the tab Network-WAN. Us in the drop down list WAN Connection Type you need to select the type of connection that your Internet service provider uses. It could be: Dynamic IP, Static IP, PPPoE, L2TP, or PPTP. For example, I personally PPPoE(the most common type of connection).

Setting up PPPoE, L2TP, and PPTP
If your provider uses one of the above connection methods, then select the one you need and set the necessary parameters that the provider should give you: username, password, IP address. It already depends on the connection type and provider you choose.

The main thing that needs to be achieved from the settings on this page is that the router connects to the Internet and starts distributing it. If the Internet is working, then click on the button Save, and continue. If you can’t configure, then call your Internet provider and ask him for all the data that is necessary to configure the router.
If your computer has a configured high speed connection to the Internet, then we no longer need it. You don't need to run it. Our router will now launch such a connection. You can remove it altogether.
It may also be that the provider binds to the MAC address (you need to check with the provider), in which case you can clone the MAC in the router settings, on the tab Network-MAC Clone. Or, you can change MAC address router. You can also call your ISP and ask them to remove the old MAC from the binding and bind your new MAC address.

If the router has connected to the provider and distributes the Internet, then you can continue the configuration. To check if the router is distributing the Internet, just try to go to any site from the computer with which you are setting up the router (which is connected to the router to the port LAN)
Setting up a Wi-Fi network on TL-WR841N(d) and setting a password on Wi-Fi
For wifi settings you need to open the tab on the settings page Wireless - Wireless Settings. On this page we need in the field Wireless Network Name come up with and write down a name for your WiFi networks, and in the Region drop-down menu, select the country where you live. Leave the rest of the settings as in my screenshot below.

To protect our wireless network with a password, go to the tab Wireless-Wireless Security. There you need to select the type of security WPA/WPA2 - Personal(Recommended).
In field PSK Password create and write down a password that will protect your WiFi net.

Save settings by pressing the button Save.
Changing the default password for the admin user
While we are in the settings Tp-link TL-WR841N, I advise you to immediately change the standard password that is set to protect the settings of your router. So that everyone who connects to your network cannot enter the router settings and change them (for example, we gave the Wi-Fi password to a neighbor / friend).
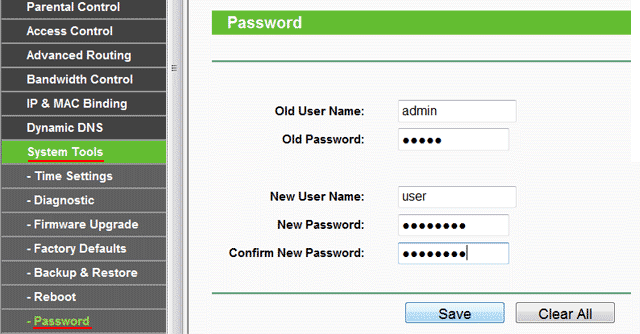
Open a tab System Tools-Password. Enter your old username and password first (default is admin). Then, below, enter a new username (you can leave admin) and New Password. I advise you to write down this password somewhere, so as not to forget. Save settings with the button Save.
That's all, the configuration of the Tp-link TL-WR841N router is completed.
It remains only to reboot the router. This can be done by turning off / on the power, or from the settings, on the tab System Tools - Reboot, you need to click on the button Reboot.
After setting up, and rebooting, a Wi-Fi network will appear, with the name that we set during the setup process. And to connect to wireless network, use the password that we also set when setting up the router.
I hope this article helped you! I did my best. If you have any questions, ask them in the comments to the post. If you have an offer, you can send them to the email address
In the next article, I will tell you
Thank you for your attention! See you soon!
Hi all! Nowadays, most users install Wi-Fi routers at home. Firstly, it is extremely convenient, unless you are a fan of getting tangled in wires and being tied to one place. Secondly, with the purchase of mobile gadgets, it becomes necessary to have unlimited high-speed Internet at home. Otherwise, you will have to run to a cafe with Wi-Fi every time to download the game to your phone. And that's not serious at all, is it?
Why all this fuss around routers? Few people know how to set up a Wi-Fi router so that the connection is stable, powerful and fast. For example router TP-Link model TL-WR841N, we will tell you how to set up a tp-link router at home without calling a specialist.
A few words about the model with which we will work today. Without a doubt, this is one of the best offers on the market for routers, which at one time was bought for 1200 rubles. The router is relatively inexpensive, but it can provide you with a full Wi-Fi connection throughout the apartment.
How to connect a TP-Link TL-WR841N router?
- So, you became the proud owner of a router and brought it home with joy. Opening the box, you will see inside a lot of different pieces of paper, a disk with instructions in electronic form, as well as the router itself, a small power supply for it, a network cable for connecting to a home PC.
- The question of how to set up a tp-link router does not bother us yet. First you need to connect this device, everything else later. Place the router close to the computer in a convenient location on a stable surface. In principle, it can be placed in the hallway, and even in the kitchen - as long as there is enough wire. Since the included network cable is usually not very long, place the transmitter near a PC or go to a computer store where they will crimp a larger cable for you.
- Connect the power to the router, plug it into a power outlet. Then connect the Internet cable to the WAN socket (it is blue). Please note that there are four LAN ports. Therefore, it will be possible to connect network cable four PCs at once (if necessary). We connect the computer to the router using the cable that came with the kit.
- To make it clear to you, let's briefly go through all the connectors and buttons of our router (figure below):

1) This button can turn the router on and off.
2) Power cord.
3) WAN connector required for Internet connection.
4) LAN connector, through which we connected the router to the computer.
5) Enable the QSS option.
6) Emergency button (it is a pity that it is not red). Resets all router settings.

How to set up a Wi-Fi router quickly?

How to set up the Internet on the router?

How to set up a full Wi-Fi network on TP-Link TL-WR841N?

That's all! We have just set up Wi-Fi operation router and saved the money needed to call a specialist. How good it is to do something, realizing that you are doing it yourself, that you have learned it! If you have any questions along the way, feel free to ask them in the comments below. Good luck everyone, see you next post!
Our article today is for those who are going to purchase or have already bought a Tp-link TL-WR841N router. We will take a step-by-step look at the entire setup of this router - connection settings, wireless network, Wi-Fi security key, accompanying the process with photographs for clarity. Also, all the settings described here are suitable for the TL-WR841ND model. Therefore, if you follow our instructions, setting up your new router will only take you a few minutes.
This is a successful and therefore quite common router model among users, the quality of which fully justifies the price. In my opinion, this is an ideal option for organizing home networks, which will cover all their needs. My copy has been running for more than three years, distributing the Internet to many devices over Wi-Fi, and during this time I do not remember interruptions in the Internet due to its fault. On the this page there is my review of Tp-link TL-WR841N and feedback on its work.
So, the router is already in front of you, it's time to start setting up. Here is a list of the configuration steps we will have to go through:
- Connecting a router to a computer.
- Setting up Internet access.
- Setting up a Wi-Fi network on TL-WR841N.
- The security key (password) of the Wi-Fi network.
- Change the administrator password.
The power cable is plugged into a suitable connector on the router and, of course, into a power outlet. Next to it there is an on / off button - it also needs to be switched to the on state. You will be told about the successful inclusion LED indicators lit up on the front panel.
You can connect the router to a computer for configuration in two ways. If it is located near the computer, it is best to do this with a lan cable.
One end is plugged into a socket. network board computer, the second - to the subscriber port of the router (yellow ports, signed as LAN).
Accordingly, the blue connector (WAN) is intended to receive settings from the provider. We will include in it the cable coming from the transmitting equipment or your modem.
The second way is to connect your devices via Wi-Fi. It happens that it is not possible to connect to the router with a cable - whether it is a damaged network card, remote friend the location of the two devices apart or other reasons. Or maybe someone doesn’t have a computer at all - then you can carry out the setup process using a tablet or smartphone connected to the router via Wi-Fi.
Usually, the Tp-link TL-WR841N router comes with a disk with a pre-selected configuration for configuration. In this case, we will not need it - our task is to learn how to configure the router through its management interface.
So, we check: your router must be connected to a computer (or other device) using any of the methods described above, and a cord coming from the provider's equipment is inserted into the WAN port. Now you can start setting up.
Setting up Internet access on a Tp-link TL-WR841N router
To go to the management interface of the router, you need to go to the browser on the computer (another device from which you are setting up) and type in the address field 192.168.1.1 . You will then see an admin password prompt - default values admin/admin. In case one of the above did not work for you - here.
And when the settings page opens, you can immediately. This is optional - that is, you can upgrade at any other time or not at all.
If asettings at 192.168.1.1 will not open, orthe admin password will not work, or the settings you made are unsuccessful - resetting the router to default settings will help you. Between the antenna mount and the fourth subscriber port of the router is a recessed Reset button. With the power still on, press down on it with a pen/needle or something else sharp and hold it for about ten seconds. When all the indicators go out and light up, the router is reset, you can release the button and start the setup process again.
The first thing we need to do is to enable the router to connect to the provider's equipment and get from it the settings needed to access the Internet. Without this, further configuration will be meaningless.
On the control page, select the menu network — WAN. A list will appear WAN Connection Type, in which you specify the type of connection. You can find out from the provider's support which one you need: Dynamic IP, Static IP, PPPoE, L2TP, or PPTP. If this is a dynamic IP, then this choice - after saving by clicking the button Save the router will go online.
If your provider gives you one of the PPPoE, L2TP, PPTP or static IP options, you will need to enter the necessary data - IP address, gateway and DNS addresses, username, password - it all depends on the specific type of connection. You can also get this information from technical support or find it in your contract for the provision of Internet services.
If you previously used some kind of high-speed connection to access the Internet, you can safely delete it. Now this function will pass to the router, and you will no longer need to manually establish a connection.
In addition, the provider can bind your end devices to account by MAC address. You can also check this with a support person. If the binding exists, you can tell the employee the MAC of your router, indicated on the sticker on its bottom panel. Another option is to clone the MAC network card to the router (menu Network - MAC clone) or change it manually on the router.
This configuration step ends when your router gains access to the Internet. If everything worked out, save the settings with the button Save and move on to the next step. And in case this configuration step was unsuccessful, we recommend the instructions: When setting up the router, it says “Without access to the Internet”, or “Limited”.
WiFi network setup and security key protection
To set up a Wi-Fi network, we need to go to the menu Wireless — Wireless Settings. Here in line Wireless Network Name enter the name of the network by which devices trying to connect will search for it. Below is the drop down list region, in which you need to select your country of residence. All of the following settings on this screen can be left unchanged.
Save the settings again Save.
To protect your network from unnecessary connections, we recommend setting up a security key (password). Go to the menu Wireless — Wireless Security. Put a label next to the line WPA/WPA2-Personal(Recommended). AT PSK Password enter the password, which will now be requested from each device trying to access your router's network. Also, installing a Wi-Fi security key is described in detail in this article.
Once a password has been created and assigned, save immediately by pressing Save.
Changing the administrator password
We already had a publication on how to change the default admin password, which gives access to the management page of the Tp-link TL-WR841N router. Now, while we are still on the management page, you can immediately change this password. This function is needed so that any user working through your network cannot log into the router and make any changes without your knowledge.
It's on the menu System Tools — Password. You will be prompted to enter your existing authorization data, and then a new admin login and password. It is allowed to keep the name admin unchanged, and come up with a new password and write it down somewhere in an inaccessible place so that you do not forget it, and someone else does not recognize it. These settings are also saved with the button Save.
This completes the configuration of the Tp-link TL-WR841N router. Now all that remains is to reboot it so that it can receive the settings from the provider. Reboot is done through the menu System Tools - Reboot, or by simply turning off the power for a few seconds.
After the reboot, the wireless network is activated. To connect to it, use the network name and security key assigned earlier in the setup process. Even if you configured the router, for example, from a laptop by connecting it via a lan cable, now you can remove the cable and connect to the network via wifi.
We sincerely hope that you did not encounter difficulties when setting up Internet access, but if this still happened, here are our publications on this topic: “No Internet access” in Windows 7 and “Connection is limited” in Windows 10.
You probably have some questions or feedback about the operation of the Tp-link TL-WR841N router. Leave them in the comments.
If you have purchased a TP-Link TL-WR841N Router, but do not know how to configure it correctly, then this article is for you. Thanks to step by step detailed instructions, setting up the TP-Link TL-WR841N router will take you no more than 15 minutes. By the way, this model has gained immense popularity around the world. Due to safe use, high-quality signal, high speed data transmission and low cost, the device can be called one of the best solutions in terms of price-quality ratio in its category.
The first step is getting to know
Let's start with a basic introduction. The router has two antennas - this allows you to significantly increase the range and stability of the signal. The rear view of our device is represented by six connectors and buttons:
- Power on/off button.
- Connector for the power cable that connects the device to a power outlet.
- An Ethernet port is used to connect the Internet cable.
- Lan - connector, connects the router and laptop / computer with a local network.
- Quick Security Setup - a button (quick secure installation) - an analogue of WPS, is a distinctive feature of TP-Link.
- Reset button to factory settings (Reset).
Video review of the TP-Link TL-WR841N router:
The second stage - connecting the device
This stage consists in connecting all the cables necessary for operation.
Step-by-step instruction:

The third stage - software configuration
There are two ways:
Via CD
We insert the disk into the drive, we expect the Easy Setup Assistant application to load automatically. If after a minute nothing appears, open it yourself. We go to the "Computer", open the CD: 
The TL-WR740N router is used as an example, but the installation is identical. In the menu that appears, click on the "Quick Setup Wizard". 
Choose the language that suits you best, click "start". 
Check if the LAN cable is properly connected to the computer and the router. Also check your internet cable. The same goes for the power adapter.
Read this text carefully, check if everything matches. 
In this menu, select your country of residence, city/region, enter the name of the Internet service provider, and use the Dynamic IP address in the connection type. 
If you want to have static IP address, then you must enter the data provided by your provider. This information must be specified in the contract. Didn't find it - go to hotline, call the service specialist of the company at home. 
Use the item “I did not find suitable settings” only if your country is not in the proposed list, or you do not know the name of the provider's server. 
Enter the desired name for the future Wi-Fi network. 
Be sure to select the highest level of protection (WPA2-PSK) from the options provided. The column below shows the default password, you can change it to your liking. 
Just in case, click the suggested item below, this will save data on the type of connection and protection, name, and password in a separate Text Document. 
If everything is entered correctly, an inscription will appear on the successful completion of the verification and configuration WiFi router. Click "next". 
Great, the CD installation is complete.
In browser
To configure the TP-Link TL-WR841N router with this method, you just need to connect your laptop to the Wi-Fi network provided to it immediately after turning on the power. The network name must match the model name, Wi-Fi will not have a password.
Important!You can use for this purpose not only a laptop, but also a phone or tablet- All that matters is access to the internet.
Let's start the setup:
- To avoid possible problems first, we recommend doing a factory reset - press and hold the Reset key on the router for 7 seconds.
- Now open your preferred browser ( Google Chrome Opera, Mozilla Firefox or others), and in the site line enter 192.168.1.1 or 192.168.0.1, press Enter - this will provide an entrance to the router.
- In the window that appears, enter the same login and password - admin, click OK.

- First of all, for greater security, we recommend changing the standard login and password. The procedure is optional, but will provide more protection for your network.
 To enlarge, click on the picture
 - Next, to get a working Wi-Fi, you can connect a dynamic IP address. This will set the IP address for all devices that will connect to the router automatically.
 To enlarge, click on the picture
 - However, if the contract with the provider states that a static IP address is recommended, then select the appropriate type in the subparagraph, and using the data written in the contract, fill in such fields as the IP address, subnet mask, main gateway, primary and secondary DNS address manually.
 To enlarge, click on the picture
 - Another option: select “PPPoE” in the connection type - enter your login and password, and choose between dynamic (it will do everything automatically) or static (some providers provide mandatory IP and netmask for this).
 To enlarge, click on the picture
 - Rarely, but it happens that Internet service providers request that the user's computer's network card be bound to a MAC address. To do this, go to the item "Network", then "Clone MAC address" and click "Clone MAC address". After these steps, the network will gain access to the Internet.
 To enlarge, click on the picture
 The note! Check this procedure with the supplier, you may not need it.
- Usually, the purpose of this setting is simply to get access to the Internet for family use, for which you need to deal with the “settings” submenu wireless mode". Indicate in it the desired name of the Wi-Fi network and the region of your stay. In the "mode" column, it is advisable to select "11bgn mixed", it is suitable for 99% of users. We also recommend leaving the channel width and channel in auto mode. In the maximum transfer rate section, select largest number according to the principle “the more the better” (300 Mbps).
Interesting! If in home use are modern smartphones, laptops or computers no older than 3– 4 years (which have new type network cards), then in the mode column you can select« 11n» - this will provide a greater streaming data transfer rate, and will also make both antennas active in a constant mode.
If you want to stabilize and at the same time slightly increase the speed of the Internet, select the channel manually. Many people live in high-rise buildings and use the Internet from a single provider, so when automatic mode channel selection, for some it may coincide, thereby reducing the speed. To select the optimal one, install the application on Android "Wi-Fi Analyzer" and find a less used channel - select it in the settings.
 To enlarge, click on the picture
 One of the keys to using a wireless network is to secure it.
 To enlarge, click on the picture
 If you want to have top speed work on a portable device, then be sure to put a password in the "wireless protection" section, because there are a lot of people who want to use someone else's Internet for free. Next, check in the “versions” section WPA2-PSK - the most modern and secure type of protection. In the column "encryption" select AES. Enter your preferred password - this is what you will enter when connecting to this Wi-Fi.
Save.
Now you need to restart the router, for this you can turn it off for 10 seconds from the power supply using the Power button, and turn it on. After that, you can connect all your portable devices to a fully configured Wi-Fi network.
Video on working with the Wi-Fi Analyzer utility:
Setup completed. I hope you have seen that configuring the TP-Link TL WR-841N router is not difficult at all.
Wireless networking technologies are gaining more and more popularity today, but it is no wonder. If about ten years ago laptops were quite rare among ordinary users, and they had never heard of tablets, today both of them are commonplace. The routine that is connected to the network with wires is nonsense, because all their mobility is lost. Of course, if you move the laptop exclusively between the desktop and the sofa, then you can still put up with the presence of an extra cable, but if you use it throughout the apartment, it is already inconvenient to carry the cable along with you, and wiring the network to all rooms is somewhat expensive and impractical.
As for small offices, here it is often much easier and cheaper to provide a wireless connection than to lay twisted-pair coils and install switches. These things are successfully replaced by one multifunction device – wifi router. Earlier we already told you about the TP-LINK TL-WR1043ND model, and today we'll talk about.
TP-LINK is well known to everyone who deals with networks, both wired and wireless. Equipment manufactured by this company, as a rule, has fairly affordable prices, but functionality not inferior to more expensive products from other companies.
Specifications TP-LINK TL-WR841N
|
Manufacturer |
|
|
Number of ports |
|
|
Fixed IP |
|
|
Dynamic IP |
|
|
PPPoE/Russia PPPoE |
|
|
802.1x+ Dynamic IP |
|
|
802.1x+ Fixed IP |
|
|
PPTP/Russia PPTP |
yes, (dual access) |
|
L2TP/Russia L2TP |
yes, (dual access) |
|
Ability to manually set MAC |
|
|
Ability to set the MTU size manually |
|
|
Number of ports |
|
|
Manual blocking of interfaces |
|
|
Quantity |
|
|
fixed, dipole, external 5 dBi |
|
|
Antenna replacement/connector type |
|
|
Forced assignment of the working antenna number |
|
|
Operating frequencies, GHz |
|
|
Supported standards and speeds |
|
|
OFDM (30/ 60/ 90/ 120/ 180/ 240/ 270/300 Mbps) |
|
|
BPSK, QPSK, 16QAM, 64QAM, OFDM: 54, 48, 36, 18, 12, 11, 9, 6 Mbps |
|
|
CCK (11 Mbps, 5.5 Mbps), DQPSK (2 Mbps) DBPSK (1 Mbps) |
|
|
Region/Number of channels |
|
|
Protocol extensions |
|
|
Possibility of manual speed setting |
|
|
Output power, dBm |
|
|
(maximum) |
|
|
802.11n @270Mbps |
|
|
802.11g @54Mbps |
|
|
802.11b @11Mbps |
|
|
Receiver sensitivity, dBm |
|
|
802.11n @270Mbps |
|
|
802.11g @54Mbps-108Mbps |
|
|
802.11b @11Mbps |
|
|
Working with another AP |
|
|
WDS support (bridge) |
|
|
AP Support |
|
|
Support WDS+AP |
|
|
Ability to work in client mode |
|
|
Wireless repeater (repeater) |
|
|
Safety |
|
|
Broadcast SSID blocking |
|
|
Binding to MAC addresses |
|
|
yes, up to 152 bit |
|
|
WPA-Auto-Personal |
|
|
WPA2-Auto-Enterprise |
|
|
802.1x (via Radius) |
|
|
Firmware capabilities |
|
|
Administration |
|
|
Setting a password for the admin user |
|
|
Ability to change adding Login |
|
|
Management via WAN by specified IP&port |
Yes, open through the Security menu. |
|
WEB interface |
|
|
WEB interface via SSL |
|
|
Own utility |
|
|
Ability to save and load configuration |
|
|
Built-in DHCP server |
|
|
Static DHCP over MAC |
|
|
UPnP support |
|
|
Protocols supported by WAN |
|
|
Operating mode of a conventional switch for LAN, WAN and WLAN interfaces |
|
|
one-to-many NAT (standard) |
|
|
Ability to disable NAT (work in router mode) |
|
|
Ability to work in bridge mode |
|
|
VPN pass through |
|
|
Traffic shaping (traffic restriction) |
|
|
Built-in DNS server (dns-relay) |
|
|
Dynamic DNS support |
yes, dyndns.org, comexe.cn, no-ip.com |
|
Watch |
|
|
Clock synchronization |
|
|
Setting the time manually |
|
|
Utilities |
|
|
Logging |
|
|
Logging the execution of firewall rules |
|
|
Logging Wireless |
|
|
DHCP Leases logging |
|
|
Logging Port Forwarding |
|
|
System Log |
|
|
Storage inside the device |
|
|
Storage on an external Syslog server |
|
|
Sending by email |
|
|
Routing |
|
|
Static (set entries manually) |
|
|
Availability and capabilities of built-in filters and firewall |
|
|
SPI (Stateful Packet Inspection) Capabilities |
|
|
SPI (Stateful Packet Inspection) support |
|
|
Ability to use SPI in rules |
|
|
Presence of filters/firewall |
|
|
on the LAN-WAN segment, Internet access restriction |
|
|
on the WLAN-WAN segment, Internet access restriction |
|
|
on LAN-WLAN segment |
|
|
Supported filter types |
|
|
Including SPI |
|
|
By MAC address |
|
|
By source IP address |
|
|
By destination IP address |
|
|
By protocol |
|
|
By source port |
|
|
By destination port |
|
|
Time binding |
|
|
By application |
|
|
By domain |
|
|
Working with URL Block List Services |
|
|
Action types |
|
|
Virtual servers |
|
|
Ability to create |
|
|
With the ability to turn on / off. by time, day of the week |
|
|
Setting different public/private ports for a virtual server |
|
|
Ability to set DMZ |
|
|
Ability to set DMZ traffic at the port level |
|
|
Food |
|
|
external, 9V AC, 0.6 A |
|
|
Support 802.1af (PoE) |
|
|
Additional Information |
|
|
Connection external USB HDD, Flash |
|
|
Connection WEB cameras(CCTV) |
|
|
Connecting a USB printer |
|
|
Firmware version |
V 3.12.5 Build 100929 Rel.57776n |
|
Dimensions, mm |
|
|
Products webpage |
http://www.tp-link.ua/ |
The information given in the table was collected based on the data provided on the manufacturer's website, as well as on the actual capabilities of the WEB interface. In general, the capabilities of the router are quite extensive, almost everything that can be configured can be configured.
Package
The device is sold in a glossy cardboard box, decorated in traditional TP-LINK white and green colors.

On the front side of the package there is a photo of the router and a brief description of its key features. Among them:
high performance;
the ability to operate a wireless channel at speeds up to 300 Mbps;
easy installation;
one-button encryption setup.
Below are logos of supported network standards and technologies used.
At the ends of the box are quite detailed specifications, system requirements and installation diagram.

On the back side you can find a typical connection diagram, images of devices that can connect to the router, as well as detailed description all ports on the rear panel.

Equipment
The package contains everything you need to fully use the device immediately after removing it from the box:
power adapter;
patch cord;
documentation CD;
short and extended installation guide;
warranty card.


Antennas, which are often in the box, in this case are already installed on the router. In addition to printed materials containing information on installation and connection, several promotional brochures were also found in the package.
Router TP-LINK TL-WR841N
The body of the device is made of white matte plastic and has rounded shapes. Here and rounded corners, and smooth curves of the faces, and slightly curved top panel. This design distinguishes TP-LINK TL-WR841N from many other routers, which are ordinary rectangular boxes. But, it is worth recognizing that there are much more effective solutions.

Along the perimeter of the front panel there are several grooves in which ventilation slots are hidden. The central part is accented with a black glossy stripe with an influx at the front edge. It contains indicators for power, device operation and activity. wireless connection, LAN port connection and WAN port activity indicators, and WPS indicator.
Such an arrangement of indicators can be called successful. They are well readable both in desktop installation and when mounting the device on the wall.
In the center of the front panel is the manufacturer's logo, applied in silver paint.

The bottom panel of the router is replete with ventilation slots. It also has four rubber feet for horizontal installation and two lugs for wall mounting. The sticker located in the middle informs about the model name, power adapter parameters, network settings default.
All ports and controls are concentrated on the rear face. Along the edges are two antennas, and between them is a power button, a power supply socket, a WAN port, four LAN ports, a QSS button, and a small recessed reset button.

On the whole, the router case is well thought out, the indicators are well readable, all ports are easily accessible.
WEB interface
TP-LINK TL-WR841N is configured via the WEB interface. Despite the apparent complexity, it is quite easy to learn, all customizable options are described in detail on the right side of the screen.

The first page is Status. Here you can see the main parameters.

The next section is "Quick Setup". With it, you can quickly configure basic settings, which may be enough for home use. We are prompted to select the type of WAN connection, specify a username and password, and configure a wireless network.


In the "QSS" section is available quick setup wireless network Quick Security Setup. After activating QSS, the mechanism for connecting wireless network clients is enabled, and channel encryption is set using an automatically generated password.

The "Network" section has three subsections. In WAN, you can set the method for obtaining an IP address in an external network dynamically from an external DHCP server, or in manual mode, as well as select the connection method via an encrypted channel with a communication provider using standards: PPPoE, L2TP, PPTP, BigPondCable, specify MTU, packet size, connection mode, etc.

In the "LAN" subsection, you can manually set the IP address and subnet mask.

If the provider identifies by MAC address, the "MAC Clone" subsection will be useful.

In the “Wireless Settings” menu item of the “Wireless” section, you can select the wireless connection standard and set its name. You can select the point line channel number and enable/disable the wireless segment. You can also disable broadcast SSID (network name and login options).

The “Wireless Security” submenu allows you to select the authorization method and set the encryption algorithm, in addition safe mode data transfer can be disabled altogether.

In the MAC address filtering subsection, you can create a black and white list of devices that are prohibited or allowed to connect to your network. This filter is disabled by default.

Among the advanced settings wireless connection selection of packet size, inclusion of WMM technology (priority of video streaming), etc. are available.

There are also statistics on wireless connections.

The "DHCP" section contains DHCP server settings. Here you can reserve a pool of addresses, view information about clients.


The "Forwarding" section is useful for bypassing restrictions NAT protocol. In the "Virtual Servers" subsection, you can set the IP addresses of local machines to which certain ports from external connection. This allows you to implement any servers on machines local network, which will be opened on the prescribed ports for external traffic and connections.

In the "Port Triggering" menu, you can configure redefinition or substitution of ports for forwarding packets.

In the "DMZ" item, you can specify the IP address of the local station, to which all packets arriving at any port of the router will go. Those. it is she who will have an IP address assigned to the WAN interface and fully respond to requests from an external client.

UPnP (Universal Plug and Play) technology allows all devices in a network environment to automatically discover each other.

Among the security settings available are a standard firewall, blocking based on signs of various attacks. It is possible to restrict access by MAC addresses. There are also access settings from an external network for configuring the device.


As you can see, the capabilities of the WEB-interface are extensive, TP-LINK TL-WR841N lends itself to very flexible configuration, depending on the tasks that are set for it. But this statement is true for almost any TP-LINK wireless router, because the contents of their WEB interface are almost identical. If you open the TP-LINK TL-WR1043ND review for comparison, you will immediately see last section control devices connected to the USB port. For the rest of the points, you can try to find ten differences, and this is unlikely to succeed. In this regard, TP-LINK is pleased: the functionality of even the available models almost completely coincides with the functionality of the "top" solutions. In any case, this is true regarding the settings, but as for the speed capabilities, they are still different.
Testing
Let's move on to speed. Testing is carried out under ideal conditions, the distance between the router and the client is no more than two meters. This is due to the desire to reduce the impact on the results of interference from various equipment: mobile phones, microwave ovens, etc. Also measured numerically throughput NAT interface, and for a visual comparison, we measure the data transfer rate between two LAN ports of the device.
TP-LINK TL-WR841N has been tested in our lab using ASUS RT-N66U and ASUS EA-N66 network equipment and Gigabit Ethernet Intel 82566MC.
Comparative performance testing on a 300 Mbps connection with two meters line of sight using WPA2 encryption.

In both directions

Data flow from access point to client

Client data flow to access point
Comparative testing of the speed of packets passing through the LAN interface for another LAN client in both directions.

In both directions

Data flow in one direction
Comparative testing of the speed of passing packets through the NAT service of this router in both directions.

As you can see, the maximum average data transfer rate that was achieved over the wireless interface is 71 Mbps. This result can be called average, but in general it is typical for this class of devices. The speed of packets passing through the NAT interface does not differ much from that between two LAN ports and is close to the limit for them. Interestingly, in the graph of data transfer over a wired network in both directions, we see an average speed even higher than the declared 100 Mbps.
conclusions
The wireless router proved to be a well-balanced device. This is not a "top" model in the manufacturer's line, so it lacks some functionality, for example, the Ethernet ports here operate at a speed of 100 Mbps. Wi-Fi of the IEEE 802.11n specification, like any modern router, is supported, but the actual data transfer rate over the wireless interface is far from the limit. But, again, this is true for all similar devices.
Once again, the competent implementation of the built-in WEB-interface pleases. Despite the apparent complexity, the router is actually quite simple to set up. And a large number of available options allows you to configure the device depending on the tasks assigned to it.
In the design of the case, I liked the well-placed indicators, which remain equally well readable both on a desktop installation and when mounted on a wall.
ASUS for the provided accessories.Article read 89574 times
| Subscribe to our channels | |||||
|
|
|
||||