You can also use regular Windows tools, for example, by restoring, but this is not always possible, so it is much easier to remove the old system and install a new one.
For recovery, you need a disk or .
Consider the process of creating an image using an example Windows entries 8, although the "seven" and other operating systems are written the same way.
Step 1. Beginning of work
To commit further action you will need to run the program on behalf of the Administrator, otherwise the system simply will not let you do anything.
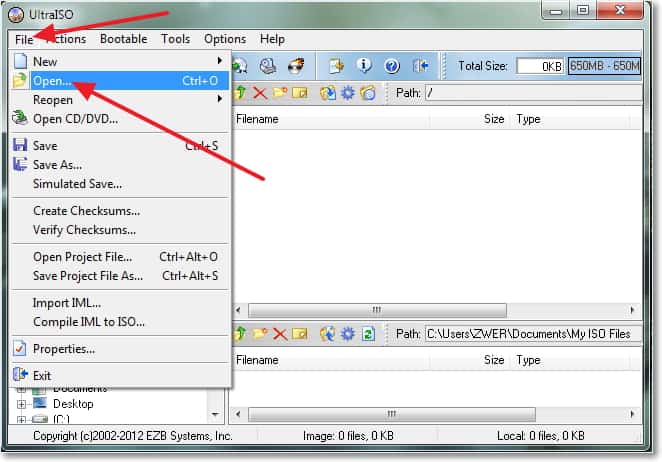
After you have opened the program, you need to click the "open" menu as shown in the first screenshot and start creating bootable flash drive ultraiso.
The example shows a prepared . The files themselves are easy to find on the Internet, in particular, on torrent trackers. The extension must be ISO, not EXE.

Once you have confirmed the image selection by pressing the "open" button, a list of used files will be displayed in the right window of the program.
Do not delete or rename anything, so that later there will be no errors during installation.

Step 2 Preparing the image for recording
A pop-up window will fly out again, once again warning that the data will be deleted. We agree with this and move on.

The most interesting begins - the direct recording of the OS. Began to create a multiboot flash drive ultraiso , which will take some time.

The program itself works quite quickly and efficiently, but the system often slows down the entire creation process. Be patient.
At the end of the process, the logs will display the notification "Recording completed"! This means that our Windows 8 flash drive is ready to use.

Since we no longer need UltraISO services, the program can be closed.
When the USB flash drive is connected to the PC for the second time, approximately the same inscription should appear, as shown in the screenshot.

Depending on the image, its name may differ from this. The figure shows just an example of the final version.

This article describes key feature Ultraiso programs. A bootable USB flash drive is created with it without problems. It is the algorithm for performing this operation that will be discussed below.
In what cases is it impossible to do without such a flash drive?
To begin with, let's define those cases when this important feature of UltraIso cannot be dispensed with. Bootable flash drive allows you to install operating system on a computer that does not have a CD-ROM drive. First of all, these are some models of ultrabooks and all netbooks. But, again, this does not mean that this method cannot be applied to a stationary personal computer (not on every system unit now you can find a device for reading CDs) or a laptop. In general, this is a universal solution for all cases. All modern computers, without exception, are equipped with a USB connector. So there will be no problems with connecting a flash drive. In this case, the installation speed of the operating system will be many times higher. Data from a flash drive transfers faster than from a CD. Therefore, this installation method is the future.

Choose an image
Before you make a bootable UltraIso flash drive, you need to choose the correct installation version of the operating system. Its demo version can be downloaded from the Internet. In this case, it is recommended to use the *.iso format (that is, the file must have such an extension). If necessary, it can be made from a CD. To do this, install it in the drive, run UltraIso, press "F8" and, following the instructions, create a copy on the hard disk of the installation version of the operating system. It is important that the source of the installer be autoloaded. Although rare, there are times when this important option is missing from the installation version. Therefore, it is necessary to pay attention to this.

Which version of the program is better?
UltraIso can be in two versions. The first one is demo and free. Some functions are not available in it, but the ability to create bootable flash drives is present. The second version is paid. She has more options, but to create such a flash drive, her purchase is not justified. Therefore, most users are advised to take the first modification of UltraIso.

Installing UltraIso
First you need to download and install UltraIso. without this step is not possible. First you need to download this program from the official site. The remaining versions are not recommended to be used, since their performance leaves much to be desired. Then run the downloaded installer. Following the instructions of the wizard, install this program on your local computer. Some additional setting there is no need to execute to create a bootable drive. After that, UltraIso is ready to go.

Create a bootable flash drive using UltraIso
How to create a bootable flash drive? After the installation is completed, the procedure for performing this operation will be as follows.

At the end of the manipulations, the process can be considered completed, and now you can easily install the operating system from the USB flash drive. Do not forget that the size of the flash drive must be larger than the installer of the operating system. That is, if the image occupies 4.4 GB, then the drive in this case must be at least 8 GB. This nuance must be taken into account without fail. Otherwise, it will not be possible to create a boot drive, and the operating system will display a corresponding message.
Preparing to install the operating system

At the next stage, you no longer have to use the UltraIso program. The bootable flash drive is already ready. But in order to start the installation process of the operating system, you need to correctly configure the BIOS personal computer. We install the prepared drive in any of the rectangular connectors of the personal computer. Next, when you turn it on, you need to pay attention to the inscription: Press X to setup. In this case, "X" will be the key that you need to press to enter the basic settings personal computer. If the manufacturer's logo is displayed during the equipment testing phase motherboard, then you need to press "Esc". It’s not always possible to figure out the key to enter the first time and have time to enter the BIOS. Therefore, if you did not have time to click, and the operating system started loading, then you need to restart the personal computer and repeat the operation of entering the basic settings, already knowing necessary information. Then, using the navigation keys (arrows are shown on them), we go to the item boot menu(loading). In it we find the item First Boot. Move the marker to it using the down arrow. At the next stage, using PgUp and PgDn, we indicate to the PC that the first boot source is, for example, the boot Windows flash drive 7. UltraIso has already placed the image on it, and it is ready for the installation process. The volume label will be the same as previously set. Once this manipulation is completed, press F10. Then you should be prompted to save the changes. We answer it positively. After that, the personal computer will restart and boot from the flash drive will begin.
Installation
The installation process from such an operating system drive is identical to exactly the same procedure from a CD made in the same UltraIso program. A bootable Windows flash drive is its exact copy. When the PC starts loading, press any key when the corresponding message appears. Then we set the language, country, monetary units and Click "Next". In the next step, click on "Install". In we select the one for which we have the key. Then we agree to the terms license agreement. To do this, check the box at the bottom of the window and click the "Next" button. At the next stage, select the type of installation: full or update. Then select the logical partition on which the OS will be installed. If necessary, format it using the appropriate command. Further, all operations are performed automatically until you need to set the name of the PC. Enter it and click "Next". If necessary, set a password for protection. Then you need to enter the registration key. You can skip this step, but then you will have trial version for 31 days. Then select security settings, time and system date. Then we set up the local computer network. At the final stage, drivers and application programs are installed.

Summary
This article describes one of the most important features of the UltraIso program. A bootable USB flash drive with it is done without problems, and even a novice user can solve this problem. To do this, just follow the previously described steps, and you should not have problems with this procedure. So let's go ahead and do it.
That told how to create a bootable usb drive for windows 7 in Windows program 7 USB/DVD Download Tool. it official program from Microsoft and it seems to work not badly. But there was a comment that it was not possible to create a bootable USB flash drive with this program. Maybe so, anything can happen, so I’ll write another way that you can create a bootable USB flash drive with Windows 7. And this time we will use good program UltraISO, I have already written about it more than once on the blog, in various articles.
I think that we don’t need to tell why we need such a bootable flash drive, if you are reading this article, then most likely you are interested in the question of how to create it, and not why it is.
In this way, you can create a flash drive not only with Windows 7, but also with Windows XP and Windows 8. What’s there, you can burn any image, any boot disk, for example Dr.Web LiveCD. Well, if you have already changed your mind about creating such a flash drive, then the image can be written to disk without any problems, I wrote about this in the article.
How to create a bootable USB flash drive with Windows 7?
We will need:
- UltraISO program. You can download it on the Internet in a couple of minutes, just type in search engine request “Download UltraISO”. After you download it, you need to install it. The installation is the most common, but if you don’t know how, then read the article. The program is paid, but when you start, just select “Trial Mode”. And if you want, you can buy it.
- A disk image with Windows 7, or any other image that you want to burn to a USB flash drive. This image must be in the format .iso I hope you have already downloaded it.
- Flash drive size minimum 4 GB(this is for Windows 7, if you want to burn a small image, then 1 GB is enough). The flash drive will have to be formatted, and this will destroy all the files on it, so you need either a clean flash drive, or copy all the information from it to your computer in advance.
If everything is ready, then let's get started.
We start the program UltraISO(there should be a shortcut on the desktop and in the start menu). I will show on the example of the English version, since I had a problem with the Russian one, all menu items are displayed in an incomprehensible font. But there is nothing wrong with that, everything is clear and so.
The program has opened, now we need to select the .iso image of the boot disk in it, in our case with Windows 7. Click “File” (File), and select “Open” (Open).
We find our image, select it and click "Open".

Now our image is open in the UltraISO program, all that remains is to write it to a USB flash drive. Click and choose “Write Disk Image…” hard drive…) .

A window will open in which we need to specify some settings. See what's opposite “Write Method:” (Write method), has been set to “USB-HDD+” . And opposite “Disk Drive”, the flash drive we needed was selected.
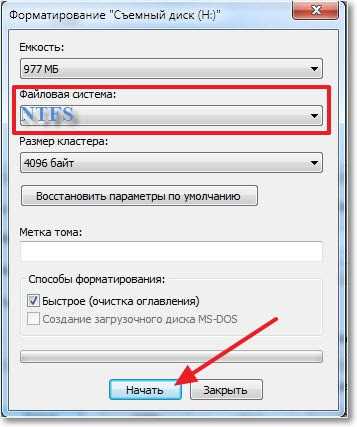
Now we still need to format the flash drive and we can start recording. Click the button “Format” (Format). Do not look at the fact that I have a 1 GB flash drive, I just don’t have a larger volume at hand. You must have a flash drive of at least 4 GB.

A small window will appear in which we will format our flash drive.
Formatting a flash drive will destroy all the files that are on it. So save them to your computer in advance.
Needed only in paragraph "File system" select NTFS, and click "Start".
A warning will appear, click "OK".
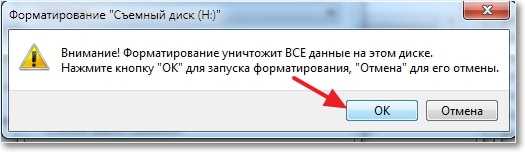
 Everything, the flash drive is formatted. Close the window “Formatting” by clicking on “Close” .
Readers have asked several times how to create an image of a bootable flash drive, make ISO image from it for subsequent recording to another USB flash drive or disk. This instruction is just about creating such images, and not only in ISO format, but also in other formats, which are a complete copy USB drive(including empty space on it).
First of all, I want to draw your attention to the fact that you can create a bootable USB flash drive image and there are many tools for this, but usually this is not an ISO image. The reason for this is that ISO image files are images of CDs (but not any other drives) that are written to in a certain way (although an ISO image can be burned to a USB flash drive). So there is no program like "USB to ISO" or easy way creating an ISO image from any bootable USB flash drive and in most cases it is created img image, IMA or BIN. However, the option to create boot image There is an ISO from the bootable flash drive, and it will be described first below.

Flash drive image using UltraISO
UltraISO is a very popular program in our latitudes for working with disc images, creating and burning them. Among other things, with using UltraISO you can also make an image of a flash drive, and there are two ways to do this. In the first method, we will create an ISO image from a bootable USB flash drive.
In UltraISO with a flash drive connected, drag the entire USB drive to the window with the list of files (empty immediately after launch).

Confirm copying all files.

In the program menu, open the "Boot" item and click "Extract boot data from floppy/hard drive" and save the download file to your computer.
Then in the same section of the menu select "Download download file" and download the previously extracted download file.

The second way to create full image USB flash drives, but already in the format ima, which is a byte-by-byte copy of the entire drive (i.e., the image of even an empty 16 GB flash drive will occupy all these 16 GB) is somewhat simpler.

In the "Selfloading" menu, select "Create a hard disk image" and follow the instructions (you just need to select the USB flash drive from which the image is taken and specify the location to save it). In the future, to burn the flash drive image created in this way, use the "Burn hard disk image" item in UltraISO.
Creating a complete image of a USB flash drive in the USB Image Tool
The first, easiest way to create an image of a flash drive (not only bootable, but any other) is to use free program USB Image Tool.

After starting the program, in its left part you will see a list of connected USB drives. Above it there is a switch: "Device Mode" and "Partition Mode". The second item makes sense to use only when your drive has several partitions and you need to create an image of one of them.
After selecting a flash drive, just click the "Backup" button and specify where to save the image in IMG format. Upon completion, you will receive a complete copy of your flash drive in this format. In the future, in order to burn this image to a USB flash drive, you can use the same program: click "Restore" and specify from which image it should be restored.

Note: this method is suitable if you need to make an image of some flash drive you have in order to someday restore the same flash drive to its previous state. It may not be possible to write an image to another drive, even exactly the same volume; it's kind of a backup.
You can download the USB Image Tool from the official website http://www.alexpage.de/usb-image-tool/download/
Creating a flash drive image in PassMark ImageUSB
Another simple free program that does not require installation on a computer and allows you to easily create a complete image of a USB drive (in .bin format) and, if necessary, write it back to a USB flash drive - imageUSB by PassMark Software.

To create a flash drive image in the program, follow these steps:
- Select the desired drive.
- Select Create image from USB drive
- Choose a location to save the flash drive image
- Click the Create button.
In the future, to write a previously created image to a USB flash drive, use the Write image to USB drive item. At the same time, for writing images to a USB flash drive, the program supports not only the .bin format, but also regular ISO images.
You can download imageUSB from the official page http://www.osforensics.com/tools/write-usb-images.html
How to create an ISO image of a flash drive in ImgBurn
Attention: Recently, the ImgBurn program described below may contain various additional unwanted programs. I do not recommend this option, it was described earlier when the program was clean.
In general, if necessary, you can also make an ISO image of a bootable USB flash drive. True, depending on what exactly is on the USB, the process may not be as simple as it was in the previous paragraph. One way is to take advantage of the free program ImgBurn, which can be downloaded from the official website http://www.imgburn.com/index.php?act=download

After starting the program, click "Create Image File from Files/Folders", and in the next window, click the icon with the image of the folder under the "plus", select the source flash drive as the folder to use.

Bootable flash drive image in ImgBurn
But that's not all. The next step is to open the Advanced tab, and in it - Bootable Disk. It is here that you need to make manipulations in order for the future ISO image to become bootable. The main point here is the Boot Image. With the Extract Boot Image field at the bottom, you can extract boot record from a flash drive, it will be saved as a BootImage.ima file in the location you wish. After that, in the "main item" specify the path to this file. In some cases, this will be enough to make a bootable image from a USB flash drive.
If something goes wrong, then the program corrects some of the errors by independently determining the type of drive. In some cases, you will have to figure out what's what: as I said, unfortunately, there is no universal solution for turning any USB into ISO, except for the method described at the beginning of the article using the UltraISO program.
Today, USB flash drives have begun to gain popularity and have almost replaced CD / DVD drives, surpassing them in capacities that already reach sizes from 2 to 128 GB or more, they have become compact and easily fit in a pocket. Due to the increase in their volume, it became possible to install Windows any flash drive versions. More recently, this was only found on netbooks, and now the absence of optical drives has appeared on laptops. It seems to me that many owners of laptops without a floppy drive are already faced with the question of how to record Windows image to a USB flash drive, trying to simply copy the contents to a USB flash drive, as a result, they did not get the expected result, since the information copied simply to a flash drive was not bootable. Thanks to this article, we will know how to create a bootable flash drive with any bootable software, including Windows of any version from the image, sit using the program UltraISO.
To create a bootable USB flash drive with an operating Windows system 7, 8, 10 we need desktop computer the UltraISO program itself, which we download from the official site after downloading and installing it, which will work in demo mode, but this will be enough for us to create a bootable USB flash drive. And most importantly, the disk with the installation Windows, or if there is none, then its image is pre-created on the computer.
And most importantly, the same USB flash drive where the bootable disk image will be recorded. In this case, I recommend using a USB flash drive of at least 8 gigabytes, since after recording the image, we will add drivers and programs for setting up the PC there.
A simple method to create a bootable Windows USB flash drive
Why simple, yes, because in a bottom way we will create our flash drive in a few steps, which will serve as an assistant for Windows installation. To create a bootable USB flash drive, we need:
We open the previously downloaded UltraISO program, after which we select “File” at the top in the drop-down menu, select Open or simply press the combination of quick buttons (Ctrl + O). A window will open where we will find and select a pre-prepared image with Windows or a drive with a Windows disk and select it, click open as shown in the picture.
Our next step after we have opened our Windows image, in the main window, select the "Bootable" section if the VAZ has an English version (Bootable) in the drop-down menu, select the "Write a hard disk image .." section, if the English version of UltroISO then (Write Disk Image...). Before clicking, remember to insert a flash drive.

After inserting USB flash drive and clicked on the button (Burn hard disk image...). A window pops up in which we select our media
Disk Drive where the image of a bootable flash drive will be written, below in the same window we select the recording method like this USB-HDD.

After all the steps, be sure to click on the button below to format the flash drive. After clicking, a window with formatting options will appear, specify file system(NTFS) and confirm our actions by clicking on the "Start" button.

Here the setup and formatting is completed, we just have to click on the "Write" button if the English version (Write).

If you have reached this description, it means that you have waited for the recording process and it has ended, for which I congratulate you. You yourself were able to create a flash drive with which you will now install Windows on your netbook or laptop without optical drive. A small recommendation, so that you don’t have to stick a USB flash drive back and forth, load it into separately created driver folders for your device, software, which you will use every day after Windows installations"codecs, player, office programs, archivers".
Now you can at any time reinstall the operating system yourself without the help of unauthorized persons, if your finances allow, then take this bootable USB flash drive and use it only when reinstalling Windows. I wish you good luck in this interesting business!