Hello! The topic today will be a bit strange, but what can you do. As they ask, so I answer. You can’t please everyone, but you need to think something.
Guys, this is a general article about setting up all router modelsTP- Link. I highly recommend that you look on our website for settings for your specific model- save both time and nerves. And it is better to download the manual from the official site - there is much more information there.
Another request - if you did not find any item, you still have questions, there are amendments - leave comments. I have many routers TP-Link, let's think of something together.
Customization Goals
The main task of the usual home router(and TP-Link is just one of the leaders in this market, so their models can be seen in half of their neighbors) - to please the owner. What does the owner need?
- Working 24/7 Internet via Wi-Fi.
- A working local network (less often, but some people throw files, use a printer, and watch movies on TV).
- Other rare functions - everyone has their own thoughts, an individual approach is needed here, with this it is better right away in the comments.
In total, we need to connect the Internet during this manul, and the local network will configure itself. In fact, there will be nothing complicated, and the generality of the topic will not greatly affect - all routers are configured almost the same for basic functionality. TP-Links are no exception - I tried a lot of them. So look, do, think, but in case of any difficulties, look for instructions for your model from us.
Setup video
TP Link TL-WR841
This is the most popular router for the current day of all the “tipilinks”. And of course we have a separate instruction for it. All owners go to the page below:
Before setting
We will need:
- router
- Cable for connecting the router to the power supply
- Network cable connecting from the router to a computer / laptop
- ISP cable in the apartment (Ethernet or ADSL)
- A computer or laptop with the ability to connect via wire (you can, of course, a smartphone or tablet, but some models do not like this, which is what I asked you to look for for your model)
- Login and password to connect to the Internet
- Login and password to connect to the router
Small explanations. If everything is clear with the device itself, then you must definitely find your username and password for the Internet. It usually goes straight into the contract. If not, contact your provider by phone or in person. Sometimes they understand.
Another problem is the data for connecting to the router for its further configuration. Here you need to get:
- Connection address
- Login
- Password
Usually this is all located on a sticker under the router itself. Approximately like this:
If suddenly there is no sticker, try these values:
- Address: 168.0.1 or 192.168.1.1 or http://tplinklogin.net
- Login: admin
- Password: admin
If during the configuration process the values \u200b\u200bare not suitable, then there is a possibility that someone else used the router (even if it is new). Just reset the settings and everything will be as it should (about the reset will be below). Sometimes it's even better to reset the settings to default than to reconfigure.
Installation and inclusion
So, we begin to assemble the structure. Make sure the router is turned on:
- We place the router in a convenient position - to reach both the Internet cable and the computer / laptop was enough. How to install the model depends on the device itself - you can put it, you can hang it. Routers are generally unpretentious things.
- If there are removable antennas, install them.
- Connect it to power. Many TP links have an “Enable” button on the back - do not forget to click on it. See if the indicator lights (if any) are on. If it's on, keep going.
- We connect our Internet channel - whether it is an Ethernet cable, telephone cable or even a USB 3G / 4G modem - it already depends on your needs and capabilities. As a rule, another light for a successful connection of the cable lights up or USB devices. Of the important - the cable is connected to a separate WAN connector - it usually differs from other ports in color. Do not confuse.
- We wait about a minute - sometimes the procedure for identifying connections is delayed, so it's not shameful. And while it thinks, read on.
Indication

More for reference. Main indicators on the panel. They may vary from model to model, but everything is about the same everywhere. Very useful to watch when you need to quickly analyze a problem.
- Food. There is a separate lamp. Even if nothing is connected, Wi-Fi is not working, when the power is on, it will still be on.
- Internet. Active internet connection. Initially disabled. When connected, it lights up, with active use it usually flickers very quickly.
- WAN(this is an Ethernet connection, and a telephone ADSL, and a USB modem) - shows the presence of the connection itself (without the Internet). We connected the provider's wire - it caught fire. Sometimes combined with the previous lamp. For example, in ADSL, it initially blinked when the line was established, and after connecting it simply burned. But if it does not burn, then you need to look at the wire.
- Wi-fi- usually enabled initially, but can be disabled in the settings. If there is a wireless network, it will light / flicker / blink.
- WPS. Establishing a quick connection by key. Usually starts flashing when you press a special button on a device with WPS. There is almost everywhere, but may be absent.
- network ports. Also frequent lamps - on the back side there are LAN ports for connection wired devices to the router. So, when connected, the corresponding indicator immediately lights up. Usually there are about 4 ports, the same number of lamps.
- USB. Similarly, if connected, it lights up. There may be other lamps, here already look at the model. And something may be missing.
Connecting a TP-Link router

You can try to do the settings from a PC, and from a laptop, and from a tablet or phone. Another issue is that the Wi-Fi network will not always be available, so setting up by wire is a classic. But here the whole point is in the connection. All other steps are the same. So I propose to consider further connecting through a laptop - there you can use Wi-Fi and a wire.
- The wire. Wired is easy. Plug it in and see if the indicator light comes on. Fired up? Then everything is ok. I will not paint all the problems, sometimes it may be necessary to reset the network settings of the operating system. Or maybe something more interesting. So feel free to write your questions and experience in the comments. From my notes - it is important to connect the wire to the LAN connector. Do not confuse it with WAN - the provider's cable goes there, if you confuse it, you will not be able to connect.

- Wi-fi. There is nothing complicated either. We are looking for a network in networks called something like TP-Link with the best signal and connect to it “over the air”. The default password is usually empty, or it is specified in the settings on the same sticker. There were cases when it was not possible to connect at all. And the thing was that the neighbors also had a TiPiLink, and even a more powerful connection) In general, do not fly by.
Authorization in the web interface panel
It's time to try to go to the settings panel. To do this, go to the address recognized above, enter your username and password.

If suddenly the password does not fit, reset the device to factory settings. At the back of the panel there is usually a Reset recess with a button inside. We clamp it on with a needle for 10 seconds and try to connect again - everything should work out.

AT personal account on the home page usually nothing special. Just general information:

Unlike the screenshot above, when you first turn on the values of IP addresses will be zero: 0.0.0.0. The figure already shows the successful establishment of the connection.
ADSL, Ethernet, USB
Once again, I repeat that all routers are built in approximately the same way. There is only a slight difference in the technology of establishing a connection: via an ADSL telephone cable, via Ethernet, via a USB modem.
Everywhere you will be required to enter a login and password from the provider. If there are any doubts, still find a review for your model. Here, for full coverage, I will take an ADSL modem - there are a little more settings in the connection. So when using a modern cable, you will have fewer possible problems.
It doesn't matter what operating system you are using -windows,linux,MacOS,ios,Android or something else. The configuration will still take place through the browser on the web interface.
Internet setup made easy
Any modern modem is now equipped with a convenient setup wizard, and besides, in Russian. I now have it written in my model - “Quick Setup”. There really everything is shown and told in great detail, just for dummies. Therefore, I will not dwell on this extensively here, I will simply give step by step instructions what it usually does:
- Welcome you.
- Asks you to find out how you want to use the modem - put something like "Connect to the Internet."
- He will ask how you want to do it - usually choose the PPPoE mode.
- Enter your ISP username and password.
- Usually here he asks about WiFi activation networks. Asks to create a password for her.

Sometimes a special disk is supplied with the router. Usually there are no drivers on it, but a software setup wizard is located. The differences from the web interface are minimal.
Internet setup is difficult
Everything is the same here - initially we are looking for either a quick setup, or Quick Setup, or Settings, or Configurations. It may be called differently. Here is an example:

What is important to do here:
- WAN Link Type - PPPoE - the usual type for our networks, the type of connection.
- VPI / VCI - 0/33. I had 0/35 under Rostelecom. It's just about the old ones. telephone connections. This parameter was always included in the contract next to the username and password. The same difference and complexity compared to new networks.
- PPP Username and PPP Password - login and password.
Everything else is not so important here. Names may vary slightly on your model. Especially if they are in Russian) But you get the point. Do this, and the Internet will appear on the router. This will be signaled by the indicator.
WiFi setup
Usually, the whole point of setting up Wi-Fi comes down to turning it on and setting security parameters. Sometimes it's all combined on one page. Configuration occurs either automatically from the wizard, or through the menu items Wi-Fi, Wireless, Wireless mode or something like that.
Basic settings: Wireless-basic:

What is important here:
- enableWireless– enable the wireless mode itself.
- HideSSSIDBroadcast– hide the network from the list of networks. On the one hand, it's cool that no one can find your network without third party applications. On the other hand, when connecting all your devices, you will have to manually enter the name of the network - and this is far from always convenient. Yes, and modern Wi-Fi security allows you to leave this option unused. I assure you, if someone wants to hack into your network, this option will definitely not save you.
- Wireless Network Name– network name. So it will be visible in the list of networks. Write something different from the neighbors)
Attention! If you change the network name, the current Wi-Fi connection will be reset. It is enough to reconnect manually.
Now let's move on to Wi-Fi security: Wireless-security:

Back to safety points:
- enableWPS- set to Disable if you do not use WPS. This is the ability to connect to a device without a password, using the WPS function. Yes, there is a password. But this password gets over faster than the password from the Wi-Fi itself. Modern models have everything necessary protections from busting, but careful ... If you don’t need it, turn it off.
- networkAuthentication- network authentication type. Specifies the level of security by specifying encryption. You have to choose - WPA2. And only so.
Do not useWEP - this system is very easy to crack!!!
- Wirelessnetworkkey- password to your network. Use at least 10 characters, do not use simple constructions, use letters and numbers. The more difficult, the better. This is your first line of defense.
All. After saving, you can re-login to your network with a new password. This completes the basic settings. The Internet is, the network is active. You can use. And this is how it works on any device.
Nothing succeeded? There are comments where you can ask your question. Just don't forget your model name and detailed description Problems!
Panel access password
Remember also that you connected to the panel using standard password? Any person from the network can do the same and trick you into something bad. best method protection - change the password from our Wi-Fi router (not to be confused with the wireless network password):

Advanced router settings
Next, I will give only a description of the possible functionality of routers. Options that are not used very often. Use it or not - only if you need it. Experienced specialists usually figure it out on their own, but it would also be interesting to see such people in our discussion thread.
The settings below are best specified for a specific model.
- Channel - set from 1 to 11. Usually there is an Auto mode. That's what we need. But if there is some kind of network load from neighbors, devices, you can try to switch the channel, suddenly the connection will improve. Use at your own risk.
- Mode - protocol for working with Wi-Fi. Now there are b/g/n and b/g/n+ac. You can't go wrong with more choices. All current standards are compatible.
- network bridge. Many routers allow operation in repeater (or repeater) mode. The bottom line is to intercept the visible signal, and repeat it with amplification. To get to the farthest room. Usually this setting is not visible, but it is present in many places. For me, it’s easier to purchase a separate repeater, but here it’s more convenient for someone.
- Filtering - wide range for rejection different devices. Usually they filter accesses by MAC address. But you can also filter Internet access by issued IP.

Firmware
Apply in special cases. Usually everything works great out of the box. Only for those who know exactly what they are doing. Upgrade plan:
- Downloads the firmware for your model on the official TP-Link website or a third-party forum with full confidence in compatibility.
- In the panel, go to "Software Update". Select the downloaded file. Click "Update".
- Installation new firmware takes up to 5 minutes - do not reboot the router during this operation - the device may be damaged.
- The device will most likely reboot.

TP-Link is the largest manufacturer of Wi-Fi routers and a number of other computer technology. TP-Link TL WR741ND is a widely used router model for home and office use. Next, let's look at how to set up a router to access the Internet using different types of connections, and also give an example of setting up a Wi-Fi network.
Reset router settings and connect to a computer
Since you are going to completely reconfigure the TL WR741ND TP-Link router, it is best to reset it to factory settings right away. To do this, take a small object as thick as a needle (the tip of a ballpoint pen is also suitable), and then press the Reset button (see the figure below) located at the back of the router with it and hold for a few seconds. The router must be on at this point.
If you notice that all the front lights of the device turned on at the same time and then went out, then software setting reset by default - you can continue.
Before setting up the modem, connect the cable that is used to access the Internet to it. It must be connected to the WAN port, which is blue (indicated as Internet in the figure). Now let's look at how the setup itself will be done.
Since TP-Link TL WR741ND is a router wireless type, you can connect to it via a Wi-Fi connection. To do this, just turn on the router, and then connect to the Wi-Fi network through a computer or other communication device - a smartphone, tablet, or other. If the modem has just been purchased or you have reset its settings, then the network name will be the same as the model name of the router. A password is not required in this case.
If, for some reason, you cannot connect to the router via Wi-Fi, all that remains is to use a cable connection. For this one end network cable connects to any of the ports Router Link TL WR741ND, which is yellow, the other end is into the computer's network card. After that, the computer should notify about the connection to local network, and on the router the light under the number of the LAN port to which the cable was connected will blink. However, this does not always happen, so it is better to configure the connection in manual mode. Let's go in succession:


If there is no exchange, and command line writes something like “Waiting interval exceeded”, you can try to reset the router settings again, check that the wire is connected to it correctly and reconfigure the IP addresses of the computer’s network card.
The router is configured via the web interface
Open your Internet Explorer, enter "192.168.0.1" in the address bar. A small dialog will appear in the browser window, in which you will need to enter your username and password. Both are admin by default. Enter them and click OK. 
TP-Link TL WR741ND supports several types of Internet connection
Before setting up the device, you need to find out which WAN connection technology is used by your Internet provider. The most likely connection options will be discussed below, one of which will definitely fit your case.
Go to the Network section on the left side of the modem interface, then to WAN. We are interested in WAN Connection Type. Setting up for a particular type of connection always starts from here.
static IP
The technology is not used very often. Here you just need to ask the provider for 5 network IP addresses (shown in the picture below). Enter them in the appropriate fields and click Save - the setup is complete. 
PPPoE/Russia PPPoE
The technology involves the use of a login and password to access the network. If you know the data, enter it in the appropriate fields: User Name (login), Password (password) and Confirm Password (confirmation).
PPPoE technology is often used with static IP. If your provider issues these addresses to its customers, then they will also need to be entered. To do this, in the Secondary Connection section, move the switch to Static IP and enter the IP address and subnet mask provided by the provider. 
Click Save.
L2TP/Russia L2TP
By default, the connection type requires specifying the server address, login and password, as well as (not always) additional network addresses issued by the provider individually to each client.
We first enter the data in the User Name and Password fields. Then in “Server IP Address / Name” we enter the server address (also issued by the supplier). It can look like a regular IP address or like, for example, "adres.provaydera.ru". If your provider has issued additional network addresses, enable the Static IP item and fill in the fields, as in the case of the Static IP paragraph. 
Click Save.
PPTP/Russia PPTP
Another common type of connection. Here, to connect to the provider, use VPN network. The settings are exactly the same as in the case of L2TP/Russia L2TP described in the previous paragraph. You just have to call your ISP to verify the type of connection they are using. 
In the case of TP-Link TL WR741ND, Wi-Fi is installed simply:

All other items can be left as is.
Click Save. TP-Link TL WR741ND ready to go! It remains only to check the connection.
Connecting the TP-Link router is excellent and step by step described in the instructions that came with the router upon purchase. If the documents are lost, then prepare a router, adapter, WAN cable, or device capable of receiving wifi signal. Make sure that the electrical outlet and the internet cord allow you to connect the router and follow the instructions below, which will show you how to easily connect Wi-Fi TP link router in a few minutes.
For which TP-Link models is this manual?
It should be noted that there is a wide variety model range routers. The cable connection process for most of them is similar, but the setup will be different, as each model has its own firmware version and design features and ergonomics of the administration panel. Such information will be provided in a separate article.
This instruction is exactly suitable for models:
- TL-WR940N,
- TL-WR941N,
- TL-WR740N,
- TL-WR841N
- TL-WR840N,
- TL-WR842ND,
- TL-WA701ND,
- TL-WR743ND
In all other models WiFi routers TP-Link connection will be the same or very similar.
The router version TL-MR3220 will be used as an exemplary device. Unfortunately, the more popular and widespread TL-WR841N on this moment not available, but all actions are performed in the same way.
How to connect a computer to the device via a network cable?
The first task after the purchase is to supply power to the router. To do this, an adapter is connected to it in a connector called POWER. It is impossible to make a mistake in this case. The other end must be plugged into an outlet. Some models have a power button. It must be pressed if the bulbs on the box do not immediately light up. The second task is to connect the router to the computer. For this, a network cable is used. One comes as standard. Its end is inserted in network card your computer and the second part in the LAN port of the router. Tp-Link routers usually have 2 connectors. They have a characteristic yellow color. You can use any of the connectors. Their number means how many devices can be connected to this router. It can be a TV, a set-top box, or something else connected via a cable. Wi-Fi network is also allowed to use. You may find it useful to look at the instructions for connecting a laptop to Wi-Fi.
How to connect TP-Link to the Internet?
The main task of the router is the distribution of the Internet connection. For him to carry out this function, you need to connect a network cable from your ISP or ADSL modem to it. connects cable from the ISP to the WAN connector. This connector on the box is available in single copy. It is usually highlighted in blue.
If the Internet is provided via an ADSL modem, then a cable from the modem is connected to the WAN connector. It is also available as standard.
On the image, the manipulations performed are as follows.
If all actions are performed correctly, then a connection icon will appear on the computer. Most likely, it will be offline or limited. You need to configure the router. Recommended reading. Most models are configured in the same way, so an example can be used TP-LINK settings TL-WR940N. If the provider uses a dynamic type of distribution of IP addresses, then the Internet can work without presetting. Similarly, if you have an ADSL modem installed. All the data has already been entered on it, therefore, the distribution of the Internet is carried out automatically.
Even if you have the situation described above, you will have to change a number of parameters. You will need to set up wifi network and set the password to a new one wireless connection. Very often when setting up a router there are different problems. Many are connected with the lack of the Internet. Therefore, you should read the article "Without access to the Internet", or "Limited" it has the necessary answers and methods for solving problems.
Hi-hi everyone!! Did you know that connecting and setting up a network on a router is even scary experienced users computers. Why set it up yourself, if you can call a specialist who will quickly do everything.
However, I’ll tell you that you don’t need to suffer yourself, the process of setting up and connecting TP-link router models is quite simple, especially if you follow these steps according to my instructions. In today's article, a step-by-step explanation will allow you to set up and distribute the Internet to all devices in just an hour. Yes, yes, and you should not spend extra money to call a specialist, when you can set up a tp link router yourself easily and quickly.
Explanation: the instruction is suitable for modern TP-link models (not older than 5 years). The settings menu may be slightly different, but you will find the same items. So let's go...
How to set up a tp link router preface
Before proceeding to configuring the router, you need to deal with network settings Internet connection on your computer. Let's say a cable is connected to a laptop or PC. Today the most commonly used the following options network settings:
— PPPoE- users can use the Internet only after entering the login and password;
--- Dynamic IP– the system automatically sets parameters of this type, they are issued via DHCP;
--- static IP- the option is used extremely rarely today, since the user needs to manually enter the parameters.
As for the operating system, the process is carried out similarly on Windows Vista, 7, 8 and even on Windows 10. We need to go to the menu " Start" and find the tab " Control Panel" - go to " Network and Control Center public access ».

Now go to the tab " Change adapter settings».

Select active " LAN connection» (the icon should be blue). Click right click mouse and select context menu paragraph " Properties».

Do not be afraid of a large number of items and settings. Usually, many users panic when they see a large number of the settings stage, and they do not know how to configure the tp link router. There is nothing difficult. We need to highlight in the window " Internet protocol version 4" and then click on the button " Properties».

There can be two options here:
1. If the automatic IP address acquisition mode is selected in the settings, then it will be easy for you to connect the router and set the parameters, because the settings will come automatically via DHCP (this is the Dynamic IP option).
2. If you see filled items in the window and the active inscription " Use the following IP address”, then overwrite all settings. You have selected static settings providers that do not change are Static IP. Place a check mark next to " Obtain an IP address automatically” and confirm your action by pressing the button “ OK».

Blocking access to the Internet by MAC address
This item applies only to those users whose ISP automatically blocks new connections. You can find out for sure this information in the contract. To get around this point, we need to make sure that the router receives the same MAC address that is registered with the provider. Finding the MAC address is pretty easy.
We go to the menu and in the search bar we enter the command " cmd" and press the "Enter" button.

After that, you will see command console. We need to enter the command ipconfig /all and confirm your action by pressing the button " Enter».

You will see a list of all possible parameters, but we need data from the section " Ethernet adapter - LAN connection". You will learn more about how to find out the mac address and what it is from this article:
How to set up a tp-link router: Detailed connection
So, you can proceed to the settings, check that the following elements are at hand:
BUT- TP-Link router - the basis that will distribute the Internet to all kinds of devices;
B- provider cable;
C- laptop or personal computer.
The connection is elementary - this can be seen from the diagram. The cable from the power supply that comes with the router is inserted into the connector called Power. We insert the cable of your provider into the main WAN connector of the router, usually it is highlighted in blue. The computer will connect to the TP-link router using a network cable that plugs into any yellow LAN port.

Done, other devices (tablets, phones, TVs, laptops) can be connected already via WiFi connection. It's time to move on to the next point of our today's question - how to set up a tp link router.
The process of setting up a tp-link router
Setup starts with logging into the browser Internet Explorer. Enter the following address in the input line: 192.168.1.1 . If you have ever set up a proxy server, then you need to disable it. After entering the address, a security window will appear in front of you: login - admin, password - admin. By the way, on the bottom of the router itself you will find your username and password, take a look, do not be lazy!

The router window will appear in front of you. We need to choose a master Quick Setup” (quick setting) and press “ Next" (Further).

Instructions for Dynamic IP - automatic settings.
If your provider provides just such settings, then check the box next to Dynamic IP and click the "Next" button.

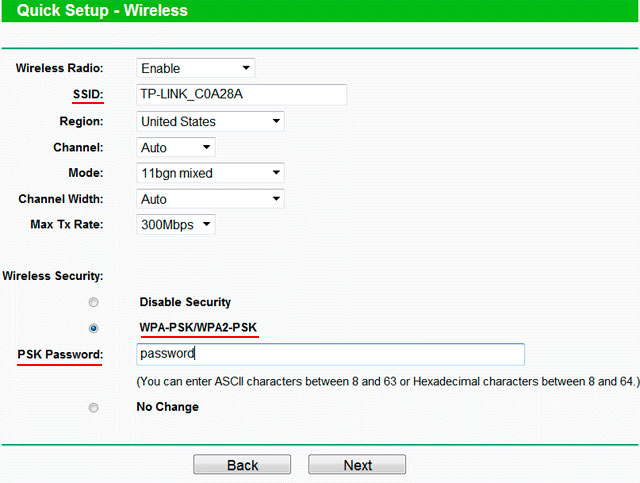
Now we set the basic settings:
- In field SSID the name of the future point is set WiFi connections.
- Chapter Wireless Security is responsible for the type of encryption - specify WPA-PSK.
- In field Password you must enter a password.

The rest of the settings in this window can be left untouched. Press " Next". The installer will inform us that the settings have taken effect. Click on " Finish and use Wi-Fi from all devices.

Explanation for users whose provider blocks access by MAC address: again go to the router menu and select the item “ network", and then -" MAC Clone". In the appropriate field, we drive in the characters we recorded. If you see that in the field " You PC's MAC» already have data, then just click « Clone MAC". Don't forget to save your settings by clicking the " Save". I also suggest that you find out how to set up a tp link router with static parameters.

Instruction for Static IP - static parameters
At the beginning of the instruction, we determined which network settings are on your computer. And if you have a Static IP, then select the appropriate item in the TP-link customizer.

The settings correspond to the data from the local network connection, so there should be no problems, but if the installer is in English, then you may not understand some terms:
Default Gateway- main gate;
Primary DNS– preferred DNS server;
Secondary DNS– alternative DNS server;
subnet mask- Subnet mask.
After completing the data entry, press " Next».

Next come standard settings. In chapter " Wireless Security"You need to select the type of encryption - put a tick in front of" WPA-PSK". Field SSID is for entering the name of the wireless network. Do not forget to put the password in the field PSK Password(at least 8 characters).

Done, the installer tells us that for the settings to take effect, you need to restart the router - click on the button " Reboot". If you have problems with the MAC address, then use the instructions above - it works for all types of connection.

Instructions for PPOE - logging into the network using a login and password
If you have the PPPoE protocol set, then check the box next to the item with the corresponding name.


Here the setup is no different from other connection options. We drive in a password to protect our wireless network from "uninvited guests" - it must be at least 8 characters. In field Wireless Security you need to set the option WPA-PSK". As for the field SSID, it is for the name of your network.
Done, setup completed successfully. Click on the button " Reboot» - after the reboot, the settings will take effect and you will be able to connect to the wireless network. So, we have discussed how to configure a tp link router if your provider uses automatic or static parameters.
I suggest you take care of the security of your Internet. I can recommend you to read my articles:
Setting up security for a wireless network
The password does not guarantee that third parties will not be able to use your Internet. They can simply go into the settings of the router itself and see your password. To prevent this from happening, go to the router settings program and drive in the following parameters:
Old User Name- enter in the column admin
old password- this is old password, by default we set admin - enter it
New User Name- this does not affect security, so you can leave it as it is
New Password- drive in New Password to configure the router (not to connect to it).
Confirm New Password- enter the new password again to confirm.

Connecting to a wireless network
We have created a wireless network, but users may have questions about connecting to it. Using the example of a laptop, I will explain this process. On phones, tablets and TVs, the process is exactly the same.
In the lower right corner, click on the wireless networks icon.

The router will ask you for a password - enter it and press the button " Connection».
Important!!!: Enter the password that was specified in the field PSK Password. Sometimes users get confused and enter a password to edit the router settings. If the data was entered correctly, then you should see wireless Internet. The password will be automatically saved so you don't have to re-enter it every time.
I am attaching a video to this article, which clearly and clearly shows how to set up a tp-link router
At the end of today's article - how to set up a tp link router, I suggest that you familiarize yourself with the most common problems when setting up a router.
1. If you forgot your password
The problem can be solved very simply. We pick up the router and find a small button on the back with the name "RESET". We hold it for 10 seconds, after which the router will return to the factory settings. Go back to Internet Explorer and enter the address 192.168.1.1, login - admin, password - admin. After that, you can configure access again and specify a password that suits you.
2. Problems with the connection and operation of the router
Some problems that may arise when trying to connect to the router can be solved by yourself. Sometimes the reason for the lack of connection is mechanical failure gadget.
3. I can't access the address to configure the router
This problem is common among TP-link users. To get rid of it, you must perform the following steps.
First of all, you need to check what is set in the wireless connection settings. If the DNS and IP address should be set automatically, and your checkboxes are unchecked, then check them again. After that, you can go back to the address and configure the router.
4. Can't connect to router
Sometimes the router does not allow a certain device to connect to the wireless network. To find out what the problem is, you need to try connecting from another gadget - a computer, tablet or smartphone. If the router does not accept all devices, then try rebooting it. After that, everything should return to its place.
If we are talking about a separate device, then the problem is most likely in it. Check if the corresponding checkboxes are checked in the Wi-Fi connection settings. Sometimes the gadget perceives your network as unsecured, so it does not allow you to connect to it. Set the options to allow connection to unidentified wireless networks.
Sometimes it helps full reset settings. To do this, hold down the RESET button for about 10 seconds (located on the back of the router). After this action, the chance of proper operation will increase markedly. The main thing is not to forget to drive in new parameters.
5. The device does not see the network
Unfortunately, there are many reasons for this problem, so you need to go through all of them. If the laptop does not find the network, then first of all it is worth checking if the Wi-Fi module is running. To do this, go to the network control center, then click on the "Adapter Settings" tab. If a wireless connection inactive (gray), then it should be enabled. Most likely, after this step, you will be able to connect to the network safely. We also recommend checking the hardware switch to turn on and off the Wi-Fi module.
If the module is running and everything is enabled, then you should check the drivers. This applies primarily to laptops. Not always in operating system have the necessary network drivers for a specific laptop model. Checking this guess is very simple: right-click on the “my computer” icon, select “ Properties"and go to the tab" Device Manager».

The screenshot shows a list network devices. In this case, they are all working and have a suitable driver package. You can see a yellow triangle opposite the network icon, which explains that the device is not working properly.
You can solve the problem simply: go to the website of your laptop manufacturer, find your model and download network drivers. After that, you will be able to connect to the wireless network.
6. Problem in the device
Sometimes it is not possible to detect a defect for the reason that the malfunction lies in the device itself. Therefore, you should not rack your brains over the question: how to set up a tp-link router if I followed all the above requirements and everything was successfully configured. In this case, you must take the router to service center under warranty (if any).
The defect can be mechanical or software. If everything is clear with the mechanical, then a software defect implies a malfunction in the firmware of the router. You can restore it yourself, but this process is much more complicated than setting it up. Also incorrect installation firmware or failure can completely disable the router completely.
So, already summing up today's article, I would like to tell you that you cannot always connect to the Internet because of the router. There may be some network problem. To test this, unplug your ISP cable from your router and plug it directly into your computer. After that, go to the network and sharing center. Enable LAN connection and try to access the Internet.
If it works, then the problem is really in the router. Sometimes a device won't allow a certain device to connect. To remedy the situation, you can try pressing the automatic router button, which is located on the back of the router. All active devices with enabled Wi-Fi modules will connect automatically.
Well, for today, everything that I wanted to tell you about today in terms of: how to set up a tp-link router. I hope the article was interesting for you. I would be glad if you have something to add to all of the above. See you at . Bye bye everyone!
In our homes there are more and more more devices who have access to the internet.
Computers, laptops, tablets, smartphones, Wi-Fi printers, and even TVs, but in order to take full advantage of their capabilities, they must have access to the Internet.
For this reason, in most homes, it is necessary to install a router to provide wireless communication for the internet.
One of the most popular manufacturers of such equipment is the TP-LINK router.
There are a lot of such routers on sale today. Here are the most popular ones today:
Tp link tl wr841n, wr740n, tp link td 786, wr741nd, wr840n, wr940n, w8901n, wr841nd, tp link wr842nd, w8151n, mr3420, wr941nd, w8951nd, tp link td w8961n, w8960n, tp link archer c20, w8968, wr741nd, mr3220, wr842n, wr340gd, mr3020, tp link аист, wr1045nd, w8950n, mr3420, wr743nd, ac750, wr1042nd, tp link archer c2, wa701nd, wr1043nd, wa801nd, wr942n, td854w, wa801nd, wr340g, w9970, adsl2, n150, n600 , w8951, dir 615, wa901nd, dir 320, w8101g, n750, dsl 2740u, wn722n.
As you can see, there are many of them, but the settings are almost the same. Therefore, I will not stop, but will write a step-by-step instruction that is general for everyone, so that you can independently, correctly connect and configure your tp link router on a computer or laptop.
NOTE: from windows version: windows 7, windows 8, windows 8, windows 10, windows 8.1 does not depend on anything, as well as on the operator (except if password protection, name and others are provided), whether for Rostelecom, Beeline Kyivstar, Ukrtelecom, Dom ru , Ufanet, Luganet, Will and so on.
It’s easiest to set up the router mode yourself or yourself if a disk is attached, but you can do it without a disk manually and even without the Internet, only if there is no Internet, then you won’t need a router, because its task is to distribute the Internet via wifi.
Usually you only need to set up a new one, but there are times when you get lost, then you need to set up wifi in a new way, and in some cases, reflash it.
I will use the configuration of the cheapest and most popular TP-LINK routers on the CIS market.
Instructions step by step in Russian how to set up a TP-LINK router to distribute wifi
Turn on the adapter first alternating current supplied with the router and connect the power.
Press the big black button - some LEDs on the router panel should light up.
You will also need two cables: one for the internet (connected to the router) and the other must be connected to the computer/laptop.
These cables (commonly referred to as "twisted pair") terminate in a distinctive connector and are visible in the picture.

Connect the cable connected to the computer to the blue connector on the back of the router.

Connect one end of the cable that comes with the router to the yellow socket with number 1 on the router, and the other end is connected to the computer instead of the disconnected cable Internet.
Step two in setting up a TP-LINK router via cable
Launch a browser (such as Internet Explorer, Google Chrome, Mozilla Firefox etc.) and in address bar type: 192.168.0.1, and then press the ENTER key.
You should see a window asking you to enter your username and password. Enter "admin" in both fields and click "OK".

You should see the router's configuration page. By clicking LMB on the “Quick Setup” option (you can quickly set it up this way, and if you are not in Russian, then click - Quick Setup).


The tab will change. Choose your location and provider. If you do not find your Internet provider in the list, put a bird in front of the line: “I did not find suitable settings” and click “Next”.

Step three in setting up a TP-LINK router without a disk
Here you may need a provider to find out which item to choose. If the settings are automatic, select the first item and click next.

All these settings can only be obtained from the Internet provider (for example, I choose the first item).
Now you have to specify or not specify the mac address, which also depends on the provider. In general, the mas address is unnecessary, it is assigned only to prohibit unauthorized access to the Internet.
If you need to specify a provider, they will tell you which one. Write it down and click next again. I don't provide an example.


Step Four in Configuring a TP-LINK Router to Distribute WIFI
Click on the menu on the left on the line: "Wireless mode", enter the name of the network (any) and wifi mode(see picture).


The first time you connect your device to a wireless wifi networks in your home, you will need to enter this password (it will be stored in the device later on and you will not need to enter it).
The password must be at least 8 characters long. After clicking the "Next" button, the last mode of the Quick Settings window will appear.
After pressing the "reboot" button, the router will reboot - wait until the page refreshes itself.
After the reboot, the device is ready to go - check that the Internet is working - to do this, open any web page.
Of course, only general settings are provided here, we can say the most common settings (basic).
Sometimes you need to specify a few more settings, but they are known only to the ISP.
If you can’t set up your TP-LINK router on your own, then in the comments I can only suggest basic settings, for example, speed, ports, and so on, but some providers (especially well-known ones) set powerful protection so that their Internet is not "stealed".
These data are known only to them. Then call and ask. Usually they will guide you through all the settings, even over the phone, and I say goodbye and wish you success.