There are only a few problems that beginners face. And one of them is the BIOS setting for Windows installations from a flash drive. This is the first step that starts everything, and this is where almost everyone stumbles.
The problem is that there are different versions BIOS. And, having studied the instructions on how to enable booting from a USB flash drive in the BIOS, a beginner may still not be able to cope. And all because he simply has the wrong BIOS version, there is no such line as in the screenshot and, accordingly, nothing happens.
It doesn't matter what brand of laptop or computer you have. The version of the operating system (Windows 10, 8, 7 or XP) also does not play a role. Only the BIOS version matters. And the easiest way to find out about it is by running it.
Before entering the BIOS settings, you need to insert a bootable USB flash drive into the USB port with installation way. At the same time, the main thing here is to write it down correctly. Otherwise it just won't load.
After that, restart your PC or laptop and constantly click the Delete or F2 button until the BIOS window opens. The button may differ depending on the brand of laptop or motherboard on the computer, so see the hint on the first black screen.
Then the BIOS is configured.
Award BIOS setup
How to understand that you have an Award BIOS? From the screenshot below:

If you have the same blue screen, then it is Award. Most often this option is found on the PC.
Management in BIOS is carried out only using the keyboard - arrows and corresponding buttons (their list is usually indicated at the bottom of the screen).
Before setting the BIOS to boot from USB, you need to check that it is enabled (otherwise the USB flash drive simply will not be displayed). For this:

The instruction is as follows:


In the screenshot above, the HDD is in 1st place, and the USB flash drive is in 2nd place. It needs to be lifted up. As you can see from the prompts at the bottom of the screen, you can set the boot priority in BIOS using the + and - (plus and minus) buttons. Select the USB flash drive and press the plus sign - it should move to the first line. Then press Esc to go back.
Then highlight the item "First Boot Device", press Enter and select "USB-HDD". Press the Esc button again. To exit the BIOS, click the F10 button and then Esc (Save and Exit).

AMI BIOS Setup
AMI BIOS looks like this:

And most often it is found on laptops. Again, you first need to make sure that the USB controller is enabled. For this:

 Now let's look at how to boot a USB flash drive through BIOS on a laptop:

Sometimes, in order to change the device boot priority (put the USB flash drive in first place), you need to press other buttons. It can be not only + and - (plus / minus), but also F6 / F7, etc. Focus on the tips where it says what a particular button does (this little instruction is always either on the right or at the bottom).
Phoenix-Award BIOS Setup
The Phoenix Award looks like this:

This is a rare (or rather, old) version, but for the full picture, let's look at the Phoenix-Award BIOS through the BIOS.
First, go to the "Peripherals" tab and check that the first two items are set to "Enabled". If necessary, expose the desired.


After that, go to the "Exit" tab (in top menu) and select the line "Save & Exit" to exit the BIOS.
UEFI BIOS Setup
The UEFI BIOS is a new and improved version of the old BIOS. She has user-friendly interface, so the BIOS setting for Windows installation here it is very simple.
All you need to do is find the USB device icon, use the mouse to move it to the 1st position, and then click the “Exit” item (in the right corner) with the mouse. And don't forget to save your settings!
In this simple way, booting from a USB flash drive through the UEFI BIOS is carried out. Undoubtedly, this method is the simplest and most understandable. Actually, it was for this that a new graphical interface was developed.
When the PC or laptop reboots for the first time during the Windows installation process, you need to go into the BIOS again and restore the previous settings. That is, put the HDD-drive in the first place, and lower the flash drive to the second or third.
Or when, after a reboot, a black screen appears with the line “Press any key…” (“Press any button”) – do nothing.

Otherwise, Windows will start installing from the very beginning. And you can go around in circles for hours.
Once again: during the installation process after the first reboot, either go to the BIOS and return all the previous settings, or simply do not press anything. Alternatively, you can also simply pull the USB flash drive out of the USB port (but only when the PC or laptop reboots).
Nowadays, manufacturers of laptops, nettops, all-in-ones and stationary PCs are increasingly releasing them as part of systems that do not have an optical drive. This is not surprising, because the digital industry has almost supplanted the distribution of various content on optical drives.
Due to the fact that the computer does not have an optical drive, users began to have difficulty installing the operating system on it. Often, when installing the OS via a DVD drive, the user did not make any settings in the BIOS, since the first boot device in it is the DVD-ROM by default. The only option for systems that do not have a DVD-ROM is to install from a flash drive.
To install the OS from a USB flash drive or from portable USB HDD, need set boot options USB devices in BIOS. In order for our readers to be able to independently download from USB drive, we have prepared a material in which, using examples, we will describe the process of setting up a BIOS for booting from a USB flash drive for various systems.
Let's prepare our USB drive
The first step is to boot the flash drive from BIOS, it needs to be made bootable. For example, let's take a licensed disk with Windows 7 and make an iso image from it. The image can be made using DAEMON Tools or Alcohol 120% programs. Also, the original disk image with a licensed seven can be downloaded from the official Microsoft website, while having a license key.
Having received the image file, we proceed to the second step. This step includes creating a bootable USB flash drives using the utility Rufus. This utility was chosen for a reason. Distinctive feature utilities Rufus is that it can write bootable USB flash drives, both for regular BIOS and for UEFI BIOS. Downloading the utility Rufus from its official page and immediately launch it, since it does not require installation.
In the program window that opens, you can see that in the first combo box " Devices” shows a 16 GB flash drive. After selecting the USB device, you must specify the program Rufus path to iso Windows image 7. To do this, press the button with the laser disc icon and select the image. After that, press the Start button and wait for the completion of the creation of our bootable USB drive.
In the same way, bootable USB flash drives are created for Windows 8, 10 and XP, as well as for other operating systems. It is especially convenient to create with Rufus bootable flash drive with Windows XP. This is because most of the ways to create a bootable flash drive with Windows XP are very difficult to regular user PC. FROM Rufus on the contrary, creating a drive with Windows XP is simple and fast.
After the bootable USB flash drive has been created, you can proceed to install or reinstall the seven using it. Therefore, in the following example, we will describe the process of booting the flash drive we created on a computer with a UEFI BIOS.
Booting from a USB drive on a computer with a UEFI BIOS
In computers with UEFI BIOS support, you can use the Windows operating system, both with support for the new BIOS and without it. For example, let's take a computer that does not have an optical drive and is assembled on the basis of motherboard MSI A58M-E33 with the support UEFI BIOS. Now we need to put the USB flash drive created earlier into this computer. For fast loading from a certain drive in motherboards running UEFI BIOS, there is a special boot menu. This menu allows you to select a specific drive without loading the main BIOS menu. On the different computers boot menu can be called with F12 and F11 . In our case, on the MSI A58M-E33 motherboard boot menu invoked via the F11 key.

From this menu, you can see the item " UEFI: KingstonDataTraveler 2.0PMAM" and " KingstonDataTraveler 2.0PMAM". If we select the first item, then the Windows 7 operating system will be installed with support UEFI BIOS, and if the second, then with support for the usual BIOS. After selecting the first or second item, the download of installation files will begin.
Note that if we created a bootable USB drive using a proprietary program from Microsoft Windows USB/DVD Download Tool, then we would not be able to supply an OS that supports UEFI BIOS, as it creates a bootable USB flash drive that does not have UEFI support.
We move on. Now let's try to set up booting from USB devices from the BIOS of the motherboard MSI boards A58M-E33. To do this, when starting the computer, press the Del key. This action will load the BIOS of the motherboard.
In the main BIOS window, go to the " Settings”, which will open the settings menu. In this menu, we need to select the item "". After selecting it, the download settings will open.

In these settings, you can see that the first boot device is the hard drive.
 In order for our flash drive to boot at system startup, we will set the item “ UEFI USB Hard Disk» first on the list.

After these steps, you must save the BIOS configuration and restart the computer. Now, at system startup, a USB drive with UEFI BIOS support will be loaded first. To select a flash drive with an OS without UEFI BIOS support, you need to set the item " USB Hard Disk» to the very top of the list in the BIOS boot settings.
The example shows how easy it is to set up boot menu and BIOS boot configuration of MSI A58M-E33 motherboard. The BIOS setup on new motherboards from other manufacturers looks similar.
Setting up booting from a USB drive on an old computer with Phoenix BIOS
Phoenix BIOS Created by Phoenix Technologies. This BIOS was quite popular on already outdated computers. By using Phoenix BIOS you can also boot from a flash drive. For example, let's take Samsung laptop R60 that has support Phoenix BIOS. Just like on most computers, press the Del button and go to the settings Phoenix BIOS.
For our task, we need to go to the tab " Boot". On this tab, select " Boot Device Priority”, after which we will get to the boot device settings menu.
 In these settings, we need to select the flash drive first in the list, as shown below.

Having done these steps, our bootable USB flash drive will be loaded first when the system starts. In the same way, you can install and run a flash drive on most PCs running Phoenix BIOS.
Setting up booting from a USB drive on an old AMIBIOS computer
Consider launching a flash drive on a PC running AMI BIOS. developed by the American company American Megatrends Incorporated, from which follows the abbreviation in its name AMI. This BIOS is known to many PC users because of the start logo at system startup.

Let's turn on the computer and go to the settings using the Del key. In the BIOS window, we need to go to the settings item "".

 After the done actions, settings will open that allow you to set the priority of drives at system startup, including flash drives.

In the same way, you can install and run a flash drive on most computers running AMIBIOS.
Problems in solving the task on AMIBIOS and Phoenix BIOS
Users of very ancient laptops and desktop computers may encounter a problem starting a bootable USB device.
This problem is related to the fact that on very old computers running AMIBIOS and Phoenix BIOS there is no support for starting USB devices at system startup. Therefore, the only bootable device in this case will be an optical drive.
Another nuance in solving our problem may be different versions of AMIBIOS and Phoenix BIOS, which differ from those discussed above. The main difference may be the interface and a different arrangement of settings. In this case, you should not be upset, since the developers do not hide the boot configuration settings far and they can always be found and configured by analogy with the examples described above.
Set up booting from a USB drive to a mini PC
New mini pc Compute Stick from by Intel quickly gained popularity among users, as it is a computer with Windows OS on board, which is only several times larger than a conventional flash drive in size. Due to such dimensions, it does not have most of the interfaces that desktop PCs and laptops have. For example, there is no RJ45 interface and no interface for digital monitors displayport.

Since Intel Compute Stick comes with a pre-installed operating Windows system 8 or 10, then most users have no problems installing an OS on it. But what about the situation when the OS has suffered as a result of viruses or deletion of system files.
In this situation, a bootable USB flash drive will help and boot menu BIOS. For example, take an analogue of Intel Compute Stick called Meegopad T02. To reinstall on this Windows computer, you need to download the OS image on the official website of the manufacturer Meegopad T02 www.x86pad.com. After downloading and creating bootable flash drive, put it in Meegopad T02. Then turn on Meegopad T02, after booting into boot menu BIOS using the F10 key.

AT boot menu you can select a USB flash drive and install Windows using it. To constantly boot the USB flash drive at system startup, you can open the BIOS and set the boot priority for different USB drives in it.
Summing up
After reading the above examples, an ordinary PC user can easily set priority bootable flash drives on systems with different BIOS versions. By learning how to put the USB flash drive first when booting, you will understand how quickly and conveniently you can install various operating systems on your PC.
We hope our article will help you boot from a USB flash drive and install the operating system, as well as help you install it on computers that do not have an optical drive.
Related videos
It is recommended to perform computer BIOS setup in the following cases:
- Building a PC from scratch;
- Replacement of components;
- The presence of integrated graphics in the CPU;
- CPU overclocking and random access memory;
- Fan settings system block;
- Enabling sound emergency alerts;
- Reinstalling the operating system.
Gigabyte motherboard BIOS setup
To enter Board BIOS Gigabyte company when booting the computer, press the Del key. On the home page (M.I.T.CurrentStatus) we will see current version BIOS, system bus frequency multiplier, CPU and RAM frequencies, memory size, temperature and voltage of the central processor.
RAM
At the beginning of 2018, the most common type of RAM for PCs is DDR4, the frequency of which reaches 4266 MHz, which is much higher than that of DDR3. By default, RAM memory runs at 2133 MHz. Therefore, it is necessary to translate it to a frequency corresponding to the specification. The frequency value is hardwired into the X.M.P profile. To activate it, we find the parameter Advanced Memory Settings, Further - Extreme Memory Profile (X.M.P.) and set the value to Profile1.
For enthusiasts, memory overclocking is available by changing the timings ( Channel A/B Memory Sub Timings) and stress ( DRAM Voltage Control).

Video adapter settings
In the next step of the configuration, we focus on the graphics adapter. The tab will help us with this. Peripherals. If the configuration of the system unit does not involve the use of a discrete video card, then we activate the built-in CPU graphics core: Initial Display Output- select IGFX. This adapter uses some of the computer's total RAM. To change its volume in the section chipset click on DVMT Pre-Allocated and stop at the maximum possible meaning. And in DVMT Total Gfx Mem make the MAX size active.
If you have an external video card, the parameter Initial Display Output change to PCIe 1 slot (PCIEX16 slot) or PCIe 2 slot (PCIEX4 slot), and the value Internal Graphics in the submenu chipset- on Disabled. This is done to reduce the load on the CPU. In the presence of two monitors, it is possible to use two graphics adapters at once - external and built-in - the choice is up to the user.

Fan control
What is the main thing - maintaining the lowest possible temperature inside the case or silence? The answer lies in the type of video adapter you are using. If it generates a lot of heat (from 150 watts), then the exhausted hot air must be removed from the case as soon as possible. This is done by coolers located in front, behind and at the top of the system unit. They are connected to the corresponding connectors on the motherboard. But at undemanding tasks A modern graphics adapter consumes little power. Therefore, in a large section M.I.T.\PC Health Status in the submenu 1 st System Fan Speed Control, 2 nd System Fan Speed Control and 3 rd System Fan Speed Control set the Normal parameter, which will automatically change the speed of rotation of the blades based on the temperature in the system. You can also activate your own graph of this dependence by selecting Manual. These values are set in the subsection Fan Speed Control for each cooler. If the adapter built into the CPU core is responsible for the video graphics, then we use the quiet mode - Silent - to reduce noise.
In the same section, the parameter CPU Fan Speed Control (CPU_FAN Connector) is responsible for regulating the rotation speed of the CPU cooler. The following options are available: Normal (automatic operation depending on the temperature of the CPU cores), Silent (fan runs at low speeds), Manual ( manual control), Full Speed (the maximum possible degree of rotation).

Alarms
The specifications of the central processing units imply their operation up to 100 ºС. But the lower the temperature inside the CPU, the longer it will work. Therefore, the BIOS suggests setting a threshold value for this parameter, upon reaching which the alarm is activated. Find in the menu M.I.T.\PC Health Status string CPU/System Temperature Warning. By default, it is set to Disabled. For processors with low heat dissipation, it is recommended to change it to 70 ºС / 158 ºF, and for "hot" - 90 ºС / 194 ºF. This parameter depends on how efficiently the cooler removes heat from the processor cover. This setting applicable for case cooling fans.
An alarm will also be triggered if any of the fans fail and are not properly connected to the connectors on the system board. To enable this feature in the same section, look for CPU/CPU OPT/System Fan Fail Warning and change to Enabled. Recently, coolers with a semi-passive mode of operation have begun to appear on the market. With a small load on the central processor, they do not rotate. In this case, it is advisable to leave the default value - Disabled.
Optimizing Peripheral Devices
To install the operating system, it is necessary that the computer accesses the disk where the distribution kit of the operating system is located at startup. You can set these options in BIOS Features by going into Boot Option Priorities, where as the first boot disk choose HDD, SSD, USB or DVD.
The system is now usually installed on a solid state drive that works best in AHCI mode. You can activate it in the section Peripherals - SATA Configuration and its subsection SATA Mode Selection. Here, but in the submenu External SATA turn on external devices with SATA interface.
Every motherboard has an integrated audio controller. If the user is not satisfied with the sound quality, he adds to the PCI port or USB external sound card. Then you need to turn off the integrated sound in the menu chipset – Audio Controller.

The final stage
Confirmation or cancellation of the BIOS changes made is done in the section Save &exit:
- Save &Exit Setup– save corrections and exit;
- exitWithoutSaving– exit without amendment;
- Load Optimized Defaults– loading the optimal default settings that are required after BIOS updates or clearing CMOS parameters.

Asus motherboard BIOS setup
To enter the Asus motherboard BIOS, press Del or F2. There are two modes available here - EZ Mode and advanced mode. Loaded by default EZ Mode. To switch to the second state, you need to find the corresponding link below or use the F7 key. Let's consider in more detail advanced mode.

The options responsible for the operation of coolers in the system are located in Q Fan Control (F6). There are preset and manual profiles for CPU and case fans: Standard, Silent, Turbo, Full Speed, Manual. AT manual mode you can build the dependence of the degree of rotation of each cooler on temperature.

You can disable the cooler control function in the menu Monitor\Q-Fan Configuration. Regulation of 3-pin fans is also available by selecting DC Mode.
Utility EZ Tuning Wizard (F11) allows you to overclock the processor, taking into account the type of its cooling. This is true for owners Intel processors with index K. In the submenu OS choose a scenario for a daily computer (Daily Computing) or a gaming PC (Gaming/Media Editing). Then we click on the icon with a box, tower or liquid cooler and start the tuning process.


Activation of the XMP profile for RAM occurs in the submenu.

For graphics integrated into the CPU, it is necessary in the section Advanced\System Agent (SA) Configuration\Graphics Configuration\Primary Display set the value of IGFX, and for a discrete video adapter - PEG.

The operating mode of drives with SATA interface is configured in Advanced\PCH Storage Configuration\SATA Mode Selection. Choose AHCI. Here is the point S.M.A.R.T. status check monitors the status of hard drives and notifies you of errors in their operation.

The speed of SSD devices slows down over time as free space fills up. Utility Secure Erase on the menu Tool optimizes the operation of solid-state drives, thereby returning them to their original performance.


Information about all connected storage media can be viewed in Advanced\HDD/SSD Smart Information.

Enabling / disabling the audio controller built into the motherboard is carried out in the submenu Advanced\HD Audio Controller.

Device loading priority is set in the menu Boot\Boot Option Priorities.
Saving and canceling changes made to the BIOS, loading optimal factory settings is available in the main menu exit.

BIOS setup is important for those who want to get the most out of assembling a computer configuration. Therefore, before installing the operating system, you need to study this procedure in detail, which is described in the instructions supplied in the box with the motherboard.
How to set the system date and time? How do I boot my computer from a CD or flash drive? These and other common questions will be answered by getting acquainted with the basic BIOS settings and how to edit them.
Introduction
If you still don’t know what BIOS (BIOS) is and what this firmware is for, then we advise you to read our previous material that tells how the computer boots up and what role the “basic input / conclusion." In the same article, we will get acquainted with the BIOS setup program, which is most often called the BIOS (CMOS) Setup Utility.
By the way, in most cases, users use the abbreviated names of this program, calling it BIOS Setup or simply BIOS. For example, you can often hear expressions such as “enter the BIOS” or “open the BIOS”, which is somewhat incorrect, since in both cases we are talking about entering the program BIOS settings Setup, which is only part of the BIOS.
In most cases, BIOS Setup is used by ordinary users only to set the system time and date or select boot devices. But in fact, this program can have a lot of possibilities. With it, you can manage the operation of the processor, RAM, chipset and other important PC components, monitor the temperature regime of devices and perform many other useful actions.
Enter BIOS (CMOS) Setup Utility
In order to launch the BIOS setup program, it is necessary to press a certain key or a combination of them during the initial PC testing procedure. In the vast majority of cases in desktop computers to enter the BIOS Setup, use the Del key, less often F1 or F2. In laptops, on the contrary, it is the function keys (F1, F2, F11, F12) that are most often used for these purposes.

You can find out exactly which of the keys are used to start BIOS Setup from the instructions for the computer or motherboard. Also, in some cases, during the POST procedure, a hint is displayed on the monitor about which key you need to press to enter the settings.

True, on-screen prompts are becoming less common in modern computers and laptops, but in any case, finding the right key will always help search query in the Internet.
In addition to the need to know the right key to get into BIOS Setup, it is equally important to choose the right moment to press it. In order not to be late, it is better to repeatedly press the enter key immediately after the start of the PC boot. In most cases, this method is guaranteed to run the BIOS settings.
BIOS Interface (CMOS) Setup Utility
The Bios Setup program has a text interface without any design tricks and is controlled exclusively using the keyboard. This is explained by the fact that the graphical shell of this application has not changed much since the 80s, so everything looks very simple and ascetic.
In general, the BIOS Setup interface is of two types: with the location of the main menu in two columns or horizontally. You can understand what type is in front of you immediately after entering the program and opening its main window.

In the first case, you will see a list of sections placed in two columns on a blue background. This option is typical for BIOS versions developed by Phoenix Technologies (AwardBIOS, Award Modular BIOS, Award WorkstationBIOS). They are traditionally used in their motherboards by manufacturers such as MSI, Gigabyte, Foxconn, ECS and others.

In the second case, a window will appear in front of you with gray background, in which the menu with the main sections will be placed at the top of the screen, in the form of a blue horizontal bar. Such an interface is usually inherent in the American Megatrends BIOS (AMIBIOS, Aptio AMIBIOS) used in motherboards. ASUS boards, Intel, ASRock and some others.
Despite such differences in the interface of these two options, all BIOS Setup sections have a similar presentation. To verify this, let's look at the structure of the program's windows in both cases.
At the top of the screen you will always find the name of the current section (in the case of horizontal menu title is highlighted) or subsection.
The main part of the screen is occupied by an area containing a list of subsections (indicated by triangular arrows) and parameters of the selected section. To the right of the parameter names are their values. At the same time, it should be noted that if a parameter is highlighted in pale color (blue or light gray), then it either has the read-only status and is purely informational, or in order to edit it, you need to change another parameter associated with it.

The right side of the screen is usually occupied by a column in which a brief summary is displayed. reference Information by selected parameter or subsection, as well as tips on possible actions and use of control keys (American Megatrends). In the BIOS setup program with a blue background, the function key prompt is usually located at the bottom of the screen.
As you can see, despite the different colors and slight differences in the arrangement of work items on the screen, both interfaces are inherently very similar and present information to users in almost the same way. That is why the methods of working with BIOS parameters in both cases are almost the same.
Arrow keys are used to navigate through the menu and select the desired options, subsections or sections, and the Enter key is used to open them. The "ESC" key is responsible for returning to the previous screen and exiting the current settings. Also, with this key, you can exit BIOS Setup without making changes to the settings by pressing it in the main menu. In addition, the functions of the "F1" key, which calls for help, and "F10", which initializes the exit from BIOS Setup, from any place in the program, with saving the changes made, are unchanged. The "PageUP"/"PageDown" or "+"/"-" keys are traditionally used to cycle through the available values of the parameters to be changed.
In addition to the above keys, other function keys ("F2" - "F9", "F11", "F12") can also be used to work with BIOS settings, but their purpose may differ depending on the board model and its manufacturer. However, in order to understand what each of them is responsible for, it is not difficult. It is enough to refer to the prompts that appear on the screen or look through the manual for the motherboard.
Main sectionsBIOSSetupwith a columned main menu (blue background)
Each motherboard model in many cases has its own unique set of customizable parameters, but the names and thematic focus of the main BIOS Setup sections usually remain unchanged.
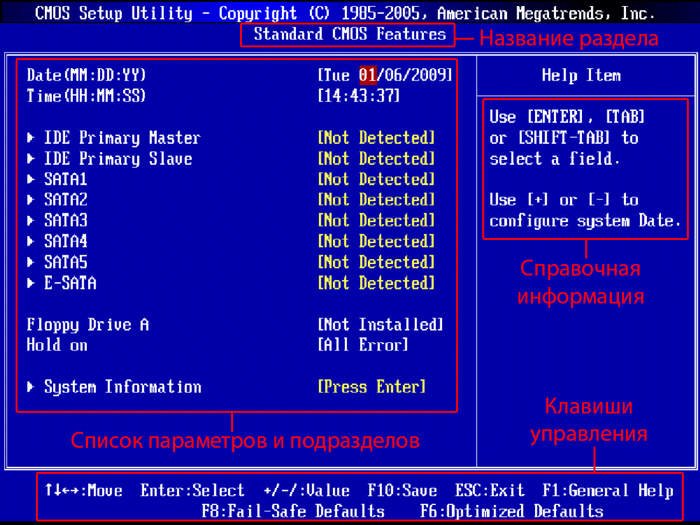
standard CMOS futures
This section contains the main (standard) computer settings, which include: setting the system date and time ( date, time), disk drive parameters ( IDE Channel), as well as various information about the system (information about the installed processor, the amount of RAM, and others).
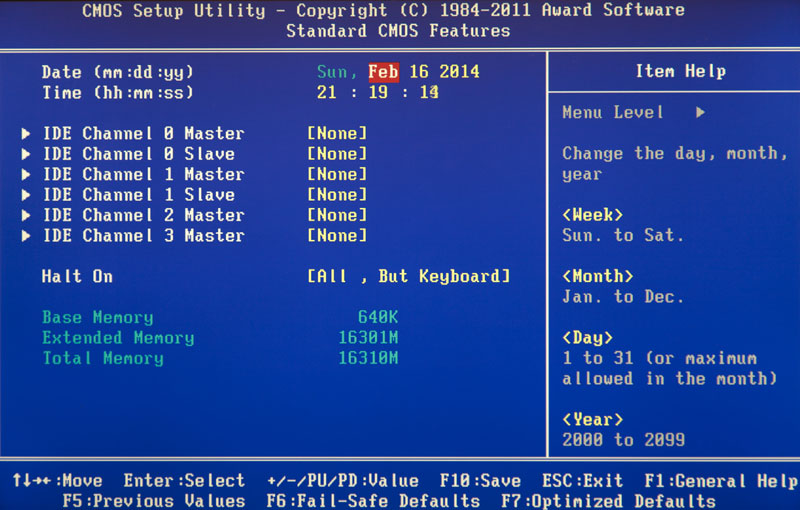
By the way, setting the date and time for most users is one of the key reasons for visiting BIOS Setup.
Advanced BIOS Features
This section contains advanced BIOS settings. The most common of them include:
- CPU Cache Management
- Options related to the nuances of booting a computer. For example, here you can enable / disable the NumLock mode, the accelerated download (Quick Boot ), as well as displaying the logo of the board manufacturer during the self-test procedure ( Full Screen LOGO Show).
- Selecting the sequence of polling boot devices ( First/Second/Third Boot Device). Another most requested feature in BIOS Setup, along with setting the date and time.
- Enable/disable self-monitoring technology hard drive S.M.A.R.T.

It should be noted that depending on the motherboard model and BIOS modification, the set of settings in this section may vary.
Advanced chipset Features
This section describes the settings of the chipset installed in the motherboard, so the set of parameters here directly depends on its type and modification. In most cases, here are collected options that are responsible for the operation of RAM (adjusting the frequency and timings), the data exchange bus between the processor and RAM, the AGP / PCI-E graphics bus and the video adapter.
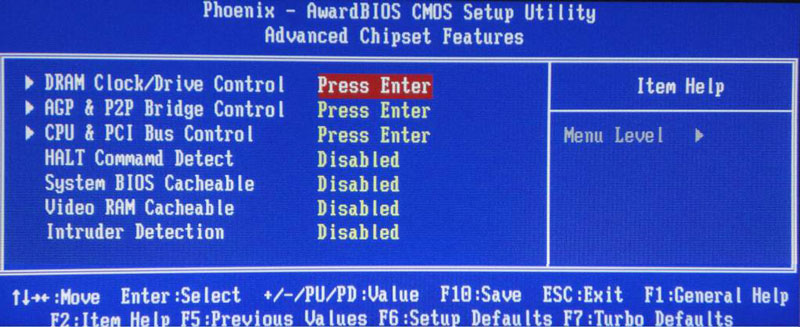
It should be noted that in some situations it is by changing the parameters of this section that you can increase the speed of your computer or, as they say, overclock it. True, recently, the options responsible for increasing the speed of the PC are most often taken out by manufacturers in a separate specialized section of the BIOS.
integrated Peripherals
This section contains parameters that are responsible for the operation of integrated into the motherboard, peripherals such as: controllers for hard drives, USB ports, sound and network adapters, and others.
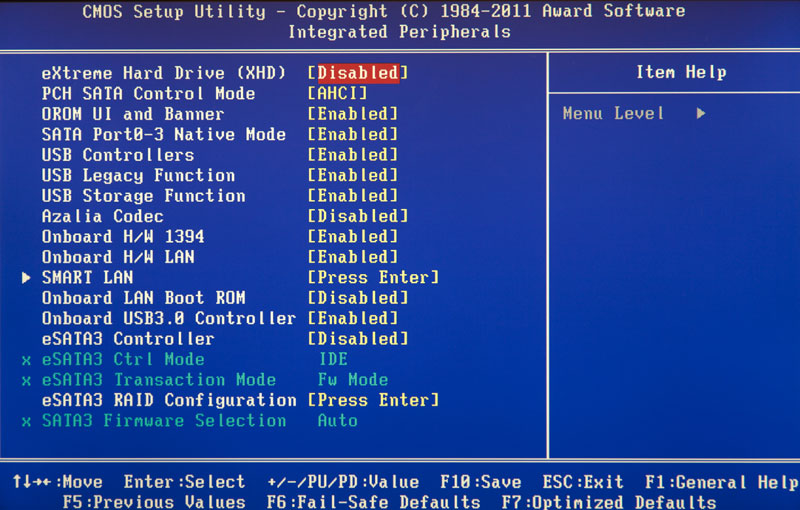
For example, here you can enable/disable the built-in sound card, support USB input devices, or select RAID mode to create an array of hard drives.
Here are collected options that are responsible for the power supply and power saving modes of the computer. Almost all modern computers allow you to manage power directly from the operating system, but this requires BIOS support for specialized ACPI standards, the mode and functions of which are regulated in this section.

Also here you can specify what actions should take place when you press the power button, set the conditions for turning on the PC and switching it to low power consumption or exiting hibernation.
PnP/PCI Configurations
This section contains the control parameters of the Plug and Play technology, which is responsible for the distribution of resources between PC devices and their quick configuration, as well as the settings for the operation of the PCI bus. As a rule, these functions are successfully performed by the system and do not require manual intervention. Therefore, in modern computers, this section may be absent altogether.
PC Health Status( H/ W monitor)
Modern motherboards are always equipped with sensors that monitor the operating temperatures and voltages of the main devices, as well as the speed of rotation of the cooling fans. All their indicators are displayed in this section.

In addition, in PC Health Status, you can control the fan operation modes and configure alert options in case of overheating, the cooler stops or the case cover is opened.
frequency/ Voltage control
This section contains parameters that are responsible for setting the operating frequencies and voltage values for the processor, RAM, video card and other devices. By default, all frequencies and voltages have recommended values and are adjusted automatically, which guarantees reliable system operation.

However, the value of some parameters in this section can be changed manually. This makes it possible to overclock the processor, memory and other components, forcing them to work at higher frequencies. It is only necessary to remember that, on the one hand, overclocking allows you to increase the overall performance of the system, and on the other hand, it can cause PC malfunctions and cause overclocked hardware to fail (for example, when setting too high voltage values). So you have to be very careful here.

It is worth noting that many major motherboard manufacturers list options for setting frequencies and voltages in a special section with the original name, for example MB Intelligent Tweaker (M.I.T.) or Cell Menu .
load Fail- safe Defaults
This is not a section, but a command that resets all BIOS settings to their default values, which guarantee stable work the entire system. After selecting this item, a window will open in front of you, in which you will need to confirm the reset by pressing the "Y" key.

A command that sets the BIOS settings in such a way that the optimal performance of the computer is ensured while maintaining the stability of all its components. However, the parameters that are subject to automatic change depend on the model of the motherboard and may vary.
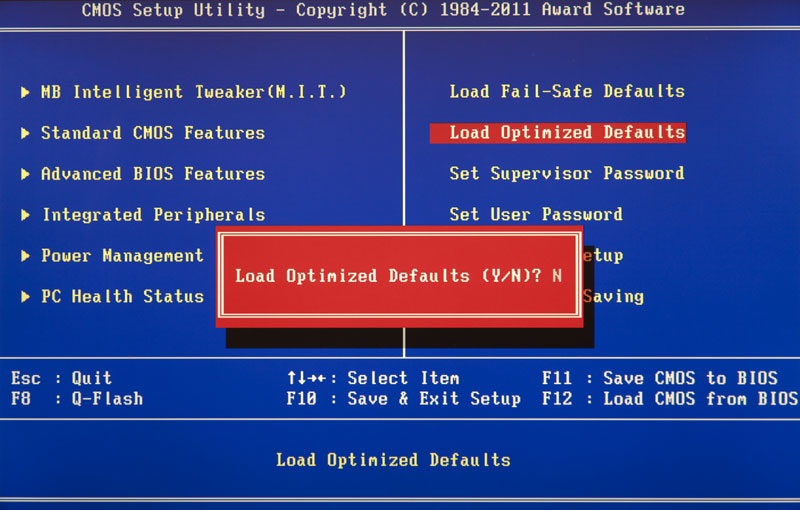
However, please note that such optimization of settings in some cases may lead to unstable operation of the system due to the incompatibility of the installed equipment. Then you should return to the default settings using the command Load Fail-Safe Defaults and try to configure the desired parameters manually.
Set Supervisor Password
A command that allows you to set, remove or change the administrative password that is used for full access to all BIOS settings, as well as when booting the PC.
Set User Password
A command that sets a user password that allows access to view BIOS settings. That is, most of the settings will be closed for editing. Same way given password can be used when booting the computer.
Main sectionsBIOSSetupwith horizontal main menu (gray background)
As we have already noted, the BIOS setup interface exists in two main versions, which differ not only external design and the location of the main menu, but also the layout of the parameters by sections. So now let's get acquainted with the second type of interface, which is used by such motherboard market leaders as ASUS or AsRock.
Main
Based on the name, according to the developers, this section contains the main BIOS settings, which include time and date, parameters of installed disk drives and general system information (BIOS version, processor model, amount of installed memory). In this way, Main is almost a complete analogue of the already familiar section .

As you probably already guessed, the most requested option in this section is setting the system date and time.
Advanced
As a rule, this section has the largest number of options for configuring components and PCs and includes several significant subsections at once. Here are the parameters responsible for the operation of the central processor ( CPU Configuration), RAM, video adapter, chipset ( chipset), PCI data bus and Plug and Play technology ( PnP/PCI Configuration, PCI PnP), built-in peripherals ( Onboard Device Configuration), USB ports ( USB configuration) and other equipment.

Also in this section you can find overclocking options that allow you to manually set the frequencies and voltages of the processor, memory, as well as PCI bus. In some cases, users can additionally adjust RAM delays (timings / latency). In many motherboard models, the parameters responsible for overclocking are placed in a separate subsection (for example, Jumper FreeConfiguration) or even an independent section of the main menu ( AITweaker, Overclocking or ExtremeTweaker).
Due to a sufficiently large set of components and a variety of parameters, the section Advanced practically does not have a unified structure. Depending on the board model and BIOS developer, the number of subsections/settings and their names can vary greatly. Indeed, if compared with the BIOS Setup version, which has a blue background, it turns out that in the section Advanced collected the contents of five sections at once: Advanced BIOS Features, Advanced Chipset Features, Integrated Peripherals, Frequency/Voltage Control and PnP/PCI Configurations.
power
This section is identical in content and essence to the sections and PC Health Status (H/W Monitor).

Here are the parameters responsible for the power supply and energy saving of the PC, monitoring the operating temperatures and voltages of its main components, as well as controlling the fan speeds.
Boot
Already from the name it is clear that this section is responsible for configuring the boot parameters of the computer. It is here that the settings for determining the sequence of polling boot devices and enabling / disabling the “Num Lock” key are located, which are in demand by many users (subsection Boot Settings Configuration).

In many cases the section Boot includes subsection Security A containing commands to set, remove, or change administrative and user passwords. In some versions of BIOS Setup, password management parameters can be placed in a separate section of the same name.
Tools
Most motherboards from the popular ASUS manufacturer contain an additional section that contains auxiliary tools for updating the BIOS ( EZ Flash 2), disable/enable mini-OS on the Linux kernel ( Express Gate), creating profiles of individual BIOS settings ( O.C. Profile), as well as checking the connection network cable during PC boot AINET 2).
exit
This section is responsible for exiting the BIOS settings menu and combines commands such as:
- Exit & Save Changes- provides an exit from the program with preservation of all changes made by you.
- Exit & Discard Changes- exits the program without saving all the changes made.
- Load Setup Defaults- returns BIOS settings to default values (factory reset).
- Discard Changes- Cancel the changes made without exiting the program.
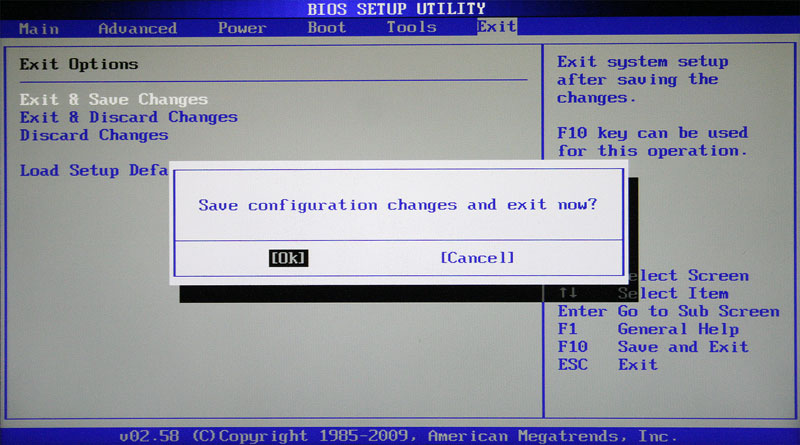
After selecting any of the above commands, a window will appear in front of you in which you need to confirm its execution by pressing the “Y” key and then “Enter”
Setting the time and date
When you turn on a new computer for the first time, it is better to immediately take care of setting the correct system time and date in the BIOS, thereby setting a baseline for both the operating system and for software, able to function without an installed OS.
To get into the BIOS settings menu, immediately after the computer starts booting, press the desired key (usually "Del" or "F2"). After the main BIOS Setup menu appears in front of you, in order to achieve the task, we perform a few simple manipulations.
BIOSSetup with blue background
Use the arrow keys to move the cursor to a section and press "Enter" ("Enter"). Often this section is the first and nothing needs to be moved anywhere, but there are exceptions.

In the window that opens with options, on top we find the two parameters we need - Date (Date) and Time (Time). Use the arrows to move between parameter values. To set values, you can use both the "+" / "PgUp" or "-" / "PgDn" keys, as well as direct entry of numbers from the keyboard. The “Enter” key is used to fix the set values.
The general algorithm of actions here is quite simple: place the cursor on the desired field (highlighted in red), enter or select its value and press "Enter". Next, go to the next field and repeat everything until all parameters are set.
After all the values are entered, to save the changes, press the "F10" key. In the red window that opens, enter the letter "Y" by pressing the key of the same name on the keyboard. After the reboot, the new time and date values will take effect.
BIOSSetup with gray background
Use the "←" and "→" keys to select a section Main, although in most cases this will not be necessary, since it is almost always located first and opens by default immediately after entering BIOS Setup.

We find in this section the parameters System Date (System date) and System Time (System time) and move the cursor there using the "↓" and "" keys. Further, to enter values, we use either the number keys directly, or the “+” and “-” keys. To move between fields within one parameter, the “Tab” key is used here. After entering the required value, press "Enter".
Boot device change
When installing an operating system or carrying out maintenance work with an already installed OS, it is often necessary to ensure that the computer is booted not from a hard drive, but from an optical media, USB flash drive, or some other storage device. Therefore, one of the most popular tasks for which ordinary users have to "climb" into the BIOS settings is the need to change the boot device.
BIOSSetup with blue background
After opening the BIOS Setup program, use the arrows to move the cursor to the section and press "Enter".

Use the "↓" key to go to the parameter (First boot device) and press "Enter" again.
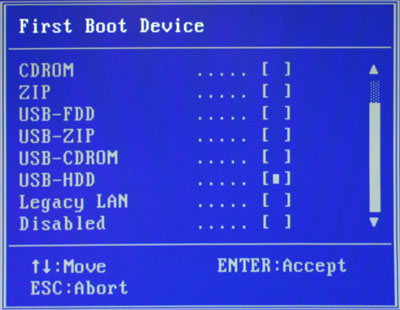
Next, you will see a window with a list of devices that you can select as bootable. If you plan to start a PC with optical disc, then use the arrows to select the CDROM value and then, as usual, "Enter". If you need to boot from a flash drive or an external portable drive, then select the USB-HDD option. In the same way, you can select the second and third boot devices ( SecondBootdevice and ThirdBootdevice).
At the same time, it should be taken into account that if several hard drives or solid-state drives that contain the system and are bootable are installed in the computer at once, then a special item is intended to indicate the sequence of their polling. HarddiskBootpriority.
In order for all the settings you have made to take effect, do not forget to press the "F10" key, then "Y" and finally "Enter".
BIOSSetup with gray background
After opening the BIOS settings window, use the "→" key to select the item Boot and press "Enter". Next, you may expect two options, depending on the BIOS version.

In the first case, you will immediately see a list of boot device assignments. They are designated as 1st, 2nd and 3rd Boot Devices (the first, second and third boot devices, respectively). Moving through the list is done with the "↓" keys, selection of values (HDD, CDROM, USB, Removable) - with the "Enter" or "+/-" keys.

In the second case, section Boot will contain several subsections, among which in this situation we are interested in the item Bootdevicepriority. Move the cursor over it and press Enter. Immediately after that, a window will open in front of you with a list of boot devices, the selection of which is carried out in exactly the same way as described above.
The owner of several drives should pay attention to the subsection Harddiskdrives. It is in it that the priority boot disk is selected among the hard drives installed in the computer. If you have several optical drives installed, then in this case the choice of a priority device among them can be organized in the subsection CDROMdrives.
After completing the settings, it remains to press the "F10" key, and then "Enter" to save the changes made.
Conclusion
Although the BIOS is still the most common system used for initial setting hardware and PC boot, its time is inexorably coming to an end. Today, most motherboards are equipped with a new promising software boot interface - UEFI, which has a modern graphical shell and has much more functionality.
Nevertheless, it is too early to write off the "old lady" BIOS. After all, the mass introduction of UEFI began just a few years ago, while the BIOS has been the main boot system for several decades. Therefore, for a long time, great amount computers with BIOS will be used by many users.
If you have purchased assembled computer or a laptop, then its BIOS is already configured properly, but you can always make any personal adjustments. When a computer is assembled on its own, then for it correct operation you need to configure the BIOS yourself. Also, this need may arise if a new component was connected to the motherboard and all parameters were reset to default.
The interface of most BIOS versions, with the exception of the most modern ones, is a primitive graphical shell, where there are several menu items from which you can go to another screen with already configured parameters. For example, the menu item Boot opens the user the parameters for distributing the priority of loading the computer, that is, there you can select the device from which the PC will be loaded.
In total, there are 3 BIOS manufacturers on the market, and each of them has an interface that can vary significantly in appearance. For example, AMI (American Megatrands Inc.) has a top menu:

In some versions of Phoenix and Award, all section items are located on the main page in the form of columns.

Plus, depending on the manufacturer, the names of some items and parameters may also differ, although they will carry the same meaning.
All movement between items occurs using the arrow keys, and selection - using Enter. Some manufacturers even make a special footnote in the BIOS interface, which says which key is responsible for what. UEFI (the most modern type of BIOS) has a more advanced user interface, controllable with computer mouse, as well as the translation of some items into Russian (the latter is quite rare).

Basic settings
Basic settings include time, date, computer boot priority, various settings memory, hard drives and disk drives. Provided that you have just assembled the computer, you need to configure these parameters.
They will be in the section Main, Standard CMOS Features and Boot. It is worth remembering that depending on the manufacturer, the names may differ. To get started, set the date and time according to these instructions:

Now you need to make a priority setting for hard drives and drives. Sometimes, if you do not do it, the system simply will not boot. All the necessary parameters are in the section Main or Standard CMOS Features(depending on the BIOS version). A step-by-step instruction using the Award/Phoenix BIOS as an example is as follows:

Similar settings need to be made for BIOS users from AMI, only here the SATA parameters change. Use this guide to get things done:

AMI BIOS users can complete the standard settings on this, but the Award and Phoenix developers have a few more additional items that need user participation. All of them are in the section Standard CMOS Features. Here is their list:

This completes the standard settings. Usually half of these items will already have what they need.
Options "Advanced"
This time all settings will be made in the section "Advanced". It is in the BIOS from any manufacturer, however, it may have a slightly different name. Inside it may be a different number of items depending on the manufacturer.
Consider the interface on the example of AMI BIOS:

Now let's proceed directly to the parameter settings from the item :

Award and Phoenix do not need to configure these parameters, since they are configured correctly by default and are located in a completely different section. But in the section "Advanced" you will find advanced settings for setting download priorities. If the computer already has HDD with the operating system installed on it, then in "First Boot Device" select value "HDD-1"(sometimes you have to choose "HDD-0").

If the operating system has not yet been installed on the hard disk, then it is recommended to set the value instead. "USB FDD".
Also at Award and Phoenix in the section "Advanced" there is an item regarding the settings for entering the BIOS with a password - "Password Check". If you have set a password, then it is recommended to pay attention to this item and set a value that is acceptable to you, there are only two of them:

Setting up security and stability
This feature is relevant only for owners of machines with BIOS from Award or Phoenix. You can enable maximum performance or stability mode. In the first case, the system will work a little faster, but there is a risk of incompatibility with some operating systems. In the second case, everything works more stable, but slower (not always).
To enable high performance mode, from the main menu select "Top performance" and put a value in it "Enable". It is worth remembering that there is a risk of disrupting the stability of the operating system, so work in this mode for several days, and if any failures appear in the system that were not previously observed, then disable it by setting the value Disable.

If you prefer stability to speed, then it is recommended to download the protocol safe settings, there are two types:

To download any of these protocols, you need to select one of the items discussed above on the right side of the screen, and then confirm the download using the keys Enter or Y.
Setting a password
After completing the basic settings, you can set a password. In this case, no one except you will be able to access the BIOS and / or the ability to change its parameters in any way (depending on the settings that were described above).
In Award and Phoenix, in order to set a password, you need to select the item on the main screen "Set Supervisor Password". A window will open where you enter a password up to 8 characters long, after entering a similar window opens where you need to enter the same password for confirmation. When typing, use only Latin characters and Arabic numerals.

To remove the password, you need to select the item again. "Set Supervisor Password", but when the window for entering a new password appears, just leave it blank and click Enter.
In AMI BIOS, the password is set a little differently. First you need to go to the section Boot, which is in the top menu, and there already find "Supervisor Password". The password is set and removed in the same way with Award/Phoenix.

Upon completion of all manipulations in the BIOS, you need to exit it while saving the previously made settings. To do this, find the item "Save & Exit". In some cases, you can use hot key F10.
Setting up the BIOS is not as difficult as it might seem at first glance. In addition, most of the described settings are often already set by default, as is necessary for the normal operation of the computer.