Why is your mobile phone suddenly began to behave differently than usual, or even “healed” his “life”? Perhaps because she settled in it malware. Today, the number of viruses and trojans for Android is growing exponentially. Why? Yes, because the cunning virus writers know that smartphones and tablets are increasingly being used by our fellow citizens as electronic wallets, and they are doing everything to move funds from the owners' accounts into their pockets. Let's talk about how to understand that a mobile device has picked up an infection, how to remove a virus from Android and protect yourself from re-infection.
Symptoms of a virus infection on an Android device
- The gadget turns on longer than usual, slows down or suddenly reboots.
- In the history of SMS and phone calls, there are outgoing messages and calls that you did not make.
- Money is debited from your phone account by itself.
- Ads appear on the desktop or in the browser that are not associated with any application or site.
- Programs are installed by themselves, Wi-Fi, Bluetooth or a camera are turned on.
- Lost access to e-wallets, mobile bank, or for unknown reasons, the amount on the accounts has decreased.
- Someone took over your account in social networks or instant messengers (if used on a mobile device).
- The gadget is blocked, and a message is displayed on the screen that you have violated something and must pay a fine or simply transfer money to someone for unlocking.
- Applications suddenly stopped running, access to folders and files was lost, any device functions were blocked (for example, buttons are not pressed).
- When you start programs, messages pop up, like "an error occurred in the com.android.systemUI application."
- Unknown icons appeared in the application list, and unknown processes appeared in the task manager.
- The anti-virus program informs you about the detection of malicious objects.
- The anti-virus program was accidentally deleted from the device or does not start.
- Your phone or tablet battery is draining faster than usual.
Not all of these symptoms are 100% indicative of a virus, but each is a reason to immediately scan your device for infection.
The easiest way to remove a mobile virus
If the gadget has remained operational, the easiest way is to remove the virus using the installed on android antivirus. Run a full scan of the phone's flash memory, if a malicious object is detected, select the "Delete" option, saving the neutralized copy in quarantine (in case the antivirus mistook something safe for a virus).

Unfortunately, this method helps in about 30-40% of cases, since most malicious objects actively resist their removal. But there is control over them too. Next, we will look at options for when:
- the antivirus does not start, does not detect or remove the source of the problem;
- the malicious program is restored after removal;
- the device (or its individual functions) is blocked.
Removing malware in safe mode
If you are unable to clean your phone or tablet in normal mode, try to do it in a safe way. The bulk of malicious programs (not only mobile ones) do not manifest themselves in safe mode no activity and does not prevent destruction.
To boot the device into safe mode, press the on/off button, put your finger on "Power off" and hold it until the message "Entering safe mode" appears. After that click OK.

If you have old version Android - 4.0 and below, turn off the gadget in the usual way and turn it back on. When the Android logo appears on the screen, press the Volume Up and Volume Down keys at the same time. Hold them until the machine boots up completely.
While in safe mode, scan your device with an antivirus. If there is no antivirus or it does not start for some reason, install (or reinstall) it from Google Play.
In this way, advertising viruses such as Android.Gmobi 1 and Android.Gmobi.3 (according to Dr. Web classification) are successfully removed, which download various programs to the phone (in order to increase the rating), and also display banners and ads on the desktop.
If you have superuser (root) rights and know exactly what caused the problem, run file manager(for example, Root explorer), follow the path of the location of this file and delete it. Most often, mobile viruses and trojans place their bodies (executable files with the .apk extension) in the system/app directory.
To switch to normal mode, simply reboot the device.
Removing mobile viruses through a computer
Removing viruses on the phone through a computer helps out when the mobile antivirus does not cope with its task even in safe mode or the device functions are partially blocked.
It is also possible to remove a virus from a tablet and phone using a computer in two ways:
- using an antivirus installed on a PC;
- manually through a file manager for Android gadgets, for example, Android Commander.
Using an antivirus on a computer
To check files mobile device antivirus installed on your computer, connect your phone or tablet to the PC with a USB cable, choosing the "As a USB drive" method.
 Then turn on USB.

After that, 2 additional “disks” will appear in the “Computer” folder on the PC - the internal memory of the phone and the SD card. To start scanning, open context menu each disk and click "Check for viruses".

Removing malware using Android Commander
Android Commander is a program for exchanging files between a mobile android gadget and a PC. Running on a computer, it provides the owner with access to the memory of a tablet or phone, allows you to copy, move and delete any data.
For full access to all the contents of the android gadget, you must first obtain root rights and enable USB debugging. The latter is activated through the service application "Settings" - "System" - "Developer Options".

Next, connect the gadget to the PC as a USB drive and run Android Commander with administrator rights. In it, unlike Windows Explorer, protected system files and directories of the Android OS are displayed - just as, for example, in root explorer- file manager for root users.
The right half of the Android Commander window shows the directories of the mobile device. Find the executable file of the application (with the .apk extension) that is causing the problem in them and delete it. Alternatively, copy suspicious folders from your phone to your computer and scan each of them with an antivirus.

What to do if the virus is not removed
If the above operations did not lead to anything, the malware still makes itself felt, and also if the operating system has ceased to function normally after cleaning, you will have to resort to one of the radical measures:
- reset with restoration of factory settings through the system menu;
- hard reset through the Recovery menu;
- flashing the device.
Any of these methods will bring the device to a state as after purchase - there will be no user programs left on it, personal settings, files and other information (data about SMS, calls, etc.). It will also remove your Account Google. Therefore, if possible, transfer the phone book to the SIM card and copy paid apps and other valuable objects to external media. It is advisable to do this manually - without using special programs, so as not to accidentally copy the virus. After that, proceed to the "treatment".
Restoring factory settings through the system menu
This option is the easiest. They can be used when the functions operating system and the device itself is not blocked.
Go to the Settings app, open the "Personal" - "Backup" section and select "Reset with factory settings".

Hard reset via Recovery menu
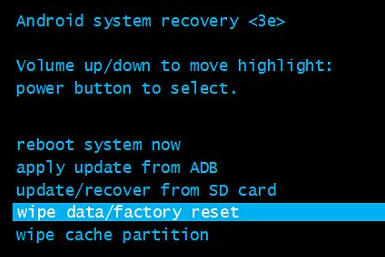
A “hard” reset will help deal with malware if it is not removed by any of the listed methods or has blocked the login. To our delight, access to the Recovery menu (system restore) is preserved.
Login to Recovery on different phones and tablets are carried out in their own way. On some, for this you need to hold the “Volume +” key when turned on, on others - “Volume -“, on the third - press a special recessed button, etc. The exact information is contained in the instructions for the device.
In the Recovery menu, select the option "wipe data / factory reset" or simply "factory reset".
 flashing
Flashing is essentially a reinstallation of the Android OS, the same extreme measure as reinstalling Windows on the computer. It is resorted to in exceptional cases, for example, when a certain Chinese virus is embedded directly into the firmware and lives on the device from the moment it was “born”. One such malware is spyware. android program spy 128 origin.
To flash a phone or tablet, you will need root rights, a distribution kit (the firmware itself), an installation program, a computer with a USB cable, or an SD card. Remember that each gadget model has its own, individual firmware versions. They usually come with installation instructions.
How to Avoid Virus Infection of Android Devices
- Install mobile applications only from trusted sources, refuse hacked programs.
- Update your device as system updates are released - in them, developers close vulnerabilities that are used by viruses and trojans.
- Install a mobile antivirus and keep it always on.
- If the gadget serves as your wallet, do not allow other people to access the Internet from it or open unverified files on it.
Subscribe:

The Android OS is therefore the best because you can do absolutely everything in it, even remove system applications that cannot be removed in any way through the standard options in the Settings menu. And many of them the user never uses, so this procedure only optimizes the system.
A necessary condition in order to be able to delete system applications for Android is to obtain root rights. They will be needed in many more cases and will greatly expand the capabilities of the device, so getting them can be considered a must for any smartphone owner. This can be done using different software: Kingo Android ROOT, Unlock Root, Framaroot, etc.
After obtaining such rights, you need to install the explorer, which will give access to the initially hidden system files. It is best to use ES Explorer or Root Explorer.
Two ways to uninstall protected apps on Android
Most effective way , but also the most dangerous is to simply remove applications directly from the file system. They are located along the path / system / app, and there you need to select unnecessary files with apk extension, but do it very carefully, being aware of every action.

Additionally, you can delete the odex files in the same place, separate folders with the names of applications, and along the path / data / app updates of these “non-removable” programs.
Finally, along the path / data / data there are cache files that can also be erased.
It is best to remove pre-installed applications, such as live wallpapers, etc.
Remember! System files with an Android label, you can only erase with a clear understanding of why this is needed.
An easier way to remove- through a special program Root Uninstaller Pro. It has a fairly simple and clear interface, you can quickly select the right software and erase it.

A big plus of this method is that you can not destroy software completely, but also "freeze" it with the possibility of further recovery. Such a "freeze" completely stops a particular software.
Through ES Explorer itself, you can also remove protected applications from a special GUI rather than by accessing directly to file system. To do this, you need to go along the path to the explorer menu: "Libraries" - "APPs" - "Custom" - "System", select the ones you need in the expanded list and uninstall them completely with one simple click.
Comments
Mobile applications significantly expand the functionality of Android devices. They allow you to play games, work with email, send instant messages, make purchases, and more. But sooner or later, many users face the question - how to remove unnecessary applications on Android? You can deal with the removal in several ways at once, which will be discussed in our review.
Removing through the main menu
Programs accumulating in memory take up space, slow down Android devices, and consume battery power. Moreover, the expense is manifested even when (albeit not fully) when the programs are not running. Therefore, unnecessary software must be removed. To do this, you need to look at android device and soberly assess the need for the presence of a particular software.
If something has become unnecessary or you use some applications too rarely, you should get rid of these unnecessary things. The easiest way to uninstall apps on Android is to go to the main menu of your smartphone. Here we will see a lot of labels installed applications Android. For to remove an unnecessary program, you need to hold down its shortcut with your finger for a few seconds.
A small menu should appear at the top of the screen, in which the “Delete” item (with a trash can) will be visible. Without releasing your finger from the shortcut, we transfer it to this item, release it and confirm the deletion - the application is uninstalled.
After removing a particular program, you must use the software to clean up the operating Android systems- uninstalling software leaves behind a bunch of junk files. This applies to any method of uninstalling programs. A good degree of cleaning is provided by the Clean Master utility.
How else can you erase junk programs from memory on Android? Open the main menu and go to "Settings - Application Manager". Here, in the "Downloaded" tab, you will see all the software that is in the system. In order to proceed with the removal, you need to tap on the unnecessary program with your finger and click on the "Delete" button. After that, unnecessary software will be removed.
Please note that if you want to clear the internal memory, but do not want to delete applications, move unnecessary software to the memory card - instead of the "Delete" button, click on the "To SD memory card" button (this functionality is not supported by all smartphones and tablets).
Removal through the Playmarket
We have already figured out how to remove unnecessary software through the menu of a smartphone or tablet. Now let's try to remove the software through the Playmarket - launch the software store, wait for it to download, go to the "Games and applications - My applications and games" section. In this section, we will see all the software installed on this device.
The removal process goes like this - select an unnecessary program, click on the "Delete" button and confirm your actions. After a few seconds, the selected program will be deleted.
Does this method have any advantages over other methods? Absolutely none - all methods have the same mechanism of action.
Removing built-in apps
Buying new smartphone or a tablet, we see various pre-installed software in it - banking clients, toys, instant messengers, etc. There is also a part of the basic software, such as Youtube, Google Press, Maps, Play Games and much more.
Which apps on Android can be removed, and which ones are better left? It should be said that to remove basic programs owned by Google is not worth it - this may lead to a system malfunction. Moreover, you simply cannot uninstall these programs.
If you do not want any of this to work, update, waste traffic and battery power, go to "Settings - Application Manager", tap on an unnecessary program, then click the "Stop" and "Turn off" buttons. The system will issue the last warnings, after which it will remove the software updates and disable the selected programs.
Keep in mind that disabling some basic applications may cause a violation of the functionality of the Android operating system.
If you want to remove clearly third-party software, then you may encounter a lack of uninstallation option - phone manufacturers block their uninstallation. How to remove such software? You have two options:
- Select the program in the "Application Manager", then click on the "Stop" and "Turn off" buttons - the application will be stopped and even disappear from the main menu;
- Get root rights (superuser rights) and completely clean your phone from unnecessary programs.
The latter method is complicated by the fact that in order to obtain root rights, you will have to find special software. Also gaining superuser rights will void the warranty. To avoid voiding your warranty, simply disable unnecessary android apps through Device Manager.
Most often, when buying a new device, it turns out that it is packed from top to bottom various applications that you don't need. However, these applications take up the internal memory of the device, spend traffic on their update, drain the battery, and even RAM consume. This is especially critical for budget smartphones / tablets, which do not have much of it.
In this article, we will tell you how to remove unnecessary system applications without risking the "health" of your smartphone. There are several different ways and many utilities with which you can do this. We will consider the most accessible and popular in detail.
Our first step is to get Root rights. Without them, not a single pre-installed application can be deleted, except that it can only be disabled, but it will remain in memory. Root rights or Superuser rights can be obtained in one click using any of the programs on.
On my smartphone, I got them using . We install the program, it will automatically determine the device model and the presence of root rights. Click Try to root, wait for the process to complete (the device may reboot, there's nothing to worry about) and voila, now we have Superuser rights.
Before you start removing the pre-installed trash, you need to backup all the data using a popular program. Instructions for use are detailed on. A timely backup will save you from many troubles associated with deleting system applications that are not supposed to be touched.
Important!
All of the following methods were tested on a device with OS 5.0.2. On other versions of the Android OS, there may be minor differences, but the general principle of uninstallation will remain the same.
Method one
You can remove pre-installed applications using the above universal program. In addition to obtaining Superuser rights, the program allows you to remove any applications, manage autorun, and has a number of other useful functions.
Instruction:
1. Run "KingRoot" and select "Uninstall programs" from the main menu.

2. Here we see two tabs: "Built-in" and "Custom". We are interested in the first tab "Built-in", switch to it.

3. Select the applications we want to get rid of. For example, Gmail.
4. Put a tick in front of it and click the "Delete" button.

This way you will be able to remove any unwanted programs. Most importantly, do not remove system applications that may affect stable work devices.
Method two
This method involves the installation of any third-party conductor. We will use one of the most popular applications "Root Explorer", which can be downloaded.
Instruction:
Install "Root Explorer" and run it.

We go to the / system / app folder. All applications that are on your device are stored here.

We select the applications that we want to delete, for example, "YouTube". Check the box next to it and click on the trash icon in the line below.

Confirm the deletion and wait for the process to complete.

That's all, "YouTube" or any other application removed in this way will not bother you anymore.
Method three
We remove the built-in applications using the aforementioned "Titanium Backup". Apart from Reserve copy data, this program has a huge functionality, including removing unnecessary system applications. Download "Titanium Backup" you can at the specified.
Instruction:
1. Download "Titanium Backup" to your android device and install it.

2. After starting, the following message may appear (if it does not appear, then nothing needs to be done).

3. We go along the specified path and turn on "Debugging via USB".
4. We return to "Titanium Backup" and in the main menu we switch to the "Backup copies" tab. We select the application that interferes with us. This time I have it "Google Maps".

5. Click on the application and in the window that opens, select the "Delete" button.

6. We confirm the deletion and wait for the process to complete.

Another useless application(unless you use navigation, of course) has been removed and will no longer take up space in internal memory.
Method four
We remove built-in applications using the "ES Explorer" program, which can be downloaded.
Instruction:
Download, install and run "ES Explorer".

Click the "APPs" button in the upper right corner.

In the window that opens, select the item "Installed in the device".

In the left upper corner press the "menu" button. Here you need to find the "Root Explorer" item and activate it by moving the slider to the right.

You will be prompted to grant root rights. Click the "Allow" button.

We return to the list of pre-installed applications, find the one that interferes with us (I have this Multistore) and click on it.
In the window that appears, click the "Uninstall" button and confirm the action.
A message will appear stating that the application has been uninstalled.
That's all. Let's move on to the next method.
Method five
We remove system applications using the application "Root App Deleter", a complete free version which you can download
Instruction:
1. Download, install and open "Root App Deleter".

2. Select the item "System applications". Here we are only interested in the "Pro" mode.
3. In the list that appears, find the "extra" application, for example, Gmail, and click on it.

4. In the window that appears, tap the "Uninstall" button.

5. A window will appear in which permission to grant root rights will be requested, click the "Allow" button.
6. We confirm the deletion.

7. If everything went well, "Root App Deleter" will notify you about it. If an error occurs during the uninstallation process, we will see such a message. In this case, press "No. 1" and forcibly delete the application.

That's all. An unnecessary program has been removed from the internal memory of our device.
Method six
Uninstalling a pre-installed application using a third-party program "Root Uninstaller Pro", which you can download by going to
Instruction:
Download, install and run "Root Uninstaller Pro".

After starting the program, press the "Accept" button, thereby confirming that we have read license agreement and agree with all of its points.
In the list that appears, look for the next "victim" and click on it.

In the window that appears, we allow the granting of root rights to this program.

Click the "Delete" button.

A message will appear stating that the application has been removed.
Note that "Root Uninstaller Pro" offers to make a backup of the application before deleting, which is very convenient for a simple user.
Method seven
This time we will use third party program called "Remove System Applications" which you can download
Instruction:
1. Download, install and run "Remove system applications".
2. After starting, we immediately provide Root rights to this application.

3. In the list of applications we find the next "victim" of deletion and put a tick in front of it.

4. Press the red "Delete" button and wait for a message that everything went well.

Eighth method
This time we will use the "Easy Uninstaller Pro" application, which can be downloaded from the link below.
Instruction:
Download, install and run the above application.

Once again, we find the application that "requires" uninstallation and put a tick in front of it.

Click the green "Delete" button and wait for the process to complete successfully.

That's all. The application did not even require root rights. This program fully confirms its name. Thanks to her, it was possible to remove everything that was required in just two clicks.
Method nine
Now we will remove pre-installed applications using one of the most popular programs for cleaning our android from any "junk" - "CCleaner". Here you can download
7. We reboot and see that the application that we deleted has disappeared from the desktop.
Method ten
Now we will remove the pre-installed applications using the PC. To do this, we need the "Debloater" program. Just note that it is only suitable for android devices with OS 4.0 or higher.
Instruction:
Download, install "Debloater" on PC and run it.

Download and install adb drivers for each specific model smartphone to your PC. They are needed so that the computer can see your device.
Go to android settings, select the "For developers" tab and turn on USB debugging.

Then we launch "KingRoot" (without it, nowhere), press the "Manage Root Rights" button.
Here, opposite the "ADB Program" application, click the "request" button and in the line that appears, click "allow".

We return to "Debloater" and see that the program has successfully "seen" our smartphone. Press the button in the upper left corner "Read Device Packages" and wait for the process to complete.

Now the program window displays all the applications installed on our device.

We select the application that we want to delete and put a tick in front of it (for example, Multistore).
Check the box labeled "Remove" and click the "Apply" button.

Voila, the app has been permanently deleted.
This method is the most difficult, therefore it is suitable only for those who, for some reason, could not use the previous instructions. Or hardcore fans who want to break their heads over difficult tasks.
Conclusion
As we managed to find out, there are a lot of ways and applications, thanks to which you can remove unnecessary system software. Most of them are based on general principle work, so dealing with each of them will not be particularly difficult.
Important!
Again, don't uninstall apps you don't know anything about. This can lead both to unstable operation of the android device, and to the complete "bricking" of the smartphone. Make a backup of your data and do not experiment if you are not sure of the result.
If you have any questions, write in the comments to the article, and we will be happy to answer you. Good luck!
Not infrequently, when trying to remove a program, users are faced with the fact that the program is not removed. When trying to start the uninstallation of the program through the "Control Panel", the user receives an error that interrupts the uninstallation process. After that, the program remains on the computer.
If you also don't know how to uninstall a program that won't uninstall, then this article should help you. Here we consider three simple and effective ways solutions to this problem.
Method number 1. Stop all processes that are associated with the program.
If the program is not removed, then most likely it is in this moment works. In order to stop the program, open " " (for example, using the key combination CTRL + SHIFT + ESC) and go to the list of processes. In the list of processes, you need to find those processes that are associated with the program and stop them.
If you have Windows 8 or Windows 10, then you need to click right click mouse on the process you want to end, and in the menu that appears, select the "End task" item. On Windows 7 and older Windows versions, the menu item you need will be called "End Process".
After all processes associated with the program are stopped, you need to try again to uninstall the program. If a this method did not help to remove the program, then try restarting the computer and try again. Perhaps something has hung up on you and thus blocked the removal of the program.
Method number 2. Use a special program to remove programs.
If the program is not removed even after a reboot, then you can try to remove it using special program. Most popular program this kind is . This program allows you to remove any other programs. At the same time, uninstallation is possible even in cases where the uninstaller does not work or the program is not displayed in the control panel.
Using Revo Uninstaller is quite simple. First you need to run this program and wait until it scans the computer and displays all installed programs. After that, you need to right-click on the program you want to remove and select "Uninstall".

After that, a window will appear in which you need to select a method for uninstalling the program. In most cases, the "Moderate" option will do.


Here you can click on the "Select All" button and confirm the deletion by clicking on the "Next" button.
Method number 3. Remove the program through safe mode.
If none of the above helps to remove the program, then you need to boot the computer into and try again.

In safe mode, only the main components of the operating system are loaded; other programs that can block uninstallation are not loaded. Therefore, in safe mode, the removal should go without problems.