Creating, deleting and formatting computer disk partitions is only part of the possibilities hard drive management applications. Today, they allow you to securely carry out operations that previously required deletion of data or other dizzying combinations.
Many tasks implemented through the partition manager can, in theory, be performed using the built-in windows tool for disk management. However, it is not as intuitive as the programs discussed here.
A good disk management application consists of several modules. They are used to create, delete and format partitions. Apart from these functions, they also have functions for copying and moving partitions, creating images and backups.
Additional modules support system migration, merging and splitting partitions. Various partition schemes, dynamic disks, RAID configurations, various systems files and boot records.
Attention! Whenever you work with sections hard drive need to be carefully planned, executed backup data, be sure to select the correct hard drive or partition before pressing Enter .
Attention! All operations carried out on partitions are burdened with risks. The editorial board recommends that you exercise extreme caution and is not responsible for possible loss data or other damage suffered by readers.
Disk Management EaseUS Partition Master
One of the most popular partition management software hard drives on Windows. Provides allocation of new partitions without data loss.
Benefits of EaseUS Partition Master
- Simple conversion of partition type, primary to logical and vice versa
- Recovers deleted or non-existent partitions
- Supported hard drive capacity up to 8TB
Flaws
- No ability to transfer data from HDD to SSD free version
License: freeware
Price: free
Disk Management AOMEI Partition Assistant
Also popular. Creates, splits, joins, copies partitions of hard drives, changing their size, while saving files. It is possible to transfer the system.
Benefits of AOMEI Partition Assistant
- Convenient wizards for every operation
- Supports all the most popular file systems
- Displays accurate information about supported media
- Allows you to create a bootable CD with the application
License: freeware
Price: free
Disk management in GParted
A tool for managing computer hard disk partitions. Distributed as an ISO file. Install it on a USB flash drive or burn it to a CD and start your computer from it.

Benefits of GParted
- Does not require installation and does not take up disk space
- Attractive free offer for companies
- Extensive partition management capabilities for virtually any file system
Flaws
- Mastering takes time
- Only available via Live CD
License: freeware
Price: free
MiniTool Partition Wizard
Carries out all operations with hard disk partitions, also hides it. Copying the contents of the disk and changing the file system.
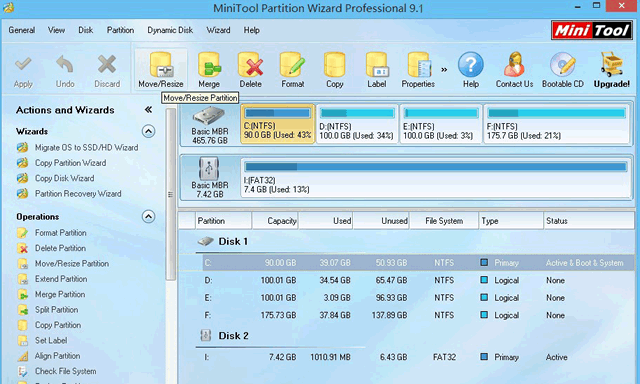
Benefits of MiniTool Partition Wizard
- Many tools, including cleaning and checking the disk
- Convenient visual wizard for each operation
- Allows you to convert NTFS to FAT32 without formatting, change the disk type from MBR to GPT
License: freeware
Price: free
[email protected] Partition Manager
Performs operations on disk partitions. Formats a flash drive in FAT32 and NTFS. Fixes MBR disks. Converts MBR to GPT and vice versa.
Advantages [email protected] Partition manager
- Disc imaging tool
- Convenient wizard for creating and modifying partitions
- Built-in editor boot sectors, allows you to manually make changes
- Shows S.M.A.R.T. for hard drives
Flaws
- Just on English language
License: freeware
Price: free
While working with personal computer it may be necessary to change, add or remove hard disk partitions. If at the initial Windows installation Since the creation of partitions takes place in an interactive mode and is intuitive, making changes to the created partitions requires a certain skill. Due to the lack of any experience in these matters, the user may incorrectly perform the necessary actions, which will subsequently lead to a complete loss of data or even to failure of the hard drive. The Disk Management utility will help facilitate the process of creating and modifying disk partitions.
Disk Management utility and its functions
The Disk Management utility is a tool for performing various operations with hard drives and their partitions.
With its help you can:
- create, delete, merge volumes on a disk;
- compress volumes;
- format volumes;
- assign characters to volumes;
- add volumes without reboot;
- manage local and remote drives online.
Opening "Disk Management"
There are several ways to start the program.
Through the start menu
- Click on the start menu and press right click mouse on "Computer". Select "Management".
Right-click on "Computer" and select "Manage"
- In the Computer Management window that opens, click on Disk Management.
Select "Disk Management"
- The Disk Management window will open.
Disk Management window
Through the command line

Through the "Control Panel"
- Click on the "Start" menu, select "Control Panel".
Click "Control Panel"
- In the search bar, enter “administration” and click on the “Administration” section that appears.
Click on the "Administration" section
- Select "Computer Management" from the list.
Select "Computer Management"
- In the Computer Management window that opens, click on Disk Management.
Click on "Disk Management"
Why won't Disk Management open?
There are situations when the Disk Management console does not open or opens, but the console window is empty and the warning "Failed to connect to the Logical Disk Manager service" appears.
The reasons for this problem may be different. To exclude their influence on the disk management process, you must perform the following steps:
- Run an antivirus scan. launch antivirus program it is recommended to do it from an optical disc or from a secure flash drive. After checking, open the "Quarantine" of the antivirus. If the dmdskmgr.dll library is in Quarantine, then return it to its place.
- Run the command Rundll32 setupapi, InstallHinfSection DefaultInstall 132 %windir%\inf\dmreg.inf through the Start menu and the Run window.
- Go to the path "Control Panel" - "Administrative Tools" - "Services" and make sure that the "Logical Disk Manager" and "Logical Disk Manager Administrative Service" are running. If they are disabled, then enable them.
- Enter the Basic Input/Output System (BIOS) menu. To do this, while turning on the computer, press Del, F2 or Esc (the choice of the key depends on the computer manufacturer). If there is no information about the connected HDD in the launch panel, then check the connecting cables at the points of connection to the drive.
How to create a logical drive
The very first hard drives, first created by IBM in 1973, contained 30 cylinders, each of which was divided into 30 tracks. By analogy with automatic rifles using the .30-30 Winchester cartridge, such discs were called "winchesters". Over time, in colloquial speech, the word "winchester" was transformed into "screw".
Most "hard drives" are sold already prepared for installing Windows, that is, the main partition has already been created on them. The remaining operations are carried out during the installation of the system. Installation is carried out from a bootable optical disk or USB device. At one of the installation stages, a window will appear asking you to select a space for installing the system.
If the "hard drive" before going on sale was not prepared for the immediate installation of the system, then all operations will have to be done by the user. This will require a bootable optical disc or USB stick.
Before installation, we configure the BIOS (basic input / output system) to boot from a DVD or USB drive:

When forming a partition on the "hard drive", all free space is used, and additional partitions are created after Windows installations 7.
If possible, it is better to use the Windows PE download, which has built-in Acronis software Disk Director or Partition Magic. These utilities are designed to manage hard drive partitions.
Windows Preinstallation Environment (Windows PE) is used to prepare a computer for installing Windows. It is a built-in element of other installation and system recovery tools and is not intended to be used as a primary operating system.
In the absence of such boot disk, like Windows PE, you can:

The created logical drives must be formatted using the format.com utility. Now you can proceed to install Windows 7.
Manage logical disks "hard drive"
You can manage hard drive partitions through context menu each of them. They provide a set of commands necessary for work.
Partition compression
The command to shrink a logical disk is set in the context menu.

Section creation
The new partition is created in a free area on the hard drive that is not yet part of the formatted volume. At the bottom of the Disk Management console, this space is highlighted in bright green, and is indicated as "Free" in the legend bar.
- After the partition is compressed, right-click on the unallocated space and select "Create a simple volume" in the context menu.
Right-click on the unallocated space and select "Create Simple Volume" from the context menu
- The "Create a Simple Volume Wizard" will start.
After launching the "New Simple Volume Wizard", click "Next"
- Specify the size of the new volume.
Specify the size of the new volume
- Assign a drive letter (letter).
Assign a drive letter (letter)
- We decide on the file system, cluster size and volume label.
- We are formatting the partition.
We format the partition
- In the last window, click on the "Finish" button and create a new logical drive.
Click on the "Finish" button

After reformatting, the volume is ready for use.
Changing a section letter

Merging Sections
When it becomes necessary to reduce the number of logical disks, two are combined into one joint logical disk. Before merging, the necessary information from the deleted logical disk is copied to another disk or to removable media.
To merge one drive with another:
- Select the volume you want to attach and call the context menu. Click on "Delete Volume".

Like
Like
tweet
A hard drive in a computer and the drive icon in My Computer are two different things. For example, a computer may have one hard drive installed, while My Computer may have several. The reason for such a strange discrepancy is that the hard disk can be divided into so-called partitions. This is called logical disk partitioning.
I will talk about why such markup is needed, how to do it correctly (and whether it should be done at all), and also talk about free programs for such a delicate procedure.
Why you need to partition your hard drive
There are several reasons for dividing a hard drive into partitions:
- Partitions on a hard drive are primarily needed for proper storage of information. For example, some users prefer the following division: operating system and programs on the same disk (usually C), documents - on the second ( D), photo archive on the third ( E) and so on. In this case, the hard drive may well be one.
- If you have one hard drive, but want to have two or more operating systems, you will have to divide the hard drive into partitions, since Windows and other operating systems can only be installed on different partitions or hard drives.
- Notebook manufacturers (and some well-known computer manufacturers such as Acer) have their own reason for dividing hard disk partitions: on a partition that is visible as a disk c, Windows installed, second ( D) is completely empty, and the third one (which is not visible in the My Computer window at all) stores a compressed copy of the partition C. This hidden partition of the hard drive is called recovery partition. If something happened to the operating system (“Windows crashed” - as some users like to say), then when you turn on the laptop, just press the key combination (which one - see the instructions for the laptop) and a special program will clean the disk C, then unpacks the contents of the hidden section there. As a result, the user will receive a laptop with the programs that were originally on it at the time of purchase in the store. Disk D it will not be changed. The conclusion suggests itself: if on a laptop with such a recovery system all documents are stored not on C drive, a only on D, it will be possible at any time to restore damaged Windows with a new one, while not losing important data for yourself. By the way, any advanced user can make such a recovery system for himself, but I will talk about it some other time.
- Operating Windows systems 7 and Windows 8, when installed on a blank, "unpartitioned" hard drive, create a hidden partition of 100-350 megabytes. This small section stores the bootloader, which, oddly enough, is designed to boot Windows. This partition will not exist or its contents will be damaged - and the computer will not start the operating system, displaying the inscription on the black screen "Boot fail", "Cannot find boot device", "Boot error" or similar, the meaning of which is the same - a boot disk with operating system. In fact, the bootloader can be stored on disk C:, and/or in hidden hard disk (outside partitions), but the developers decided to use a separate hidden partition in Windows 7/8 to somehow protect the bootloader from damage by other programs, viruses or the user.
- There are other reasons for dividing a hard drive into partitions. For example, for the correct operation of GNU / Linux operating systems, several partitions should be created, but this is a topic for a separate article, we will not consider them here.
So, The main reasons for dividing a hard drive into partitions are: for the convenience of storing information, for installing several operating systems, for the operation of the recovery system, for storage Windows bootloader 7/8.
A bit of theory: file systems, partition types
Information about partitions (i.e. logical drives) is stored in a "partition table". Each logical drive can have its own file system. You can read more about all this in the Wikipedia articles: Disk partition, Logical disk, File system. It is enough for a novice user to know the bare minimum:
- If you divide the hard disk into logical disks (partitions), disk capacity will not increase- there is simply nowhere to take a free place! You can make partitions of any size, but in total they cannot be larger than the size of a real hard drive. Here is less - please. Then you will get unallocated free space, not visible in My Computer, from which you can get one or more new partitions. This is a question I often get from newbies, so I put it in the first place.
- Exist primary (basic) and extended (optional) sections. One hard drive cannot have more than four main partitions (for some reason, follow the links above), so we came up with an extended partition - this is a primary partition that can include as many partitions as you like. As a result, thanks to the extended partition, the hard disk can have as many partitions as you like - tens, hundreds.
- Each partition can have its own file system. AT this moment to install Windows Vista, 7 and 8, you can only use NTFS, and the outdated Windows XP can be installed on disks with the FAT32 file system. However, I do not recommend doing this, as it imposes too many restrictions. Make all partitions in NTFS - everything will work as it should.
- Any hard disk must be partitioned one way or another. To one or more logical drives - it's up to you. When buying a hard drive, it is usually already marked into one partition - the manufacturer decided so. If you are satisfied with this way of organizing information - do not touch.
- It is very undesirable to partition a disk in laptops - most of them have hidden recovery partitions that can be damaged (see point 3 of the previous chapter).
- If you bought a hard drive with a capacity of 2 terabytes, and in "My Computer" - "only" 1.86 terabytes (1860 gigabytes), then do not rush to run back to the store. It's all about how manufacturers and Windows consider volume. Read more about this in the Wikipedia article Hard drive. The larger the size of the hard drive, the more clearly it can be seen that there are fewer real gigabytes.
- Sections can delete, create, move(change their physical position on the disk), resize, format, convert file systems on partitions from one to another. Moreover, many programs can do this while saving all the data. There are other operations, but novice users most often need the above.
- In the event of an error during the process of changing partitions (see point 7), information is almost always lost. Yes, it can be restored (or part of it) with special programs with the participation of specialists, but it is best to save the entire important information to other disks (not logical, but real disks) or flash drives, so as not to pay money for data recovery.
Windows Disk Management snap-in
Windows has standard remedy partition changes - " Disk Management". Depending on the Windows versions, the capabilities of this program change a little, but in general over the past years (if we talk about Windows Vista, 7, 8) there have been no major changes. Windows XP looks more modest in this regard - apart from formatting and changing the drive letter, there is little you can do there.
As an example, I will take " Disk Management» Windows 7. There are several ways to open this program:
- The simplest - right-click on the line A computer on the menu Start- choose an item Control- select in a new window Disk Management.
- We open Control Panel - Administration - Computer management - Disk Management.
- Click Start - Run(or keyboard shortcut Win + R) - enter in the window that opens diskmgmt.msc- press OK.
Disk Management looks like that:
Here you can see how physical disks(including DVD drives, flash drives and other storage devices), and logical, i.e. virtual - hidden Windows 7 bootloader partition, disks C and D. Your computer may have a different number of disks.
The main actions are available by right-clicking on the desired section:

The list of actions is rather sparse:
- Items Open, Conductor allow you to see the contents of disks
- Make section active- indicate on which disk (partition) the bootloader is located. On Windows 7 and 8 it is reserved by the system chapter. You cannot make another partition active - the operating system will stop loading.
- Change Drive Letter or Drive Path- you can change the drive letter displayed in the "Computer" window or display it as a folder. Yes, partitions can be displayed not only as disks, but also as folders on a disk.
- Format- you can read about it in the article Formatting Wikipedia. The item opens a window with which you can start high-level formatting.
- Extend Volume- if there is a place on the hard disk that is not marked as a partition, then you can expand the size of the partition using this free space.
- Shrink Volume- this item allows you to reduce the partition size. The result will be the formation of unallocated space, which can be put into action - to expand the volume of another section (see the previous paragraph).
- Delete volume- delete section. Do not click on an item without thoroughly considering the consequences. If you delete a partition, then the information on it will be possible to save only with the help of special programs, and even then not always.
- Properties- a properties window will open with information about the selected disk (partition).
Of course, this is not a complete list of possibilities. Disk Management. One can create dynamic disks, for example. However, novice users do not need this, this article is designed just for them.
So, to create, delete, resize partitions through Disk Management, you only need three menu items: Extend Volume, Shrink Volume, Delete Volume.
All operations take place in real time, i.e. after pressing the desired item and an affirmative answer to the question - do we want to do this - the actual action takes place.
Do not forget that there is a risk of failure, due to which we can lose one partition or all. This applies primarily to computers with a large number of unnecessary programs- each of them may be the culprit of deleting all data. Moreover, the scenario when you need to change the partition from which Windows is started (usually this is a disk C), is the worst - most often, users have problems when they try to change system partition.
To minimize the risk of failure, there are three methods:
- Insert a hard drive into another computer and change partitions from it by running Disk Management or any other program for changing partitions. Due to the fact that Windows will be launched from a different disk, no programs will climb onto foreign disk, interfering with responsible operation.
- Boot from a Live CD disk - the operating system and programs will be launched not from a hard disk, but from a CD or DVD, flash drive - again, nothing will interfere with changing partitions.
- Use a program that can work in Native mode to change sections. For example, check disk C always works in this mode - a black window with white text until the Desktop loads. In this mode, a minimum of programs is launched, the risk of failure is minimal.
The third option is the easiest, because the user doesn't really need to do anything - just restart the computer and wait a few minutes. The following two review programs can do this.
A free hard disk partitioning program for home use.
surface test- checking the surface of the disk (physical). Allows you to detect bad sectors (the so-called "bads", "bad blocks").
view properties- display information about the disk.
Yes, knowledge of English is clearly required here, especially considering that almost every item calls up a window with the settings for the action to be performed. After you make the necessary manipulations, you need to apply the changes by pressing the button Apply(Apply):

Only then will the partitioning begin. This process can take some time - from a couple of minutes to several hours.
Depending on whether the system partition is affected or not, operations are carried out either immediately in the window, or you will need to restart the computer and start changing the partition in Native mode:


The program has a lot of functions, it's impossible to list them all. I recommend that you read the help for EaseUS Partition Master. It is in English, unfortunately, but you can use Google translator. The translation is quite understandable.
Pros of EaseUS Partition Master Home Edition:
- Lots of features.
- All actions are "virtual" until the Apply button is pressed. So, you can cancel the operations up to this "point of no return" and try to do something else with the partitions. Or don't do it at all if you change your mind.
- Works stably and predictably. For example, in the process of testing during the change of partitions, I started copying files to the partition that needs to be changed. The result - a window appeared stating that it was not possible to lock the partition, all operations were interrupted, the data did not disappear anywhere.
- The program is free for home use.
Cons of EaseUS Partition Master Home Edition:
- The interface is in English only.
- There are perhaps even too many possibilities - this can confuse beginners.
- A serious failure during the operation will lead to serious consequences.
- For example, if you turn off the computer while changing the partition, the data from the partition will disappear. However, this is a minus of absolutely all programs for changing partitions.
Conclusion: the program is good. You can and should use it, there are no alternatives among free programs.
Paragon Partition Manager 11 Free
Free partition changer from a company based in Russia. Unfortunately, the program is in English. What made the developers take such a step is unclear. Moreover, the paid version of the program is in Russian.
The main window of the program is no different from the window of the hero of the previous review, except that the buttons have changed their order:

Worthy of special mention Express Mode(Simplified mode). By clicking on this button, we will get a window with a list of the most frequent actions:

One could say that this is an ideal mode for beginners, if not for one "but": everything here is in English. Moreover, I had a suspicion that the English here was somehow wrong, as if it were not a person who translated, but a machine.
Pros of Paragon Partition Manager 11 Free:
- Many of the windows have a clear enough view to understand the functions.
- Some operations are carried out immediately in the program window, some (if required) in Native mode. That is, the program does everything to reduce the chance of data loss.
- The program is free to use at home.
Cons of Paragon Partition Manager 11 Free:
- English, and because of the strange construction of phrases, it is quite difficult to perceive.
- Simplified Express mode Mode works exactly the opposite: firstly, the descriptions of operations and the operations themselves have more technical subtleties than is required; secondly, this mode is very capricious and does not really work, giving meaningless errors.
- The program is too slow. For example, it took me about 5 minutes to remove a 38 GB hard drive partition - long enough for such a simple operation.
Conclusion: The program works, but is somehow unpredictable. I do not recommend using this program, since there is an alternative in the form of EaseUS Partition Master Home.
Changing partitions during installation of Windows 7, 8, 10
This tool also deserves a mention.
We take any installation disk with Windows Vista, Windows 7, 8 or 10, start the installation of the disk, go to the partition selection and click Disk setup:

Everything seems to be simple: you need to click on the section in the list, then the action button. Unfortunately, there is little action here: delete, format, partition and expand.
You can, for example, delete a partition and use the freed space to increase the size of another partition or partitions (by choosing desired sections, you need to press the Delete and Extension buttons in turn).
Alas, a very popular operation - reducing the size of partitions - is not here. It is possible to delete a partition, then re-create a new one with a smaller partition, but, unfortunately, we will lose data in this case.
All operations take place in real time, i.e. after the button is pressed, an action occurs.
Outcome: editing partitions during Windows installation is an extremely primitive tool. It works, but performs only a limited list of actions, among which the only one that saves data is increasing (expanding) the size of the partition. If you need to install Windows and do not need to save data on partitions, then the tool will come in handy.
If suddenly you accidentally deleted a partition during Windows installation or through any program, do not despair - the partition recovery feature is included in EaseUS Partition Master Home Edition.
To recover a deleted hard drive partition, do not touch sections, immediately boot into Windows (or insert the hard drive into another computer if you have deleted the system partition and Windows boot impossible), then run the above program, click on the line with the word Unallocated("Unassigned"), then click the button Partition recovery.
The rest, as they say, is a matter of technique - the action wizard will tell you where to click, where to check the boxes, then restore your deleted disk.
Tip #2: Installing two or more Windows operating systems on one hard drive
All that is needed for this - several sections. If the hard drive already has a second partition that is visible in the " A computer"- make sure that there is at least 20 GB of free space (more is better), then during the Windows installation, simply specify this second (third, fourth, etc.) drive. After installation, you will be able to select Windows using the menu that will appear when you turn on your computer.
If you have only one disk C), I propose the simplest option: Through Disk Management give section first FROM command Compress, reducing at least 20 gigabytes (or better, more, because in addition to Windows, you will also install programs):

Right click on drive C...

After pressing the button Compress disk size C decreases, unallocated (free) space appears in the partition map:

Specify unallocated space. The partition will be created by the installer itself.
After installation, you will have two operating systems. You can make more unallocated spaces or empty disks, specify them for installation.
Thanks to reader Vladimir for bringing this topic up.
You may have noticed that in the screenshots of the Disk Management window, all partitions are marked with a blue bar. You may have sections with green stripes. What is the difference between blue and green sections?
The green bar in Disk Management is a sign of an extended (additional) partition. As I wrote above, there may be "nested" sections inside, which from the user's point of view are no different from the main (primary). Nested partitions have one feature - if you reduce their size, then due to the free space that has appeared, it will not be possible to expand the main partition just like that. You must first compress the extended partition itself (which stores free place and a reduced partition) to create free space outside of any partitions, only then you can expand the disks.
Like
Like
To work with hard disk partitions (dividing into partitions or combining them into one) in the Windows 10 operating system, there is a built-in utility " Disk Management". Its use, in my opinion, is preferable to installing any third-party tools. How to divide the "tens" by your own means HDD or, on the contrary, to combine its sections can be read in separate articles of this site: divide and unite. But sometimes there are situations when it is quite difficult to do without third-party tools.
This article was written in response to questions from readers of the site who had problems dividing a hard drive or combining its volumes. The Disk Management utility built into Windows 10, despite all its advantages, has its drawbacks: sometimes it does not allow you to create a partition of the desired size, from time to time it does not allow you to split the hard disk at all, sometimes you cannot merge the necessary volumes into one. In these problematic situations (and only in them!) I recommend using a third-party, albeit free program for managing hard disk partitions in the "top ten". It is worth remembering that using any third-party tool to manage the operating system can be potentially dangerous. I am not inclined to dramatize the situation, but I believe that it is my duty to warn about it, even if the likelihood possible problems is one chance in ten thousand. Therefore, when possible, it is still better to use the built-in Disk Management utility developed by Microsoft in Windows 10.
When I was preparing this article, I spent several hours of time to find a truly completely free, reliable and reputable hard drive partitioning software(or their combinations). There are a lot of outright lies and dubious programs of unknown origin in this area. A separate item in my search was the question that the software found was not only free, but also had a Russian-language interface and also turned out to be completely compatible with Windows 10. The last question is far from idle - the fact is that on the Internet you can find information about how some disk partitioning programs created for Windows 7 or 8 ruined hard drives Windows users 10.
So, as a result of a long and careful search, I finally found and tried the program myself AOMEI Partition Assistant. In general, its full version of the Professional Edition costs from $ 59 and much more. But don't let that scare you, because the functionality of its free Standard Edition branch is quite enough to:
- Divide hard drive into partitions
- Merge hard drive volumes into one partition
In general, the presence of a paid version speaks only in favor of this software. After all, this testifies to the seriousness of the intentions of its authors. Those who create programs for money certainly make worthy solutions for free, albeit with somewhat limited functionality (all the more so, it will be enough for us). Another proof of the authority of AOMEI Partition Assistant, in my opinion, is the presence of an article about it in Wikipedia. By the way, if you doubt the reliability and safety of a program, always check through a search engine to see if Wikipedia writes about it. This, of course, is not a 100% guarantee, but still, since this electronic encyclopedia strives for maximum objectivity, in articles about software there you can find information about the possible "pitfalls" of a particular program. It is in the same place, on Wikipedia, that it is better to take a link to the official website of the program. The fact is that in search engines, the first places are often occupied by no means official sites of certain programs.
On the official site AOMEI Technology I immediately found section on Partition Assistant. We go down on this page a little down to the second screen. There to download the free version of the program we need to manage hard drive find the point Partition Assistant Standard Edition and (of course) click "Download". Do not be afraid that the site is in English, the program itself has an official Russian localization. Please note that there are several options for downloading this program for different needs on the page - for home free use, choose the version Standard edition.

The process of installing the program is not complicated at all. First, it is proposed to select a language, then traditionally accept the usage agreement, if necessary, select the folder where the program will be stored - that, in general, is all. After installation, the program will automatically start if at the last step you leave a check mark on the “Run this program” item.
I will not consider all options for using AOMEI Partition Assistant to manage a hard drive. I will analyze in detail only the question of how this free program partition hard drive into multiple partitions in windows 10. Everything else (including merging volumes) is done by analogy.
Partitioning a hard drive with the free AOMEI Partition Assistant in Windows 10
When the program starts, all the physical hard drives installed on your computer or laptop, as well as the partitions that exist on them, will be displayed at the bottom of it. In order to divide a disk into several volumes, you first need to "pin off" a piece of space from an existing partition. To do this, stand on the donor volume and right-click on it, select " Resize partition».

A new window will appear in which you need to specify what size you want to leave the existing volume. The rest of the space will be freed up for the new partition. I left the C drive 150 GB. We press OK.

Now we see that we have free space labeled " Unoccupied". We need to create on it new section(volume). To do this, click again with the right mouse button on it and select the item " Section creation».

The pop-up window appears again. In it, we leave everything by default and click OK.

After that, a new section will already appear on the program screen. It would seem that you can rejoice. But it was not there. Turns out, no changes have been made to the hard drive itself yet! To complete the operation, you must press the button at the top Apply».

As a rule, a computer restart is required to complete the operation. This is what the new window in the AOMEI Partition Assistant tells us about. Click "Go" on it. It is better to leave a tick in front of the “Check partitions before execution” item. It will allow the program to check sections for errors before dividing.
After that, a new window will appear again with a warning about restarting the computer. We agree and click "Yes".

After the reboot, the actual physical division of the hard disk into two partitions begins. It occurs before the Windows 10 operating system boots in PreOS mode.

Personally, this process took me a couple of minutes. Most likely, the fact is that on the shared hard disk I had nothing but myself cleanly installed Windows 10 and several programs. Therefore, it did not take much time to move the files. If the computer is weak, and there is a lot of information on the disk, then the division process can take much longer. My computer rebooted twice and then started in normal mode. After that, a new section appeared in the explorer, and the existing one became smaller.
Let me remind you that by analogy with this instruction in Windows 10 Freeware AOMEI Partition Assistant Can Merge Hard Disk Partitions.
I foresee a question from some caustic readers of my site, why I reviewed only one free program for managing hard drive partitions on the "top ten". Will explain. The fact is that the rest of the programs I studied did not suit me for various reasons: some of them did not have the Russian language (and for many this is important), for others the functionality in the free version turned out to be too much curtailed, and still others raised doubts in terms of security for the operating system and compatibility with Windows 10. In addition, I absolutely see no reason to look for something else to solve fairly rare tasks. I believe that the considered software copes with the tasks set with a bang and has undoubted advantages over all others. free programs which I have studied. So why fill your head with unnecessary information then?)
Each of us has encountered a problem when a computer or laptop starts to freeze and slow down. But not everyone knows that it is most likely related to the operation of the hard drive (as the slowest link in the system performance chain). Fortunately, this problem can be solved at home, without getting up from your chair, it is enough to optimize the performance of the hard drive.
Optimizing the hard drive in Windows 7
The need to optimize the hard disk arises due to the accumulation of a large amount of unstructured and unnecessary trash on it. Your task will be literally "cleaning" the hard drive. But first things first.
Advanced Disk Cleanup
Enhanced Disk Cleanup is a tool provided by the Windows 7 operating system itself. To perform this procedure, you need to open " command line» in one of two main ways:
- Through the Run window:
- Through the start menu:

- Type the command %systemroot%\system32\cmd.exe /c cleanmgr /sageset:65535 & cleanmgr /sagerun:65535 and press Enter.
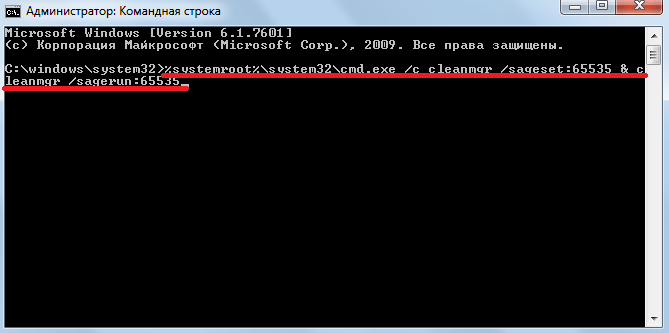 To call the extended hard disk cleanup, enter the command in the "Command line"
 - Examine the list of files and select the ones you want to delete. Pay attention to each item: delete only what you no longer need.
 Select the categories of files you want to delete
Disk Defragmenter
When writing a file to a disk, Windows can distribute its parts to any free disk cells. Because of this, it is more difficult for the system to access it if it is big file, for example, a movie, and it is located in several places on the hard drive. Defragmentation allows you to overwrite all files one after another for more quick access to them.
Windows 7 has a built-in defragmenter. You can call it through the search bar in the Start menu.
 Find the program "Disk Defragmenter" by searching in the "Start"
 Video: How to Defragment a Disk in Windows 7
Windows 7 Optimizer for SSDs
SSD Mini Tweaker is a portable operating system setup program for using SSD drives. It is needed in order to fully experience all the delights of using SSD drives on the Windows 7 operating system.
For an inexplicable reason, Microsoft developers do not create a directed software to work with SSD drives. There are a number of settings that prevent overclocking SSDs, and to disable them all, you need to suffer. Therefore, enthusiasts created SSD program Mini Tweaker, which allows you to customize the system in one click.
The principle of operation is very simple. You download the program, run it and click the "Apply changes" button, since all the settings are already checked.
After successfully completing the program action, restart your computer and enjoy the fast speed of your computer.
Video: how to use SSD Mini Tweaker
How to open Disk Management
Direct work with disks, their renaming or separation takes place in the "Disk Management". There are several ways to open this utility:

Video: how to open disk manager
What to do if the dynamic disk is invalid
Often there are cases when, after reinstalling the Windows 7 operating system on computers with two or more hard drives, a problem arises in which one or more hard drives become unavailable for work. At the same time, they are connected, determined and serviceable. In this case, they became dynamically invalid, that is, unsuitable for running on this operating system.
The solution to this problem is very simple:

After the conversion is complete, restart your computer for the changes to take effect.
Some mechanical and software damage to disks leads to their conversion to dynamic disks. In this case, only specialists of the service center will help you.
Video: How to convert a dynamic disk to basic
What to do if a hard disk failure is detected
Whatever the cause of the hard drive failure message, it does not bode well for you.
Errors are of two types:
- physical;
- logical (software).
The first ones occur when the magnetic layer of the disk surface is damaged. In this case, save the data to a safe medium as soon as the sectors and blocks of the hard drive will deteriorate one after another, and feel free to go to the store for a new hard drive.
It is best to save data using another computer by connecting the hard drive as a second drive. And after performing all the operations, carry out resuscitation procedures. MHDD is the most popular disk corruption utility. To restore bad sectors, low-level formatting (ERASE) is used. And if after it problems continue with the return of the hard drive to its place, then the problem is of a physical nature.
Video: what to do if Windows detects hard drive problems
How to format a drive for installing Windows 7
When installing a new operating system, the installer already has a built-in formatting option to put Windows on a fresh and blank disc. This helps to solve many problems, such as, for example, the conflict between the old and new systems.

Make sure you select the correct disk to format, otherwise you may lose important information.
Program to format the disk before installing Windows 7
most popular program to format the disk is Acronis Disk Director:

Video: how to format and repartition a hard drive when installing Windows 7
Disk programs
As mentioned above, some stationary utilities from Windows 7 are not the highest quality products for solving certain problems when working with a hard drive. Therefore, companies and enthusiasts create more convenient and functional software for working with disks.
Disk Cleanup Software
"Computer Accelerator" - powerful program to clean up your computer unnecessary garbage. "Top Selling" is the most powerful computer cleaning utility. The program, among others, is distinguished by a convenient and understandable Russian-language interface. It has great amount built-in functions from startup control to cleaning the system from broken shortcuts.
hard drive cloning software
EASEUS Disk Copy is a free and high quality utility. Its advantage over competitors lies in the fact that it has the ability to work from a boot disk or flash drive. This makes it versatile.
A simple interface and quality of work also add points to the "usefulness" of this application.
Hard disk partition recovery software
Recuva is the most famous recovery software deleted files. It is known for its multifunctional interface. You can choose to search and display only one category of files, such as photos or text documents.
A set of software for emulating disks
Beyond any competition in the disk emulation market for Windows, the best and developing program is DAEMON Tools.
The program supports all existing disk image formats, new versions are constantly released. The advantages also include support and work with several virtual drives simultaneously.
Sooner or later there is a need to improve the performance of the hard drive. Fortunately, there are many ways to optimize it. But it should be remembered that actions to improve the performance of the computer should be carried out from time to time in order to extend the life of the hard drive.